 Kayser-Sosa
I wanted control some Etekcity RF switches from Home Assistant.
I had an old Raspberry Pi 2 Model B V1.1 laying around doing nothing, so I got started. I believe this process should work with any model, the pins just may be different and easily updated in the send/receive scripts.
I started by installing Raspberry Pi OS Lite, as I didn't need a screen other than initial setup. I had a USB Wifi dongle that I use for communication and I enabled SSH. The OS was fully updated and configured and autologin was setup.
I wired up the RF Transmitter and RF Receiver per https://github.com/milaq/rpi-rf.
I then configured the RF per https://www.instructables.com/RF-433-MHZ-Raspberry-Pi/. Installing RPi-RF per https://pypi.org/project/rpi-rf/. Created my working directory and copied my scripts from https://github.com/KayserSosa/RPiRF. I then obtained the On/Off codes from the outlets. and tested to make sure the send code was working.
MQTT configuration was next. I used https://www.emqx.io/blog/how-to-use-mqtt-in-python and https://pimylifeup.com/raspberry-pi-mosquitto-mqtt-server/ to get it installed on the RPi. I copied my script from https://github.com/KayserSosa/RPiRF and tested. I was able to send words back and forth from Home Assistant and the RPi. This was before I had the final version of the code, so most of the testing was with the original version that I tweaked as needed.
I then experimented with several ways to create a button or switch in Home Assistant to control the Etekcity RF switches. I finally settled on a working method via scripts. I only setup a single button at this time, the rest were setup when the project was completed.
Next I started on trying to figure out how to auto execute my python script and ran into several walls. One of the methods I had used on another older project kept giving me errors and I couldn't figure it out. That is where it sat for awhile, until I finally came back to it. I had to almost re-figure out what I had done. Luckily I had most of it already done and partly documented.
I then figured out how to the execute my python script at login, modify the rc.local file instead, which I verified it worked.
I knew I needed a safe shutdown switch for the RPi or it would become corrupted. I next wired in and configured the button. Testing was successful.
Then I needed to figure out how to execute both python scripts at boot. Wasn't sure if I had to combine them into a single script or if I could run them both the same way as the main script, I was finding conflicting information on that topic. I put them both in the rc.local and success.
The next task was to create the buttons in Home Assistant and everything was working.
The last thing I did was block the IP of the RPi from the internet, as I have no need for the access unless I'm updating.
I have this RPi sitting in my office which is on the first floor and opposite side of the house from a pair of the switches that are upstairs as well. It can access all the switches without issue. Also my Home Assistant server is on a virtual machine not a RPi.
An issue I ran into, was the retention of the last button press. So if I turned on a light and had to reboot the RPi but had manually turn the light off, the light would come back on after reboot. Being new to MQTT, after a bunch of reading and trying different things in the code I discovered I had selected retain message to yes on the Home Assistant side. Once I cleared the retained messages and set retained message to no, the issue was gone.
I think I figured out the final issue of keeping the system alive. I initially had it setup on Wifi (2.4ghz) and have since hardwired it. My 2.4ghz network has lots of stuff on it. I haven't had an issue since connecting to hardwire. ...
Read more »

 Randy Elwin
 facelessloser
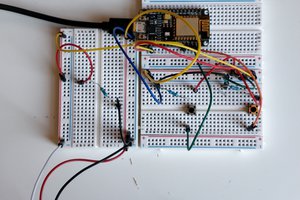
 Jamie
Jamie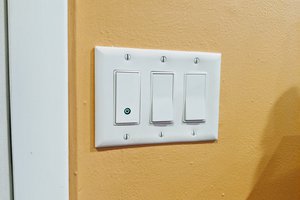
 Mike Szczys
If you want an even lighter RPi distro, try https://dietpi.com/ That's what I used for #An NTP server using GNSS for time