 William Somsky
Inspiration
I've long had my computers set to dual boot between Linux and Windows, but always had to push keys at just the right time during the boot sequence to make my OS selection. Get distracted and the system boots into its default OS, even if that wasn't what I wanted. The solution is to have a hardware toggle which can be flipped beforehand and that the computer will read during boot to determine which OS it will boot into. After seeing Stephen Holdaway's Hardware boot selection switch, I knew I wanted to have one as part of my latest home computer build.
In his build, Stephen uses an STM32 microcontroller acting as a USB mass-storage device to report the state of an attached toggle switch. The microcontroller serves up a dynamic file whose contents can be "sourced" by the grub booting software, setting a variable which will be used to select the desired boot OS. (He later describes a Simplified hardware boot switch which doesn't need a microcontroller, but merely enables/disables a USB flash drive. But that's not the route I followed.)
RP2040 Microcontrollers
Because of their current popularity, low cost, and ready availability, I chose to base this project on one of the numerous RP2040 microcontrollers, the pilot of which is the Raspberry Pi Pico. Not having ventured into the realm of microcontrollers before, I obtained a number of likely candidates and started experimenting.
One nice feature of the RP2040 boards (though not unique to them) is that most come w/ USB connectors already attached and contain a UF2 bootloader which, when triggered, causes the microcontroller to appear as a USB mass-storage device to which program files may be drag-and-dropped for installation. Alas, this will not function as the dynamic USB mass-storage we want for this project, but it shows that such behavior is possible, and greatly simplifies the development process.
Trying Python
Another (again, not unique) feature of the RP2040 boards is that they can run MicroPython or CircuitPython allowing programming with a high-level language with no compilers needed and drag-and-drop copying of Python scripts to the microcontroller. Further, Micro/CircuitPython can be run in a REPL (read-eval-print) mode providing direct type-and-try access to the microcontroller.
Having some experience w/ Python, I decided to try this approach first. There were examples available of using an RP2040 board as a USB logging device and reading the resulting file from USB storage which looked promising. So I wired a toggle switch to an RP2040 microcontroller and went to coding.
The results were less than desired. I was readily able to configure and read the toggle switch and write the results to a file in the USB-exposed storage area, but there was a hitch in trying to read this file from the booting computer. Or rather, in reading the current state of the file. Due to some caching, or optimization, or something, the results I read wouldn't track the switch position in real-time.
Perhaps there was some bit I hadn't twiddled, some incantation I hadn't uttered, or some elder god I hadn't placated. Perhaps a more knowledgeable practitioner of the Pythonic arts could have made it work. But as for me, I was stuck. Python was giving me no joy.
A New Approach
I began searching the web for a possible solution to my dilemma, and came across a posting Hardware Boot Select Switch Using Pico by Madrajib Lab. He too had seen Stephen Holdaway's original article and created a version of it with the Raspberry Pi Pico. This is what I was looking for!
In his version, Madrajib used the Raspberry Pi Pico SDK and the tinyusb library. With these and the cdc_msc example from the tinyusb library, he created a USB mass-storage emulation program which served up a single file named switch.cfg whose contents were dynamically created from the state of the attached toggle switch each time it was read.
I installed the SDK and library, downloaded Madrajib's code, tweaked it for the pinouts and pullups I was using, compiled it, and it worked!
The Resulting Hardware and a Unique "Spin"
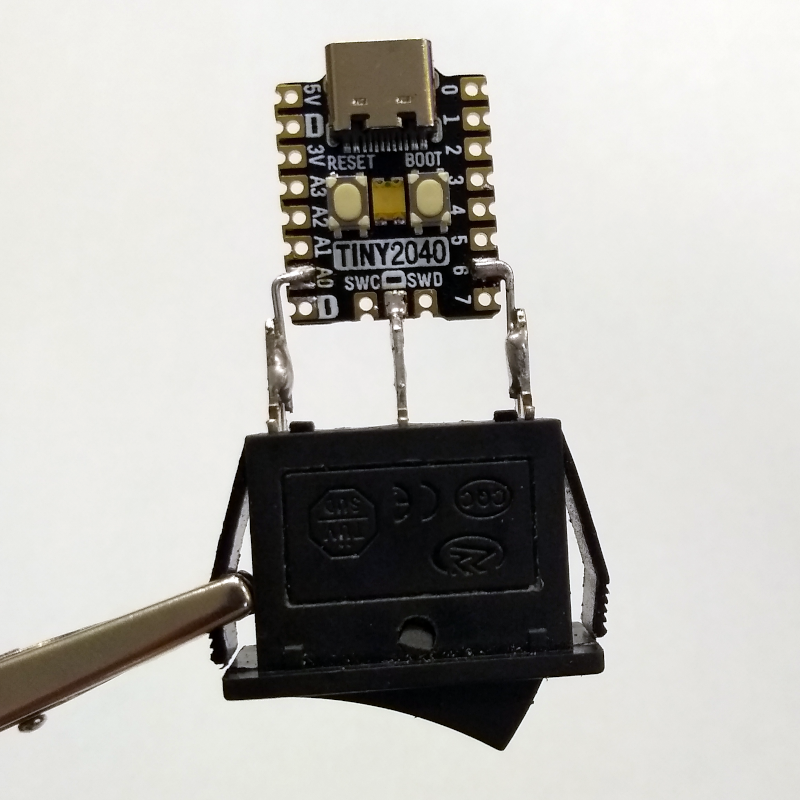
With the code on the microcontroller working, it was time to take my contraption from the breadboard to its final form. I settled on using a Pimoroni Tiny 2040 since it was compact and had a physical "Reset" switch that some other boards lacked.
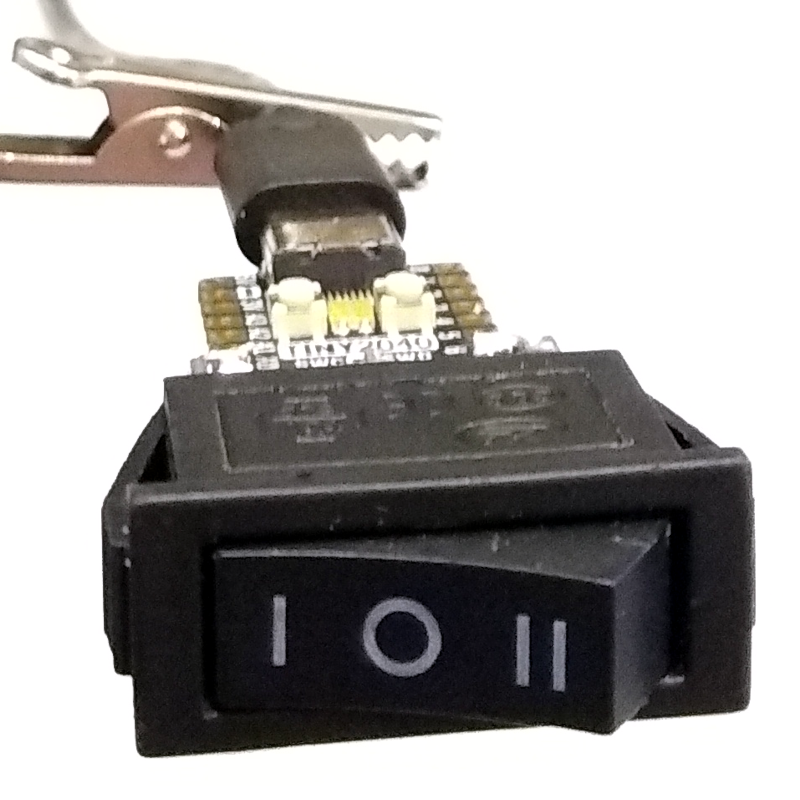
In both Stephen's and Madrajib's cases, they used a SPDT toggle switch wired in a simple on-off configuration (essentially SPST) and produced an output of "0" or "1" in their resulting emulated files. I chose to use a 3-way ON-OFF-ON SPDT switch and wired this to ground and two GPIO pins, allowing three states and an output of "0", "1", or "2". (Being trained in particle physics, I can't help but think of their work as spin-1/2 solutions, while mine is a spin-1 solution. A unique "spin" indeed!)
Since the RP2040 can internally perform pull-up on GPIO pins used for input, no further components beyond the switch and microcontroller board are needed. Further, with the small size of the Tiny 2040, I was able to do a minor bit of "circuit sculpting" (with the aid of a couple paperclips for wiring) and attach the microcontroller directly onto the back of the switch. The resulting assembly is compact and sturdy and could be installed through a cutout sized for panel-mounting the toggle switch.
The Grub2 Interface
I'm currently running Fedora 35 and Windows 11 on my home computer and booting is controlled by Grub2. In the configuration supplied by Fedora, Grub configures a menu of boot choices and then presents that menu to the user to select the desired OS to boot. If no selection is made within a configurable timeout period, Grub automatically boots a default selection.
While one can edit the various Grub configuration files, they are rather complex and it would be error prone to modify them. Luckily, the supplied configuration already contains a hook for customization. If a file /boot/grub2/custom.cfg is present, Grub will execute this file immediately before presenting the boot selection menu to the user. There we can add instruction to read our boot-switch device and modify the relevant menu variables based on the state of our toggle switch.
The following /boot/grub2/custom.cfg file uses the Grub 'search' command to locate the boot-switch device. If it is found, the file switch.cfg on it is 'source'd, setting the variable "os_hw_switch". If the value of this variable is "1", then "default" and "timeout" are set to boot into the first (zero-origin) menu item (which is Linux) with no delay for user input. If the value of this variable is "2", then "default" and "timeout" are set to boot into the third (zero-origin) menu item (which is Windows) with no delay. If "os_hw_switch" is zero, or if the boot-switch device is not found, the settings are left unaltered and Grub presents the boot menu to the user as per usual.
search --no-floppy --fs-uuid --set hdswitch 0000-1234

if [ "$hdswitch" ] ; then
  source ($hdswitch)/switch.cfg

  if   [ "$os_hw_switch" = 1 ] ; then
    # Boot directly into linux
    set default=0
    set timeout=0

  elif [ "$os_hw_switch" = 2 ] ; then
    # Boot directly into windows
    set default=2
    set timeout=0

  fi
fi
Code Repository
I'm currently in the process of setting up a github code repository for this project. Watch this space for future news!
Conclusion
So far, my new hardware boot switch has been working a treat. I've currently been using it just plugged into a dangling USB cable, but plan on doing a more proper and permanent mounting. The simplest method would be to double-stick it to the underside of my computer monitor shelf and routing it to the USB hub used by my keyboard and mouse. Another, more daring, possibility is to cut a mounting slot into my computer case, install the switch-controller assembly through that slot, and wire it to one of the motherboard USB headers. Time will tell...
Thanks
My thanks to Stephen Holdaway and Madrajib Lab for their work upon which I built my project.