kutluhan_aktar
Since I have always logged my ratings on a notebook or a piece of paper, my home library has been deluged with unsolicited paper clusters. Therefore, I decided to create this IoT device to log and monitor my book ratings so as to obviate the need for handwriting.
After perusing book review and classification methods, I decided to employ this device to rate and record six different book characteristics which denote a book's quality and reliability:
- Plot
- Delineation
- Immersion
- Prolixity
- Characters
- Editing
For each characteristic above, I defined four different rating points to create a concise and coherent rating system with the collected data:
- 1 ➡ Mundane
- 2 ➡ Interesting
- 3 ➡ Fascinating
- 4 ➡ Captivating
After defining my rating system, I decided to utilize RFID disk tags to identify books rather than scanning barcodes (ISBNs) with a barcode scanner since I wanted to design unique bookmarks with the RFID disk tags for each book. Therefore, I connected an MFRC522 RFID reader to the Arduino Nano 33 IoT so as to detect UIDs.
To display the rating settings menu, I connected an SH1106 OLED screen to the Nano 33 IoT. Then, I created a simple controller to adjust ratings for each characteristic with joysticks and buttons.
Instead of developing a web application from scratch to log and monitor the mentioned book ratings transferred by the Nano 33 IoT, I decided to utilize the Qubitro portal to build an IoT application. Since Qubitro supports various connectivity methods with different development boards and provides an easy-to-understand interface to visualize the received data packets on the cloud, I did not encounter any issues while building my IoT application for this project.
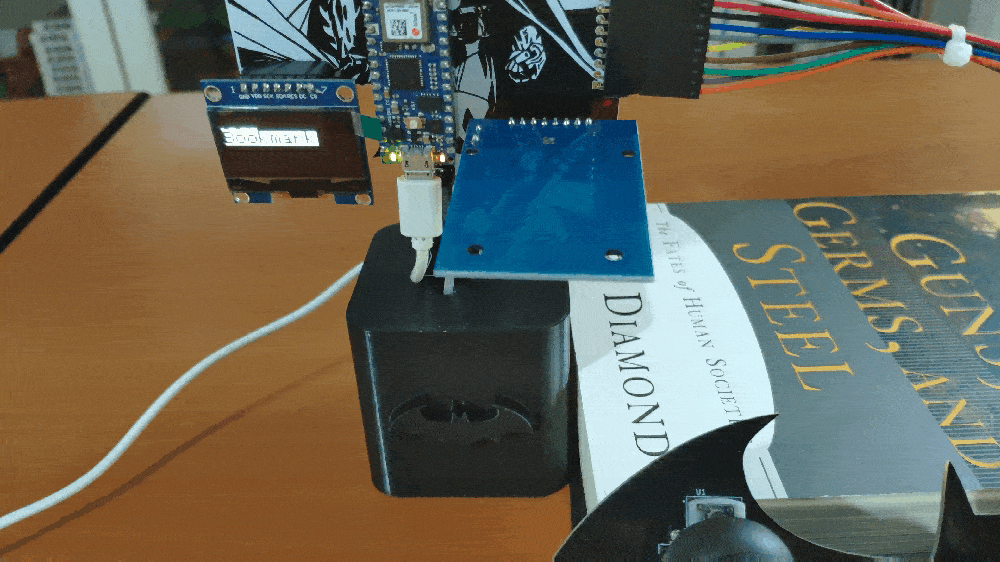
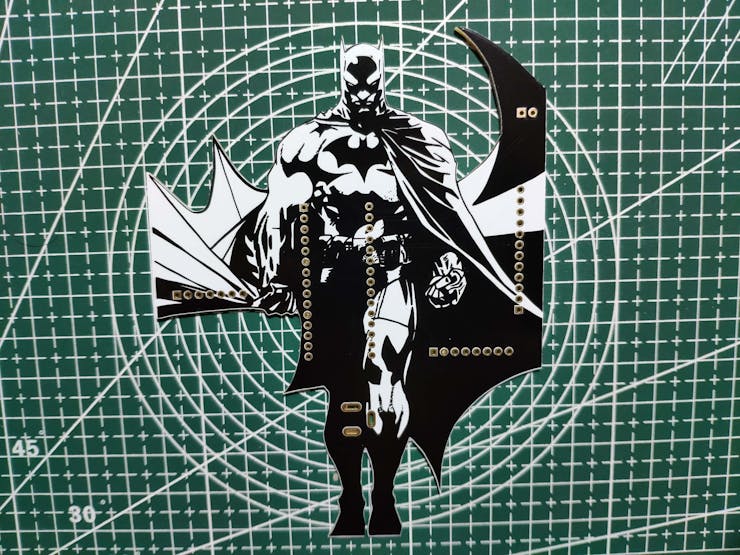
After completing wiring on a breadboard and testing the code for transferring data packets to the Qubitro application, I designed Batman-themed base and controller PCBs for this project. When I was watching the Batman: The Animated Series recently, I saw a bat-themed library in the Batcave. Since Batman is my favorite comic book character, I thought it would be interesting to design this device as if it is a part of that library in the Batcave.
Lastly, I also designed a complementary Batman-inspired book stand (3D printable) to insert the base and controller PCBs in order to create a robust and stylish device emphasizing the Batman theme gloriously :)
🎁🎨 Huge thanks to PCBWay for sponsoring this project.
🎁🎨 Also, huge thanks to Creality3D for sponsoring a Creality CR-6 SE 3D Printer.
🎁🎨 If you want to purchase some products from Creality3D, you can use my 10% discount coupon (Aktar10) even for their new and most popular printers: CR-10 Smart,CR-30 3DPrintMill,Ender-3 Pro, and Ender-3 V2. You can also use the coupon for Creality filaments.


Step 1: Designing and soldering Batman-themed base and controller PCBs
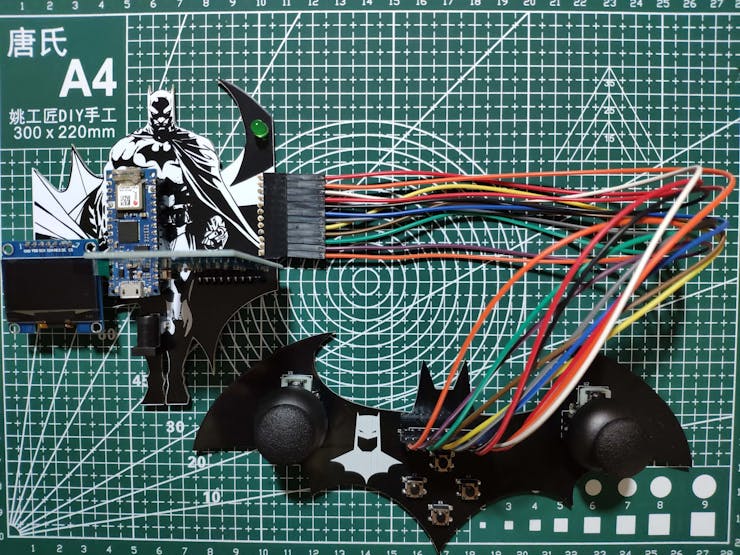
Before prototyping my Batman-themed base and controller PCB designs, I tested all connections and wiring with the Arduino Nano 33 IoT and the MFRC522 RFID reader.

Then, I designed the Batman-themed base and controller PCBs by utilizing KiCad - inspired by the legends of the Dark Knight :) I attached the Gerber files for both PCBs below. Therefore, if you want, you can order my PCB designs from PCBWay to create your RFID-enabled IoT bookmark and reading tracker so as to transfer your book ratings effortlessly to a Qubitro application.
Click here to inspect and order the base and controller PCBs directly on PCBWay.


First of all, by utilizing a soldering iron, I attached headers (female), COM-09032 analog joysticks, pushbuttons (6x6), a 5mm green LED, and a power jack to the base and controller PCBs.
📌 Component list on the base PCB:
A1 (Headers for Arduino Nano 33 IoT)
RFID1 (Headers for MFRC522 RFID Reader)
SH1106 (Headers for SH1106 OLED Display)
J1 (Headers for Controller PCB)
D1 (5mm Green LED)
J2 (Power Jack)
📌 Component list on the controller PCB:
J1 (Headers for Base PCB)
U1, U2 (COM-09032 Analog Joystick)
K1, K2, K3, K4 (6x6 Pushbutton)


Step 1.1: Making connections and adjustments
// Connections// Arduino Nano 33 IoT :
//                                MFRC522
// D3  --------------------------- RST
// D4  --------------------------- SDA
// D11 --------------------------- MOSI
// D12 --------------------------- MISO
// D13 --------------------------- SCK
//                                SH1106 OLED Display (128x64)
// D6  --------------------------- SDA
// D5  --------------------------- SCK
// D7  --------------------------- RES
// D8  --------------------------- DC
// D9  --------------------------- CS
//                                JoyStick (R)
// A0  --------------------------- VRY
// A1  --------------------------- VRX
// A2  --------------------------- SW
//                                JoyStick (L)
// A3  --------------------------- VRY
// A4  --------------------------- VRX
// A5  --------------------------- SW
//                                Button (Up)
// A6  --------------------------- S
//                                Button (Right)
// A7  --------------------------- S
//                                Button (Left)
// D2  --------------------------- S
//                                Button (Down)
// D10 --------------------------- S
//                                5mm Green LED
// D0  --------------------------- +
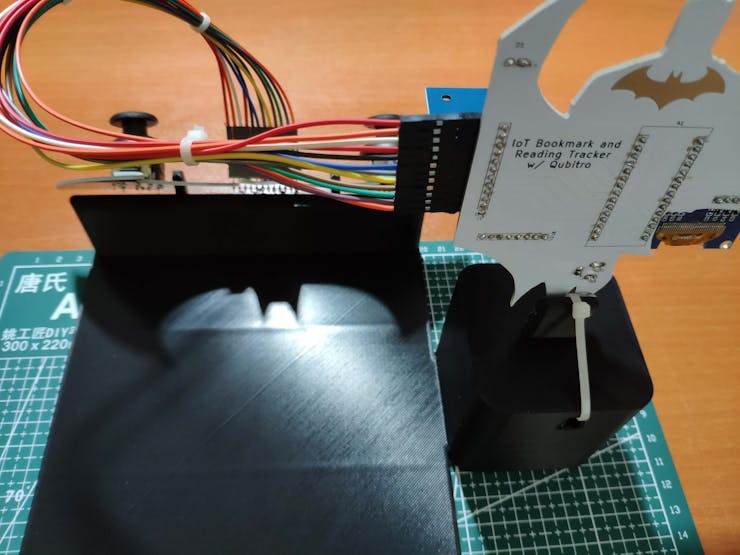
After completing soldering, I attached all remaining components to the Batman-themed base and controller PCBs via headers - Arduino Nano 33 IoT, MFRC522 RFID reader, and SH1106 OLED screen.
Then, I connected the base PCB to the controller PCB by utilizing male jumper wires.
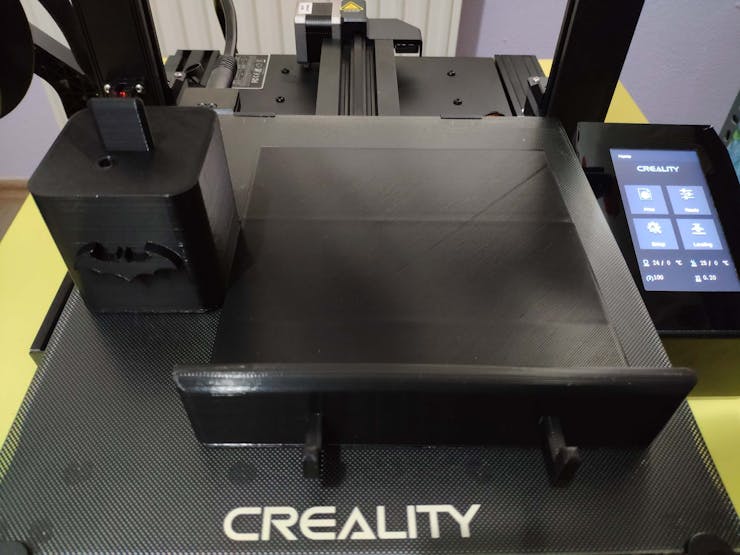
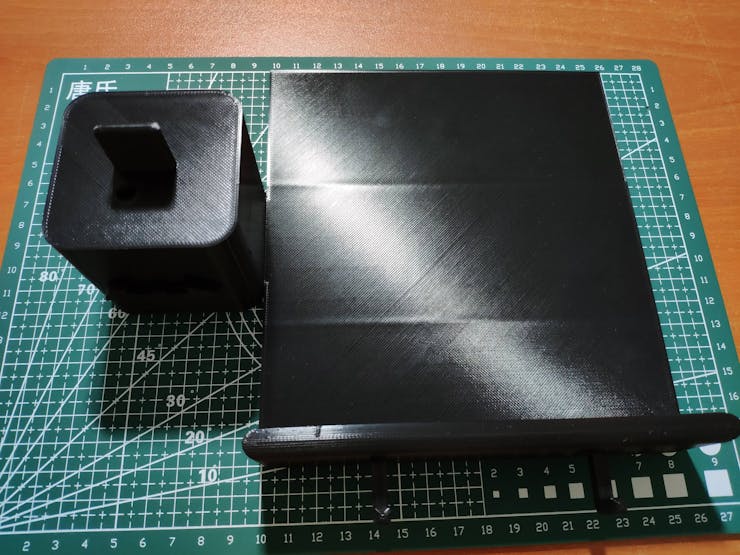
Step 2: Designing and printing a Batman-inspired book stand
Since I wanted to apply the bat theme to create a device as if it is a part of the Batcave from the animated series, I decided to design a complementing book stand to display the books I am currently reading in my home library. To insert and attach the Batman-themed base and controller PCBs to the book stand effortlessly, I added slots and hooks. Also, I inscribed the prominent bat symbol on the book stand to emphasize the Batman theme gloriously :)
I designed the book stand in Autodesk Fusion 360. You can download its STL file below.


Then, I sliced my book stand 3D model (STL file) in Ultimaker Cura.

Since I wanted to create a solid structure for the book stand and complement the Batman theme, I utilized this PLA filament:
- Black
Finally, I printed the book stand (model) with my Creality CR-6 SE 3D Printer. Although I am a novice in 3D printing, and it is my first FDM 3D printer, I got incredible results effortlessly with the CR-6 SE :)
Step 2.1: Assembling the book stand and creating RFID bookmarks
After printing my book stand 3D model, I affixed the Batman-themed base and controller PCBs to the book stand. I placed the controller PCB via the hooks on the front. Then, I fastened the base PCB to its slot on the top via a hot glue gun and utilized a cable tie to make a rigid and stable connection.


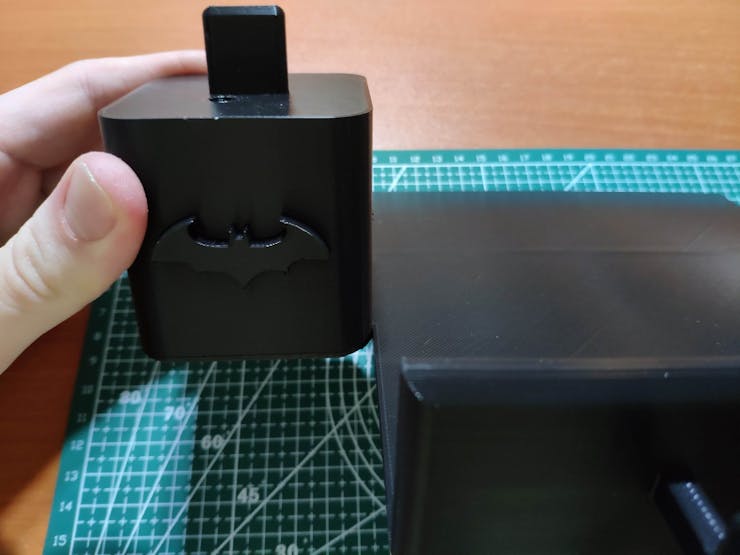


Since I decided to employ RFID disk tags to create unique bookmarks in order to identify books, I fastened the disk tags to my limited edition comic bookmarks I purchased from a comic book convention in my hometown.

Step 3: Setting up an IoT application on Qubitro
To log and monitor the book ratings transferred by the Nano 33 IoT, I decided to utilize the Qubitro portal to build an IoT application. Qubitro provides developer-friendly features and supports various connectivity methods such as a fully-featured MQTT broker and The Things Stack devices. Since Qubitro has easy-to-understand online examples with technical guides and allows the user to visualize the received data packets on the cloud with specialized widgets effortlessly, I highly recommend building IoT applications with Qubitro.
#️⃣ First of all, go to the Qubitro portal and sign in.

#️⃣ Then, create a new project (IoT application) and define its name and description.


#️⃣ To create a new Qubitro device under the application, choose a connectivity method depending on your project's requirements. Select the MQTT option to transfer data via the Qubitro MQTT broker to the given Qubitro device.

#️⃣ Define the device information and details.

If required, you can also use the application's MQTT credentials to publish data via the Qubitro APIs.

#️⃣ After creating the Qubitro device successfully, open the device on the project dashboard and click Settings.
#️⃣ Then, copy the device ID and token to transfer data packets from the Nano 33 IoT to the Qubitro device via the MQTT broker.

Step 3.1: Analyzing the collected data on Qubitro
After building my IoT application on Qubitro, I started to send data packets (book ratings) from the Nano 33 IoT to the Qubitro device under the application via the MQTT broker immediately.
To analyze the collected data, I utilized the built-in chart feature in the device interface.
You can inspect the code for transferring book ratings via the Qubitro MQTT broker in Step 4.
#️⃣ After the Qubitro device receives data packets, open the device on the project dashboard and click Analytics.


#️⃣ Then, create a chart with unique colors for each data element to scrutinize the collected data in a given period.


Step 3.2: Creating widgets to visualize the collected data on Qubitro
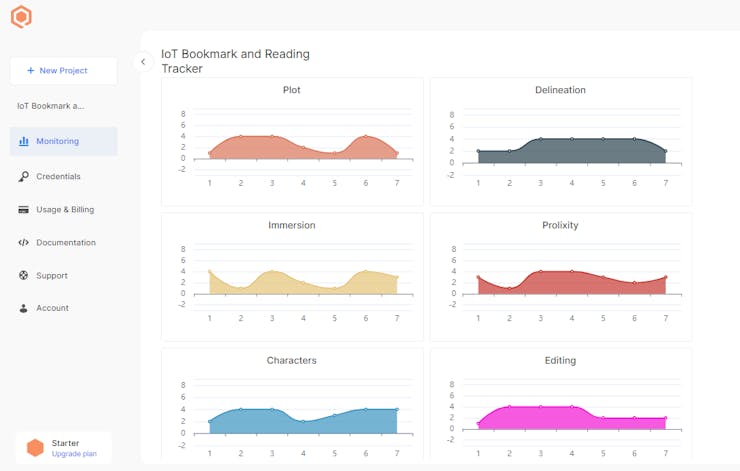
#️⃣ First of all, on the project dashboard, go to Monitoring so as to create a new monitoring dashboard.

#️⃣ Then, click the Add widget button.
#️⃣ Define the required information for the widget: title, project (IoT application) name, device name, and widget type (e.g., area chart).


#️⃣ To customize the recently created widget, assign a data element (sensor value), select the widget color, and adjust the appearance settings.

After creating widgets for each data element, the Qubitro portal should show a monitoring dashboard as follows.

Step 4: Programming the Arduino Nano 33 IoT
Modes and Features
🦇📗 First of all, the device attempts to connect to the given Wi-Fi network and the Qubitro device via the Qubitro MQTT broker.
🦇📗 Then, the device displays the home screen.

🦇📗 If the device detects an RFID card or tag UID, it initiates the rating settings menu and shows the detected UID and the current book ratings:
- UID
- Plot
- Delineation
- Immersion
- Prolixity
- Characters
- Editing

🦇📗 On the rating settings menu, the device allows the user to adjust the book ratings by utilizing joystick movements and control buttons:
🕹️ To adjust the Plot rating:
- Move the first joystick to the right ➡ Press any control button
🕹️ To adjust the Delineation rating:
- Move the first joystick to the left ➡ Press any control button
🕹️ To adjust the Immersion rating:
- Move the first joystick to the up ➡ Press any control button
🕹️ To adjust the Prolixity rating:
- Move the second joystick to the right ➡ Press any control button
🕹️ To adjust the Characters rating:
- Move the second joystick to the left ➡ Press any control button
🕹️ To adjust the Editing rating:
- Move the second joystick to the up ➡ Press any control button
🎮 Rating points by control buttons:
- Up button ➡ Mundane [1]
- Right button ➡ Interesting [2]
- Left button ➡ Fascinating [3]
- Down button ➡ Captivating [4]

🦇📗 If the second joystick's switch is pressed, the device sends the data packet (the detected UID and the adjusted book ratings) to the Qubitro device via the Qubitro MQTT broker.
🦇📗 Then, the device blinks the 5mm green LED if the Qubitro device receives the transferred data packet successfully.


🦇📗 After sending the data packet, the device returns to the home screen.
🦇📗 If the first joystick's switch is pressed, the device also returns to the home screen without transferring the data packet.

🦇📗 The device stores the adjusted book ratings and shows them on the rating settings menu when being activated so as to remind the user of the previously assigned book ratings.

🦇📗 If the Nano 33 IoT throws an error while operating, the device prints the error code and details on the serial monitor.

🦇📗 Also, the device prints notifications and UID readings on the serial monitor for debugging.

🦇📗 After transferring data packets to the Qubitro device, the Qubitro portal lets the user visualize the book ratings on the monitoring dashboard, as explained in Step 3.2.