 Mrinnovative
DIY-V6-Solenoid-engine
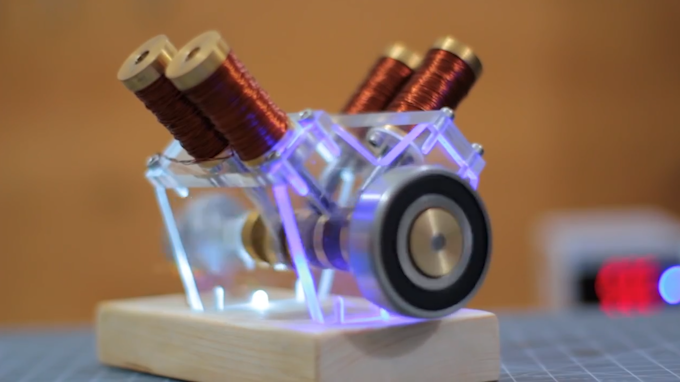
Hello friends in this video I have made a small V4 solenoid engine, I made its body from 6mm thick cast acrylic sheet so it can be transparent and visible through also added 2 leds for illumination.. rest of the parts are made up of brass and aluminium.
Material Used
6mm acrylic sheet
Piece of wood for the base
Brass rods
1/4 inch aluminum sheet
Steel rods
26 AWG copper wire
2 no. 693 zz ball bearings
Copper safety pins
TIP122 transistors
7805 voltage regulator
100-ohm resistors
LEDs
Something to use as a flywheel
Mini CNC milling machine
Jigsaw
Mini lathe
Various bolts and nuts
Screwdriver set
Electrical wires and soldering gear
Soldering Kit
With all the materials needed in hand, it is time to get on with the build.
The first step is to cut out the shapes you need from the acrylic sheet. You can use a power tool, like a jigsaw, or cut by hand -- completely up to you.
No dimensions are provided, so watch the video for more details.
VIDEO
https://www.youtube.com/watch?v=Uhpn99a_eXg&t

Next, place the cut acrylic pieces onto your CNC milling machine, and cut out the main V4 pieces. Alternatively,
you could 3D print these pieces if you are not worried about them being transparent.
Again, no dimensions are provided by the creator, so this will take some trial and error.

Drill holes and assemble the main solenoid V4 frame as shown in the video.
Next, mark out and cut out a suitably sized piece of wood to form the base of the solenoid V4.
Again, sadly, no dimensions are provided, so ensure it is big enough to mount the entire final V4 model onto.
Once cut to size, CNC mill the wood to form a shallow recess on one face of it, as shown below.
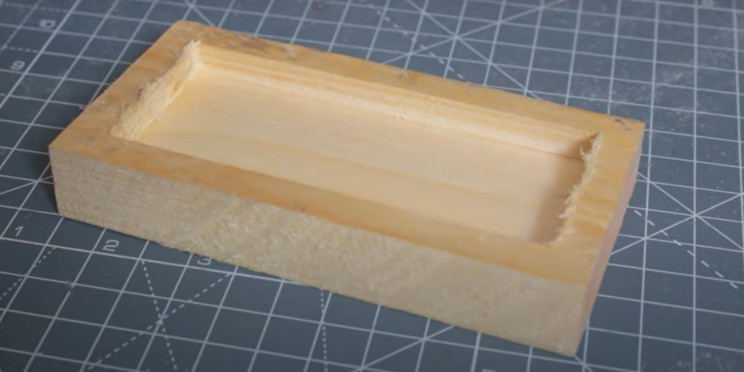
Sand it down, as required.
Next, mark out and drill sufficient numbers and size holes to mount the acrylic frame to the base.

Now, it is time to make the crankshaft discs for the V4 engine. Grab a brass rod, and cut off a small length -- as shown in the video.
Then place the rod piece into a mini lathe and machine the discs, also as shown in the video. The discs made in this guide are 20mm in diameter by 5mm thick.
You'll need 5 of them in total.

Buff and polish, as required.
Next, cut out a piece of the aluminum sheet, place it on your CNC milling machine, and create the piston rods required. You'll need four of these -- once for each cylinder.

Buff and polish these pieces too.
Next to make the crank disc and rod connecting rods. Grab your steel rods and cut them into sections, and machine as required.
You will also need to make the solenoid "pistonhead" pieces too.
Again, no dimensions are provided so please watch the video for more details on this section.
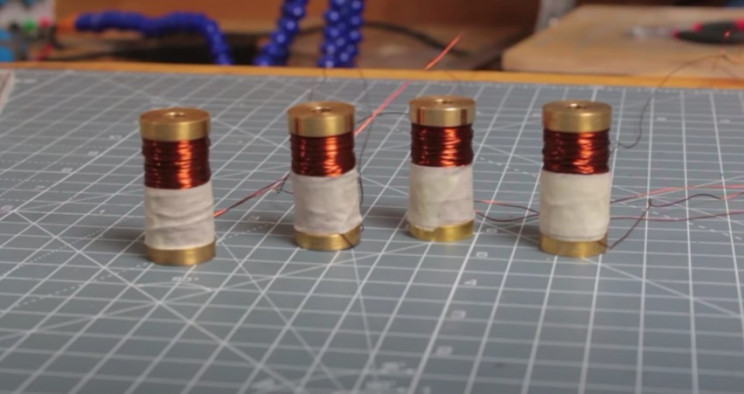
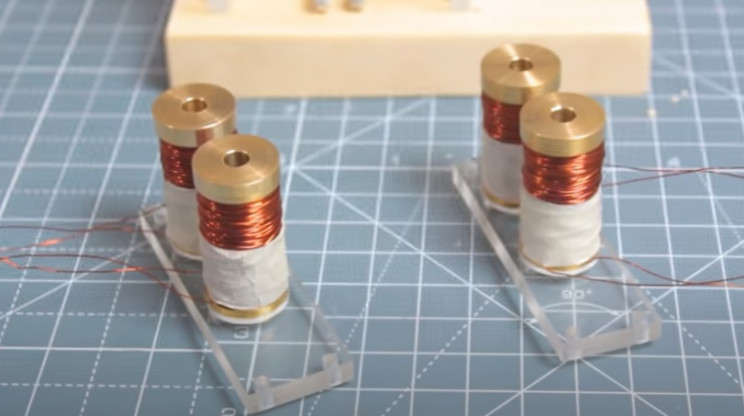
With that complete, the next phase is to make the solenoid "cylinders". Take some more brass rod, and cut off 4 equally sized sections.
Machine these brass rod pieces into cylindrical I-shaped pieces "bobbin", as shown in the video and the image below.

These pieces will also need a suitably sized hole through the center to enable a snug fit for the piston rods you made earlier.
With those complete, now coil copper wire around each one. You can now connect each one up to a battery, place the steel rod piston heads inside them, and test whether the heads move inside the cylinders, or not.
Next, grab the brass discs, rods, and piston heads, and assemble the crank shaft as shown in the video and image below.

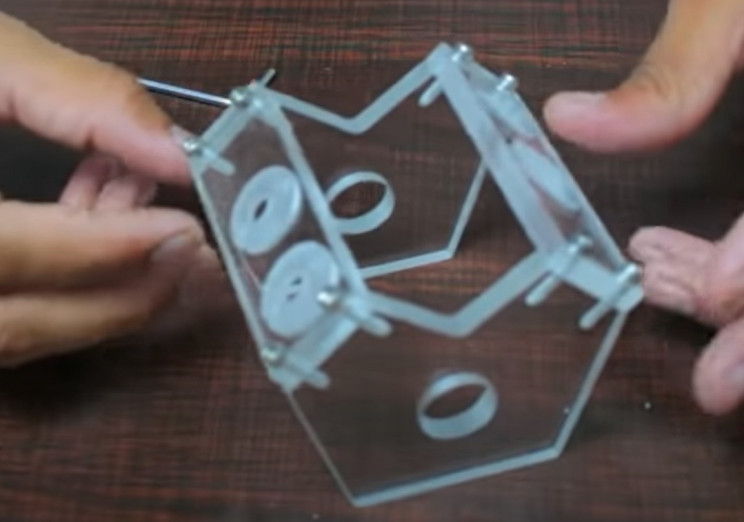
Now, partially dismantle the acrylic V4 frame, you made earlier and insert the two ball bearings into each endplate, as shown.

With those in place, insert the completed crankshaft to the V4 frame as shown below.

Next, attached the piston heads to the piston rods. Now, attach the solenoid cylinders to the acrylic top plates, as shown below, and in the video.
With that stage complete, insert the piston heads inside each solenoid, and screw the top plates into place as shown below.

Next, feed the copper wires through the wooden base. The next step is to make the solenoid V4's basic wiring.
Take your TIP122 transistors, 100ohm resistors, LEDs (to light the acrylic frame), and 7805 voltage regulator, and copper safety pins.
Now create the circuitry as detailed in the diagram below and the video.


Before moving fuurther I would like to tell you something about PCB
Yes PCB are the heart of the electronics based project usually we hesitate to try custom PCB and opt to homemade solutions
like breadboard or Zero PCB earlier I also was in the same boat, I hesitate to try custom PCB my belief was they are much expensive.
but then I came to know about JLCPCB.COM and I was totally surprised how low price PCB's are they offering
there PCB quality is best in market, now I always go with PCB for my project and JLCPCB.COM is my trusted
If you planing to order any PCB for your projects so you can consider JLCPCB.com because
I always prefer JLCPCB.com for my PCB needs, JLCPCB.com have best deals for their customers $2 for 1-4 Layer PCBs, free SMT assembly monthly.
If you seriously need quality PCB quickly in your hand then you must have to try JLCPCB PCB manufacturing service. They have Special offer of $2 for 1-4 Layer PCBs, free SMT assembly monthly. If new user signup today from this link JLCPCB.com you will get welcome coupons from JLCPCB.
SMT Assembly service of JLCPCB.com is cherry on top now get your PCB fully assembled and save your time and money Select components for your PCB from there Parts Library of 200k+ in-stock components they are offering $30 valued New User coupons & $24 SMT coupons every month $8.00 setup fee, and $0.0017 per joint
Now no need to order components separately for you PCB and get free from stress of soldering them on PCB just try PCB SMT assembly service and get you PCB with components pre assembled and ready for the project
👉 Try PCBA service of JLCPCB.com and save your time and money, get PCB ready for project, 200K+ components in library of JLCPCB.com as well as 3rd party parts to choose from. Assembly will support 10M+ parts from Digikey, mouser
👉 $30 valued New User coupons
👉 $24 SMT coupons every month
For more detials & offers please visit JLCPCB.com
With that, the solenoid V4 is basically complete. Now just add some form of a flywheel to the crankshaft, add some power, and let the solenoid engine roar!
