Close
0%
0%

My first DIY dosimeter

Radiation sensor for the youngest engineers

Public Chat
Similar projects worth following
Starting from
$50.00
yelowknife has 216 orders / 8reviews
Ships from Kazakhstan
Description how to make a simple working DIY dosimeter in 2 hours

Testing a homemade dosimeter

Today we have considered the most budget version of the dosimeter-radiometer. Out of curiosity, we ordered transparent plexiglass plates to make the device more convenient and descriptive. Potassium sulfate was used for testing. The fertilizer is rich in the radioactive isotope potassium-40, which actively emits beta radiation.

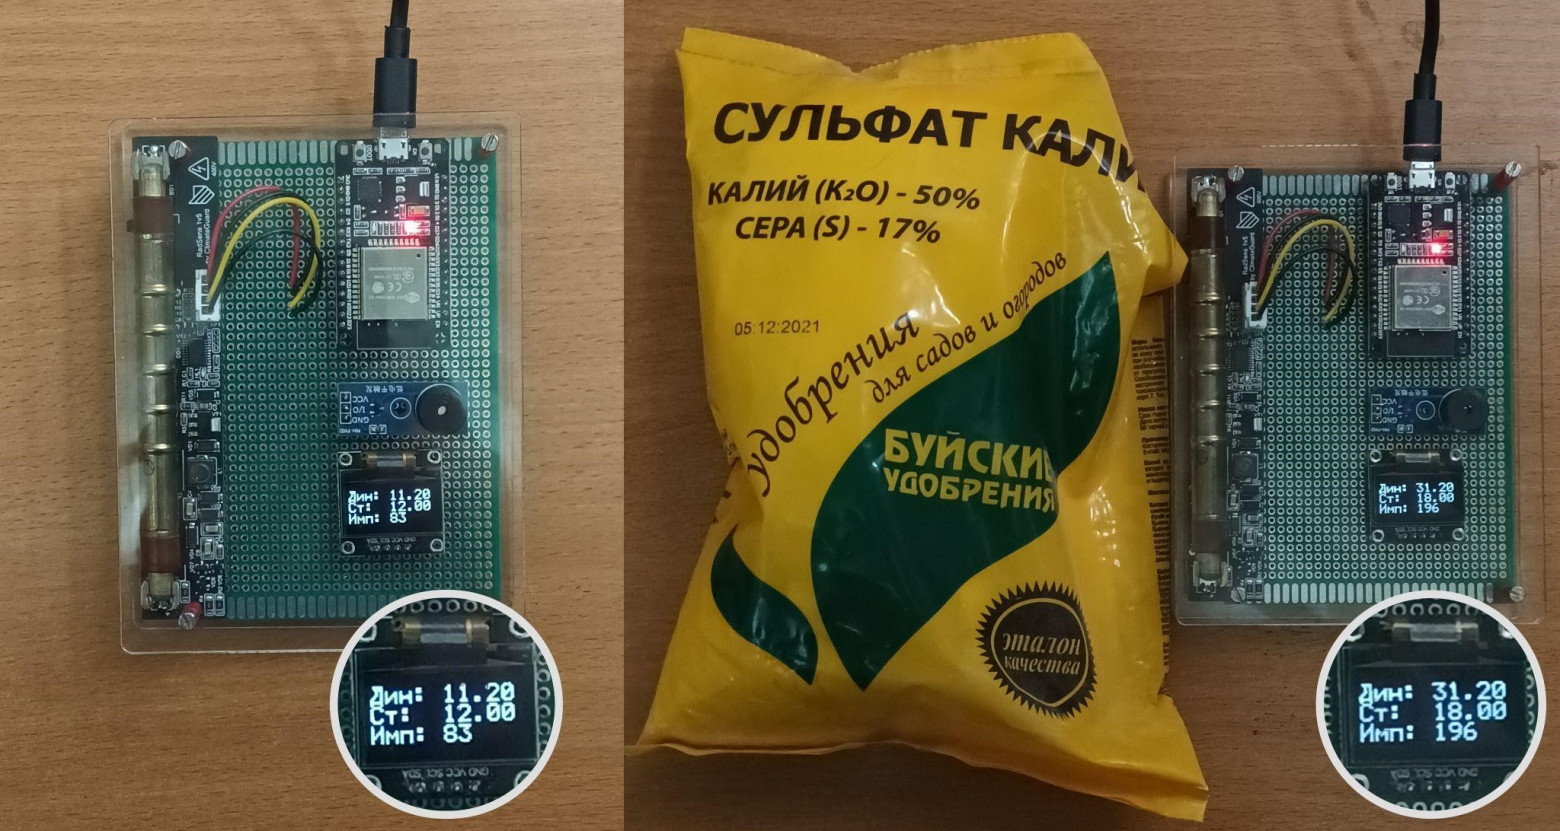
The standard level of radiation in a room is 15-20 μR/h. With direct contact of potassium sulfate, we get 32-39 μR/h, two times higher.


glass.dxf

Glass cover for DIY dosimeter. Two pieces needed

AutoCAD DXF - 88.27 kB - 05/29/2022 at 16:54

Download

  • 1 × RadSens 2 Radisation sensor
  • 1 × OLED display SSD1306
  • 1 × MH-FMD Piezo Buzzer Module
  • 1 × Breadboard 120*80
  • 1 × Espressif ESP32 development board

  • 1
    Homemade dosimeter assembling process

    Required steps:

    1. Solder the elements to the breadboard in the desired position.
    2. Connect all the elements according to the proposed scheme.
    3. Check the connection first visually, then by connecting the ESP to USB.
    4. Connect the RadSens library and the ESP32 board to the Arduino IDE.
    5. Add code to IDE and upload it.
  • 2
    Step 1. Connection

    We need to solder all the elements and connect them. The SDA and SCL pins on the RadSens and the OLED screen must be connected to the D22 (SCL) and D21 (SDA) ports, which communicate via the I2C interface. Connect the rest according to the diagram below.

    esp32 pinout

    Connection scheme Example of the dosimeter layout.
  • 3
    Step 2. RadSens, ESP32, GyverOLED libraries connection

    Before installing ESP32 tool you need to open preferences and type “https://dl.espressif.com/dl/package_esp32_index.json" in the Additional Boards Manager URL’s line

    Extensions connection in the Arduino IDE for the ESP32 board is as follows:

    Arduino -> Tools -> Board -> Board Manager -> type “ESP32” in the search bar.

    After the installation, you need to specify “ESP32 Dev module” in the “Board” section.

    Next, we need to select the specific board. To do this, go to the “Tools” tab, select the “Board” section, then select “ESP32 Dev Module” in the “ESP32 Arduino” subsection.

    Almost done! Let's move on to the library installation.

    To install the RadSens library, you need to follow almost the same steps:

    Arduino -> Sketch -> Add Library -> Manage Libraries -> Type “RadSens” in the search bar.

    Next, you need to install the GyverOLED library in the library manager.

    Now we are ready to move on to development.


View all 4 instructions

Enjoy this project?

Share

Discussions

Similar Projects

Does this project spark your interest?

Become a member to follow this project and never miss any updates