 Sam Smith
The Trash Printer was inspired by the Precious Plastic movement, a global, open-source, small-scale plastic recycling movement! It started with 4 open-source machines - a shredder, an extruder, an injection molder, and a compression oven. Since the original designs were published in 2013, a global network of makers has emerged, modifying, improving, and developing the original tools, and adding their own!
The Trash Printer is my small contribution to that global open-source effort. Precious Plastic is one of the most inspiring projects that I know of, and it’s changed the way I look at plastic. For my entire life, plastic was a material that I felt I had zero agency over. I didn’t get to decide what got made out of plastic, and I didn’t get to decide what happened to it after it was thrown away. It felt like all I could do was feel bad about it.
What I love about Precious Plastic is that it’s not about telling people what they shouldn’t do, or what the people in power should do, it’s about what we can do, right now, with our friends and the tools and materials we have around us.
None of the Precious Plastic machines are particularly revolutionary- the technology has existed at an industrial scale for decades. But that technology has always been large-scale, requiring huge facilities, tightly-held patents, highly-specialized skills, and lots and lots of money.
What Precious Plastic did that was revolutionary was take those basic machines and make them accessible to a much wider range of makers, lowering the barriers to entry, by making them smaller, cheaper, and fully open-source, so that people can get together with their friends, and actually DO SOMETHING about their plastic waste, instead of just feeling bad about it!
Like the other Precious Plastic Machines, the Trash Printer isn’t a particularly revolutionary machine. It’s certainly not the first or only pellet/flake extruder or large format printer - I was originally inspired by the RichRap extruder, and the SeeMeCNC Part Daddy, which showed me that printing from flakes instead of filament was possible.
It’s also not the only printer to print with recycled plastic. The PullStruder and PolyFormer Plus can print high-detail parts using recycled PET (#1), and the enormous Bloft MK2 (also inspired by Precious Plastic) can print huge parts! I've always wanted print a whole surfboard out of plastic trash!
When you're up against a challenge as big as global plastic waste, there really isn’t such a thing as competition. The “competition” is the plastic waste problem itself. The waste problem is distributed, and it requires equally distributed solutions, not one single machine or one idea.
Every new open-source tool we can add to our toolkit expands what YOU and YOUR FRIENDS can do with YOUR trash, and ultimately, that's what Precious Plastic is all about. It’s about what YOU can do about it. The Precious Plastic machines were the first plastic recycling tools that were simple and well-documented enough to make me go, “Hey, I could do that!”
My deepest hope is that the Trash Printer might do the same for you. My primary design goal for this entire project has always been to make the Trash Printer as easy as possible to build, requiring the simplest tools, the most widely available parts, for the least amount of money possible.
I’m not a 3D printing expert, and the Trash Printer was the first 3D printer that I ever built. If you are a 3D printing expert, you can probably tell.
When I first started building the Trash Printer, I knew nothing about how 3D printers worked, and "3D printer people" seemed to possess some magical, mystical, deeply technical knowledge that felt far beyond my understanding.
I didn’t know what I didn’t know, and didn’t know where to start. I didn’t even know what questions to ask. They would say things like, “all you have to do is flash Marlin onto a RAMPS, and then slice an STL into g-code” as if I knew what any of those words meant.
So for this project, I have made every effort, within the limits of my time, budget, and technical skill, to make the Trash Printer as easy for you and your friends to get started as possible; to lower the barriers to entry as much as I possibly can, and make it easier for you than it was for me. 3D printing with plastic trash is kind of an inevitable idea, but it’s an idea that's only really cool if lots of people can actually do it, everywhere, as quickly as possible.
I call this project The Trash Printer, but it might be better to call it a trashprinter. I want to see trashprinters become common, generic, universal household appliances, like dishwashers. I want our kids to grow up and take the idea completely for granted - “hey honey, can you throw this in the trashprinter for me?”
It doesn't matter if you use my design, or someone else's, or if you design your own trashprinter completely from scratch! What does matter is getting as many people printing useful stuff out of their actual trash as quickly as possible.
When a lot of people are engaged in creative problem solving, the impossible can become possible very quickly.
The Trash Printer Version 3 documented here will probably cost you roughly $1000 - $1500 for all the parts new, but many can be found locally and/or used, or scavenged from old 3D printers. The latest V3 Mini build took me exactly 12 hours, over 5 days.
It prints at an energy cost of about 1 watt-hour per gram, or 1 kilogram per kilowatt hour, which means that in most climates, a single 300-400W solar panel will generate enough energy, on average, to recycle 1-2 kilograms of plastic every day, using nothing but trash and sunshine.
It can print all sorts of useful parts- particularly strong, big parts, more comparable to those made by injection molding than by most 3D printers. Considering that most plastic injection molded objects are manufactured in China and shipped across the entire Pacific Ocean, being able to make comparable parts locally, even simple ones, directly out of trash, using only sunshine, is pretty incredible.
Since the material is essentially free, the real benchmarks of performance are the cost to build the machine, the energy it takes to run it, and what kind of stuff you can make with it. Can you lower the cost to build the Trash Printer? Can you make it more efficient? Can you print increasingly useful stuff and share your code, so that we all can too? This is a design challenge that I find endless fascinating, and I invite you to come hack on it with me.
You know that scene in Hackers when all the hackers from all around the world coordinate their skills and knowledge to avert ecological catastrophe and stick it to corrupt and destructive institutions? Of course you do! That’s what Precious Plastic feels like to me in real life.
It feels like a little taste of what we have the opportunity to do with everything - our power, our water, our food, our shelter, our waste - developing and sharing designs for small-scale, open-source, closed-loop infrastructure that puts power directly in the hands of local communities and makers.
Have you ever dreamed of being part of that rag-tag band of misfits who hatch a plan just crazy enough to save the world at the last possible second? Have you ever dreamed of hacking the planet, but for reals? I know I have. And I'm starting to believe it might actually be possible.
☠️LET'S HACK THE PLANET!!!
Taking out the Trash
The Version 3 Trash Printer is built around a polypropylene service cart. These carts are relatively cheap and widely available, and they come in two common sizes - 24” x 36” and 16” x 30”. The Trash Printer parts are exactly the same for both, aside from the lengths of the rails and X/Y leadscrews. The plastic shavings generated by cutting and drilling the cart to make the Trash Printer can be fed back to the completed Trash Printer, which is very satisfying.
In fact, quite a lot of the packaging that comes with the parts for the Trash Printer are made of polypropylene - the tube the auger bit comes in, the box the wire levers come in, the spacers that come between the magnets… once you start looking, you’ll find that precious, printable plastic is laying around everywhere, just waiting to be turned back into neat stuff!
When you’re starting with trash, the bar is extremely low. ANYTHING you can print out trash that is useful, beautiful, or interesting in any way is a drastic improvement!
So what kinds of trash can you print with?
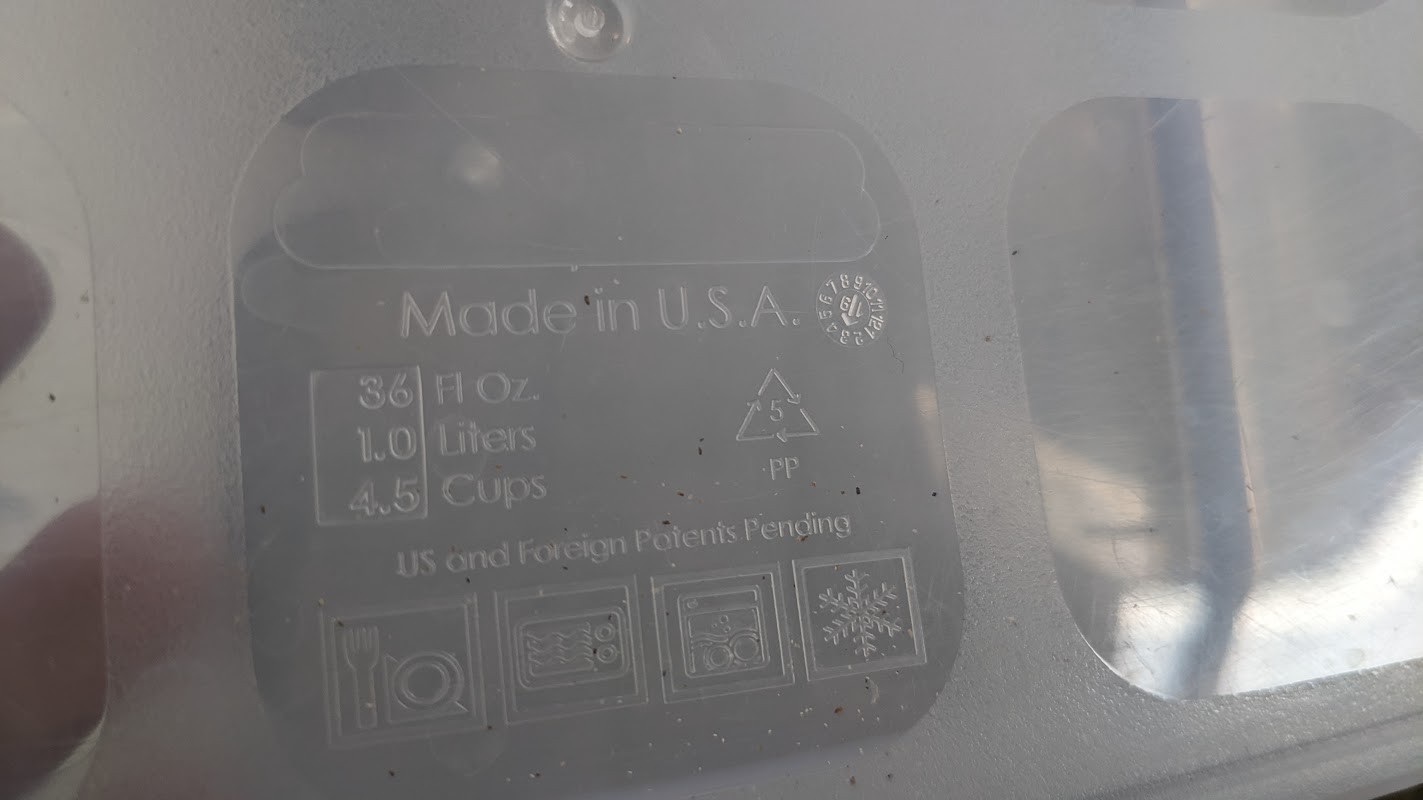
The Trash Printer prints best with polypropylene, #5, which you can find in yogurt containers, prescription bottles, political lawn signs, tupperware, take out containers, plastic bins, toys, coffee cups, rope, N95 masks, and service carts, just to name a few.
I’ve also printed with HDPE, #2 and LDPE, #4, which you can find in milk jugs, 55-gallon barrels, soda bottle caps, tubing, non-food grade detergent containers, and plastic amazon mailers. Polyethylene is more challenging to print with than PP, but the parts can be VERY strong.
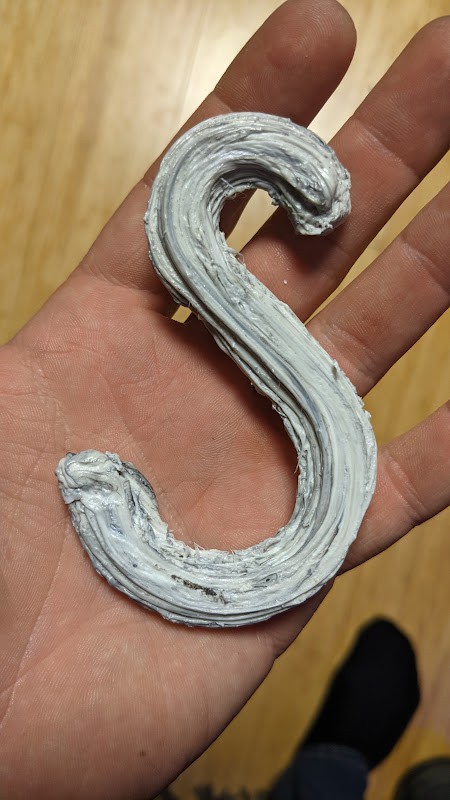
It can be challenging to get good bed adhesion, and even good layer adhesion sometimes. Unlike PP which prints like hot glue, HDPE prints like thick old toothpaste no matter how hot you print it. But I did successfully print a simple S-hook out of HDPE that could hold a 40kg load, so there is definitely potential to build simple, strong parts.
The Trash Printer could probably also print with PET (#1) but I haven’t had a chance to try it yet. PET is found in soda bottles, supplement bottles, and food containers. PET is naturally hygroscopic and absorbs moisture from the air, so it must be dried before it can be printed, otherwise the water will create bubbles in the melt.
This extra step is what has stopped me from trying it so far. Once dry, however, it has a significantly lower thermal warp than PP or PE, and it makes much more rigid prints, more comparable to ABS or PLA. PET is the only recycled plastic I’ve seen people get good results making filament for desktop printers, for example, PullStruder or PolyFormer Plus.
PVC #3, and Polystyrene #6 may potentially be printable, but they are less common, and pose additional challenges. When PVC burns, it releases hydrochloric acid, and Polystyrene can off-gas benzene, so good ventilation and good thermal control is absolutely critical. Working with these plastics is not recommended without a lot of experience, and very good ventilation.
How clean does it have to be?
Not very. The better you clean and/or sort your plastic, the better your final parts will look, but the Trash Printer’s wide nozzle makes it very tolerant of dirt, hair, food, labels, and adhesives, and really anything besides small rocks larger than 1-2mm. I’ve been on a quest to see what I can make out of the lowest grade plastic trash possible, with the least amount of pre-processing possible, and I printed a whole functional wind turbine using nothing but takeout containers and coffee cups, labels, food bits and all, so you really can make useful stuff out of 100% unwashed trash. It just smells a little like coffee when it’s printing.
It does matter that all the plastic is the same type, however. I accidentally shredded up a single nylon zip tie with the rest of my PP trash one time, which has a much higher melting point than PP, and it came out in solid chunks that would get stuck at the nozzle and make valleys in the print until I cleared them out with a knife.
It also helps to keep your shred size to about ¼” granules. Plastic bits larger than ¼” will have a hard time getting down into the barrel and can jam the auger, and bits smaller than ¼” will make for more brittle, ugly prints. Plastic polymers are made up of long chains of repeating hydrocarbon monomers, and generally speaking the longer these chains are, the more plastic-y the plastic will be, and the better it will print.
Shredding plastic finer than ¼” physically cuts these chains, and significantly decreases the average overall polymer length of the plastic, and decreases the quality of the prints. They’ll still print, but with a consistency more like thick chunky old toothpaste rather than smooth hot glue.
You can mitigate this problem if you can find a source of higher grade waste plastic to mix in with your low-quality trash. I have access to a basically unlimited supply of single-use PP test tubes from a company in Oregon that tests wine, which provides a very clean, high grade feedstock that prints like hot glue. Mixing in 20-50% of this plastic with the lower-grade trash increases the average polymer length and improves the prints significantly.
A wider nozzle also helps. I have not gotten good results printing PP with nozzles smaller than around 3mm. On the Trash Printer V3 Mini, I’m using an 8mm nozzle, and it’s working great. The thick wall means that you lose a little bit of X/Y resolution, mostly on sharp corner angles, but the parts print fast, are VERY tolerant of impurities, and are just unbelievably strong. Like, can’t-even-break-it-if-you-try, drive-over-it-with-your-car strong.
Nozzles
I’ve tried to build the Trash Printer using as many common, hardware store parts as possible. I’ve tried all sorts of brass fittings for the nozzle - Air hose quick connectors, PEX connectors, compression fittings, garden hose sprayers, and host barbs - and none of them have NOT worked, but some have worked better than others.
I encourage you to experiment and see what works for you! Currently, my preference is to use a ¾” FNPT to ½” FNPT adapter, connected to a ½” MNPT to ⅜” compression fitting, and then using a ⅜” compression insert for the final nozzle barrel. The internal diameter of the ⅜” (10mm) nominal insert is actually more like 5/16” (8mm). The thin wall of the insert means that heat is transferred more easily and quickly to the material, and gives you more control over the nozzle temperature. The thin wall also seems to create a cleaner, flatter extrusion than fittings with a thicker wall, like hose barbs, which tend to drag the molten plastic around.
Hose barbs are my second favorite choice, but the uneven barbs on the fitting mean that less of the metal is in direct contact with the heater block, and so it transfers heat less effectively.
Heaters
This whole project started with the Precious Plastic extruder, which uses 120VAC band heaters - at least one for the barrel, and one for the tip/nozzle. When I modified the design to work with a printer, I used a modified aluminum heat block from a 3D printer and a 24VDC 40W cartridge heater for the tip, and kept the other band heater as a sort of “bulk” pre-heater.
I didn’t have a heated bed, so instead I used the heated bed output built into the RAMBO board to control the band heater on the barrel instead. This lets me get a lot more heat into the extruder than the board can provide using DC alone, which leads to faster, better prints. The 24VDC output for the heated bed is connected to the DC side of a Solid State Relay, which switches 120VAC power on and off to the band heater.
I’ve used both 130W 30x30mm and 380W 35x35mm band heaters, and they both work, and they both slide over the ¾ fitting, you just have to stretch the 30mm version and squeeze the 35mm version. The 380W heater increases the max peak power of the printer to just under 400W, but it doesn’t actually change the net power consumption of the printer very much.
The tip heater is just a 24VDC 40W cartridge heater, which is standard on lots of 3D printers. Just make sure that you get the 24VDC version and not the 12VDC version, which looks identical. Otherwise the resistance will be too low and the heater will burn out when you give it 24VDC.
Barrels:
I recommend using ¾” black iron or stainless steel pipe for the barrel, as steel conducts heat much more slowly than brass, and prevents heat from creeping up the barrel. In the V3 Mini, I’m using a 4”x ¾” black iron barrel.
The black iron is cheaper and easier to find, but doesn’t look as nice and has a more pronounced internal seam. It doesn’t seem to matter very much, but a stainless barrel will look better, have slightly lower heat conduction, and have a smoother internal wall, it’s just more expensive and harder to find locally.
You want the auger to be pushing the unmelted shred, not the melted plastic. Pushing the viscous molten plastic requires a lot more torque, and the 15:1 NEMA23 Stepper motor can’t really provide it. If the auger is in contact with molten plastic, it will also freeze in place until the plastic melts again, which makes maintenance more difficult because you can’t get the auger out without heating the barrel, and it requires a MUCH longer warm-up period before the plastic melts and the auger unlocks.
I started by using a ½” NPT barrel and a 7/16” Auger bit, but have found that using a wider ¾” NPT pipe as the the barrel, and a ⅝” or 11/16” auger seems to work better. The larger auger pushes more material per revolution, and is more resistant to jamming. The bottom spacers in the parts section have two sets of holes so that you can use either a ¾” or ½” flange, but I recommend using the ¾”. You may want to block the unused holes with tape or hot glue to prevent shred from falling through, but the flange will mostly block them either way.
Augers
I recommend starting with a 7.5” wood auger bit. These are widely available, and they work great. I’ve tried other augers with different pitches and patterns, and again, none have not worked, but the ⅝ or 11/16” augers in a ¾” barrel seem to push the most plastic with the least drama. You want the auger you use to be a few mm smaller on either side than the inner diameter of the barrel, otherwise the plastic bits will get caught in the space between and jam the motor.
The laser cut spacers, named T2 in the files, can be used to raise or lower the auger and determine how far it extends into the barrel. You can place them above or below the T1 stepper motor mount spacer to fine-tune the depth of the auger. On the V3 Mini, that distance is about 1.25”. You don’t want the auger to extend much more than that into the barrel, because then it might come in contact with molten plastic and lock in place, and because then it has less area in the hopper to catch material and push it into the barrel. I think that ideally 1” or ¾” is probably the sweet spot.
Hopper
I’ve used both 3” PVC and ABS plumbing wyes as the hopper, and they both work. The newest parts will fit either one. The PVC version is slightly lighter, which was more of a consideration for the less-powerful V2 Gantry, but the difference is minimal. The ABS version is easier to find, and can be a little more compact.
Of all the parts required to build the Trash Printer, the hopper body is one of the most likely candidates to be trash-printed, but the plumbing wyes are about $5-6 new, and so it makes sense to just start there.
In the future, I hope to replace the plumbing wye with a cyclonic particle filter, so that I can vacuum feed the material into the hopper with a shop vac, which would make it much easier to print larger, longer prints without constantly having to refill the hopper. Currently you have to feed it every 20ish minutes.
Good vibes only
Recently I’ve been having trouble with the material feeding into the hopper, because the test tube plastic that I’m using is very sharp and tends to bind. Not all material behaves this way, but the effect is that the auger will create a hole in the material that doesn’t always fill in by gravity alone, and so the extrusion will get thin as the auger has less and less material to “bite” down on. You only get about 1-3 thin layers before the part is beyond saving, so this can be a major issue, especially for larger, longer prints.
A friend suggested that I strap a vibrating motor onto it, to shake and settle the particles and keep them falling into the hopper. So I got a little 12V vibrator motor on Amazon, and just strapped it to the hopper with velcro, and it worked great! The vibration didn’t noticeably affect the visual print quality at all, but it did noticeably improve the extrusion consistency!
This is a hack that I’ve only just started exploring, so I haven’t integrated it into the design in an elegant way, but it’s something I would recommend you try once you’ve got your printer set up.
Motor
The Trash Printer works by “tricking” the 3D printer software into turning an auger, when it “thinks” it's moving an extruder motor and pushing a measurable amount of filament. I started my first experiments with a NEMA34 motor to see if it could work, but the NEMA34s are huge and heavy and too large to be driven the by the on-board stepper drivers of the RAMBO, so I settled on a NEMA23, then moved to a NEMA23 with a 5:1 planetary reduction, and now I use a NEMA23 with a 15:1 reduction.
I use these motors because they can be controlled directly by the RAMBO stepper drivers, without an external driver, at the same voltage (24V) as the NEMA17s I use for the XYZ axes. A brushless DC motor could provide a lot more torque much more efficiently, but driving it would require an external controller board that could interpret the step/direction signals from the RAMBO and convert them into signals for the BLDC, and I don’t know how to do that.
Boards like the O-drive or Tarocco seem like they could probably perform this task, but this is right at the edge of my skillset, and I haven't figured out how to do it yet. If you know how to do this, please help me! If not, stick with the 15:1 NEMA23 to get you started.
Control
I’m controlling the Trash Printer using a Rambo 1.4 board, running a slightly modified version of Marlin 2.1.1. I used this board because it was what was recommended for use with the MPCNC gantries that I used for Versions 1 and 2, and so it’s what I know works. It has higher outputs and more protections than a standard RAMPS board, so I figured it would be better for prototyping. Since the pandemic started, presumably due to the global chip shortage, the Rambo1.4 boards have become harder and harder to find in stock, and I would love to switch to over to a more accessible board. Can you get the Trash Printer working with RAMPS board, or other widely available control board? Let me know how it goes!
Firmware
The Trash Printer V3 uses a slightly modified version of Marlin 2.2.1. The most important changes that were made to the stock version of Marlin are:
Changed Board to RAMBO - If you don’t do this, the pinouts will be different and the code will compile and upload but when you connect the printer will read zero resistance for the thermistors and immediately give you a thermal runaway error.
Changed Default Steps per mm - The T8x8 leadscrews for the XYZ axes should be set to 400 steps per mm, not the default of 80 steps/mm
Enabled EEPROM - If you enable EEPROM, you can change the default values, such as the steps/mm through Repetier, without having to flash new firmware
Eased Thermal Runaway Settings - the stock thermal runaway protections are designed for smaller printers with much more precise temperature tolerances and thermal mass. Easing these protections prevents Thermal Runaway errors from killing your prints. Thermal Runaway errors can be annoying, but DO NOT fully disable thermal runaway settings unless you know what you are doing, are willing to watch the printer 100% of the time, and have a fire extinguisher nearby. These protections are there for a reason.
Software
The Trash Printer uses Repetier-Host as the control/slicer software. You can use other software if you know how, but if you don’t, start with Repetier.
Octoprint
If you add a Raspberry Pi running Octoprint, you can print over wifi, make timelapse videos of your prints, and add a ton of useful extra add-ons. You will need to use a program like Etcher to flash the octoprint software onto an SD card and insert it into your pi, then connect the Pi to the Rambo board using a USB-B to USB-A cable. Using Octoprint will replace Repetier as your control software, but you should still use Repetier as your Slicer program, and for initial commissioning.
Z- Bed
The Trash Printer uses 4x NEMA17 Stepper motors, connected in a 2-series, 2-parallel configuration. The RAMBO board has dual parallel outputs for two Z motors, the series connections break these out into 4 motors. If the Z-motors are mis-aligned relative to each other, the resistance increases. Beyond a few mm, this can cause the Z motors on one side to seize, and the bed will become tilted to one side with each layer.
Polypropylene is a flexible material that changes shape slightly with temperature, and the polypropylene bed tends to warp slightly inward over time. Flipping the bed upside down, so that the plastic cross braces are facing up, helps mitigate this. You can tap the plastic cylinders at the intersection of each cross brace with a ¼-20 tap/drill bit, and then thread in ¼-20 knobs. These knobs can be used to push the metal bed up or down by a few mm for precise leveling, so you don’t have to level by adjusting the Z leadscrews directly.
Leveling and Adhesion
One of the main challenges when Printing with Polypropylene or Polyethylene is thermal warp and bed adhesion. Both plastics have a high (20-30%) thermal warp that can cause part of the print to curl upwards as the plastic cools. Both plastics are also notoriously bad at sticking to anything other than itself.
Originally, I solved this problem by printing directly onto the PP bed, which provided decent adhesion, but the bed would warp and become pitted over time. Then Darcy turned me onto the idea of just using packing tape on the bed. Most packing tape is made with polypropylene, and so it adheres well to the extrusion, and the adhesive on the other side adheres well to the bed.
In most cases, printing a wide brim on the part helps a lot, but still sometimes pulls up from the bed. Recently, I’ve started using a thin-gauge mild steel plate, with packing tape on top, as the final bed surface. This lets me use strong magnets to pin down the brim if it starts to delaminate, and that works surprisingly well. In the future, it should also let me add a non-contact Z-probe, which are less complicated than probes like the BL-touch, but they require a metal bed in order to work.
Lead Screws
The Trash Printer uses acme thread, 2mm pitch, 4-start, 8mm leadscrews for all axes. Make sure you get the right kind, lead screws with a different pitch (the distance the nut moves in one rotation) will require more torque and different steps per mm, and the additional resolution they provide isn’t necessary on a big printer like the Trash Printer.
Digital Parts
The Trash Printer was designed to use ¼” thick craft plywood, but a wide range of materials and thicknesses can be used. None of the assemblies require ¼” thickness, the only real consequence is that the plates won’t align perfectly, but that is purely aesthetic, and you can change it in the Sketchup file. Feel free to experiment! Laser-cut acrylic would probably look awesome and be a lot lighter than plywood, but I recommend plywood for prototyping because it’s easy to drill out the holes and modify the parts as needed, which is more difficult to do with acrylic.
Casters
The rolling casters that come with the cart work fine, but only two of them lock and swivel. I like to upgrade mine to all swivel and all lock for more stability and maneuverability. I call this the “Tokyo Drift” upgrade. If you’ve ever used a shopping cart at Ikea, you know the difference it makes!
Connectors
You can cut, splice, and solder the connections if you want, it’s ultimately cheaper than using lever-lock connectors, but not having to solder at all is a big deal for me personally, and it’s a LOT of soldering and shrinking to make good connections. The lever lock connectors make switching out and connecting components super easy, and as long as you have your wires stripped and inserted properly, they’re perfectly secure enough to use permanently. The back of the connector has a an indentation that represents the proper length to strip and insert the wires- it’s about half an inch. Longer is better than shorter.
The new 12-position ones I just tried out are PERFECT for making your own series connectors, and have mounting holes to secure them.
The 2-1 and 3-1 lever connectors are great for splitting the DC power output, which lets you plug in a 24V-5VDC USB buck converter, so that you have plenty of 5V amps to run the lights AND raspberry pi for Octoprint.
If you get stepper motors with 4-pin headers and a 1m lead, you can cut them off, use the lever locks to extend the cables and put them in series, and then use the original headers to connect to your RAMBO board. Having to make your own headers is annoying.
Wires
You’ll need a spool of 4-wire 20GA (Black-Gree-Red-Blue) stepper wire, and a spool of 2-conductor 18GA wire (Red-Black) for the DC power. I like to use 20 or 22 gauge speaker wire for the thermistors and endstops, because it's cheap and easy to find, and so that it looks different from the Red-Black power connections so I don’t mix them up.
For the AC heater cable, I like to cut the socket side off a 6’ extension cord, so that the end already has a plug on it. Add the lever lock connector to the side you cut off right after you cut it, so that you don’t accidentally plug it in with the bare wires exposed. This cable is carrying a max of 380W, so any cheap extension cord works, you don’t need a thick 12-guage one, 14-ga is fine.
Cable Management
I like to make a wire harness guide out 10mm corrugated plastic. This is the stuff that political lawn signs are made out of, but the flutes are 10mm instead of 4mm. It’s cheap, light, flexible, and works great! I get it locally at a local sign company in Portland, but you can order it online if you can’t find it. The plastic it’s made of is…you guessed it, polypropylene, so you can feed any scraps you have back to the printer.
For the Trash Printer Mini, you don’t really need a cable guide for the Y axis unless it bothers you to have wires hanging off the side, but if does you can add one.
Rails
The parts provided are for exactly 1” OD tubing. 1” Aluminum tubing is available at most hardware stores. Stainless tubing is more rigid, looks better, and lasts longer, but is harder to find and more expensive. EMT conduit is a cheap and widely available option, but the OD of 1” nominal EMT is NOT exactly 1”, so you’ll have to modify the hole sizes, and probably a lot of the other parts, if you want to use it. Just use the Aluminum, you can always replace it later.
Solar Power
You can power the Trash Printer entirely with a single 300-400W solar panel, and a small battery pack. If you know how to work with solar, you can homebrew your own setup, but if you don’t, I recommend just using a solar generator that has the charge controller, battery, and inverter all integrated into one box. I’m using a Bluetti EB240 that I got from Light Harvest Solar, I like it because its flat, super simple, and plug-and-play! One solar panel, and one EB180 or EB240 will power the whole thing!