Close
0%
0%

Well well

Monitoring the monitor that monitors the well

Public Chat
Similar projects worth following
There is device on the market that protects your well's pump motor from common fault conditions. However, it does not provide an alarm in the event of trouble. This project adds that alarm and early warning to some potential faults.

This project began as page on HackADay.IO. From there it spiraled in to an entire project that has kept me busy for nearly two years, and threatening to become a full-time job. It all began when my water line froze one Friday afternoon.

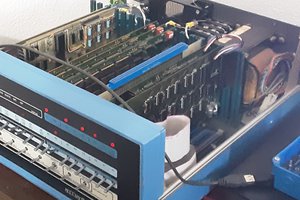
When I finished thawing the line and had replaced the check valve that was the cause, I took a closer look at a device installed in the pump's control circuit. The device is designed to shutdown the pump, should trouble crop up. The interesting part of the device's manual states: "are equipped with an infrared LED that will communicate".

What it did not do was communicate to me that I was about to run out of water. This project adds that communication capability, performance monitoring, data logging, and a handy phone app to watch over it all.

IMG_20231116.jpg

A WellWell device nearly ready for beta testing. Ok, ready to be put in an enclosure.

JPEG Image - 462.99 kB - 11/16/2023 at 23:29

Preview
Download

Screenshot_20231116-150741_Well Now.png

A screen shot of my WellNow app just after the well finished a cycle. Is it ready for release?

Portable Network Graphics (PNG) - 273.31 kB - 11/16/2023 at 22:23

Preview
Download

  • 1 × Z8F0812 Microprocessors, Microcontrollers, DSPs / Microcontrollers (MCUs)
  • 1 × mcp1700-33 Power Management ICs / Linear Voltage Regulators and LDOs
  • 1 × HC-05 Bluetooth to serial bridge
  • 1 × SFH309FA Opto and Fiber Optic Semiconductors and ICs / Photo Transistors
  • 1 × mmbt3906 Discrete Semiconductors / Transistors, MOSFETs, FETs, IGBTs

View all 17 components

  • Oops...

    Darrin B01/04/2024 at 18:23 0 comments

    Testing the device, means that I'm playing a videogame. There's not much that can I do while waiting for the well to cycle. Sometimes, though, I am looking over the code for potential bugs. I did find a pair of minor ones, and I corrected one I considered a show stopper. One other bug still eludes me. While looking for it, a possible power saving idea came to me, turn the on-chip crystal driver off. Since the device is using an external oscillator, this should not be a problem, right?

    Wanting to test the bug fixes, I flashed the new code in to a device. Maybe it flashed, I don't recall the exact error message that came back from the dev studio but the device seemed to be dead. A few more unsuccessful attempts to re-flash the device convinced me to build a new wire harness to connect the board to the debug system. With that in hand I resumed the quest.

    Still no luck. Could it be that I killed the oscillator, or something else, while poking around the board with the voltmeter? Warm up the o-scope, one probe on the Z8's clock input and the other on the debug input. There's the 20 MHz signal, the Z8 should be running. Oddly, there was no activity on DBG. Poke, prod, oopsie, just shorted two pins with the probe. What? The status LEDs just lit up. That could mean that my code is executing. How odd. Didn't I read something about...

    The actual clock signal used inside the Z8 is derived from the signal on the XOUT (Crystal Output) pin, not the XIN (Crystal Input) pin that the oscillator is attached to. Shorting XIN and XOUT forces a clock signal in to the chip, allowing everything to function and re-flashing the chip possible. Connecting two outputs got the job done!

    Now that all of the non-functioning devices have been reflashed and the new code is monitoring my well, I'm again waiting for the pump to cycle. I think I should go slay some rodents of unusual size and leave the option bits alone.

  • Slower is faster?

    Darrin B12/20/2023 at 16:53 0 comments

    The device and software has been working here for a few weeks. Not quite flawlessly, but well enough that I have been considering enlisting my neighbors as beta testers. The first oppurtunity arrived a few nights ago, when my friend's well either ran dry or froze and I was asked to diagnose the problem. By the time I arrived to test the system, the condition had cleared itself and results were inconclusive. A dry well could have recovered in the time it took me to get to the house, while a frozen line could have cleared after my friend had turned on the heat in the space that the water line traversed.

    Now that water was flowing and life could resume, we powered up the WellWell and started the WellNow app. The power-on self test ran, and then nothing. No data appeared in the app, something that I feared would happen. Something in the data timing of the well monitoring device has changed and I need to drag out the reverse engineering tools again. This time, however, I have a device that is practically purpose made for the task, it just needs appropriate software. Introducing WellWhat, an infrared to VCD tool chain. Load this firmware in to a WellWell device, pair it to something that can capture serial data. Run the captured data through a few lines of a Ruby app to get a VCD file for Pulseview to display. There are refinements to make in the code, but as things are I can now get the data I need to see what has changed.

    This brings us to the meaning of the title of this entry. While developing the new firmware, this time without the assistance of DMA hardware, I ran in to a huge bottleneck. Data transfer between the Z8 and HC-05 is over a serial UART running at about 113kb/s. That is close enough to 115kb/s that it hasn't been a problem until now. Sending just the two byte timestamp values can take longer than than the bit time of the well monitor, leading to lost data and unhappiness. Why not turn up the baud rate, you ask? The next higher baud rate I can use, 250kb/s, is not supported by the HC-05. The '05 does support 230.4kb/s but there would be a more than 8% timing error, a little too much to ensure reliable data transfer. If I were to change the 20MHz oscillator to one running at 18.432MHz, I could turn the baud rate all the way up to 1.15Mb/s but that might require better signal routing and possibly terminations for the signal paths. I think I'll try 460kb/s, when the parts order arrives.

  • 100% Utilization?

    Darrin B11/03/2023 at 19:57 0 comments

    This project is putting nearly everything on the Z8's die to use. Nearly all of the RAM and Flash ROM are being used. Both timers are busy, as are the UART and SPI ports. All of the I/O pins have something to do. Because I installed a Z8F022 device, the ADC and its' input multiplexer is idle. For now the Watch-Dog timer is also idle, but I intend to put it to work soon. Finally there is the I2C controller, it was idle until yesterday. 

    I have been wanting to benchmark several aspects of the firmware, but was unable to due to the lack of an available timing source. Or, so I thought. Eventually, I recalled that one or another of the serial communication devices could be used as a simple timer somehow. I reread the fine manual to find that all (UART, SPI, I2C) of the serial devices could be used in this way. The I2C hardware is now the benchmark timer!

    Using the timer mode of the I2C port as an event counter exposed a mis-handling of one of the interrupts. Correcting the interrupt's behavior freed up enough CPU cycles that it is time to beta test!!

  • WellNow, there's an app for this!

    Darrin B11/01/2023 at 18:13 0 comments

    Soon after building the Z8 dev-board based prototype built, I made a Python+Tcl/Tk app to display the data it gathered. Time passes and it became clear that a more mobile display would be quite useful. A rainy spell during the summer permitted me to dig in to developing a phone application. Well, an iPhone app was a non-starter, as I don't have one and have no interest in purchasing something that proprietary. That seems to leave Android. When I tried it on my new-ish Moto, it was awful! Within a few minutes of the first boot of that phone, I began the process to install LineageOS. With that done, let's write some code!

    Most, if not all, 'droid development appears to be done with Java or Kotlin. I've heard of Java, even remember a little. Ok, start with the includes. Err, no. Ok, guess I forgot how to Java. Again.

    Finding a 'Hello, world" app that made use of things I already have installed and know how to use got things underway quickly. Five weeks later I have an app that is substantially complete, AND the boards have arrived from OSH Park! (I ordered the boards and parts when the app was functioning reliably.) A few boards built and tested later, time to kick some more app. Three months of testing, modifying, and rewriting things everything looks ready to move to beta-testing! (I still need to find an enclosure however, as my test device is taped in place.)

  • Just one more bug?

    Darrin B09/18/2023 at 19:00 0 comments

    I'll admit that the first version of software I flashed to the WellWell device was a bit of a mess. When an invalid voltage value kept appearing, I became convinced that it was time for a major re-write. (There was also the false alarm and crash at midnight. Beeeeeeeeep!) Now that the re-write has been been debugged, the testing has begun! (There was a bit flag that I failed clear. It really messed things up.)

    Testing certain parts of the code requires the well pump to run, but my being loathe to waste water makes this slow going. Fine, I'll make an emulator for the infrared transmitter. Push a button, get a simulated pump cycle. Fun!

    Some of the changes made during the rewrite shrank the size of the compiled code to the point where I could add a few more features. There's now a factory reset built-in, more thorough power-on diagnostics, and a special data-only mode when the pump is running.

    So, here we are. One last thing to check and the alpha test can begin.

    < a few days pass >

    Update: The test ended at nearly the same time it started. Tests showed that the main loop was just a little too slow to continuously update everything and not drop the occasional bit of incoming data. I am now putting the finishing touches on a new burst oriented, and interrupt driven data transmitting routine. Stay tuned.

    Wow. Lots of changes later, and we're running again. Rather than sending one data item at a time, they're now bundled and sent in groups. There's now a data limiting system in place so unnecessary data packets are not sent. Even found an interrupt bug, where there were 2.5 times the number of expected interrupts being generated. Onward!

  • HC-05 Ver 3

    Darrin B09/09/2023 at 16:23 0 comments

    The Z8's first task is to initialize its' I/O pins. That done, it goes on to determine the presence or absence of the HC-05 module, as I would like to have radio-silence available as an option. Even though the module is present, for some reason, it is not being detected.

    Shall I skip over the trials and tribulations of coaxing the updated module in to operation?

    Sure, because in the end, the difference was mostly how the reset and "key" pins operated.

    The module also handles paired devices a little differently, allowing me to remove the bit of code that facilitated un-pairing a device.

    Now having a working bluetooth interface, it's time to put the device in front of the pump monitoring device.

  • A Plague on Humanity

    Darrin B08/03/2023 at 14:36 0 comments

    Printers.

    When I finished a very DIY toner-transfer friendly circuit board layout, I hit the print button. Beeeeep, Magenta cartridge empty. I took it out to give it a shake, in a futile attempt to dislodge the last few toner particles. Ordered a refilled/refurbished cartridge, but life intervened and I took too long to discover that it wasn't. Purchasing another cartridge wouldn't fit in the budget, so this project went on hold. A incident with a neighbor's well, stoked the urgency of getting this done, but what to do?

    Again, Hack-A-Day comes to the rescue! OSH Park is mentioned favorably. Their standard price is based on the dimensions of the board. Hold-on, they can make vias. Those will save some space! Time to re-design. The original layout came in at a bit over 4 square inches (55x55 mm). The updated board shaved an entire square inch, and now measures 43x48mm. That's quite a discount and will fit in my budget better than yet another toner cartridge.

    A few days later, the boards are in my unstained by ferric chloride hands, and they look great! Assembling the first board took a little longer than I might have expected. Seems that my SMD hand soldering skills were a bit rusty. The closest thing to a flaw in the layout was my footprint for the HC-05, it was off by a small amount. Not by enough, at the moment, to bother adjusting.

    Powering up the assembled board was unexciting, nothing exploded, smoked, beeped or even blinked. Let's load the code!

  • Project Specification

    Darrin B06/17/2022 at 17:36 0 comments

    The device I intend to build has one job: sound an alarm at the slightest sign of trouble. I'll leave it to Lassie to let me know when Timmy is stuck in the well, but that should alert as line blockage. We have voltage, current, and duration data available. Let's extend the timing component to track time of day. Now we need to set the time, or do we? Not really, what is needed is when the night-time cycle begins. A pump running overnight can be a sign of trouble. Add a button, press it when the night cycle should begin. (If we power up at noon, the clock would have the right time.) Now that there's a button, it can be used to silence the alarm signal. If there was an alarm, it would be useful to know why. A few LEDs to show a binary code should suffice. The power source can be a unused 5V phone charger. A battery backup is not really necessary, since a power outage will also shut down the power hungry pump. That was easy.

    Scope creep

    There is quite a lot of unused potential, even on an 8k Z8. I know, add a bluetooth adaptor! There's an HC-05 laying around, unused. That'll do. Since there is now bi-directional data transfer, there should be read-modify-write for threshold values. If the remote device has graphics capability the pump's operating current can be dispalyed as a graph, a valuable diagnostic tool.

    Let's go!

    Hold on, that part is not available until ... When???

    Redesign a little bit.

    Let's use a piezo beeper in place of the 555 and speaker. Forget the TCXO, use a standard oscillator. Only 4 left in stock? I plan to build more than that just for the beta test. Keep looking.

    More scope creep

    A conversation with a neighbor led me to the posibility of calculating the water depth in the well shaft based on the pump's performance. I may have to invite Math.h to the party.

  • SPI without a clock?

    Darrin B06/16/2022 at 16:59 0 comments

    Looking at various widths of ones and zeroes that I had captured, I settled on a 220 uSec. bit width, clocking it with a timer. It was an ugly hack

    1. Wait for 150 mSec. of zero
    2. Wait for the rising edge
    3. Wait 1/2 of a bit width
    4. Capture the first bit
    5. Start the 220 uSec. clock
    6. Capture the next bit when the timer has elapsed
    7. Repeat step 6 until all 32 bits are received
    8. Send the value to the PC

    Before long, I added some ANSI terminal control values to the data to format the captured data. Only one value appeared to change. I don't have many of the notes I made during this time, so I'll skip ahead a bit. Eventually I worked out the bit order and whether, or not, to invert the incoming bits and that considering the data as two 16 bit values made the most sense.

    The upper 16 bits are in the range of 0x9001 to 0x9012, while the lower 16 ranged from 0x45 to 0xffff. Only the value attached to 0x9011 varied over time, hovering at about 0x9a0. That happens to be 2464, 10 times the phase to phase voltage that the pump is connected to. Not much happened until the well pump turned on while I was working on this project. While the pump ran, 0x9010 and 0x9012 were also changing. My antique clamp-on AC ammeter showed about 11 amps while the pump ran, while the number reported by the monitor was bouncing around 0x450. Looks like these are the operating current values, though scaled by 100.

    Knowing voltage and current and being able to detect the running time, there are a number of faults that can be detected. I must build something! But first the software controlled timer needed to be improved, it would generate 33 interrupts for each incoming value. I'd like to save some CPU cycles for other uses, could I use the SPI interface to collect the data? I'll need a clock source. A bit of re-wiring the Z8 dev board and rewriting code reduces the load to just 5 interrupts per incoming value, much better. The IR detector is now connected to both the SPI data input and a GPIO pin and a timer's output is connected to the SPI-CLK, watch what hppens

    1. Configure a timer for a 220 uSec. period and preset the timer count to slightly less than 110 uSec.
    2. Wait for 150 mSec. of zero
    3. Set and enable the GPIO to interrupt on a rising edge
    4. On the GPIO interrupt, disable the GPIO input, enable the timer for continuous operation
    5. SPI receiver will interrupt when it receives a byte, store it
    6. When the fourth byte is received, disable the timer and preset the count to the value used in step 1, re-enable the GPIO interrupt
    7. Since we are waiting for the GPIO interrupt, the main loop is free to process all sorts of things.

  • Bits, lots of bits

    Darrin B06/13/2022 at 20:59 0 comments

    With 10 seconds of data, there was a lot of horizontal scrolling to do.

    Shown above is the first pattern to emerge, a 154 mSec. gap followed by two 137 mSec. gaps. A small code change to the digitizer and it waits for a 150 mSec. gap before it starts capturing data. Breaking the capture on the 154 mSec. gaps, then stacking the pieces another pattern appears. This time, every 60th cluster of pulses contains a 4.56 mSec. logic high.

    Here is a closer look

    Every block looks to start with the same double spike and gap pattern, could that be a preamble for Manchester encoding? Days of toying with this idea yielded nothing but decoding errors. Also, assuming the preamble represented four bit durations, the data lengths appeared to be about twenty bits. How odd.

    The breakthrough came when I split the data on 10 mSec. gaps and stacked those segments.

    Supposing that the starting pattern is 4 bits, then each line ends up being 32 bits wide. That sounds more reasonable.

View all 13 project logs

  • 1
    Picking up the pieces

    Part Substitutions

    • Z8F0822, can be used in place of the Z8F0812
    • HC-05 is optional. Also, the HC-06 should work with no changes to the layout or code
    • Nearly any 3.3V low dropout regulator can be used
    • Just about any phototransistor should work
    • The same goes for the 3906, pick a PNP and adjust the base bias current

    The board was laid out with toner transfer in mind. At the moment, the board will not fit in an Altoids tin. I may have to fix that, though using the tin might reduce the bluetooth interface's range just a bit. A more compact layout is also available, just send it off to OSH Park. This layout makes greater use of 0805(US) parts, but remains hand solderable.

    The resistors can be most any type, and 5% would probably work just fine. As readily available as 1% resistors are, you might as well use them. However, size matters. Trying to place a 1206(US) part on a 0805(US) footprint is no fun.

    All of the capactiors are tasked with filtering duty, so a +80/-20 type would serve. For the largest capacitors, I chose dry tantalum, instead of electrolytic, for their longevity.

View all instructions

Enjoy this project?

Share

Discussions

Similar Projects

Does this project spark your interest?

Become a member to follow this project and never miss any updates