 K Gray
The Story
Hello !
I have a MacBook laptop with a finicky mouse that doesn't work very well. So, I thought of ideas to fix it. I suddenly thought of an awesome idea; a gesture mouse! I have thought of this project before, but didn't have the time to make it, so now I just dove in headfirst.
How it Works
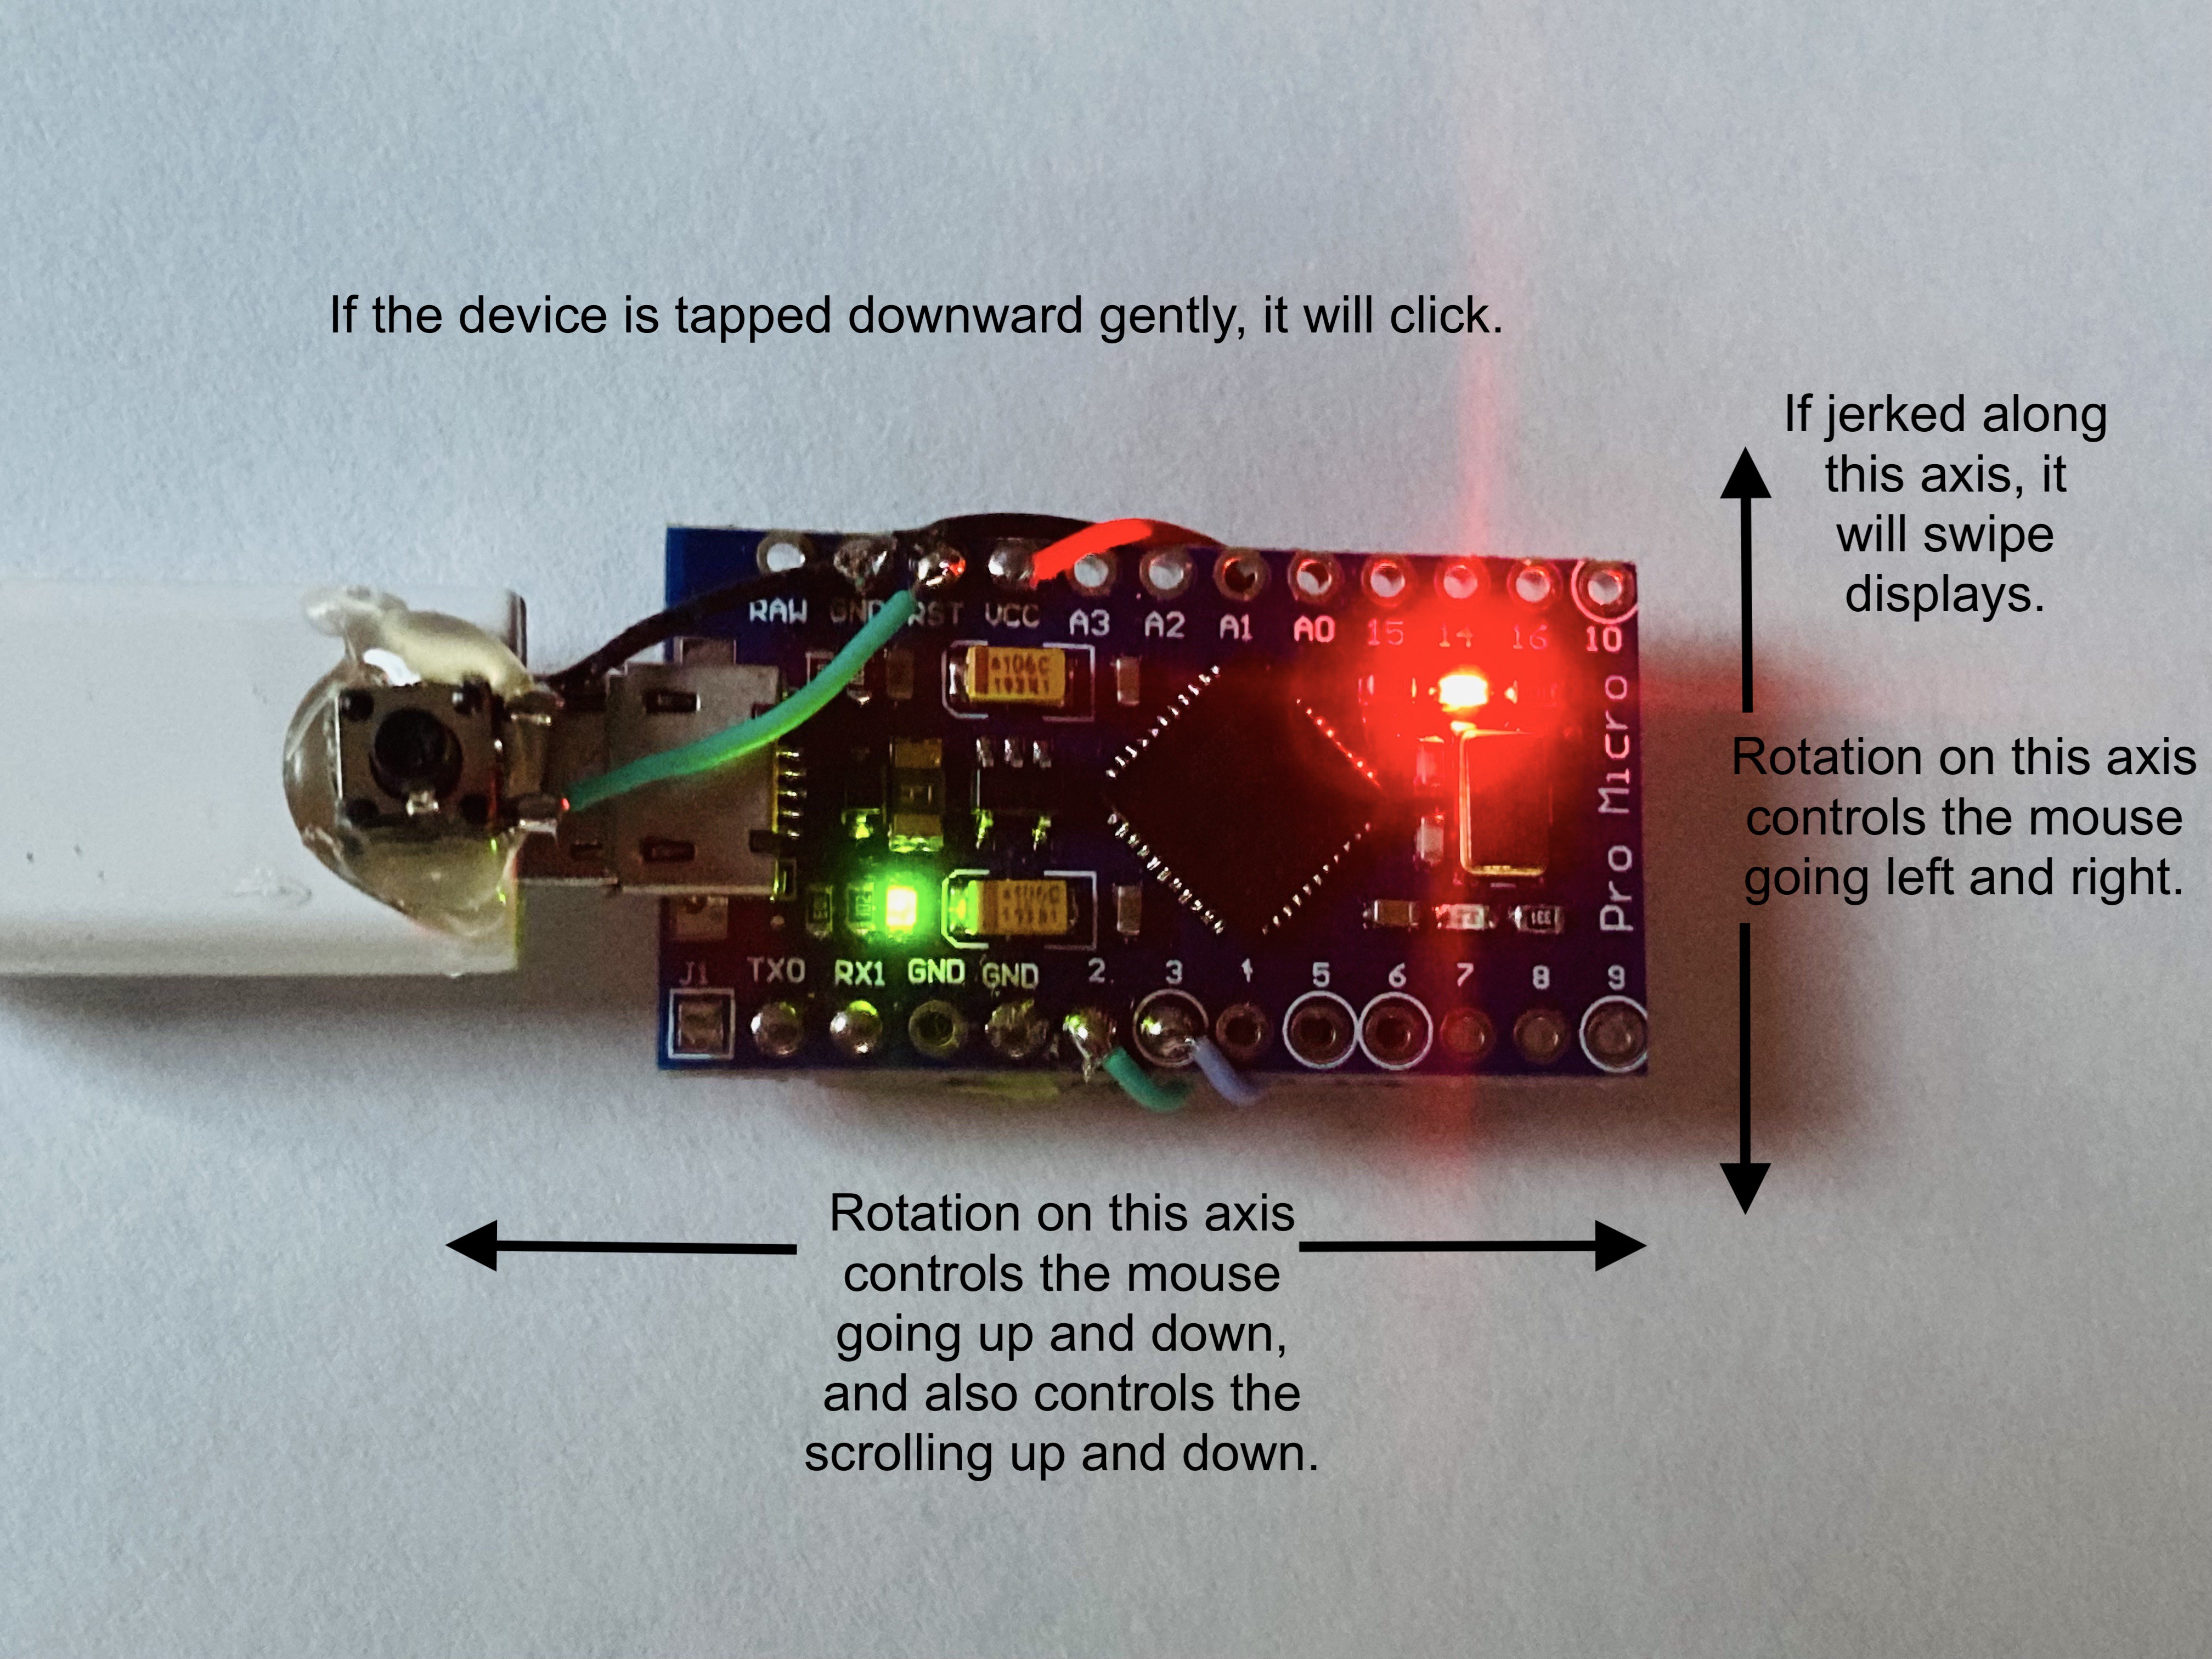
This mouse utilizes an Atmega32u4 microcontroller and a MPU-6050 accelerometer and gyroscope.
The microcontroller gathers the data from the accelerometer / gyroscope, and uses it to move and control the mouse on your personal computer!
Wiring / Schematic
The wiring is simple; only 4 wires.
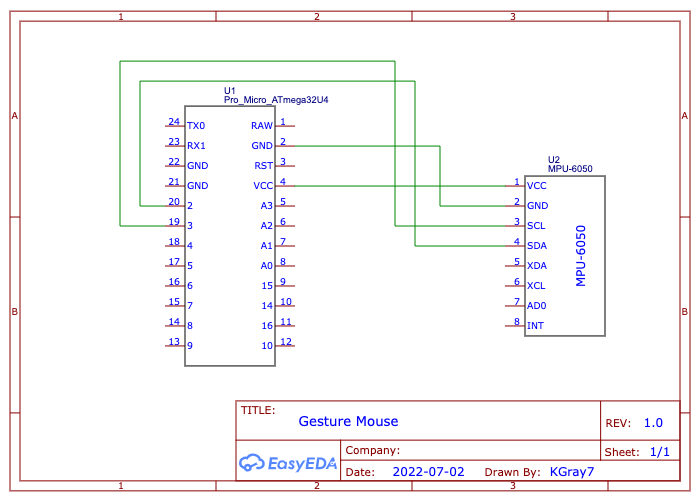
Atmega32u4 - MPU-6050
VCC - VCC
GND - GND
2 - SDA
3 - SCL
The I2C is unusual on the Atmega32u4 microcontroller, with the I2C pins being pin 2 and 3, vs. the normal A4 and A5.
The Code
Code link: https://github.com/Kgray44/Gesture-Mouse
WARNING: This code will take over control of your mouse and keyboard! The mouse and keyboard built-in to your computer will still work though at the same time.
#include <MPU6050_light.h>
#include <Wire.h>
#include <Mouse.h>
#include <Keyboard.h>
First we include the libraries needed; Wire.h and MPU6050_light.h for the gyroscope / accelerometer, and mouse.h and keyboard.h for controlling the computer.
float Ythreshhold = 5.00; //degrees; for mouse
float Xthreshhold = 5.00; //degrees; for mouse
float Xthreshholdtop = 30.00; //degrees; for mouse
float Ythreshholdtop = 40.00; //degrees; for mouse
float clickThreshhold = 1.65; //accel value; for clicking
float scrollthreshhold = 30.00; //degrees; same as Xangle; i.e. Xthreshholdtop
float switchdesktopthreshhold = 350.00; //gyro value; swiping between desktops
These are all the adjustable variables for controlling the mouse. Each is explained beside it.
int clickcounter;
boolean isClicked = false;

float gyroZ;
float accelZ;
float Xangle, Yangle, Zangle;

int timer;
These are the rest of the variables we need, to store the incoming data, and for a couple other things.
MPU6050 mpu(Wire);
Here, a library instance is declared for the MPU6050.
void setup(){
  Mouse.begin();
  Keyboard.begin();

  Serial.begin(115200);
  delay(1000);

  Wire.begin();

  byte status = mpu.begin();
  Serial.print(F("MPU6050 status: "));
  Serial.println(status);
  mpu.calcOffsets(true,true); // gyro and accelero
}
In void setup(), first, the mouse and keyboard are started. Then the serial port; useful for debugging. Then Wire is started (used for the MPU6050), and the MPU6050 is started and calibrated.
  mpu.update();

  Xangle = mpu.getAngleX();
  Yangle = mpu.getAngleY();
  Zangle = mpu.getAngleZ();
  accelZ = mpu.getAccZ();
  gyroZ = mpu.getGyroZ();

  Serial.println("Xangle: " + String(Xangle) + " Yangle: " + String(Yangle) + " Zangle: " + String(Zangle) + " AccelZ: " + String(accelZ) + " gyroZ: " + String(gyroZ));
First, in void loop(), the mpu is updated, and the data gathered and stored. The last line prints all of the incoming data to the serial monitor on 115200baud (useful for debugging).
  if ((abs(Xangle) > Xthreshhold && abs(Xangle) < Xthreshholdtop) || (abs(Yangle) > Ythreshhold && abs(Yangle) < Ythreshholdtop)){
    Mouse.move(map(Yangle,5,15,0,2),map(Xangle,5,12,0,2));
  }
This first if statement controls the mouse. The absolute of the Xangle and Yangle variables is checked to make sure they are within our threshold values. If so, the mouse is moved with mapped Yangle and Angle values. You can adjust the map values to fine tune the mouse to your desires.
  if (abs(Xangle) > scrollthreshhold){
    if (Xangle < -scrollthreshhold){
      Mouse.move(0,0,-1);
      delay(map(Xangle,-scrollthreshhold,-45,85,45));//65
    }
    else {
      Mouse.move(0,0,1);
      delay(map(Xangle,scrollthreshhold,45,85,45));//65
    }
  }
The second if statement controls the scrolling. Because the Mouse library doesn't accept float values, I used adjustable delay values to control the scrolling speed.
First, the absolute of the Xangle variable is checked to make sure it is greater than our set threshold (because the scrolling shares the Xangle variable with the mouse movement). Then, the mouse is scrolled, depending on which way the value extended beyond our threshold. The delay is set by the mapped value of Xangle, to make the scrolling speed faster the more we turn on the X axis.
  if (isClicked){
    clickcounter++;
    if (clickcounter == 20){
      isClicked = false;
      clickcounter = 0;
    }
  }
This if function increments a counter if we have swiped to the next display, to make sure that we don't swipe too many times, on accident. You can adjust the clickcounter == 20 number to whatever you like.
  if ((abs(accelZ) > clickThreshhold)){
    if (accelZ < -clickThreshhold){
      Mouse.click(MOUSE_RIGHT);
      while (accelZ < -clickThreshhold){
        mpu.update();
        accelZ = mpu.getAccZ();
        Serial.println("AccelZ: " + String(accelZ));
      }
      delay(100);
    }
    else if (accelZ > clickThreshhold){
      Mouse.click(MOUSE_LEFT);
      while (accelZ > clickThreshhold){
        mpu.update();
        accelZ = mpu.getAccZ();
        Serial.println("AccelZ: " + String(accelZ));
      }
      delay(100);
    }
  }
This if statement controls the mouse clicking. The left clicking is finicky at the writing of this tutorial, so if you have any ideas to improve it, please post in the comments!
First, the absolute value of accelZ is checked to see if it is inside our constraints. Then, depending on the direction of the accelZ variable, the mouse is either right clicked, or left clicked.
  if (abs(gyroZ) > switchdesktopthreshhold && clickcounter == 0){//Yangle
   if (gyroZ < -switchdesktopthreshhold){
      Keyboard.press(128);
      Keyboard.press(215);
      Keyboard.releaseAll();
    }
    else {
      Keyboard.press(128);
      Keyboard.press(216);
      Keyboard.releaseAll();
    }
    isClicked = true;
  }
This function controls the swiping feature. The keyboard ASCII numbers for this took me a while to figure out, but I finally found it! Depending on the gyroZ variable, the keyboard ASCII values 128 and 215 or 216 are sent, which will swipe to the next display one a Mac. I found these helpful websites for ASCII numbers:
https://www.arduino.cc/reference/en/language/functions/usb/keyboard/keyboardmodifiers/
  if (abs(Zangle) > switchdesktopthreshhold){
    timer++;
    if (timer == 50){
      mpu.calcGyroOffsets();
      delay(1000);
      Serial.println("Reset gyro");
    }
  }
  else {
    timer=0;
  }
This last function resets the gyro if it is held in a certain position over a certain amount of time.
delay(1);
Lastly, we include a delay with a value of 1, to make sure everything is steady. This value can be changed, according to what you like. If you would like a smaller value, you can use delayMicroseconds instead of delay (because delay doesn't take float values).
That is all the code!
How to Use It
Be warned, once this program is uploaded to your Atmega32u4 with MPU6050, your mouse will be taken over.
In the Arduino IDE, the board must be set to "Arduino Leonardo". Once you have programmed the Atmega32u4 with the code found in the GitHub repository, you must hold the device steady and level, until the red light on the board turns on (this calibrates the MPU6050). If you would like your mouse to react differently, you can hold it at different angles at startup, and the MPU6050 will set all values to 0 at that position.
Wrapping Up
That was all for this tutorial! If you liked it, please give it a thumbs up! If you have any questions, please post in the comments below!
Check out my other tutorials here: