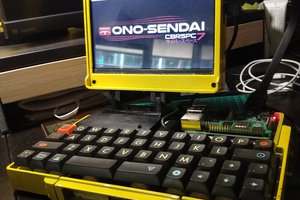
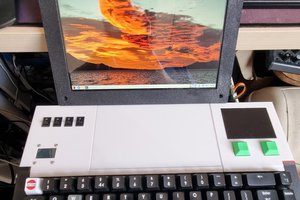
Greetings all! This is my take on a Raspberry Pi-based laptop. Can I call it a cyberdeck? That seems to be in vogue, so I will.
I was originally going to go x86/amd64 with one of these shelled but: 1) It was well-worn and had a loose hdmi port, in soldering that on I ended up loosening some of the solder beads under the eMMC memory and the computer blue-screened when it heated up (which I found out after forcibly removing the eMMC chip when disposing of the unit) and 2) I used the screen for a computer status display, which I came to like and didn’t want to disassemble. Could I have bought new (and ebayed) ones to make a slimmer and arguably better laptop? Sure, but then I’d be spending another $150-$200 on this project that I didn’t want to. If you’re interested in a build with components like that, I’d highly recommend this build log from sudomod.
Back to the pi! I had the following materials sitting around from other projects:
- Pi 4 8gb model – I bought this for $75 in 2019/2020…you can still get it for that if you live by a Microcenter
- Osyoo 5 inch screen - ~$50…the viewing angles aren’t the best (unless they changed the screen to IPS in the past couple of years) but it’s one of the best smaller DSP screens on the market imho
- 4000 mah lipo battery – for this project it’s critical you use something with 7mm height…I have higher capacity batteries with 11 mm height, but then I’d have needed to make a new bottom and didn’t want to
- 30-gauge stranded silicone coated wires – I love these and you can find rolls on amazon for cheap
- 5-pin switching headphone jack – originally these were going to have speakers…I opted not to install those
- 30 mm fan
- teensy lc – for the kb…I’d recommend going with something more standard like a pro micro knockoff as this was a pain to find firmware for (but I’ll link it for you so you don’t have to!)
- sd card extension cable – I wanted to be able to switch out OSes on the fly…also it seems retro to have a disk drive, so why not.
Here’s what I bought specifically for the project:
- ampripper 3000 – $25…there’s a surprising lack of 5 volt high amperage (3A) ready-made chargers. There’s also a surprising lack of chargers that also support pass-through charging. Like, I really like these as a small form factor charge/discharge board. Originally, they were marketed as a pass-through charging board, but that was a misnomer and re-reading the posting they’ve removed that. That being said, if you wire one to whatever format charging port you’re using + the battery and the other to the battery + discharge, you can make a pass-through charging setup pretty nicely.
- USB-C port breakout (just 6 pin, not 22 pin)
- pinephone keyboard - $60
- 18 pin 1mm pitch fpc to dip breakout board
I’ll start with why I chose the pinephone keyboard, because that dictated the design of the rest of the device. I knew that I wanted something small form-factor. I also didn’t want to use low-profile mechanical switches—it would take a long time to design and get a pcb (I was impatient) and I was worried handwiring for something intended to be mobile would jostle things loose. Maybe that’s silly, but it constrained my design decisions.
I also didn’t want thumb typing. I had a blackberry back in the day and while I loved that phone, it was not the best long-use typing experience. I write occasionally and wanted something I could use for that. *Spoiler and shameless plug: I’m currently making a handheld with an Xbox 360 chatpad for more portable/limited use. If you want to see that, check out my youtube channel where I’ll be doing regular build logs.*
I thought the pinephone keyboard had everything I needed (honestly, it was love at first sight when I saw it) and I’d just be able to swap out everything on the top side of the hinge for the computer module. The keyboard is insanely well documented and is supported by community volunteers (shout-out to Meji who is amazing for developing and running...
Read more »
 Steve Anderson
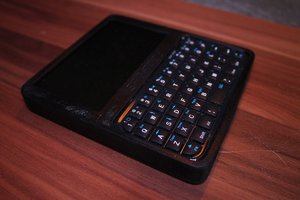
The first picture in the image gallery (and the one it uses for the list of projects) is just a close-up of the internals, so thought maybe the design wasn't completed. But pleasantly surprised when I saw that wide shot, looking great!