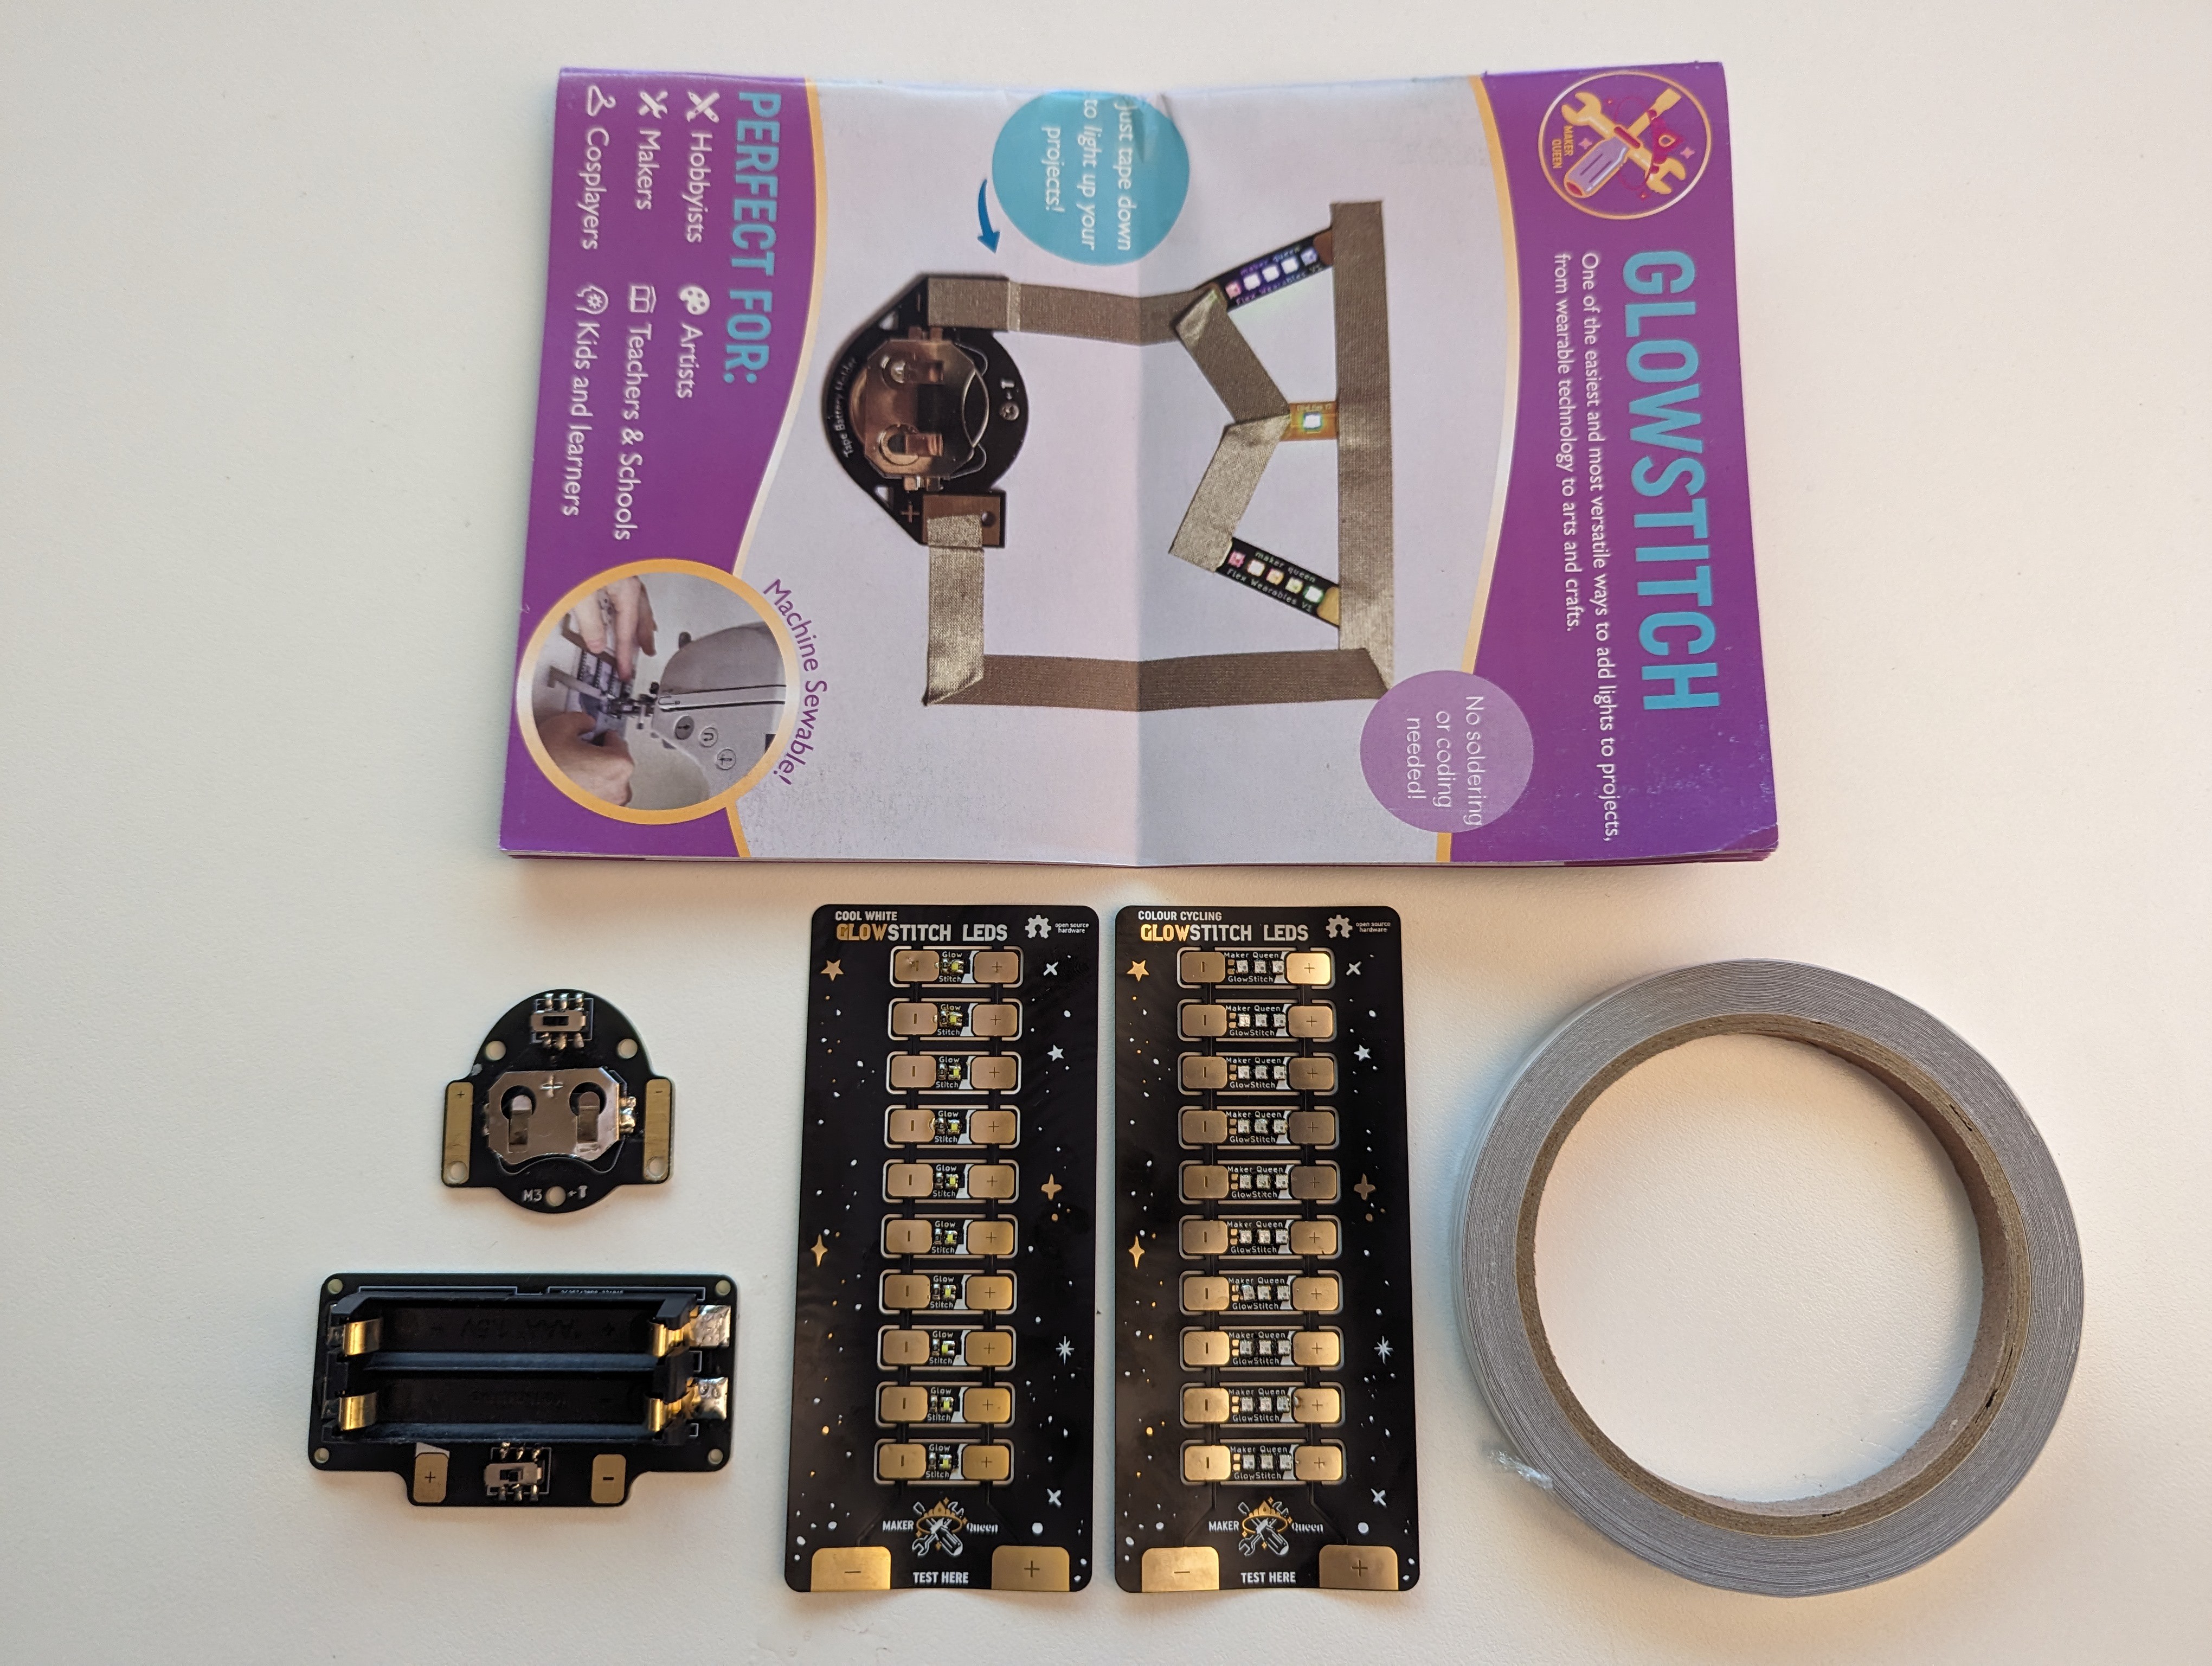
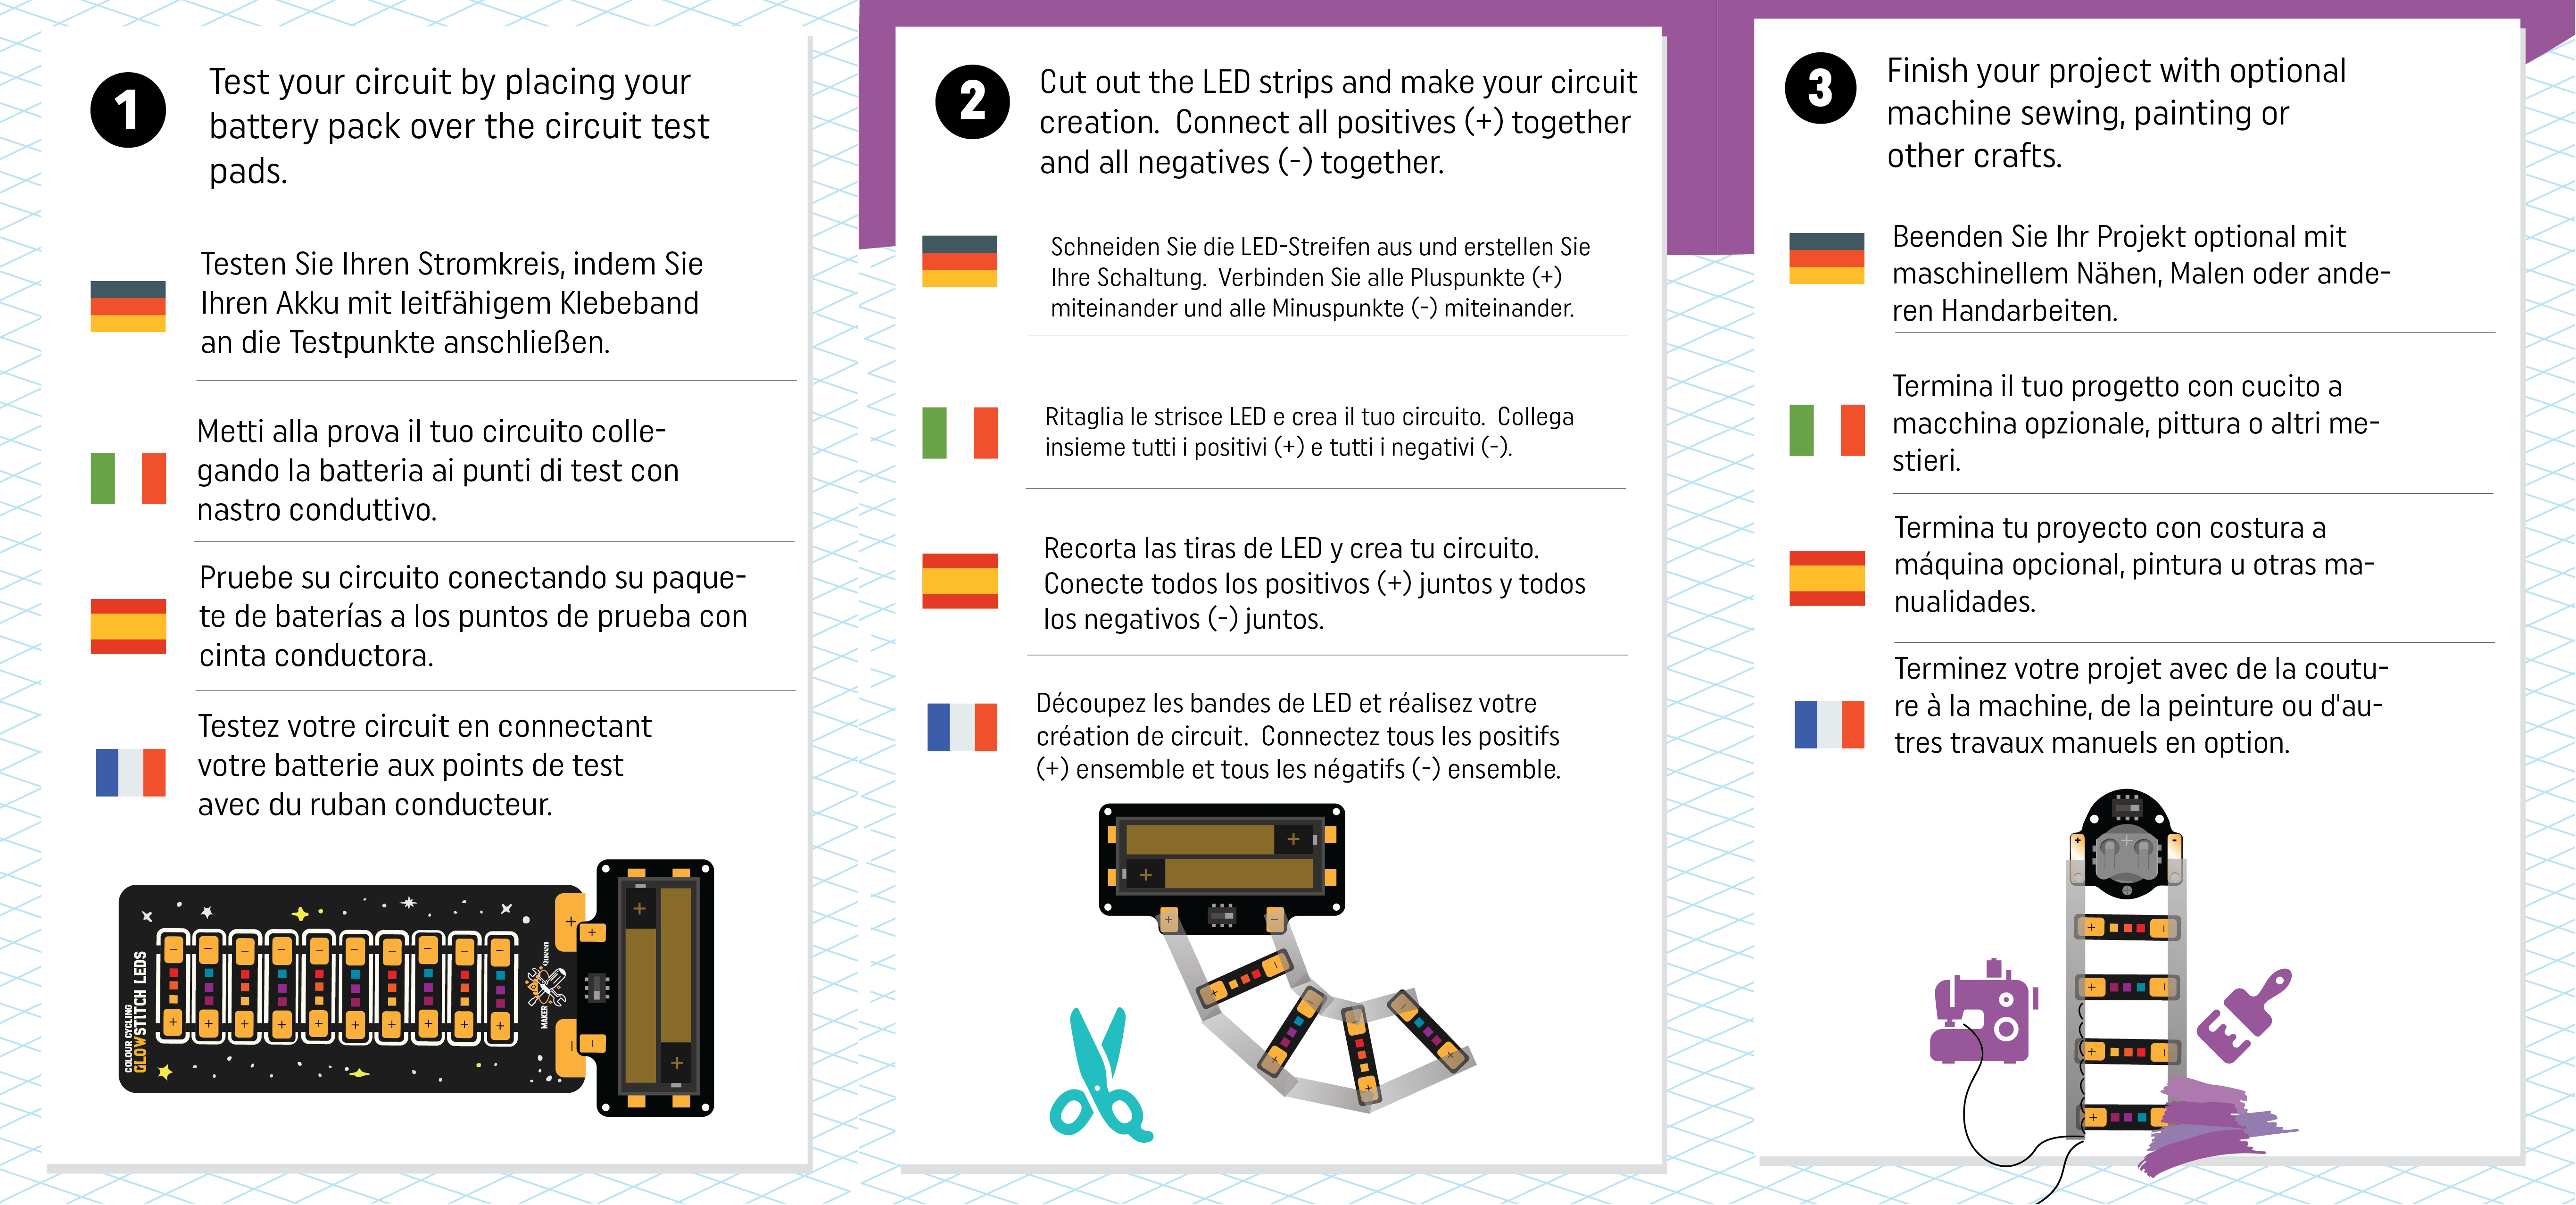
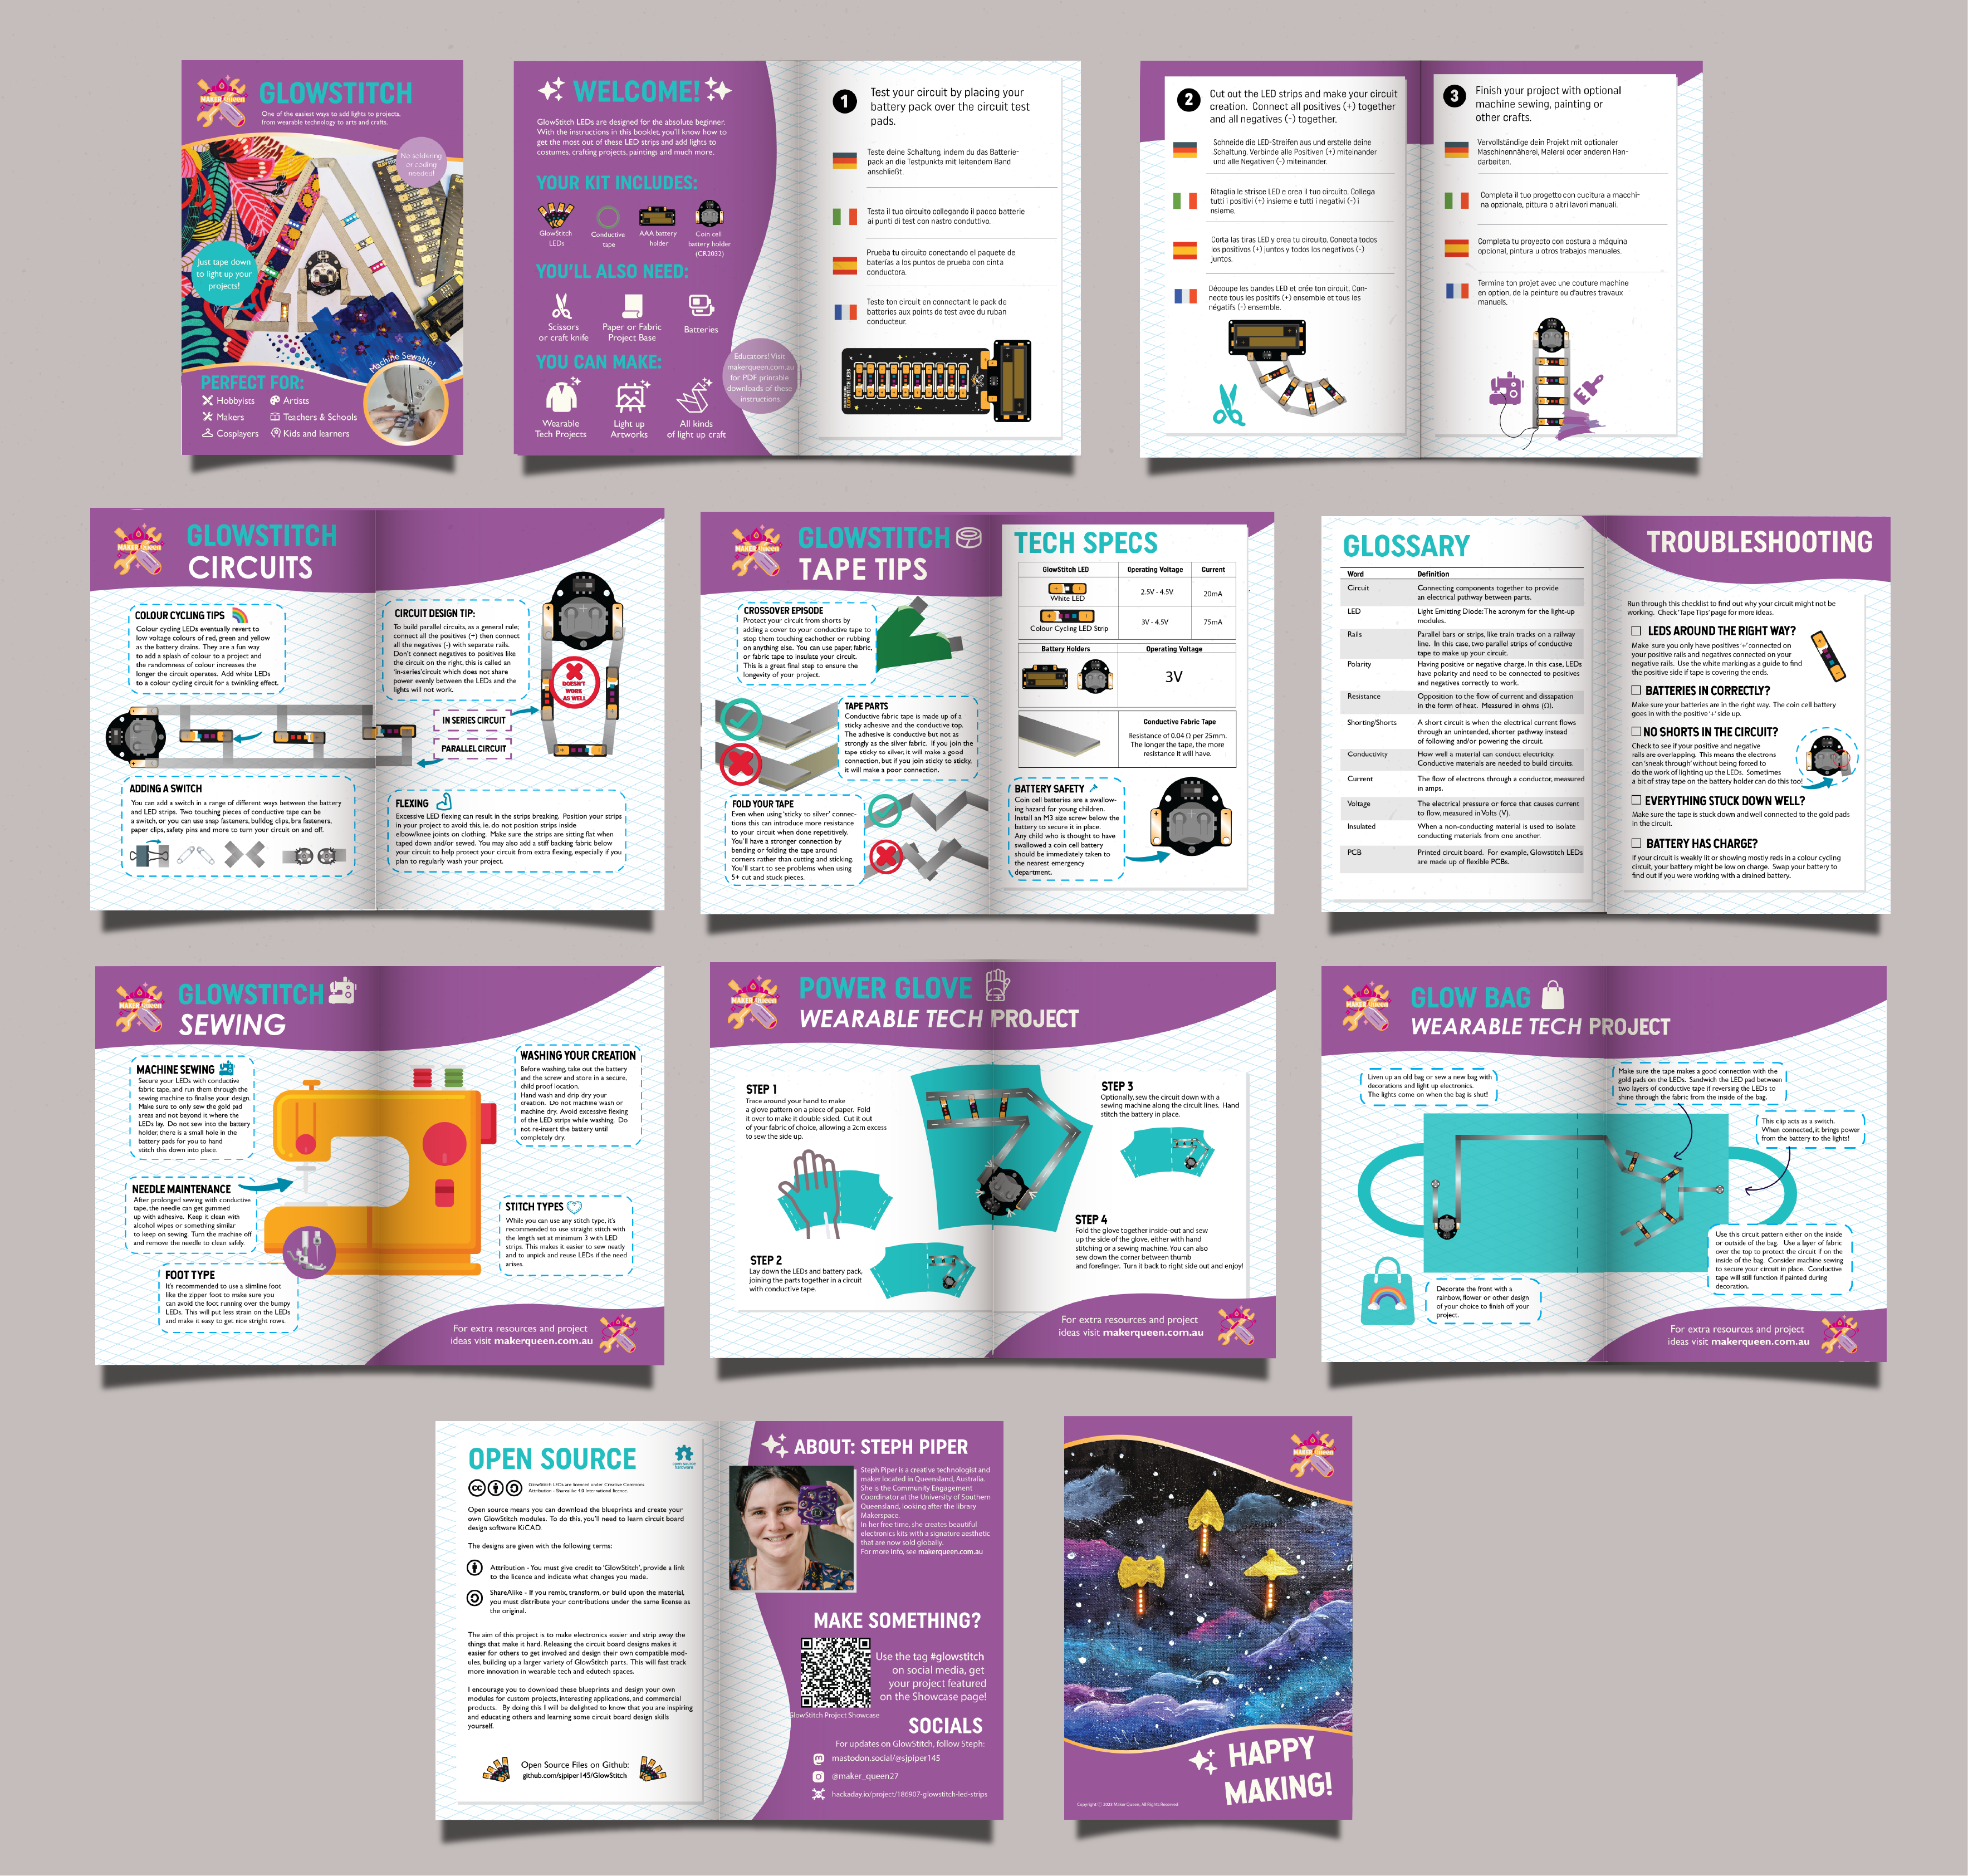
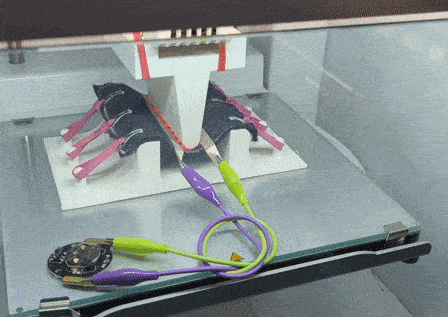
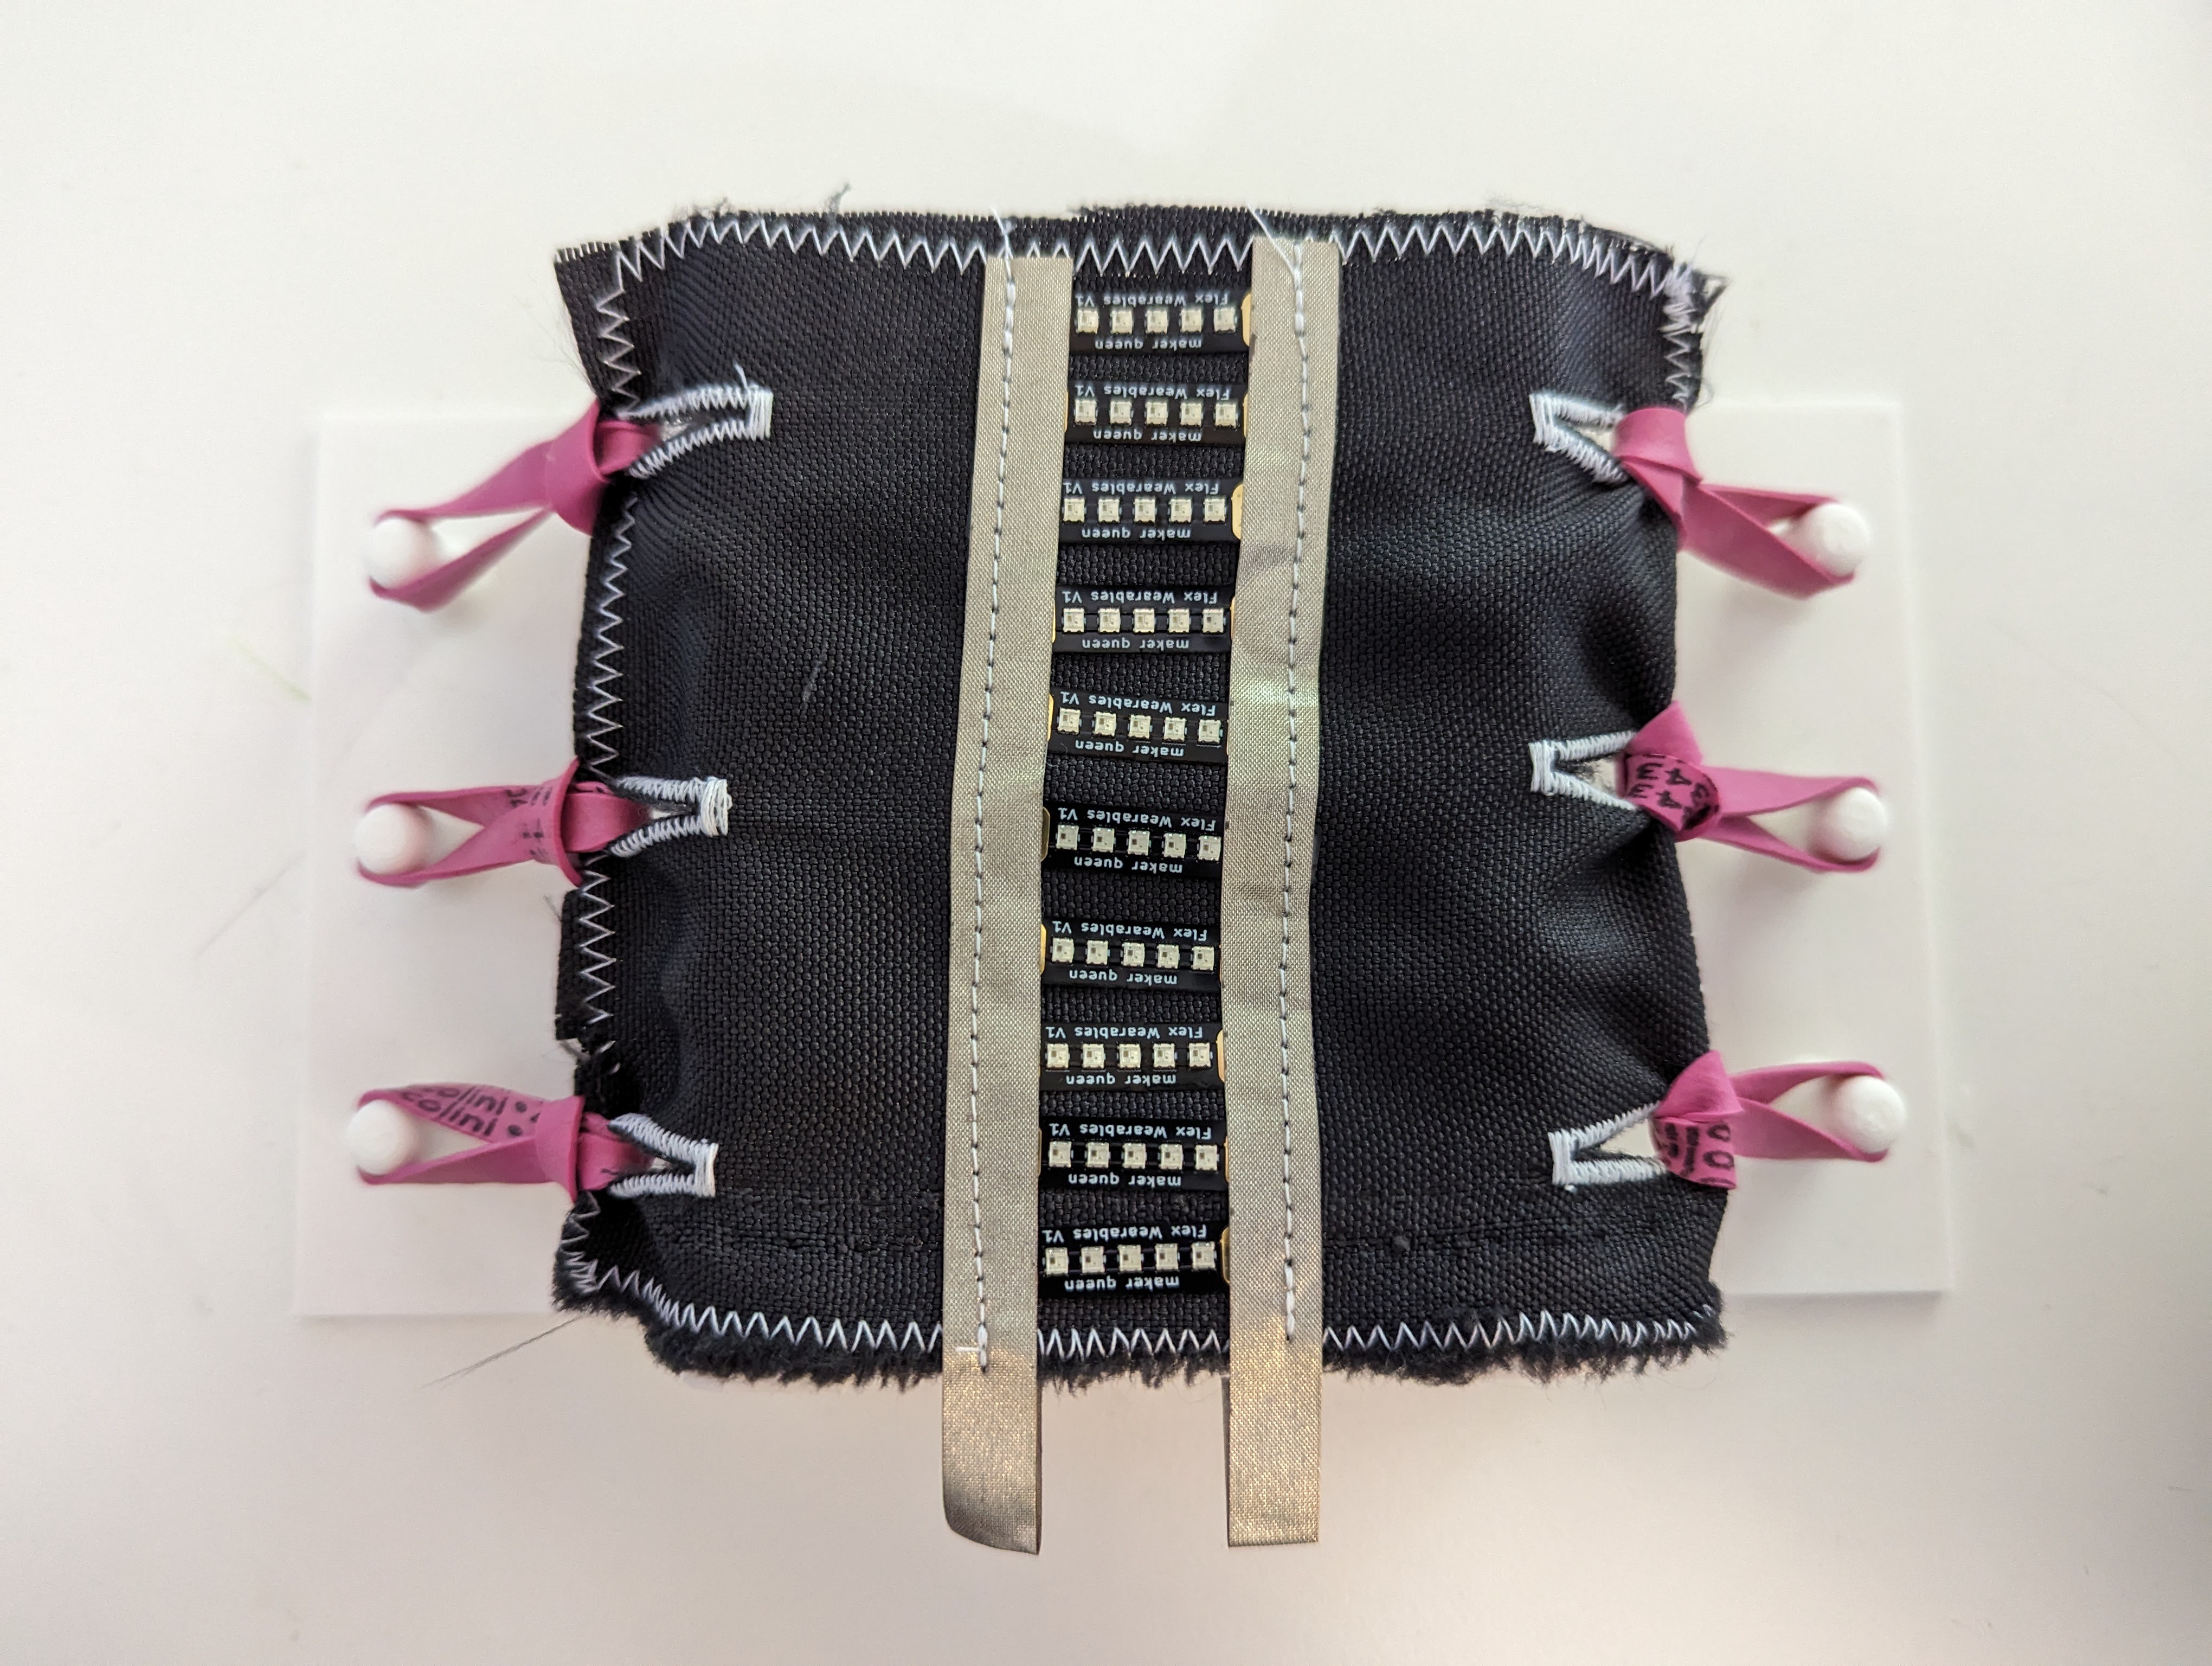
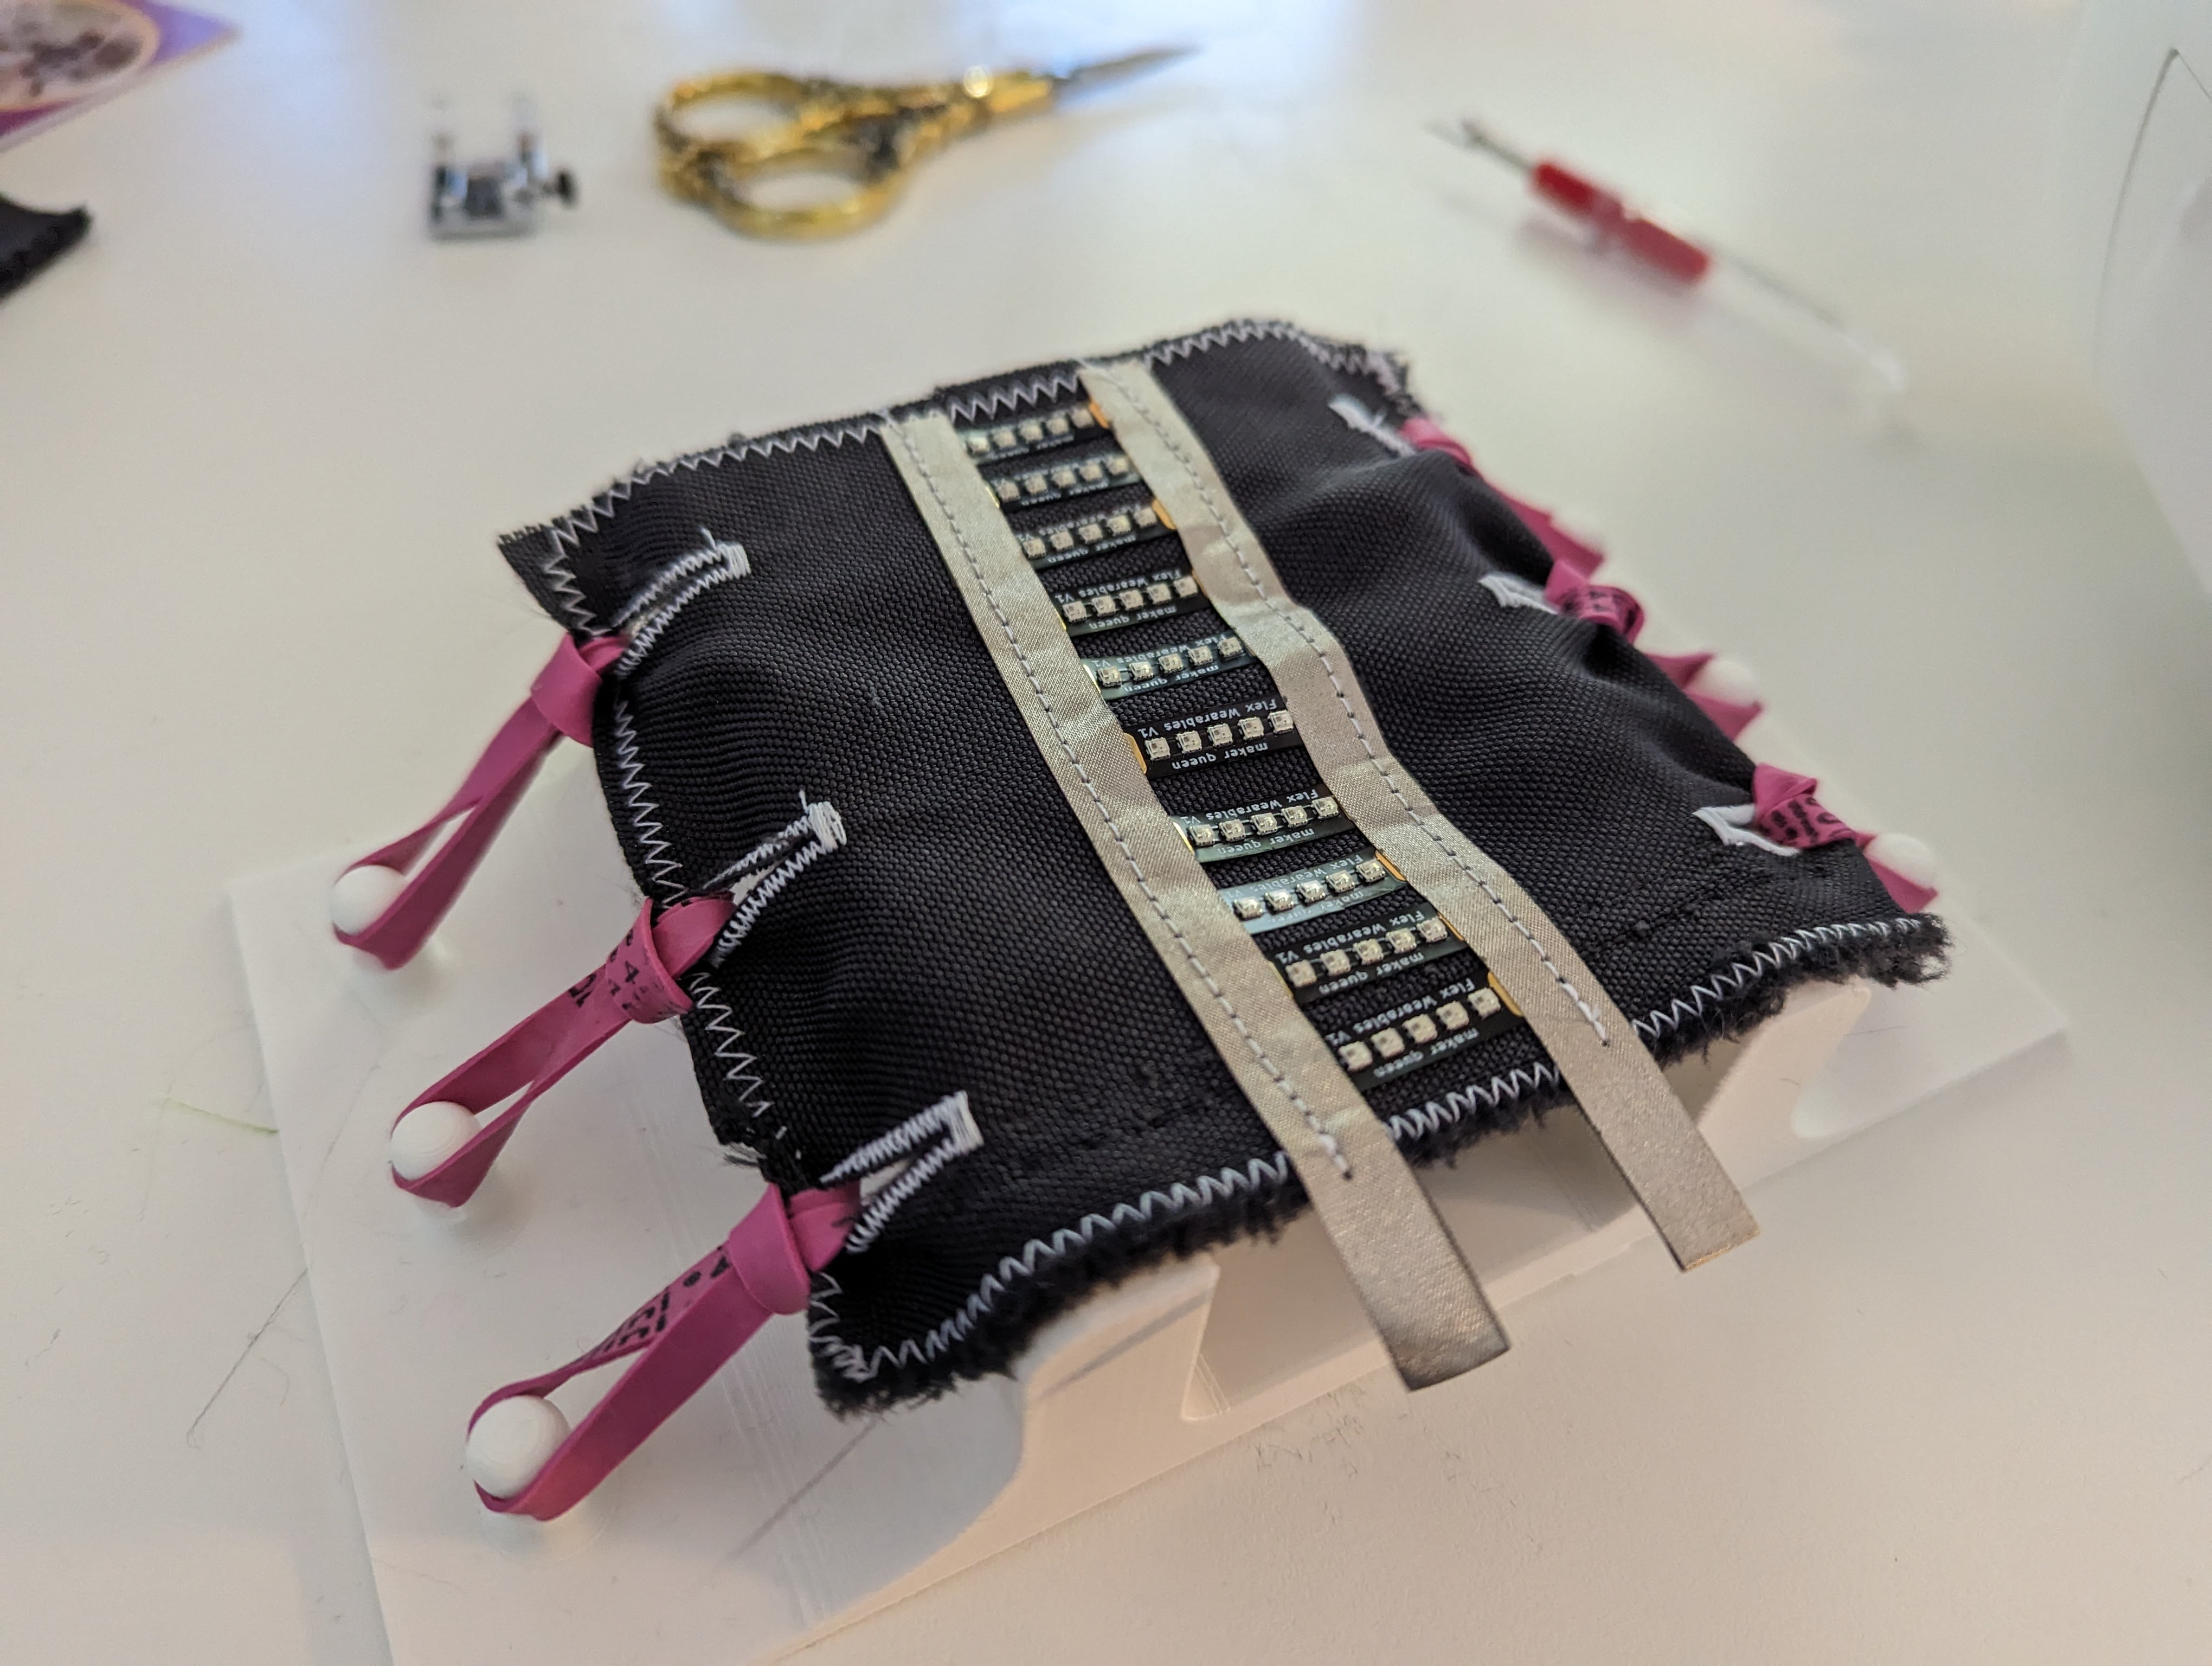
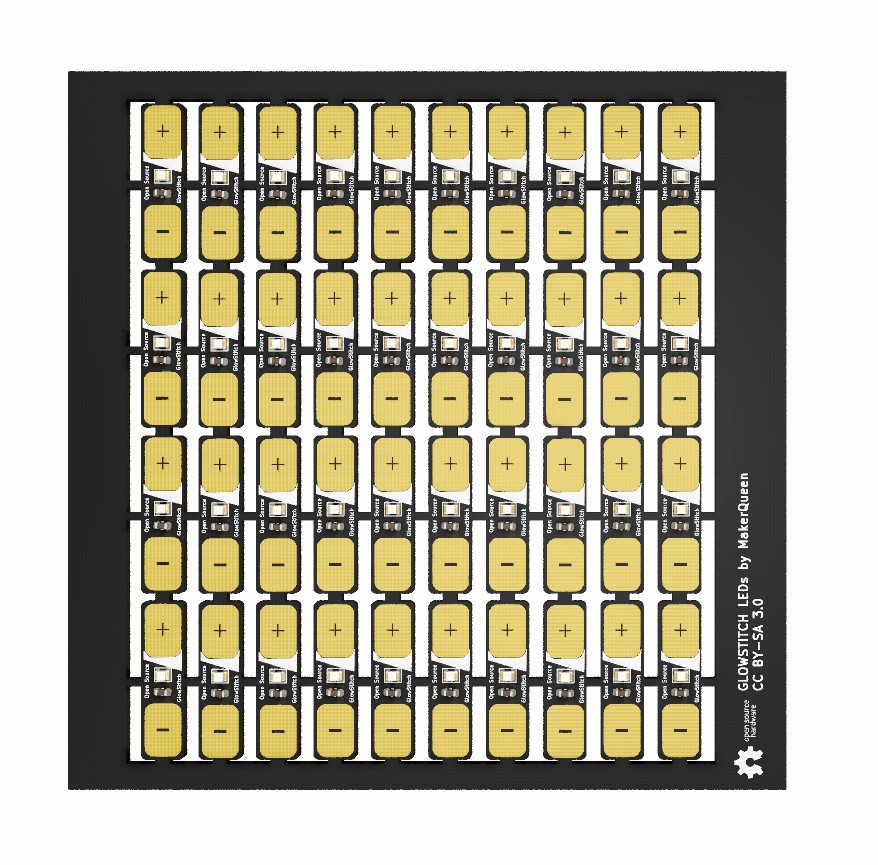
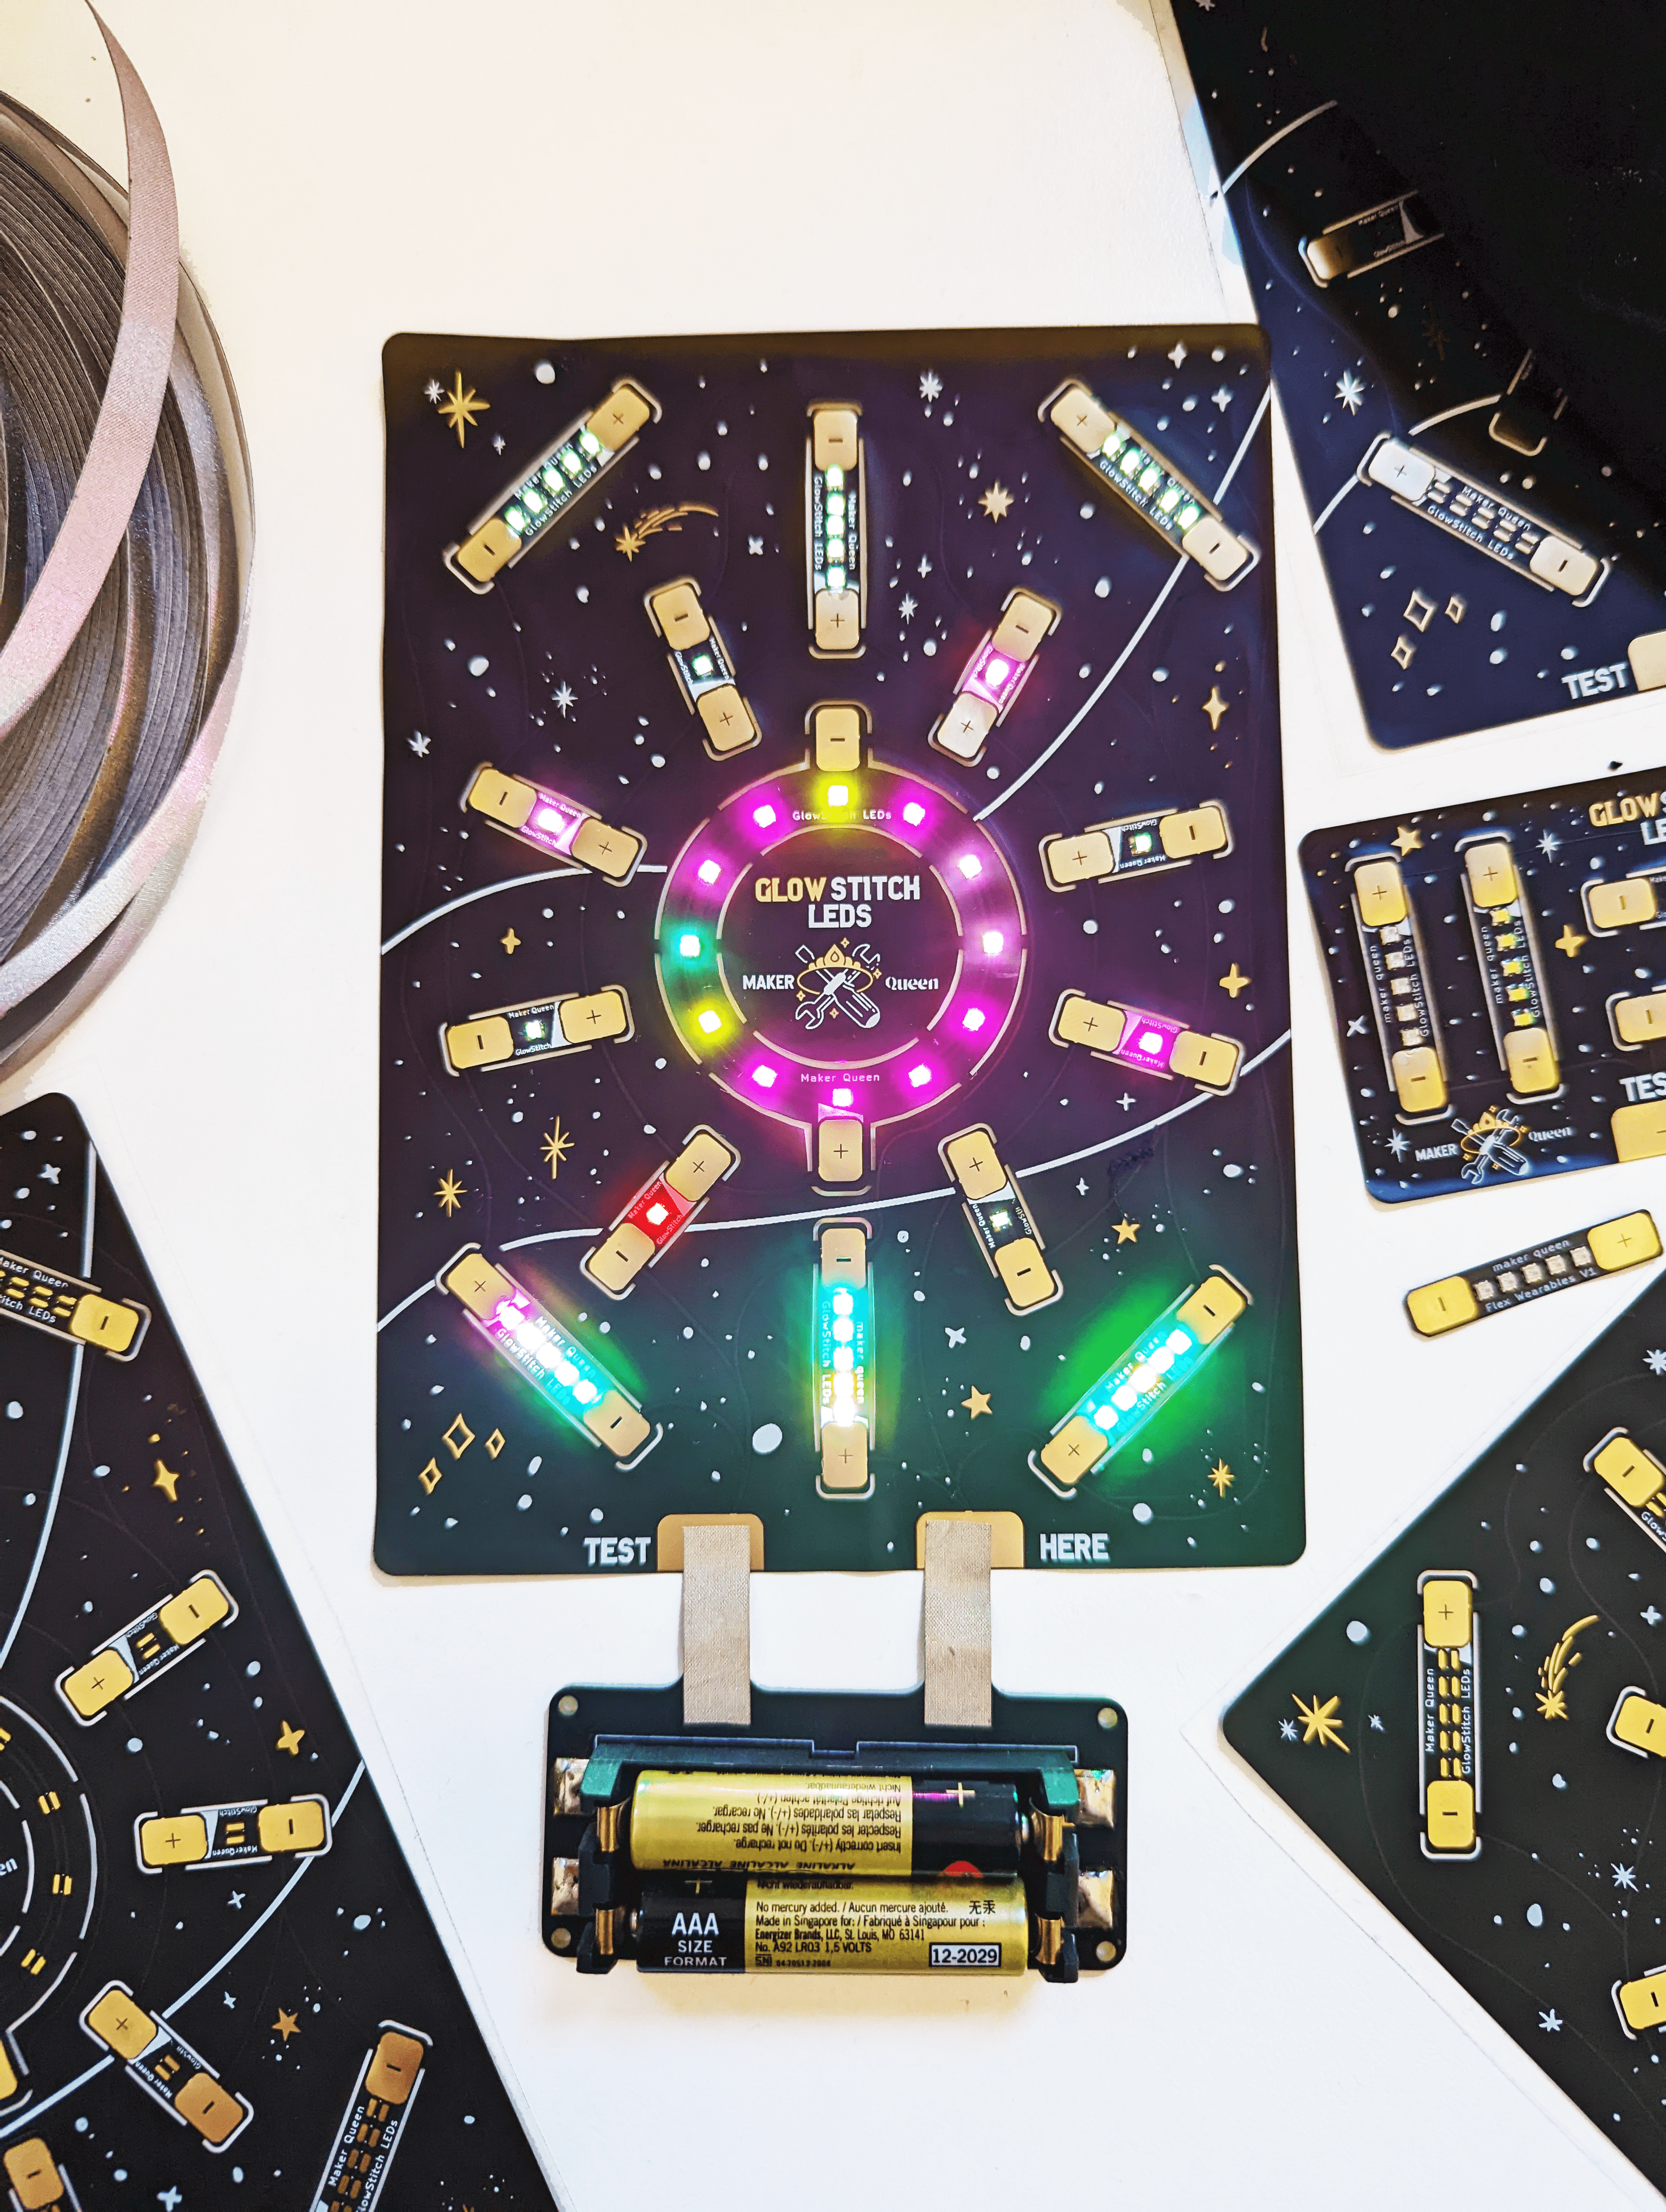
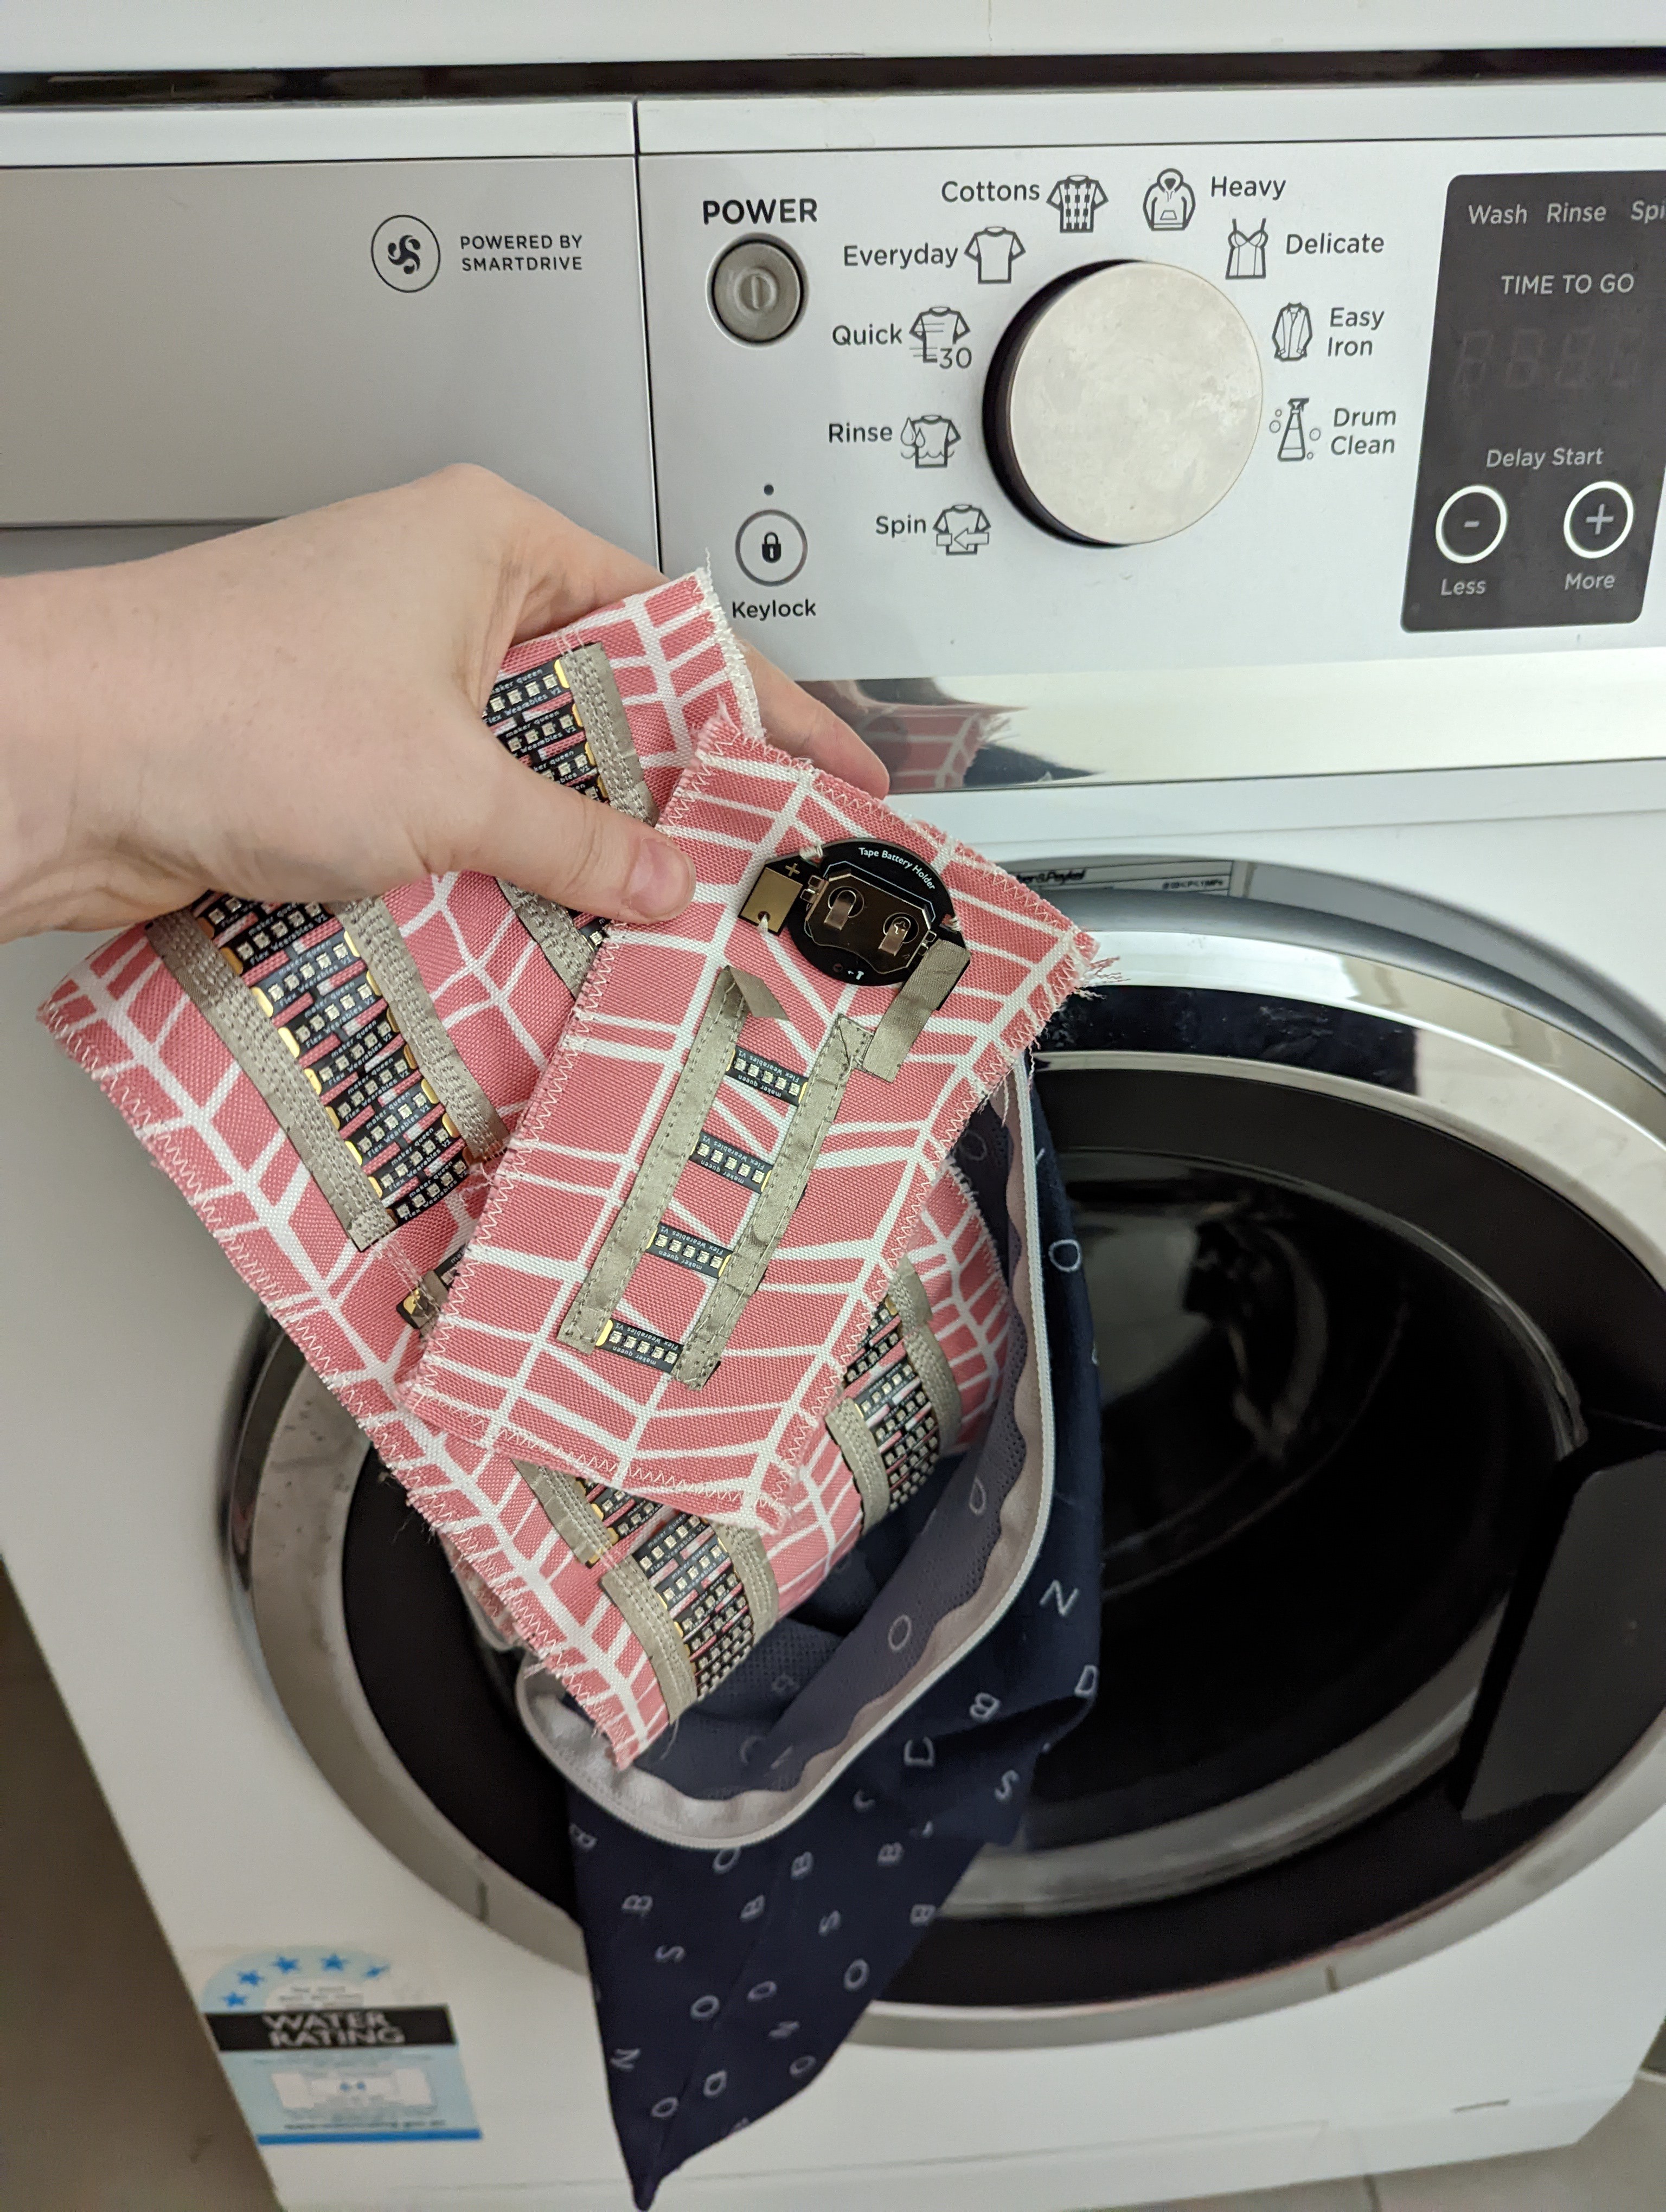
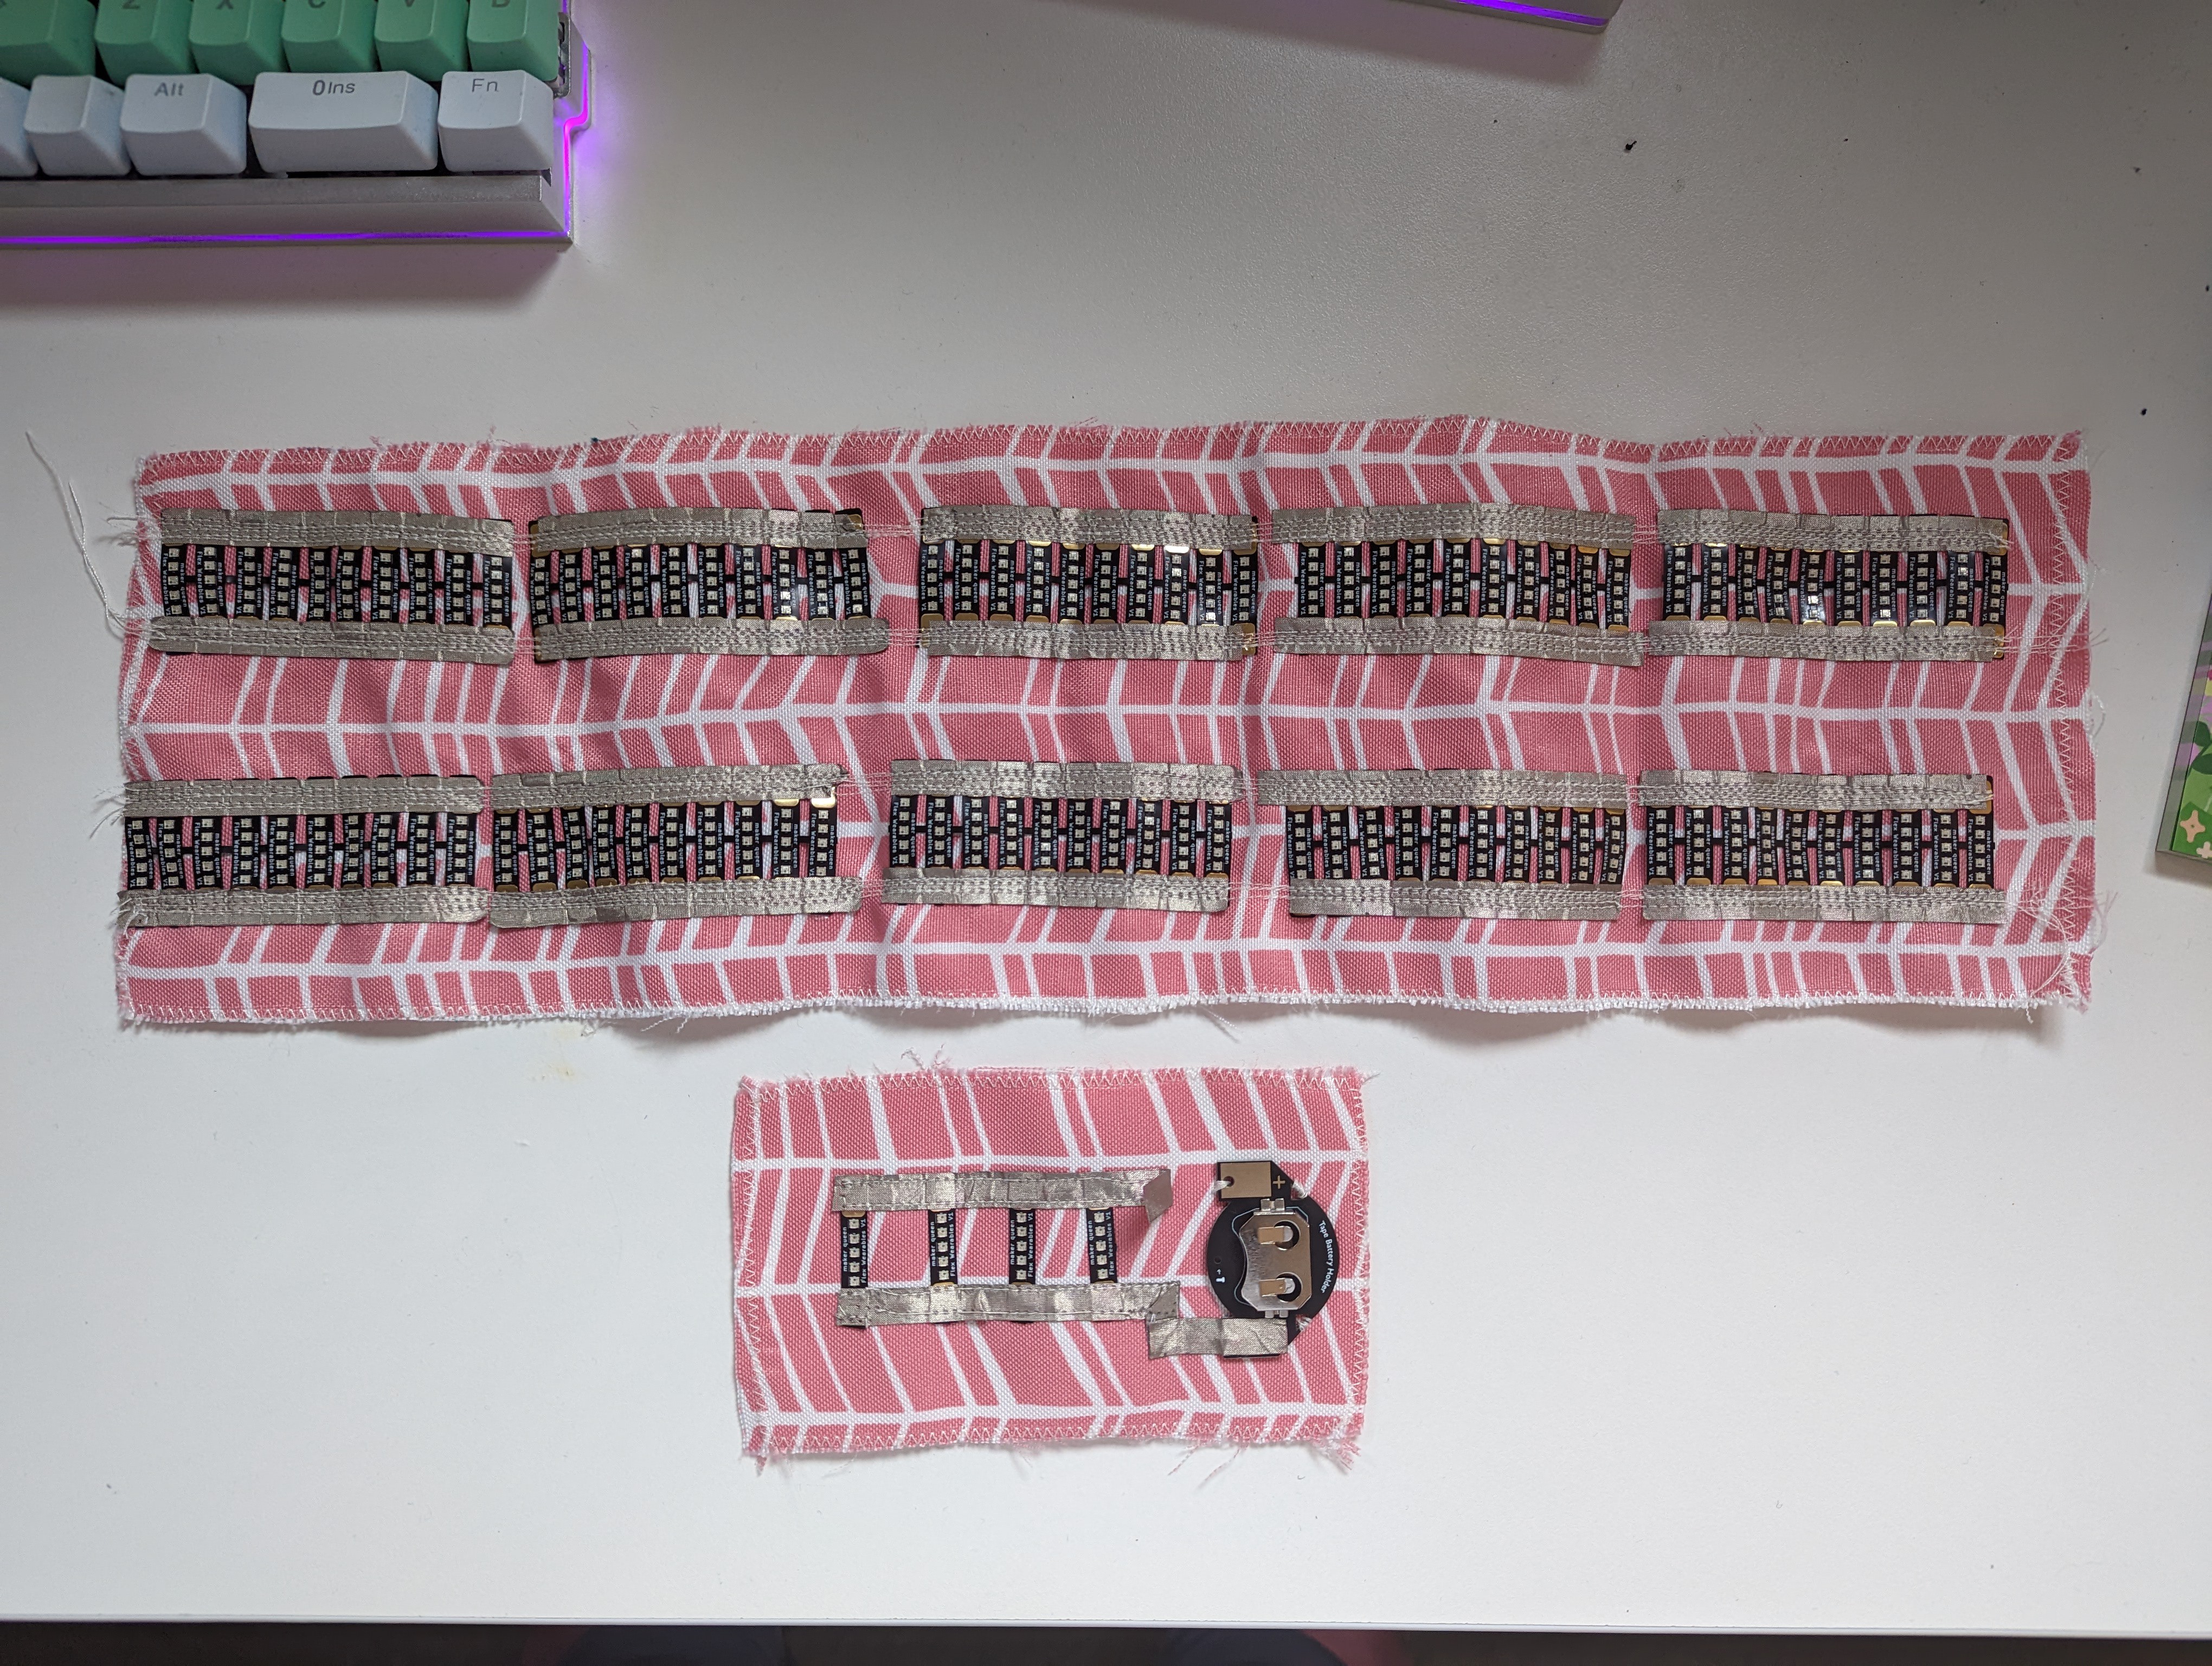
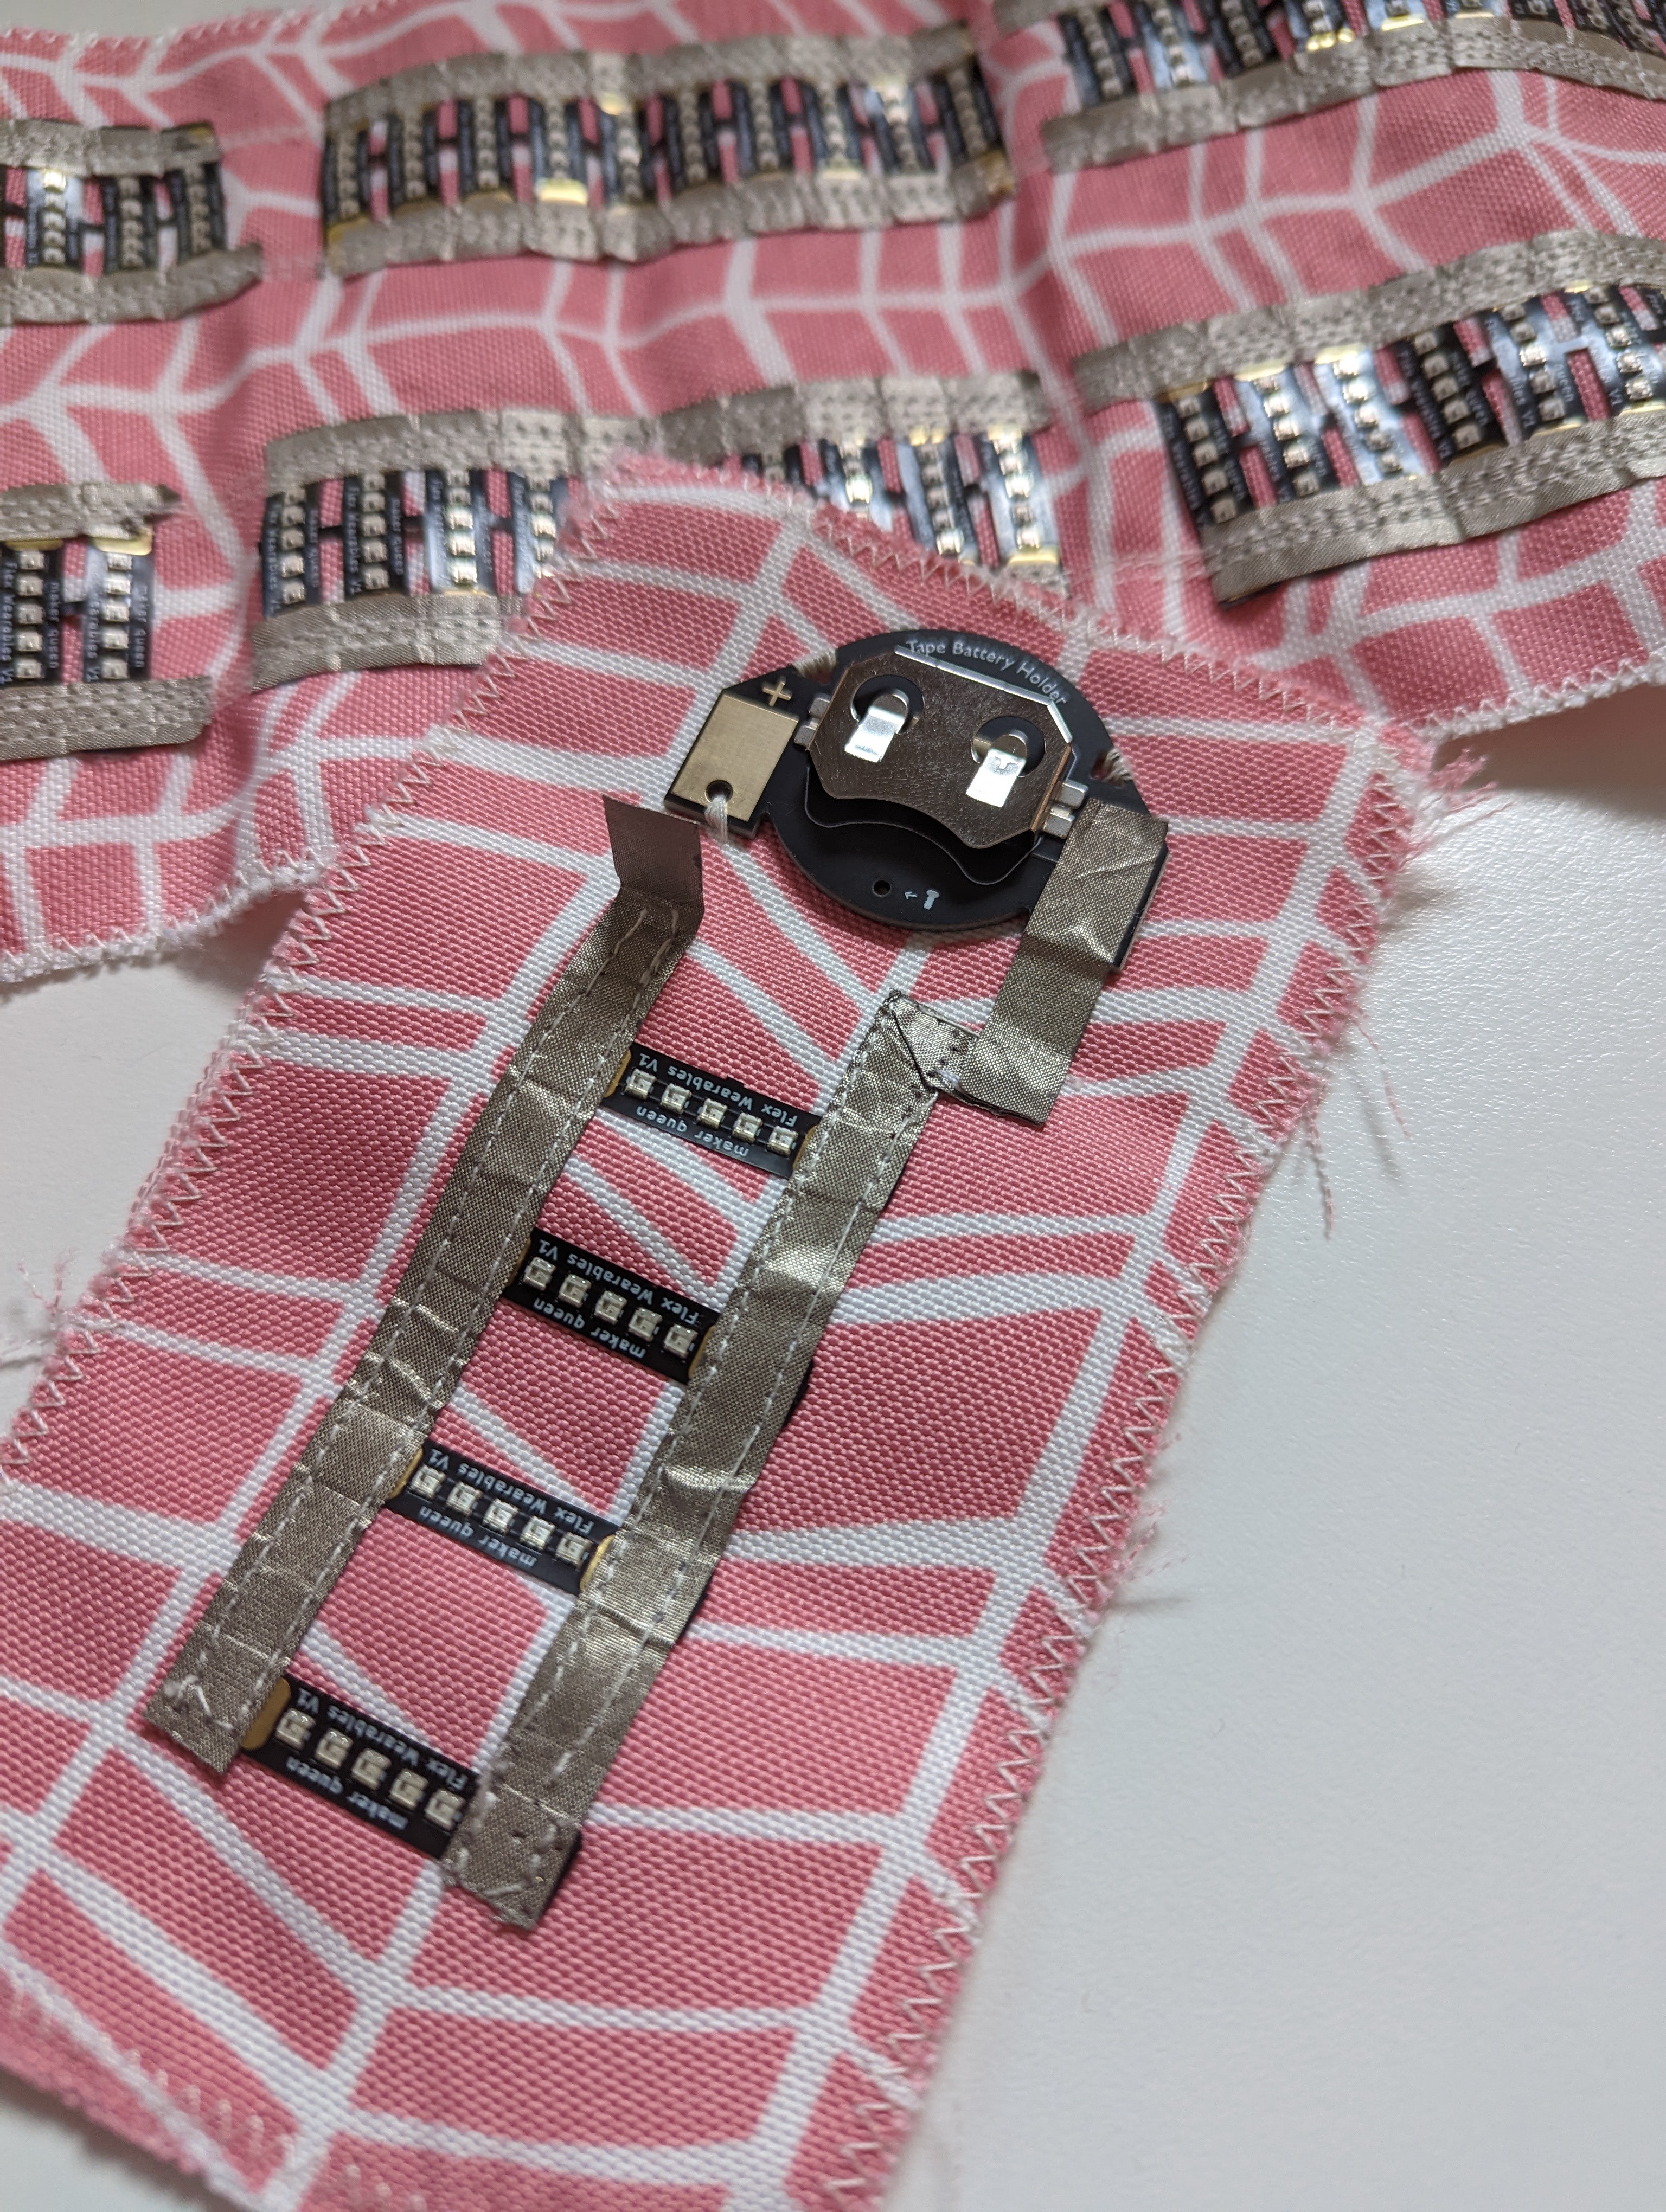
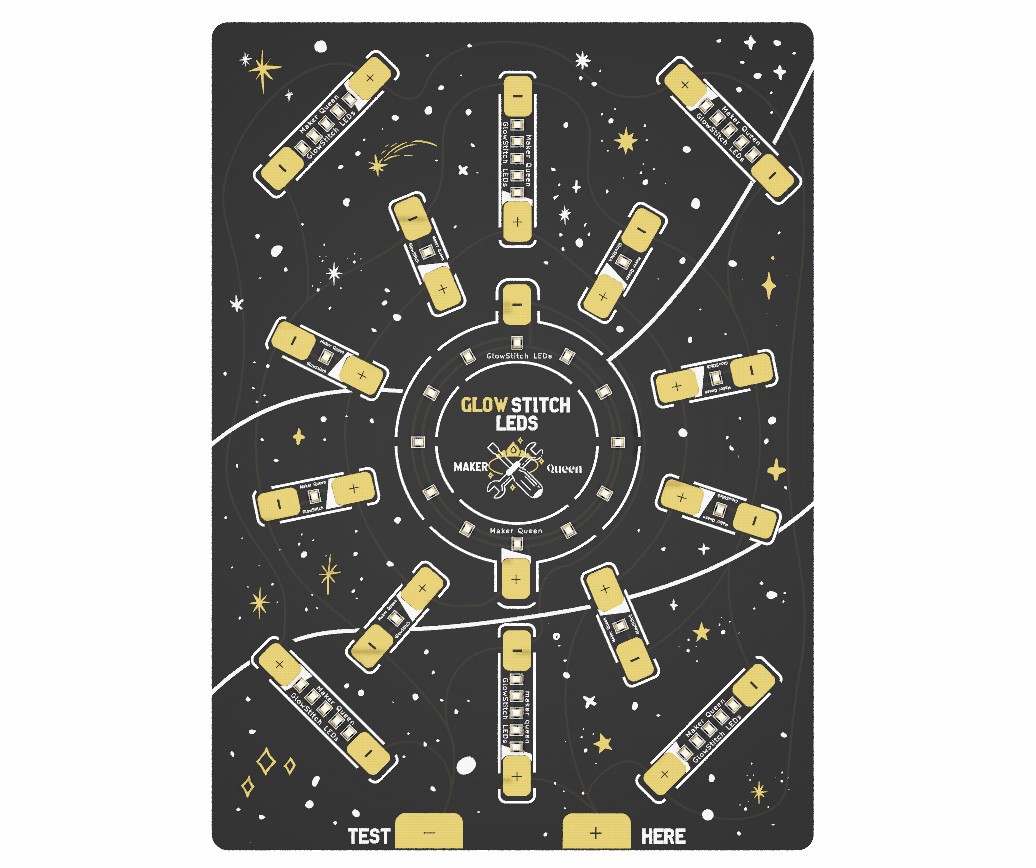
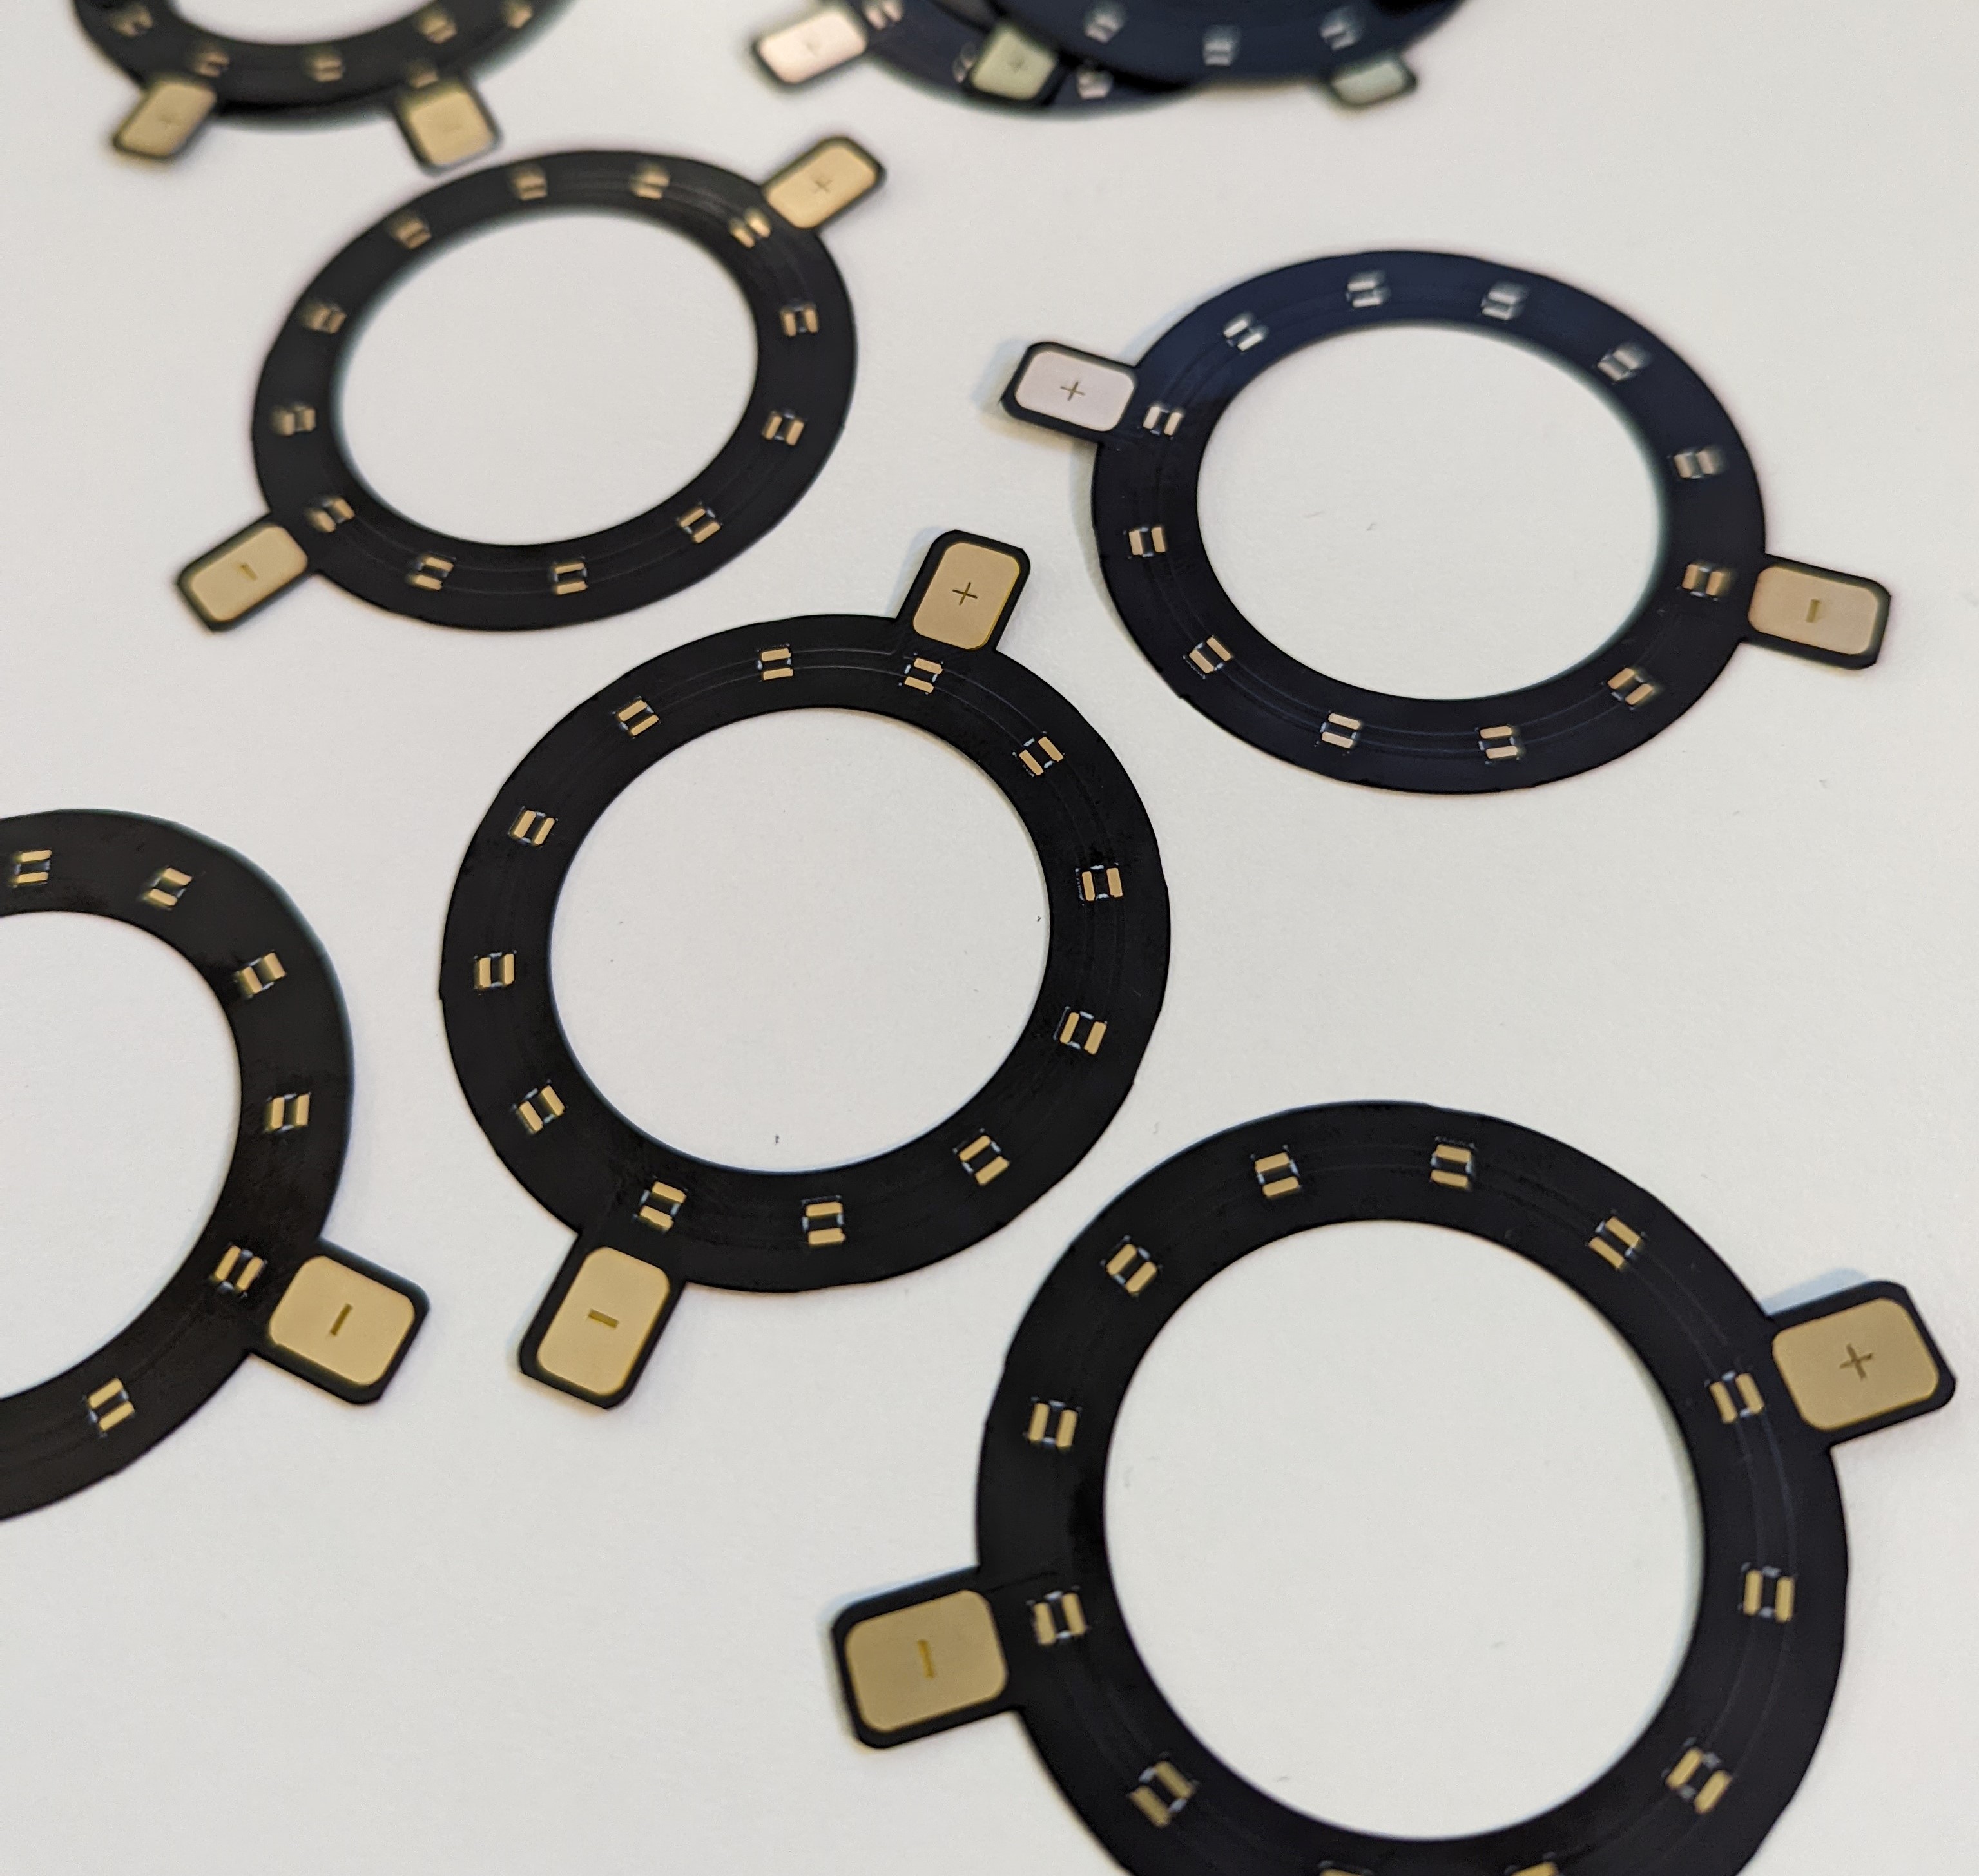
Close
0%
0%

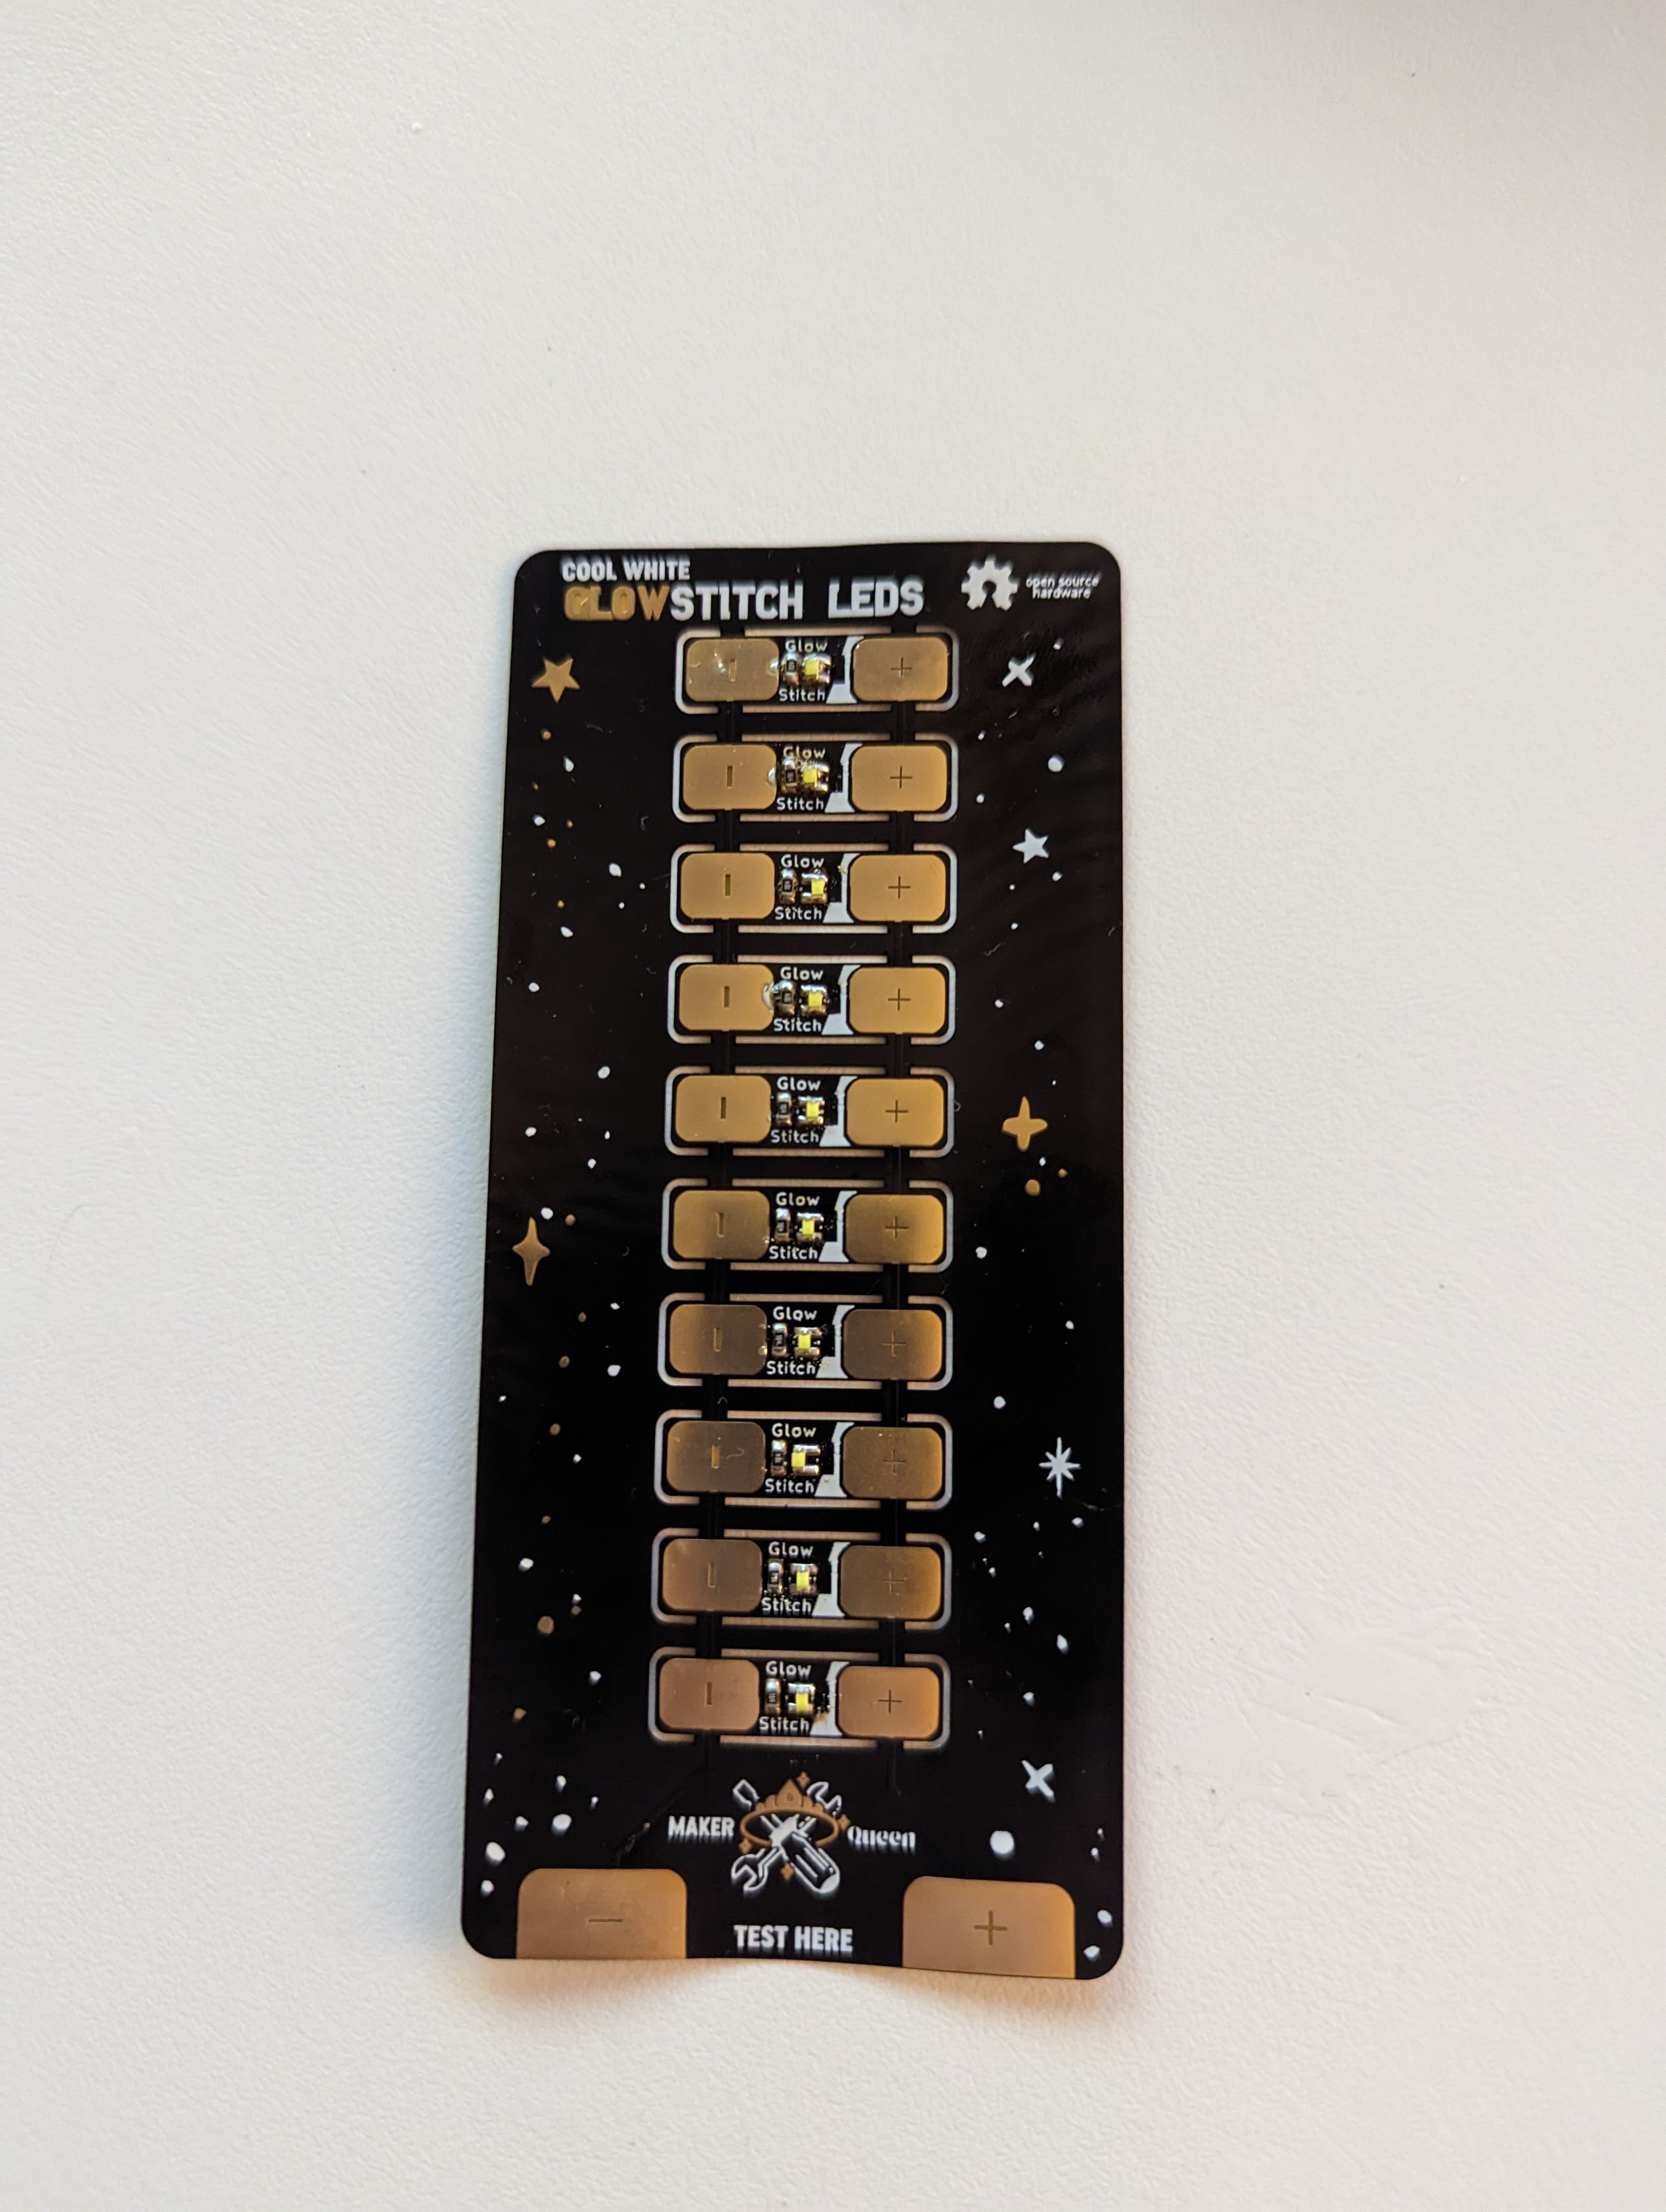
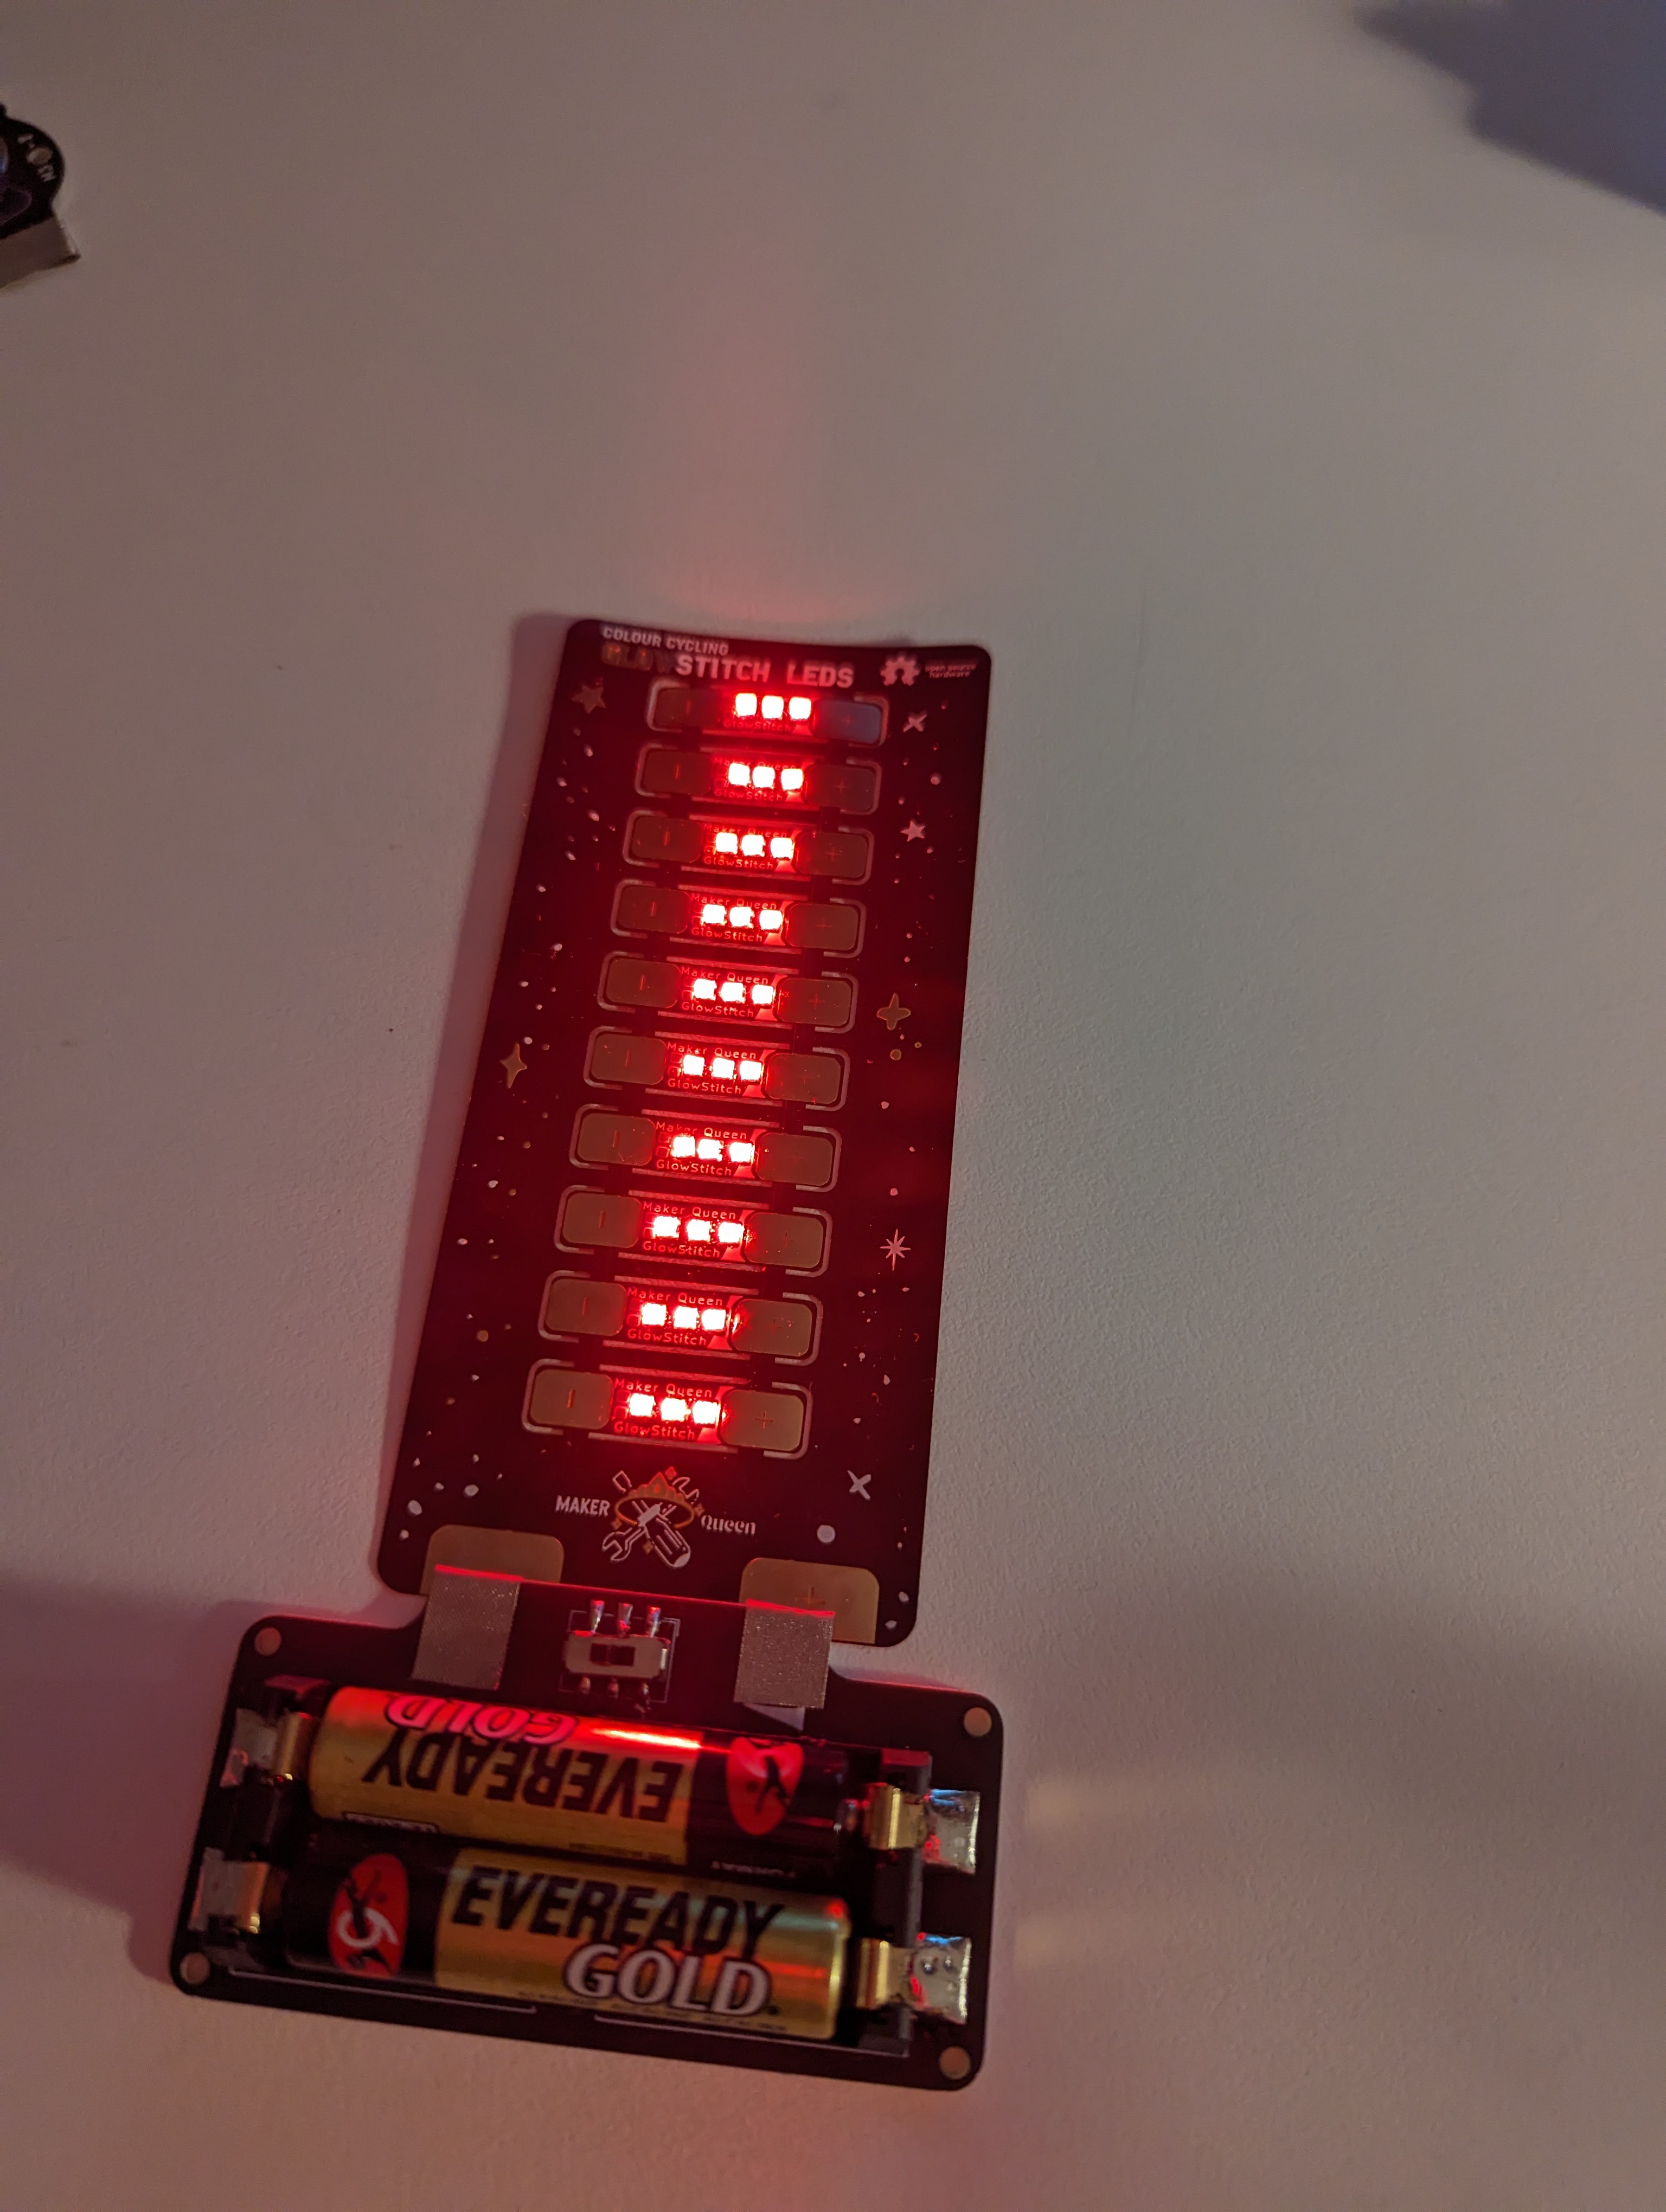
GlowStitch LED Strips

LED strips for soft circuits, paper circuits and more!

Public Chat
Similar projects worth following
GlowStitch LEDs machine sewable flexible circuit boards. Perfect for hobbyists, makers, cosplayers, and teachers, they are the ultimate all-in-one crafting product for soft circuits, paper circuits, lighting up artworks and so much more. Best of all, to get started with GlowStitch LEDs, you won’t need anything more than what comes in the box.

Currently if you want to add LEDs to clothing or soft circuits, you were stuck hand sewing with conductive thread, which is time consuming—even for professionals—and tricky to teach in schools. The sewing-machine compatibility of GlowStitch LEDs brings wearable technology into the modern era. Prototype your design with conductive-fabric tape, then quickly finalize your project with a sewing machine.

Now launched on Crowd Supply!
https://www.crowdsupply.com/makerqueenau/glowstitch-leds

Open Source Files here:
https://github.com/sjpiper145/GlowStitch

The aim to is to make wearable tech faster and more accessible with machine sewing. Using conductive tape, stick the strips down, test and sew! Good for wearable tech, paper circuits and general crafting, no need for Arduino or coding to get started.  

LED Strips Instructions Machine Sewing.pdf

Instructions specific to sewing machine usage.

Adobe Portable Document Format - 185.82 kB - 09/11/2022 at 12:06

Preview
Download

LED Strips Instructions.pdf

General use instructions and example circuit diagrams.

Adobe Portable Document Format - 355.12 kB - 09/10/2022 at 23:52

Preview
Download

LED Strips Glow Bag Project.pdf

A project to decorate a bag with LED Strips.

Adobe Portable Document Format - 211.11 kB - 08/28/2022 at 00:35

Preview
Download

LED Strips Crown Headband Project.pdf

A project to make a simple headband with LED Strips.

Adobe Portable Document Format - 233.52 kB - 08/28/2022 at 00:35

Preview
Download

  • What I learnt while designing GlowStitch LEDs

    Steph11/08/2023 at 22:05 4 comments

    This blog is a peek into the success, failures and learnings while developing GlowStitch, machine sewable LED strips. My iterative design process for this product have spanned several years and I’ve evolved my skills and the product with it over time. Here’s what I’ve learned – enjoy.

    These are crowdfunding now!  Check out the campaign page.

    A history of prototypes, samples and test jigs for GlowStitch LEDs.

    GlowStitch LEDs were borne out of a frustration with the way we do wearable technology. Wearable Tech is one of my passion areas, and is often an underdeveloped space due to needing a rare skills pairing of textiles and electronics. I’ve always been interested in making and teaching in this space, especially the idea that you can add some magic to something you can wear. Get a chance to be creative and learn some great technical skills too. However, the current tools in this space are limited. The Lilypad range has been a staple in this space for years, offering a huge variety of tools and capabilities, if you have the patience to stitch by hand with conductive thread.

    Lilypad Electronics Range - A wearable tech staple.

    Unfortunately, I do not have the patience. I’ve taught many workshops with Lilypad range parts and while hand stitching is a great skill, it can also be tedious and very tricky for younger learners. I found it to be prohibitively time consuming for the scale of projects I wanted to make. I needed something that was machine sewable.

    And so, back in 2020, I created my first set of GlowStitch prototypes. I went through the process of trying a range of different flex PCBs, and to my delight, found a type that worked fantastic. I created my first project, a bag that lit up when you closed the snap fastener. After running many workshops with paper circuits and copper tape, it was a delight to start using conductive fabric tape instead too. It held strong, didn’t crack or break and had great conductivity. I could use meters of it and still power an LED strip right at the end! The possibilities were starting to grow.

    First set of GlowStitch samples on the sewing machine.

    I also realised I could use these LEDs for not just wearable tech, but a whole range of crafting projects. You can paint over them, do paper circuits, add them to pop up books, put them in cosplay props, add them to artworks, a whole range things that work best with ultra-thin parts.

    A painting with GlowStitch LEDs.

    I started to make my first run of samples, and posted online asking “Would anyone like to receive a free sample of machine sewable LEDs in exchange for feedback and project pictures?”. I received over a hundred messages and whittled the list down to 30 people to receive samples. My first learning was that this was a waste of time.

    While customer validation is an important step, only 4 out of the 30 got back to me with feedback. Some got lost in the mail, others came back to me as returned to sender. Some people I lost contact with as they deleted their twitter accounts. Most just wanted something for free and didn’t respond back to my messages. Next time, I would ask only trusted friends, give due dates for feedback and even consider paying a product tester for thoughtful feedback. From there, I gave more samples to local friends and experts and gathered a whole range of great feedback which fed into the product. At this stage, I started to grow my two pages of instructions out to be much bigger.

    My final instructions, after three iterations and lots of feedback.

    My audience for this product is hobbyists, educators, students, kids and crafters. I needed to cater to these audiences and have empathy with their usage of my product. What if they’d never done electronics before? What kinds of things do they need to know? My instructions evolved to include tips to work with conductive tape, circuit building diagrams, troubleshooting, definitions and example projects. I continued to...

    Read more »

  • The Final Samples

    Steph08/23/2023 at 05:44 0 comments

    This week my final samples of Glowstitch sheets arrived.  I'm so happy with how they've turned out.  My final design here aims to give you value for money with x10 strips per sheet and will have a colour cycling and white LED variations.  

    While I like the large starmap design in the past prototypes, I think it's too pretty to cut up to use them practically, and I might save the design as a stretch goal / special edition for the crowdfunding.  

    Each of these will be sold separately, and a Maker kit will be available with all the items below, including a coin cell battery holder, AAA battery holder, white LED sheet, colour cycling LED sheet, instructions and a roll of conductive tape.  

    I'll also make the battery pack have connection points on the base to allow you to just pop it on top of the sheet to quickly test it out.  

    My development for the crowdfunding has taken awhile as I've gotten bogged down in the details.  I started working on a USB C power source for it, and have decided to just keep it simple and work on that after the product release.  It's been great to get contacted by schools who are interested in these and I just need to release the product without trying to make it do everything right now.  

    I've also re-worked my instructions to contain less waffle and keep the concept simple:  Just connecting all positives together and all negatives together.  The first few pages of the instructions will also be the Multilingual part to check off the CE / UKCA marking requirements. 

    And here's a sneak peek at the final instructions: 

    Stay in the loop with the launch of the crowdfunding for this here:  https://www.crowdsupply.com/makerqueenau/glowstitch-leds

  • DIY 3 Point Bend Testing GlowStitch LEDs

    Steph06/24/2023 at 04:49 0 comments

    I'd like to find out how resilient to bending GlowStitch LEDs are after they've been sewn with a sewing machine.  If you've used these in a project, especially on clothing, a certain level of flexing will occur through normal wear and tear.  In this project update, I've turned my 3D printer into a 3 point bend testing machine to find out how many flex cycles they can take before breaking.  

    Normal flex PCBs are designed to withstand 500 million flex cycles.  I won't be testing up to that many as it takes 4 hours to complete 10,000 flex cycles using my 3D printer, which would mean it would take 22 years to get up to 500 million, haha.  Using a 3D printed jig, custom G-code and lots of rubber bands, I tested x10 GlowStitch strips at a time.

    3D Printed Jig

    I designed a jig in Fusion 360 to fit inside my Ultimaker S3 3D printer.  It's not fastened to the bed and the head piece is just rubber banded in place.  For the 3D print files, visit my Github.

    A machine sewn test square is rubber banded onto the jig base. This is to ensure the fabric flexes back into place after each flex cycle.  It tests x10 machine sewn Glowstitch strips at a time.  I used machine sewn buttonholes to attach the rubber bands to the fabric. 


    Custom G-Code

    I have an Ultimaker S3 which is a bit fiddly to set up for this experiment.  You can't disable the autolevel function without  changing the firmware.  To make this custom gcode, I sliced a cube shape and saved the file as .gcode in Cura Slicer.  From there, I edited the code in Notepad ++ to turn off the bed and nozzle temperatures.  I deleted the actual print gcode, and replaced with the following: 

    G1 X50 Y100 E0 Z150
    G1 X50 Y50 E0 Z150
    G1 X100 Y50 E0 Z150
    G1 X50 Y100 E0 Z150
    G1 X100 Y100 E0 Z150

    G4 P60000

    First a custom sequence that moves the head around in a distinct pattern to let me know the machine has finished autolevel and is ready to run the Gcode.  G4 P60000 is a 60 second delay, which is my window for installing the jig and test head before the flex cycles begin.  

    G1 X100 Y100 E0 Z100
    G1 X100 Y100 E0 Z120
    G1 X100 Y100 E0 Z100
    G1 X100 Y100 E0 Z120

    This is the actual flexy cycle Gcode.  Up and down and up and down with no extrusion (E).  Initially I ran 100 bend cycles ten times with a G4 pause after each 100 to test whether the lights still worked.  I then upgraded to a 10,000 cycles tester code with breaks at every 1000 bends to test the lights.  See the github for both Gcode files for reference.   

    After creating the gcode, I then ran it back through Cura to convert to a .ufp file for my printer. 

    The Results

    Day 1 - 10,000 flex cycles completed:  All strips functional
    Day 2 - 20,000 flex cycles completed: x1 Strip experiencing flickering, located on end of testing rig

    Day 3 - 30,000 flex cycles completed: x2 strips experiencing flickering

    Day 4 - 40,000 flex cycles completed: x5 strips experiencing flickering

  • Wiggly Lines, Updated Instructions and Pencilcase Demo

    Steph12/23/2022 at 22:44 0 comments

    In my latest run of prototypes you can spot wiggly traces, especially up close on the 'ring' LED strip.  This helps to reduce cracking and strain under repeated flexing on flexible PCBs.  Big thanks to PCBWay for sponsoring this run of prototypes!  I deeply appreciate their support as many of you know how expensive it can be to continue an iterative design cycle with continuous improvements, especially in flex PCBs.  I'm super happy with the quality of these too, PCBWay did a fantastic job. 

    I've also now increased the instructions from 6 pages all the way up to twenty pages to make sure it's easy to get started, understand how to get the most out of the LED strips and troubleshoot issues quickly.  I'm super proud of how these have turned out!  The next step will be to work out how to create Multilanguage instructions as part of the CE marking certification process.  

    Lastly, another project demo.  Some of you may be familiar with the children's book, 'The Rainbow Fish'.  The book features holographic scales on the fish and the story goes that the fish gifts it's scales to the other fish.  This pencil case is a rainbow fish theme, and the scales are 3D printed directly onto the fabric.  Under the scales are some colour cycling glowstitch LEDs.  This is one of my favourite demo projects so far, it's very tactile and fun!  

  • New Open Source Files Added

    Steph11/19/2022 at 05:59 0 comments

    I've now updated the open source files to include LED Strips that have current limiting resistors.  The colour cycling LEDs that I've previously been using have current limiting built in, and after a user let out some magic smoke with some white LEDs the files are now updated to include current limiting resistors for standard LEDs.  

    Generally when these are used exclusively with conductive tape it acts to limit the current, but these will make them more robust for a variety of usage.  

  • Full GlowStitch Sheets Arrived

    Steph10/30/2022 at 06:56 0 comments

    I absolutely adore my GlowStitch sheets that arrived in the mail today! Test the sheet with the tabs and cut them out when you're ready to use. Includes a variety of long, short and ring GlowStitch LEDs in colour cycling and white.  Adding the tester tabs means that the user can have a 'sanity check' before using the strips and it also makes it easier to quality control test the sheets in the factory without creating a custom test jig.  An added bonus is that with a circuit running through the sheet, this no longer counts as a 'panelised board' from the factory perspective and it's much cheaper in the PCB quote generator.  

  • GlowStitch LEDs now fully Open Source and OSHWA Certified

    Steph10/16/2022 at 05:24 0 comments

    I'm proud to say that my GlowStitch LED strips are now open source, and the files are available on the GlowStitch Github page.  The project is under the CC - BY - SA licence, which means that you are free to share and adapt the circuit board files for your own module design, large projects and commercial use.  However, attribution is required, you must credit the original GlowStitch project and it must be distributed under the same open source licence.  

    The aim of this project is to make electronics easier and strip away the things that make it hard. Releasing the circuit board designs makes it easier for others to get involved and design their own compatible modules, building up a larger variety of GlowStitch parts. The faster we can work, the more things we’ll build and the better we’ll get at things like innovating in wearable tech and edutech spaces.
    I encourage you to download these blueprints and design your own modules for custom projects, interesting applications, and commercial products. This will enable the creation of much larger custom projects where you might require more specific LED colours for group projects, art installations, conference badges and much more. By doing this I will be delighted to know that you are inspiring and educating others and maybe even learning some circuit board design skills yourself.

    So far, I have the files for LED strips with x1 LED, x5 LEDs and x12 LED Rings, plus battery holders for x2 AAA batteries and CR2032 batteries available on the Github.  I can also confirm this project is now OSHWA Certified.  

  • Machine Washing the Circuit Test

    Steph10/16/2022 at 05:04 0 comments

    One of the questions about this project I continue to get is around washing your circuit when inside wearable tech projects.  Will it break the LEDs? Will the tape still be good? Today I did a machine washing test to find out.  

    My current guidance for washing in the instructions is as follows:  

    I do not advise you actually machine wash these but this was intended to be a product torture test. 

    I washed my sample with 4 LEDs and a battery pack and my large sheet of 100 LEDs inside a laundry bag to make sure it didn't get caught on any other washing.  I ran it on a 30 min cycle at 800 spin, cold water.  

    After washing and drying, there was visibly no difference to the tape or circuit.  The tape was not worse for wear, even where it was not sewed and just stuck down directly to the battery holder.  

    All 104 LED strips continued to function as per normal after washing too.  

    Obviously normal wear and tear will affect this product, but I'm really happy with these washing results.  

  • Variety GlowStitch Sheet

    Steph09/22/2022 at 04:50 0 comments

    I've created a mega variety sheet with 15 LED strips, including long, short and ring variations.  Half of these will be in white and half will be in colour cycling rainbow LEDs.  This panelises the variety design into a sheet to make it easy to manufacture and the customer cuts the strips out with scissors or craft knife.  The manufacturer and the customer can test the sheet with the tabs at the base easily to see all the LEDs light up simultaneously.  I've also made the background a beautiful starry night 

    I made this in KiCAD with help from Adobe Illustrator, Rhino 3D and Inkscape.  You have to use tools from all kids of software as standard circuit software is not designed for making art.  The workflow is not clean and feels like it's fighting you at every step to get the right result.  Lots of pixel pushing and convoluted steps, but I'm so happy with this result.  See render below, photos of the real thing coming soon!

  • GlowStitch Rings

    Steph09/22/2022 at 04:34 0 comments

    I now have some prototypes of LED rings with a dozen LEDs making it easier to do larger projects requiring more light diffusion.  Big thanks to PCBWay for sponsoring these, amazing quality as always.  This now makes a the current Glowstitch LED range include rings, strips with 5 LEDs and strips with a single LED for a great variety of projects. 

    Here's a short demo video of how these could be used for larger light diffusion. I some other ideas for using these include Iron man chest / glove cosplays, cyberpunk/tron paintings, halos and jewellery and more.  

View all 15 project logs

Enjoy this project?

Share

Discussions

Similar Projects

Does this project spark your interest?

Become a member to follow this project and never miss any updates