 electronicsworkshops
Introduction
In this project we will make our own audio player with esp 32. This project is a simple project to test a voice output from esp 32.
We can see many projects in the internet to play music with esp 32 using I2S Protocol. For that you need a separate SD card slot where you can plug in your SD card filled with music. You can play that mp3 file of that SD card with the help of speaker by using I2S protocol. In this project we are doing the same thing differently without using SD card module. In this project" ESP 32 Based Audio Player" We have connected one of the DAC pin of Esp -32 to amplifier where two terminals of speaker are connected. The audio output may not be loud but this application shows the ability of the ESP32 board to play audio files.
Bill Of Materials
| SN | COMPONENTS NAME | DESCRIPTION | QUANTITY | |
|---|---|---|---|---|
| 1 | ESP-32 | wroom | 1 | https://amzn.to/3wBRTzS |
| 2 | Speaker | 8-ohms | 1 | https://amzn.to/3e4o4S7 |
| 3 | Connecting Wires | Jumper Wires | 20 | https://amzn.to/3LCRiU7 |
PCB Manufacturer
The pcb of this project is manufactured by JLCPCB. The reasons to choose JLCPCB for pcb manufacturing are:
- Higher Quality
- Lower Cost
- Faster Delivery
If you want to order your pcb from jlcpcb just go through the link below:

Block Diagram of ESP 32 Based Audio Player
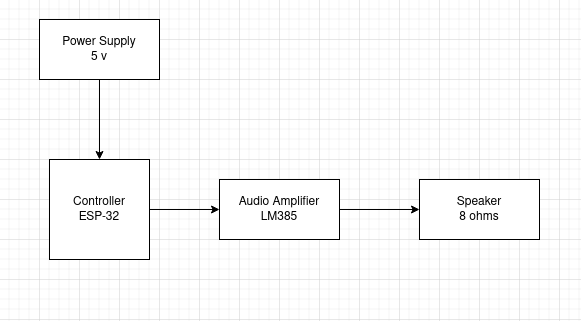
The above is the block diagram of Audio Player which mainly contains power supply, controller, audio amplifier and speaker section.
We have used 5 volt adapter to power up our system. The 5 volt is further step down to 3.3 volt and feed to Esp 32. (if you are designing your own pcb). If you are using esp 32 module you can directly power up the system by micro USB cable. The audio amplifier is connected to DAC pin of ESP 32 which are gpio 25 and gpio 26. The two terminal of simple 8 ohm speaker is connected to audio amplifier.
Circuit diagram
If you are designing your own pcb you must follow following circuit diagram :

Note : Connect AUDIO pin to DAC pin of ESP 32
If you are using esp 32 module along with audio amplifier module then you can follow below circuit diagram:

Vcc and ground of audio amplifier is connected to Vin and Gnd of esp 32 respectively and IN pin is connected to Gpio 25 which is DAC pin of esp 32. The two points of the speaker is connected to speaker terminal of audio amplifier.
After connection our system looks as below

Getting Ready with Audio Files and Arduino IDE
This is the most important part of this project. To play audio sounds on the ESP32 board, we need audio files in .wav format because ESP32 can play an audio file in .wav format only.
First of all we must be make the audio file ready that we want to play in our speaker. You can also record your own audio file in this case.
After that, download and install the Audacity Audio Editor App. This app will be used to change the file type, Sample Rate, and other properties.

Once the installation is complete, open the Audacity app and then go to file > Open and select the audio file to edit.

The first thing that needed to be changed is the sampling rate. For playing an audio file on ESP32, a sampling rate of 8000 to 16000 will be good as ESP32 doesn’t have much memory. So change the Project Rate to 16000.

After that, navigate to File > Export > Export as WAV to save the audio file in .wav format.

Now in the next window, select WAV as file type and Unsigned 8-bit PCM as an Encoding format and then click on Save.

Now we need a Hex Editor app to generate Hex codes for the audio file. So download and install the Hex Editor (HxD) from the given link. We can also use any hex editor as per the comfort. I have used editor in my case. After that, open the app, then go to File > open and open the .wav file. This will generate the Hex code for the .wav file.


Then use ctrl+A to select the complete code and then go to Edit > Copy as > C to copy the code in C Language format.

Then paste this code into sound.h part in Arduino IDE.
Coding
Here, we are going to use the XT DAC Audio library from XTronical. The XT DAC Audio library can be downloaded from here.
Once you download XT DAC Audio library in zip format you must add the library in your arduino IDE.

Once you add the library, you can conform weather the library is added to arduino IDE by going to example section.

If it is successfully added, you can see XT_DAC_Audio at the end of the example section. You can also open and upload wavspeed code to test weather the hardware is properly functioning or not.
It contain two file Wavspeed main file and sound.h file. Wavspeed contain the main code and sound.h contain the hex code of the audio file.


select the respective board and port from the arduino IDE. Upload the code to esp 32 and enjoy with the audio output in your speaker.

Adding your own audio file
If you want to add your own audio file then you can download the code below:
Once you extract this you can two file here:

open code.ino file

Go to sound.h section. and replace it with the respective audio hex code. I have already discussed how we generate audio hex code above:

once you paste your hex file in sound.h section. make sure your data type must be const unsigned char as below:
