Holiday Blinkenlights in 1K for about a buck
Creating interesting graphics on a strand of RGB LEDs using an ATtiny13, with just 64 bytes of RAM and just 1K of flash.
Creating interesting graphics on a strand of RGB LEDs using an ATtiny13, with just 64 bytes of RAM and just 1K of flash.
To make the experience fit your profile, pick a username and tell us what interests you.
We found and based on your interests.
blinkarduino.inoSimple Arduino sketch that cycles a pattern of RGB values along the length of a 240 LED strand. Uses about 2.4K of flash and over 720 bytes of SRAM. We can do better!- 974.00 bytes - 12/03/2016 at 21:50 |
|
As I go along with this project, some of my logs will be not so much to inform you as to what to do to reproduce my project, but rather to explain why I did some of the things I did in a more philosophical sense.
A fair number of my friends of roll their eyes when I mention Arduino projects. To them, the Arduino represents "amateur hour" in the tinkering universe. In their eyes, Arduino is the kind of thing that you teach to nine year olds, but discard when you become a teenager.
I think that does the Arduino a disservice. I think there are many reasons to like the Arduino:
All great stuff, but there are a few drawbacks to doing things the "Arduino way."
The Arduino framework can limit performance
The Arduino software framework provides a high level and easy to understand interface to the hardware capabilities of the Arduino board. For instance, each pin on the Arduino is abstracted as an individual numbered resource. You can tell each pin whether it is to serve as an input or an output using pinMode, and then use digitalWrite to set it to either be HIGH or LOW. If I use a Uno, a Trinket, or even one of the Arduino Mega boards, my code will work without change. As long as you have the appropriately labeled pin, it will work.
But this abstraction isn't how the real machine is organized. Each pin is part of a "port", which is a collection of eight pins. They might bear names like PORTB, and have numbered pins with names like PB_7. On different types of Arduinos, a pin number like "5" may be wired to a different pin on a different port. The Arduino framework translates the simple "5" into the appropriate port and pin number, depending on what type of Arduino you've told to compile for.
But this translation can be slow.
I wrote up some exploration of this in this blog post about using digitalWrite to drive a simple 7 segment LED display. This display is pretty simple to implement. It requires three pins. To start sending data, you bring the "latch" pin LOW. You then send which digit you want, starting with the most significant bit by:
You then repeat the process to send which segments you want to turn on, and when you are finished, you set the latch back high, and the digits update.
Here's the code implemented in canonical Arduino framework style:
void
LED_irq(void)
{
    digitalWrite(latchpin, LOW);

    // select the digit...
    shiftOut(datapin, clockpin, MSBFIRST, col[segcnt]) ;
    // and select the segments
    shiftOut(datapin, clockpin, MSBFIRST, segbuf[segcnt]) ;

    digitalWrite(latchpin, HIGH) ;
    segcnt ++ ;
    segcnt &= NDIGITS_MASK ;
}
When I first set this up, I hooked up the latch pin to my oscilloscope so I could time the total amount of time that it would take to execute. I found out it took about 320 microseconds when running at a 16Mhz clock rate like on the classic Uno. I set this up to run every 2ms, which means it takes up about 16% of available cycles. That's fine, but if I wanted to run it on an 8Mhz, it would be consuming 32% of available cycles, and I couldn't think about running it at 1Mhz.But there are faster ways to implement the same idea. The...
Read more »This is an aside from the actual project, but I thought I would go ahead and mention a tool which has become one of my favorites: platformio.
If you are the sort of person who is reading about this project, chances are good that you are using the Arduino IDE to do a lot of your programming. The Arduino IDE has a lot going for it. It is available on Linux, Windows and Mac, and it works the same pretty much everywhere. In the most recent upgrade, it supports a fair number of architectures, and has a library manager as well. For many of you, it will be a comfortable and familiar download, and requires only the installation of a single application.
But I'm kind of old school.
I cut my teeth on Unix boxes. I have a Macbook that I use for a lot of my programming, but I spend the vast majority of my time in Terminal windows, using familiar utilities like ls, cat and vi. And, I mostly don't like to use a mouse all that much. I like to use utilities like make.
But what I don't enjoy is downloading and installing all the necessary cross compiling tools to compile code for the Arduino. The Arduino IDE is really just a wrapper around the GNU C compiler. You could use make and avr-gcc without the IDE environment, but setting that up can be a pain, and its hard to keep it up to date.
Until, that is, until platformio was created.
It is a system written in Python that allows you to compile code for the Arduino and many other systems (like the Teensy, the ESP8266, and mbed processors) all with just a simple set of consistent commands. It will go off and find all the command line tools you need for the board you've selected, and then install them so that you can compile code with just a simple set of commands. Since many boards like the ESP8266 have some compatibility with Arduino code, often you can easily recompile the same code to be executed on different boards, all at once.
When I eventually make my code available on github, I will include the necessary files to compile with platformio. You can still compile any of the Arduino sketches using the IDE if you like, but I urge you to give platformio a try. In the end, I'll show how you can use it to compile barebones C code for processors like the ATtiny13, as well as some other tricks like disassembling C code to learn more about how the machine language code generated by gcc can be modified to be more compact and to understand other optimizations.
When you are writing prose, brevity can be difficult. You have to think very carefully about how to express your ideas concisely and achieve maximum impact. Often, it's simply easier to dump the contents of your brain, and just keep writing and writing, and telling stories and engaging in diversions and pretty soon you realize that you are just continuing to ramble, not just about how to do LED programming compactly, but on the meaning of Christmas, about how you wore your blinking Santa hat, and this one woman with a full grocery cart and a screaming child and a tired look on her face was behind you when you were just picking up a carton of milk, and yet managed a smile, and about how you immediately allowed her to cut in front of you because hey, that's the way it is during the holidays, and I showed her pictures of my grand daughter, and now as I think about it I have two grand daughters and I miss them especially now that it's nearing Christmas time...
You get the idea.
The fact is that the most direct path to getting a basic Christmas LED blinker is to stand on the shoulders of giants, and just use the hardware and software that others have used before you. The most obvious and least error prone way would probably be to buy a real Arduino from the official suppliers or from Adafruit for around $25, download the standard Arduino development environment, then use Adafruit's awesome NeoPixel library and tutorials. Indeed, that's just what I did. As my first program I decided to do something simple. I'd write a program that would display a repeating pattern of eight colors along the entire length of 240 LEDs that I had, and that a few times a second it would shift the LEDs, and then redisplay the pattern. It didn't take me very long (I spent more time finding a spare Arduino and the appropriate USB cable). Here's the resulting code:
#include <Adafruit_NeoPixel.h>

const int PIN = 5 ;
const int NLED = 240 ;

// Create an interface to the Adafruit library, which is
// very cool and very convenient...

Adafruit_NeoPixel strip = Adafruit_NeoPixel(240, PIN, NEO_GRB + NEO_KHZ800);

void
setup()
{
    strip.begin() ;
    strip.show() ;
}

#define LVAL 	(0)
#define HVAL	(64)

int colortab[] = {
    LVAL, LVAL, LVAL,		// BLACK
    HVAL, LVAL, LVAL,		// RED
    LVAL, HVAL, LVAL,		// GREEN
    LVAL, LVAL, HVAL,		// BLUE
    HVAL, HVAL, LVAL,		// YELLOW
    LVAL, HVAL, HVAL,		// CYAN
    HVAL, LVAL, HVAL,		// MAGENTA
    HVAL, HVAL, HVAL,		// WHITE
} ;


void
loop()
{
    int start = 0 ;
    int offset, i ;

    for (;;) {
	offset = start ;
	for (i=0; i<NLED; i++) {
	    strip.setPixelColor(i, colortab[offset], colortab[offset+1], colortab[offset+2]) ;
	    offset += 3 ;
	    if (offset >= 24)
		offset = 0 ;
	}
	strip.show() ;
	delay(100) ;

	start += 3 ;
	if (start >= 24)
	    start = 0 ;
    }
}
Yeah, it's not commented, because it seems pretty obvious to me. If it's not to you, then go read Adafruit's tutorial some more. Basically the colortab array contains R, G, B values for 8 different colors, and the main loop starts by copying entries from that table into the strip using the simple strip.setPixelColor interface. Most of the logic involves handling the wrap around and replication of color values. When all the LEDs have been updated, then it calls the strip.show() function to tell them all to update. It then updates, delays for 100 milliseconds, and then repeats.
It works. It works just fine. If you want, you could skip onto using code like this, or modifying it to do different patterns, timing, etc.
But...
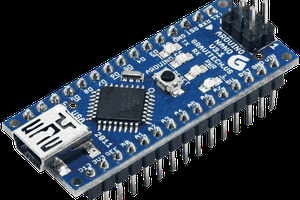
Here is the thing: it's on a $25 Arduino Uno board, which is physically large, and fairly expensive.
First, let's address the size. One of the great things about the Arduino is that there are a variety of boards which are compatible with one another. The same code could conceivably be run on those boards too. For instance, Adafruit sells the Metro Mini for a mere $12.50, which is tiny (just 0.7" x 1.7") and is in most respects a completely compatible replica of the larger and more expensive...
Read more »Back in 2011, I bought a simple battery powered strand of LEDS at a local pharmacy. They were powered by a trio of double A batteries, and consisted of two independent strings, one which had red and green, the other which had blue and yellow. But they just well, turned on and off. I thought I could do better. I had just finished my ATtiny13 "blinking pumpkin" project.
And decided that I could use the same basic ideas to implement a set of blinking lights that I could put inside a Santa hat, and wear around to bring Christmas cheer. I documented this in a series of Youtube videos at the time, as well as a blog post where I also shared the (very simple, nearly trivial) code.
http://brainwagon.org/2011/12/05/dissecting-a-set-of-99-battery-powered-christmas-lights/
http://brainwagon.org/2011/12/16/christmas-lights-powered-by-an-attiny13/
http://brainwagon.org/2011/12/18/project-completed-my-99-christmas-led-hat-with-attiny13-controller/
Look, this is kind of a ridiculous thing to do. You can probably find something to do this off the shelf, and with less muss and fuss than it will be to reproduce my project. But this is what I do for fun, so don't judge me!
I pulled my hat out of storage while setting up my Christmas tree this year, and found out that for some reason, one of the strand of LEDs has stopped working. No doubt I just have a bad connection somewhere, and I could fix it easily. But I thought that maybe it would be a good time to revisit this project using the same processor family, but perhaps with some fancier LEDs. Notably, I've been looking for an excuse to order a long strand of RGB addressable LEDs, where each LED's color can be controlled independently. So, a little surfing on amazon.com, and I ordered four meters of RGB LEDs. I also thought it was an excellent opportunity to use the platformio system to highlight how you could do "bare metal" programming that doesn't rely on a lot of Arduino libraries and infrastructure, and thus would allow you to use very small, very resource constrained processors like the 8 pin, ATtiny13. And, I wanted to highlight the excellent technical work of excellent work on NeoPixel timing over at josh.com, which makes it possible to drive these LEDs in just a few hundred bytes of code.
My goal is not so much to deliver firmware that you will download and use without much thought, but rather to use the project to demonstrate some of the thinking that I use to do simple projects like this. That it coincides with the Hackaday 1K code competition is just gravy. Writing small programs for resourced constrained processors is just fun. Blaise Pascal once famously wrote to a friend that he would have written a shorter letter if he had more time. Writing small programs requires the kind of puzzle solving skills that often don't get exercised with longer endeavors. I hope that this project serves to inspire you to consider that using tiny processors to do simple tasks can be fun and rewarding.
As a teaser, here is some (terrible) cell phone video that is as yet unexplained, but will serve to show what is possible. I've only used 25% of the available flash on the chip, with code written in C and some inline assembler, and there is lots more to come. Hope you enjoy!
Create an account to leave a comment. Already have an account? Log In.
Become a member to follow this project and never miss any updates

 Ford Sleeman
 ken.do
 PixJuan
 Robin Reiter