Here is an illustration which shows components that will be necessary to build this spot welder:
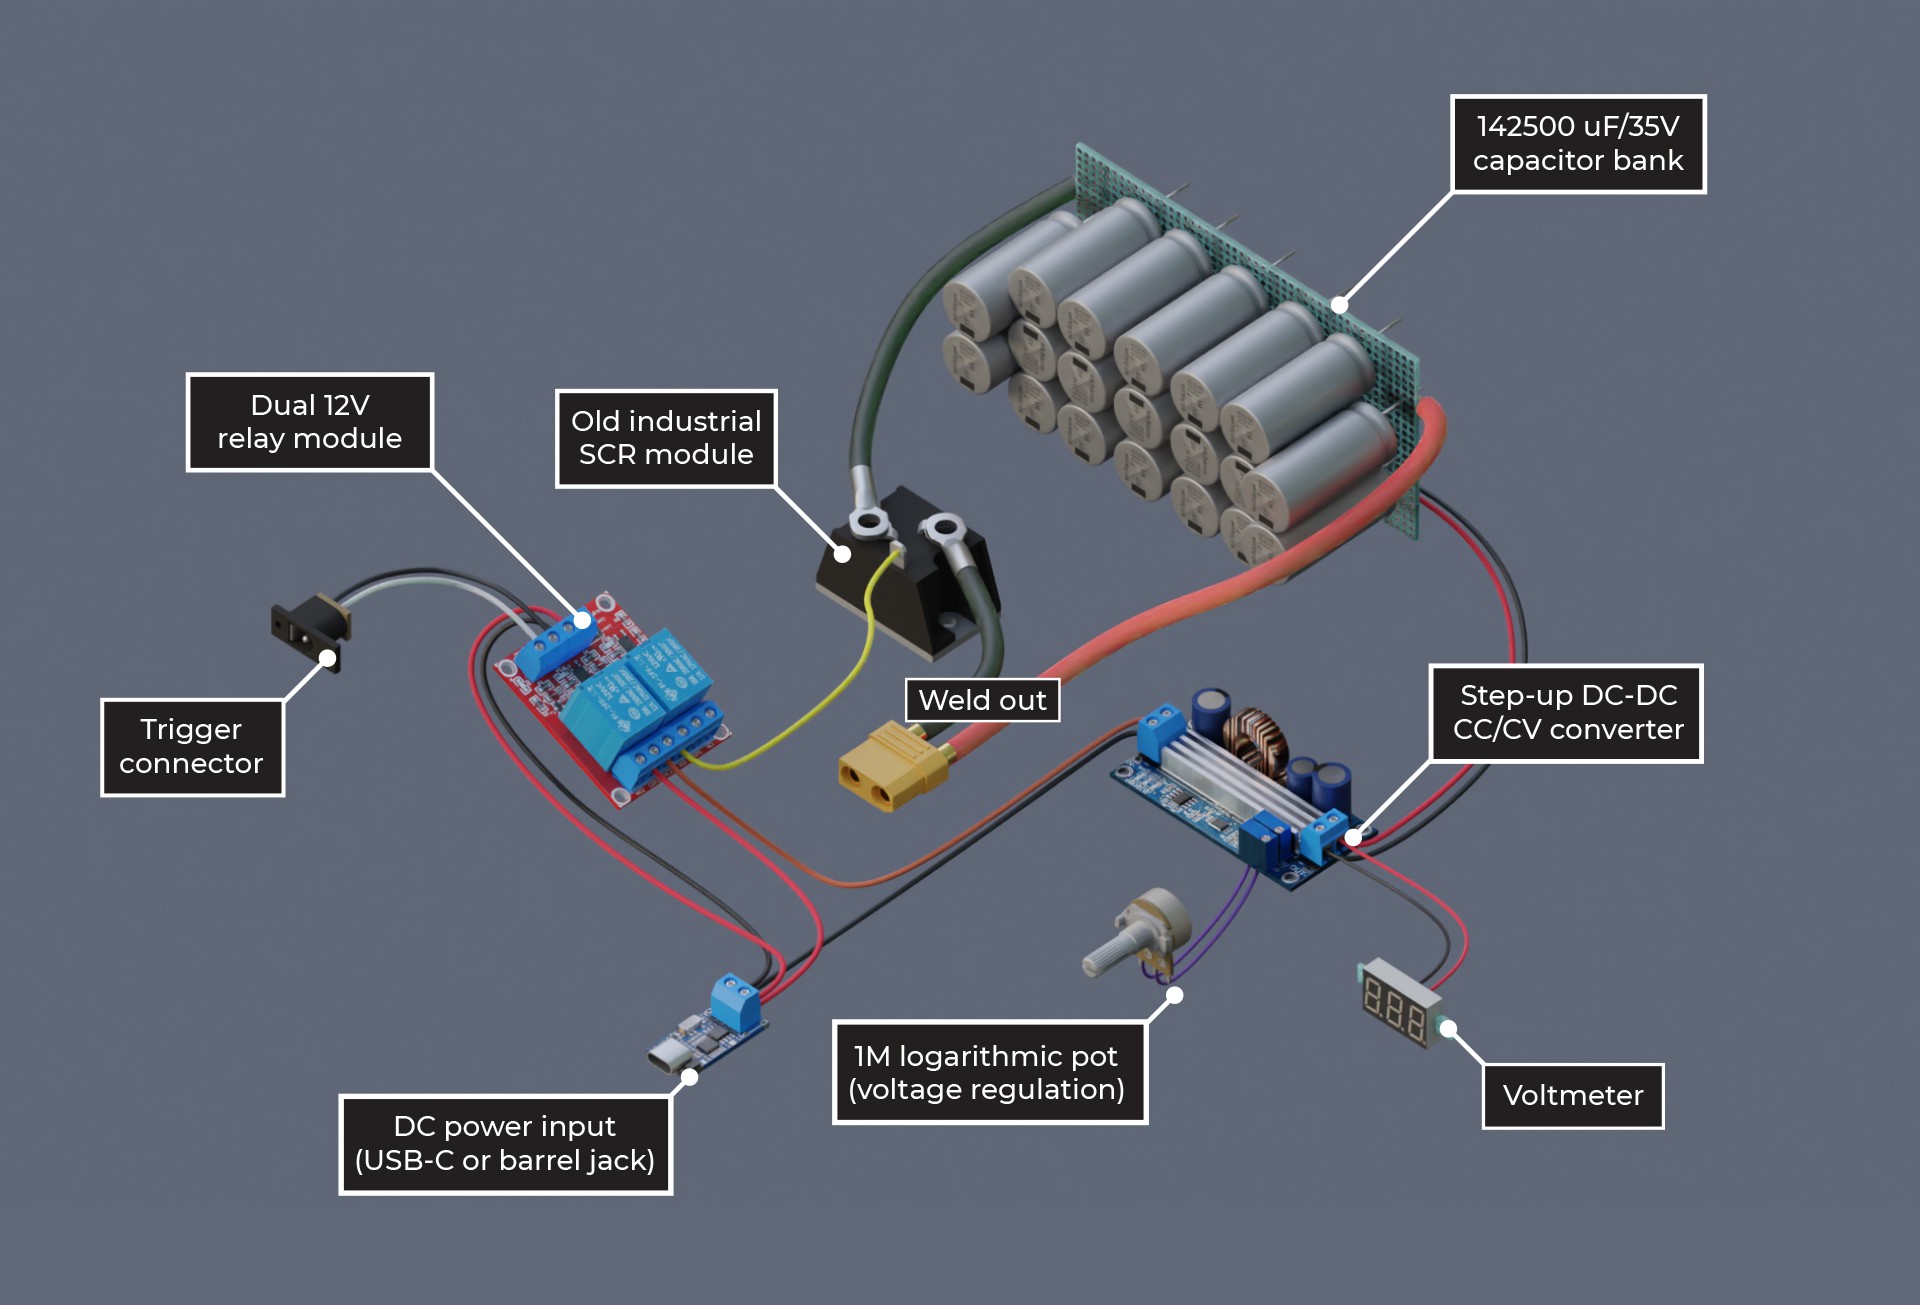
To make a spot weld, quite a lot of energy will need to be dumped into a small spot in a very short amount of time. To store such amount of energy and to allow quick release of this energy, a bank of capacitors will be used. I used 19 Nichicon UBY 7500uF/35V capacitors connected in parallel, which have total capacity of 142500uF. I will charge them to only 31V at most, because some de-rating of electrolytic capacitors is almost always used, and it should increase the lifespan of these capacitors. 142500uF at 31V will give 64.19J of energy, which should be enough for battery tab spot welding. Each of these capacitors have ESR of 18 milliohms, which drops below 1 milliohm total after parallel connection. That will allow very high welding currents.
To release this kind of energy, some kind of extremely high current switch will be required. I wanted to use something that will be relatively easy to use, and I chose a second-hand industrial SCR (thyristor) module: T90RIA120. It handles peak currents over a thousand amps and doesn't require sophisticated drivers, unlike MOSFETs. There should be several similar second-hand thyristors which could be used to build such a spot welder. These industrial modules usually have wire terminals, which will allow for an easy installation.
Before we can weld anything, we need to actually get the energy from somewhere. Capacitors will need to be charged. For the ease of use, I decided to get the power from USB-C input. I used a small 12V USB-C PD trigger module, which will allow use of powerbanks and fast chargers. However, this is not enough yet. This capacitor bank would cause an extremely high inrush current, which would most likely trigger short-circuit protection in the charger/powerbank and the device would turn off immediately. Therefore some kind of current limiter will be needed. It would also be a good idea to step the voltage up, because it will allow for much higher welding energy. Therefore I decided to incorporate a DC-DC step-up converter CC/CV module, which will both increase the voltage and limit the current. I also added an external potentiometer which will allow to change the desired voltage easily. I also added some bleeder resistors to capacitor bank, to allow for quicker voltage changes. I also added a voltmeter module which allows for easy monitoring of the voltage.
The only thing that remains is a triggering circuit. There is one caveat associated with using a thyristor: once it starts to conduct, it will conduct until the current drops, even if we are no longer triggering the gate. Therefore i will need to use a circuit, which will simultaneously stop charging the capacitors and send a pulse to the gate of the thyristor. I decided to use an off-the-shelf dual 12V relay module for that pulse. However, I made some small modifications. I wanted to add some "cool-down" time after each welding pulse, so I added a simple timing capacitor to the trigger input. I also wanted to make sure that after each trigger button press only one brief pulse will be sent to the gate of the thyristor. To achieve this, I added a second capacitor which is constantly being charged, and once the trigger is pressed, it is discharged through relay contacts into the gate of the thyristor. This is important for safety reasons. The welding should only be triggered when both welding electrodes are touching the workpiece. If welding would be triggered when electrodes were in the air, and only after that they would touch the workpiece, a shower of big sparks would appear. However if we are sending only a single pulse to the gate of the thyristor, we should be safe in case of a user mistake, because the welding will happen only if everything is set up correctly when the trigger is first pressed. I will post details on modifying the relay circuit in follow-up instructions.
Discussions
Become a Hackaday.io Member
Create an account to leave a comment. Already have an account? Log In.