 Scott
ScottAfter final assembly of the Reflow Oven, I knew I need to test and tune the PID parameters.
The sample ARDUINO program provided by ROCKET SCREAM uses a few ARDUINO libraries; most notable are Brett Beauregard’s PID and Limor Fried’s (LadyAda) MAX6675 libraries. The PID library can be found here and the MAX6675 library can be found here. The ROCKET SCREAM Reflow Oven Controller Shield schematics, PCB artworks and sample sketch can be found here.
Disclaimer: My interaction with the code and libraries was from mid-2012. The code and libraries may have been updated since that time. I will only describe my experiences from notes journaled from that time. Also, I am not an expert at PID nor reflow ovens.
Initial testing: I started by running the ROCKET SCREAM sample sketch, which uses the PID library. The sample sketch uses three sets of PID parameters; “preheat”, “soak” and “reflow”. The sample sketch uses SW1 to start the cycle. In addition to info printed on the LCD, the sample sketch emits a string of technical info out the serial port, presumably to capture and analyze a flow-curve. I created a spreadsheet and graphed the data with time (X-axis) vs. Temp (Y-axis) vs. Slope (2nd Y-axis).
With the default PID values I had overshoot by 20 deg C from preheat (150°C) to soak (155°C) in my oven and 10 deg C overshoot from “soak” to “reflow” (230°C). The ROCKET SCREAM code switches to cool once the temperature reaches “reflow” minus 5 degrees. Obviously it needed some tuning.
Modifying the PID parameters and testing each time means re-compiling and uploading to the ARDUINO over and over, which quickly becomes time consuming.
Brett Beauregard has made a GUI front-end to control an ARDUINO running his PID routines in real-time. It is for manual tuning, NOT auto-tuning. If you need to tune, get this GUI front-end. With it, you can tweak the PID parameters and send them to the ARDUINO for monitoring the effects in real-time. Since Brett’s sample ARDUINO code uses “analog(0)” for input and outputs a PWM signal with an “analogwrite”, I had to modify the input to use the MAX6675 and the output to drive an SSR in “virtual PWM” mode. For that, I borrowed the code from ROCKET SCREAM’s sketch that made that same conversion to Brett’s original sample PID code. Brett discusses this in his BLOG. I thought that updating the LCD would be good too.
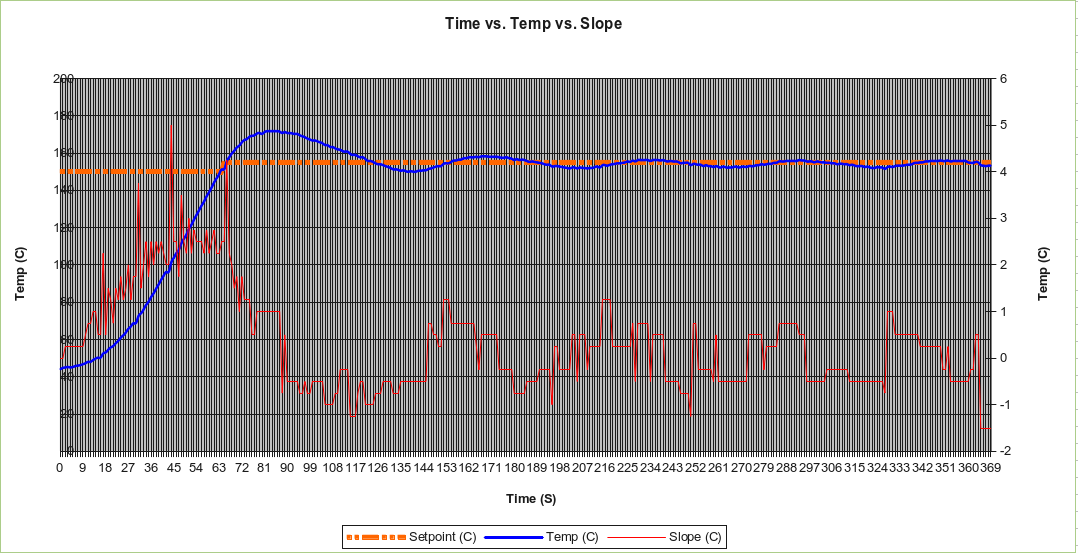
With Bret’s GUI, I found a few issues; the host sketch (running under process from process.org) wanted to access the 2nd COM port on my computer, which at the time was running WINDOWS 7®. The TOSHIBA Bluetooth Stack wanted to name “COM65” and the ARDUINO IDE was using COM2. The line near 100 in Brett’s GUI is “myPort = new Serial(this, Serial.list()[1], 57600);”, change the “[1]” to whatever port you need that shows up on the bottom of the sketch message box. Also, I found that in order to reliably connect with the ARDUINO, the ARDUINO should be held in reset until the GUI front-end comes up then release the reset. I also found a bug that disables accessing any of the controls in the GUI but I don’t know what causes it. To remedy, kill the GUI and restart it. This GUI sure has helped to save a lot of time setting the PID parameters for the “preheat” stage! Below is an example of the performance of one of my first attempts at tuning. Notice the overshoot and low frequency oscillation around the set-point while the PID algorithm tries to compensate and stabilize. Eventually, with the correct PID parameters, I was able to minimize the overshoot and improve the stabilization.
 Tuning the “soak” stage
Brett has also released an auto-tune routine. Though at the time, he did not post any docs or helpful info to get it up and running. After studying the code and making some mods, I found that first the oven must already be stabilized, then the auto-tune routines can be used. As it turns out, these routines will not help with automatically tuning the PID parameters for any particular oven. So no “press a button and auto PID for my oven majick”. I found no need to implement it in the ROCKETSCREAM code.
As shown below, with a little tuning, the results look more satisfactory.
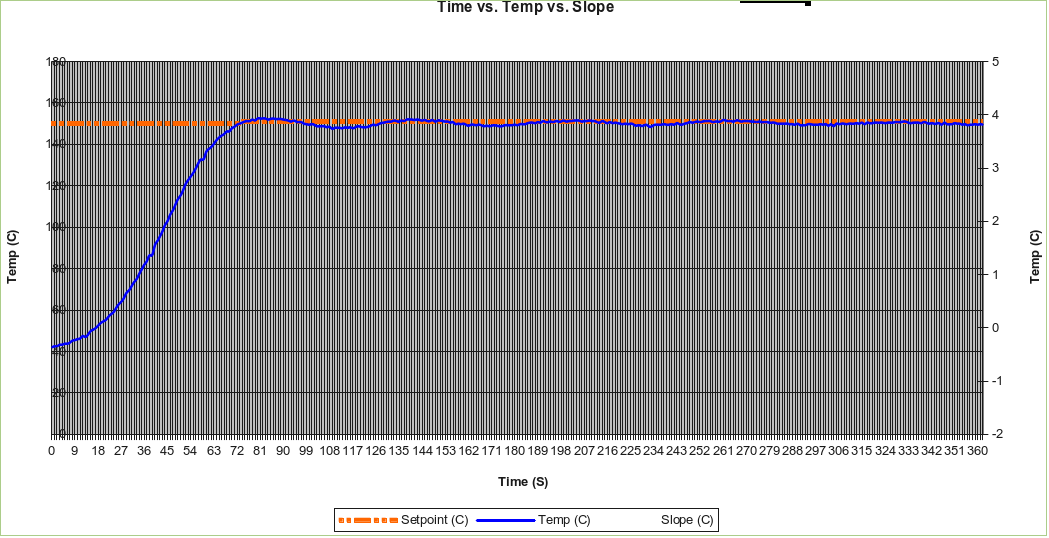 Better results after tuning
The final outcome of my PID parameters for “pre-heat“, “soak” and “reflow” is depicted below. Notice that my oven is capable of achieving a 2°C to 2.5°C per second heat-slope. As I stated, a heat-slope at or below 1°C per second is sufficient for the “soak” stage but insufficient for the “reflow” stage. 1.5°C per second or better is required.
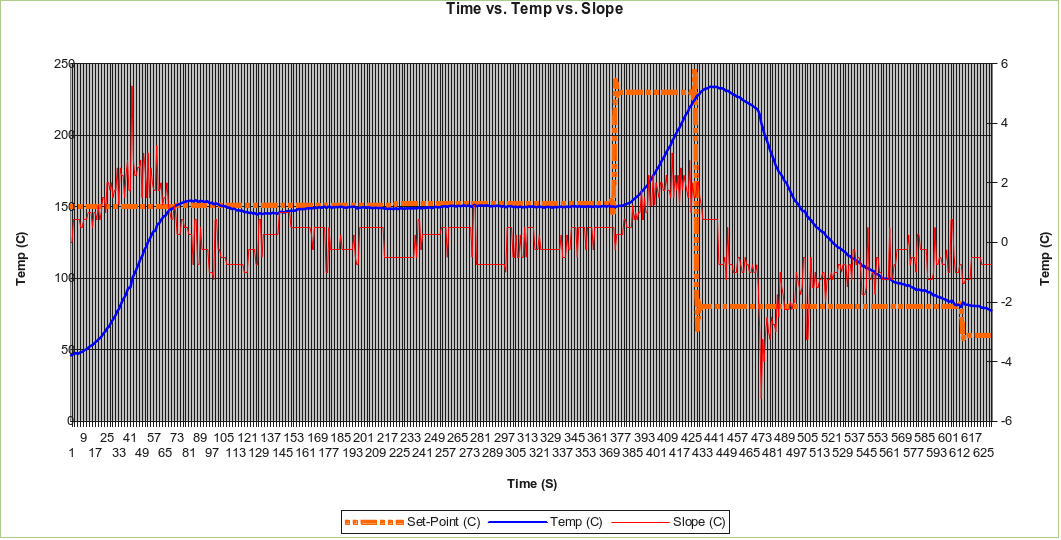 Performance of complete “pre-heat”, “soak” and “reflow” stages
In my oven, I use the oven’s provided aluminum tray and broiling rack to hold my boards. These items are heat-sinks and need a little more time to absorb the heat, thus I have extended my “soak” stage to be 240 seconds, which seems to yield acceptable results for my applications. I had thought about adding a fan to circulate the heat within the oven chamber but was unable to figure out a means to attach it and not interfere with any of the pre-existing internals of the oven; rack and heating elements. Also, I made the temperature setting for “pre-heat” and “soak” the same because I saw no need for a “pre-heat” stage as it did not get me anything extra. Although, I can see that using PID in process control on a larger scale may benefit from a “pre-heat” stage.
Words of experience: Since I am no expert on PID, process controls nor reflow ovens, I cannot offer any (free) “expert advise” as I have none to give. However, I can share my experiences, which are journaled within these pages.
The bottom line on setting the PID parameters for use with the ROCKET SCREAM sketch and a small-scale home-brew reflow oven is to use trial and error. In all, it probably took me a dozen or so hours to try different settings, capture the results, graph them and use them to adjust new settings. I started with P, I and D set to “0” just to see what the “raw” results would be without having any adjustments made. Then I started to adjust the P setting and test that. From my experiences, the ambient temperature also had an effect on the results. I have seen some home-brew designs that use a “thermal blanket” wrapped around the oven to insulate it from ambient temperature effects and to keep the heat within the oven cavity but I saw no need for that in my small oven. From what I recall, the “thermal blanket” material is also rather expensive.
I consulted some PID tuning reference material available on-line and here are a few reference links from my project journal to get started:
- Bret Beauregard’s PID library blog
- http://straightlinecontrol.com/
- http://expertune.com/tutor.aspx
- http://csimn.com/CSI_pages/PIDforDummies.html
- PID without a Ph.D – Wescott (PDF)
- PID without Math – Lacoste (PDF)
- Tuning of PID Controllers – author(s) unknown (PDF)
- Design and Construction of a Reflow Soldering Oven – Gebre, Johnson, Russell and Sun (PDF)
Discussions
Become a Hackaday.io Member
Create an account to leave a comment. Already have an account? Log In.