 6toecat
Basically, this is an "Automated Watering how-to Guide for Dummies" - as simple as technically possible.
You still require some basic command line expertise, but the steps have been proven and I provide links to the gear I used AND the Node Red code, making this EASIER than anything else I've seen online.
I'm leaving in the problems I encountered in this project because you may encounter similar issues.
DO NOT use the Home Automation HAOS images (https://github.com/home-assistant/operating-system/releases/download/8.5/haos_rpi4-64-8.5.img.xz) or use the IOTstack procedure (https://sensorsiot.github.io/IOTstack/Basic_setup/) to install NodeRED on the Rhaspberry Pi as these BOTH lack python3-rpi.gpio library needed for node-red-node-pi-gpio to function in NodeRED.
Here are my Pi Install instructions that have a WORKING gpio.
[START HERE] Use bullseye to get a working GPIO.
https://downloads.raspberrypi.org/raspios_full_armhf/images/
MY preference is the 64 bit version: https://downloads.raspberrypi.org/raspios_arm64/images/raspios_arm64-2022-09-26/
IMPORTANT: Use balenaEtcher to image 2022-09-22-raspios-bullseye-armhf-full.img
UPDATE TIP: Don't use a micro SD card, they are too slow and burn out with multiple writing. I used a fast USB thumb drive for a while, but realized a SSD is best for speed. Refer to this: https://linuxhint.com/how-to-clone-a-raspberry-pi-sd-card/
Here's what I used: https://amzn.to/3j3u8gp
To Install NodeRED, just follow the instructions here: https://nodered.org/docs/getting-started/raspberrypi
Now install Bluetooth stuff you will need:
sudo apt install bluetooth pi-bluetooth bluez blueman bluez-hcidump
sudo apt-get install python3-pip libglib2.0-dev
sudo pip3 install bluepy
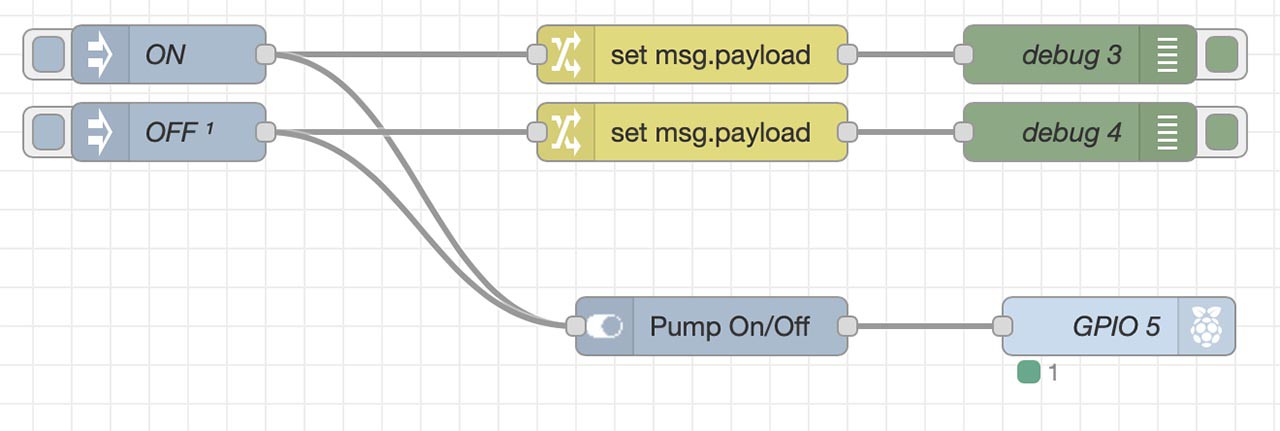
Status: Pump control is working. My NodeRED code for pump control is linked in the files.
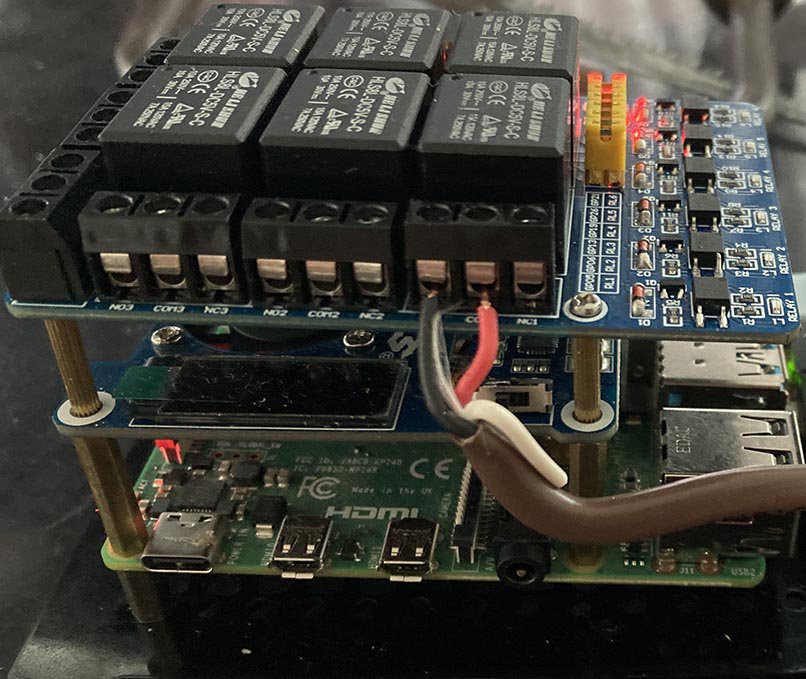
There is a dependency with my Node RED pump flow in that the Pump ON/OFF 'switch' uses node-red-contrib-ui_j to be installed in Node RED. Pump is wired to the NO1 ans COM1 connectors on the relay HAT. See photo above.
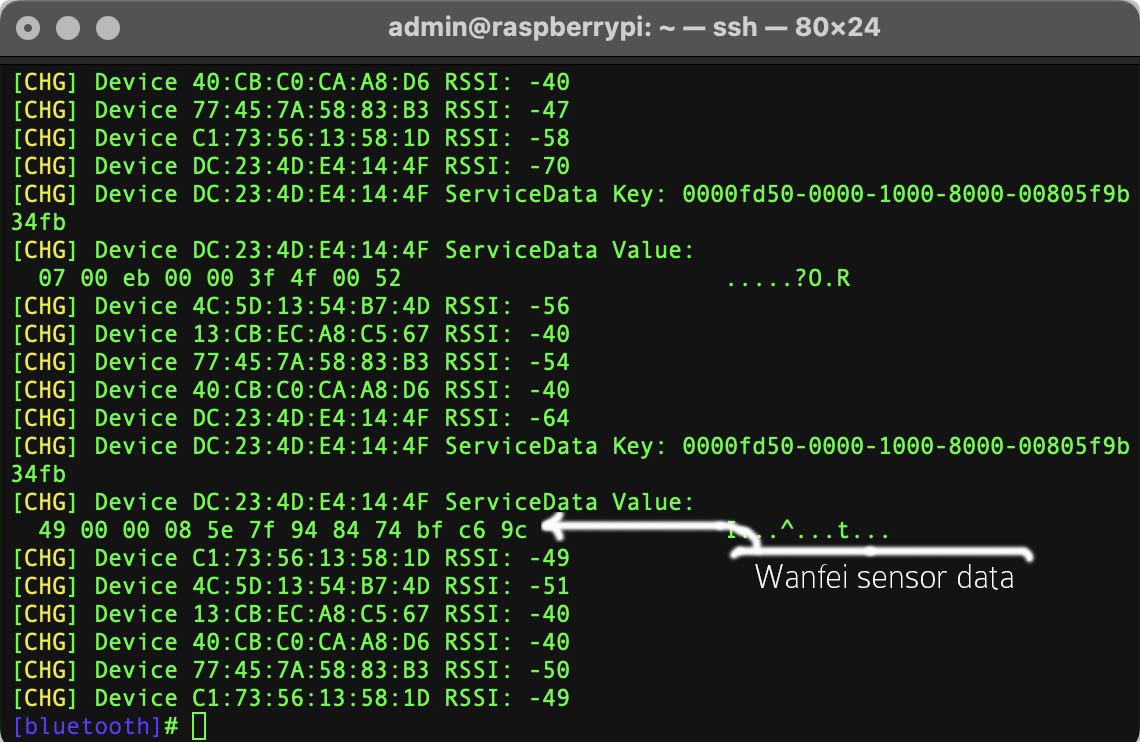
I started with a Wanfei BLE moisture sensor. It is detectable by Rhaspberry Pi4, but I had issues reading values and parsing info.

The firmware is old on my Wanfei BLE moisture sensor and it doesn't communicate with the Xiaomi BLE Node, as old Mi Flora devices need a firmware update to work with Xiaomi BLE: https://github.com/home-assistant/core/issues/76236
I can see the Wanfei BLE monitor is indeed sending data, but it is not being read/parsed by the Xiaomi BLE Node in NodeRED. BUY the right Xiaomi BLE plant monitor sensor! I found one here https://www.ebay.ca/itm/143895474465
I've ordered a 2022 Xiaomi Mi Bluetooth Monitor Flower Plants Care Smart Tester Flora Sensor. If the "Flower Care" app on iOS cannot detect your Wanfei BLE moisture sensor, it's because the firmware is too old on it and needs updating. Flower Care does not bind or detect with firmware v 2.7.0 on your moisture sensor. https://community.home-assistant.io/t/northfifteen-connected-home-plant-monitor-mi-flora-firmware-update-to-work-with-esphome/153198
If the 'Flower Care" app could detect the Wanfei Moisture sensor, it could update it's firmware, but sadly it cannnot detect it.
[UPDATE Dec 19, 2022]: 2022 Xiaomi Mi Bluetooth Monitor arrived. It can connect to the "Flower Care" app.
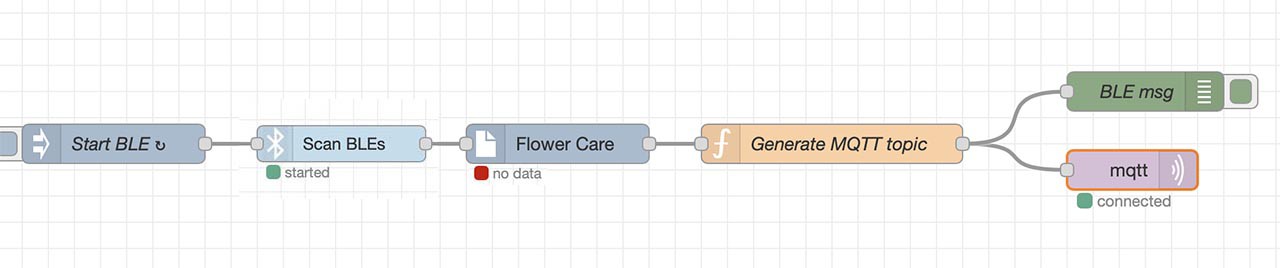
Was hoping I could use a simple flow like this to read the data from my "Flower care" but the Xiaomi node isn't working. Others are having issues too, it may be due to Xiaomi is sending encrypted data or the MiFlora isn't fully supported. https://github.com/eschava/node-red-contrib-xiaomi-ble/issues/32
To find your bluetooth device:
$ bluetoothctl
[bluetooth]# agent on
Default agent request successful
[bluetooth]# scan on
Discovery started
[CHG] Controller DC:A6:32:A5:81:2A Discovering: yes
[NEW] Device 5C:85:7E:B0:2D:2F Flower care <<--- FOUND MiFlora Mac ID
You need the Mac ID of your MiFlora for the upcoming step by ThomDietrich !
To see the service data, like shown above, use: $ bluetoothctl info YOUR MAC ID, i.e. $ bluetoothctl info DC:A6:32:A5:81:2A
Changing approach. I have found other techniques that scan, write to a file, then read data from file. Also found a method that uses a daemon to scan BLE and send data to an MQTT broker. That seems like the cleanest strategy so using that.
Do not Install MQTT broker from these instructions: https://www.catchpoint.com/network-admin-guide/mqtt-broker
WARNING: Do not change your hosts file as they describe. Don't install the AFW (firewall) as it unnecessarily complicates your installation and could block your access to SSH and NodeRED. Just do this ...
Install MQTT broker: sudo apt install mosquitto mosquitto-clients
sudo systemctl enable mosquitto

That's it, just test to make sure it's working. No host change or firewall needed.
Now to set up script to read the Flower Care BLE and post it's data to MQTT.
I'm following https://github.com/ThomDietrich/miflora-mqtt-daemon to set up a MQTT daemon to write my 'Flower care' data to MQTT for NodeRED to read. I recommend installing the daemon, so it's always reading your BLE sensor and sending to NodeRED via MQTT.
I configured both my 2022 Xiaomi 'Flower care" BLE sensor and my Wanfei BLE sensor in my config.ini but my Wanfei sensor (localname TY) does not work with this mqtt-daemon. I was hoping it would, but it doesn't. Lesson learned folks, BUY the right Xiaomi BLE plant monitor sensor!
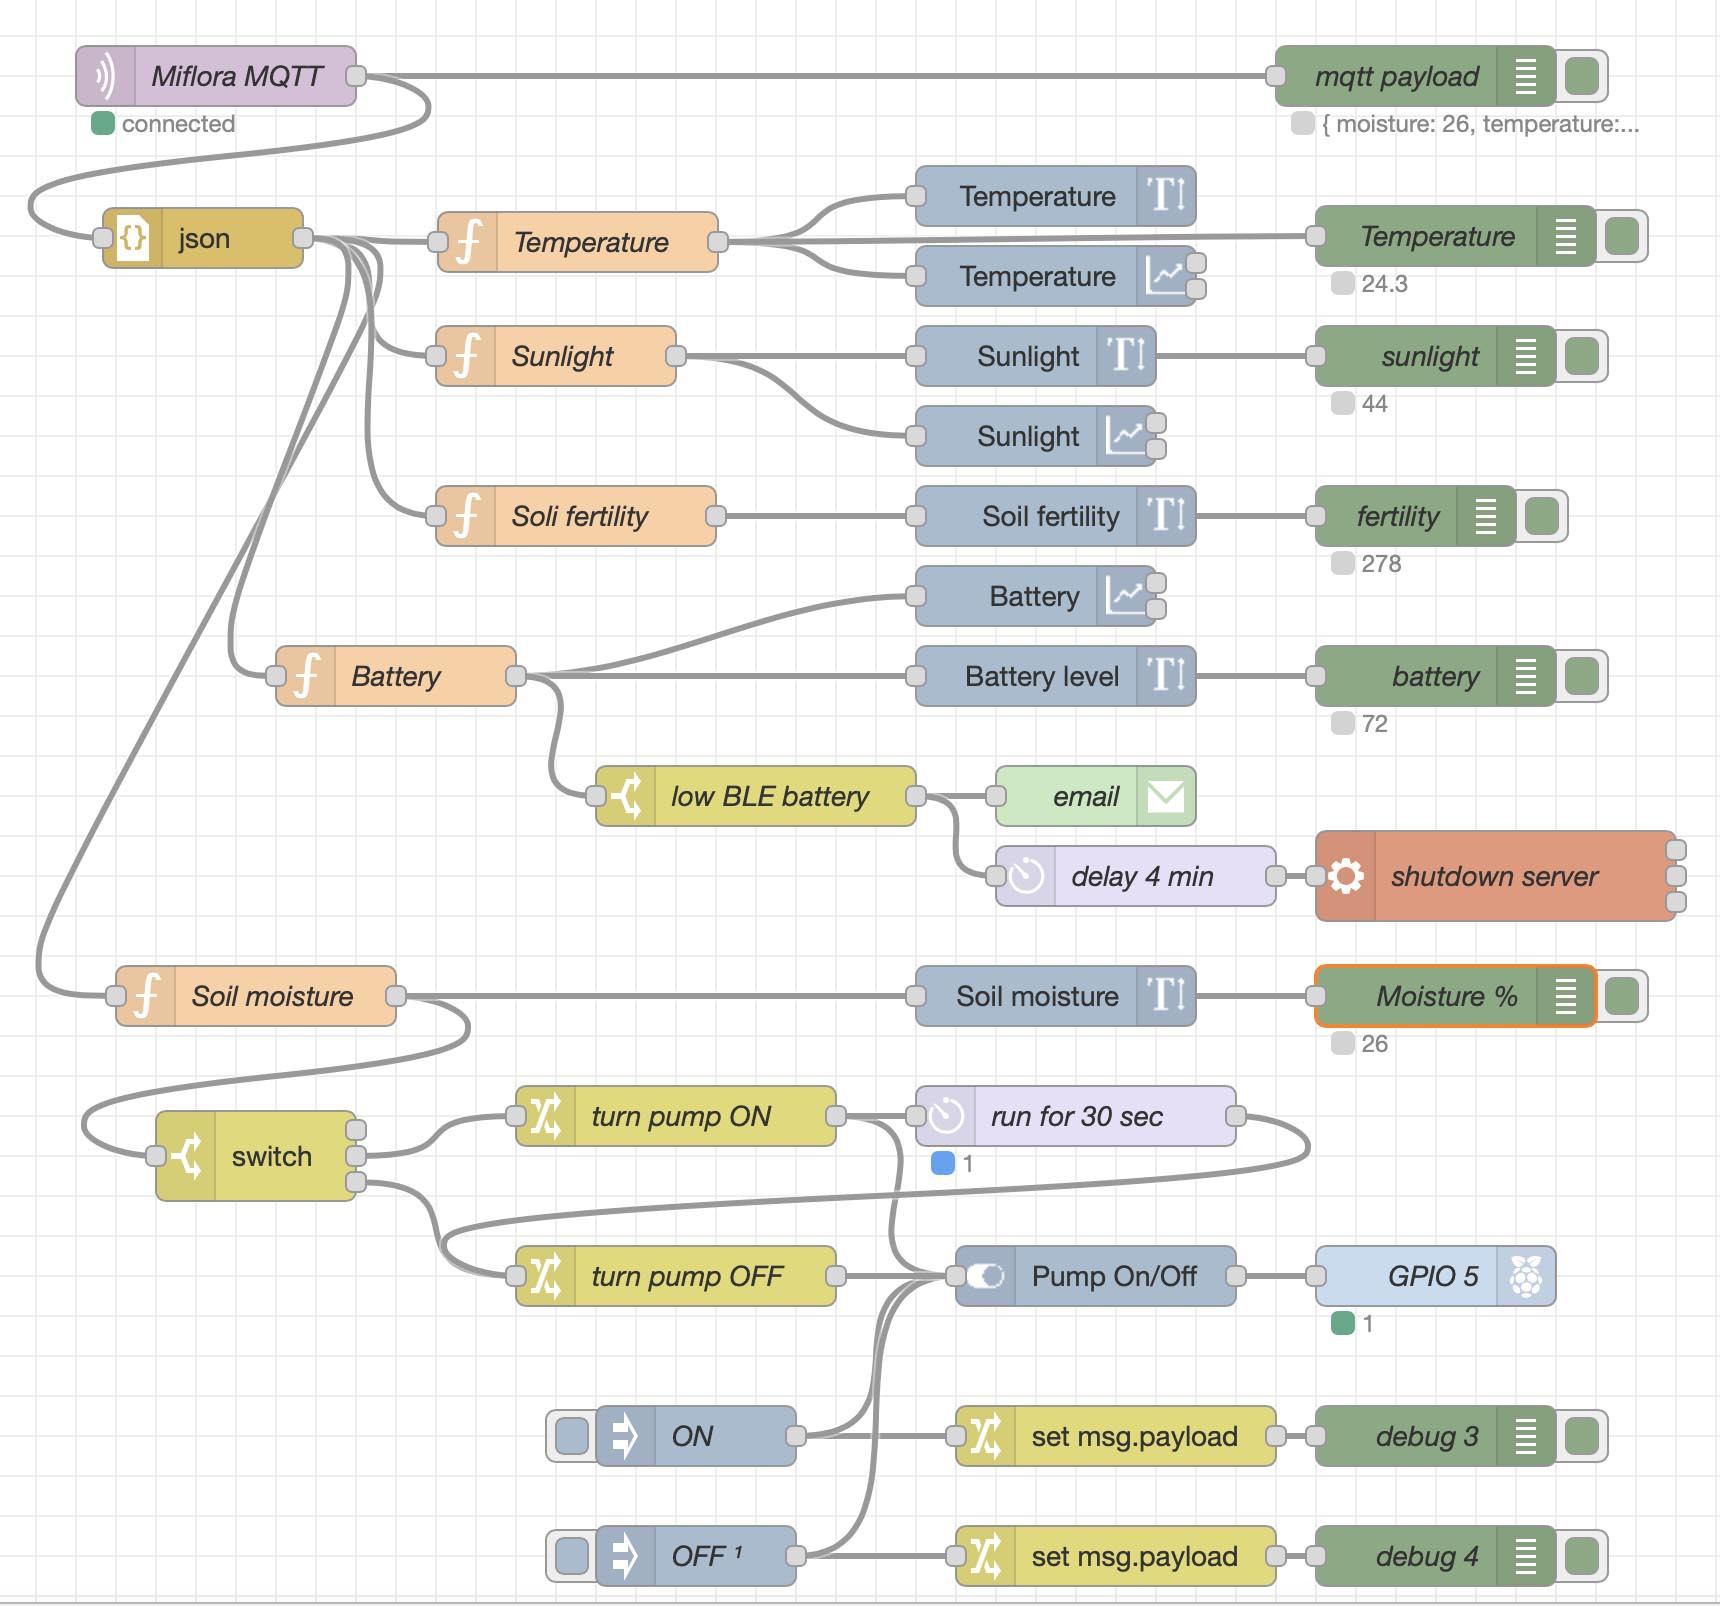
UPDATE Dec. 20, 2022: mqtt data is coming into NodeRED, and now controlling my Pump!
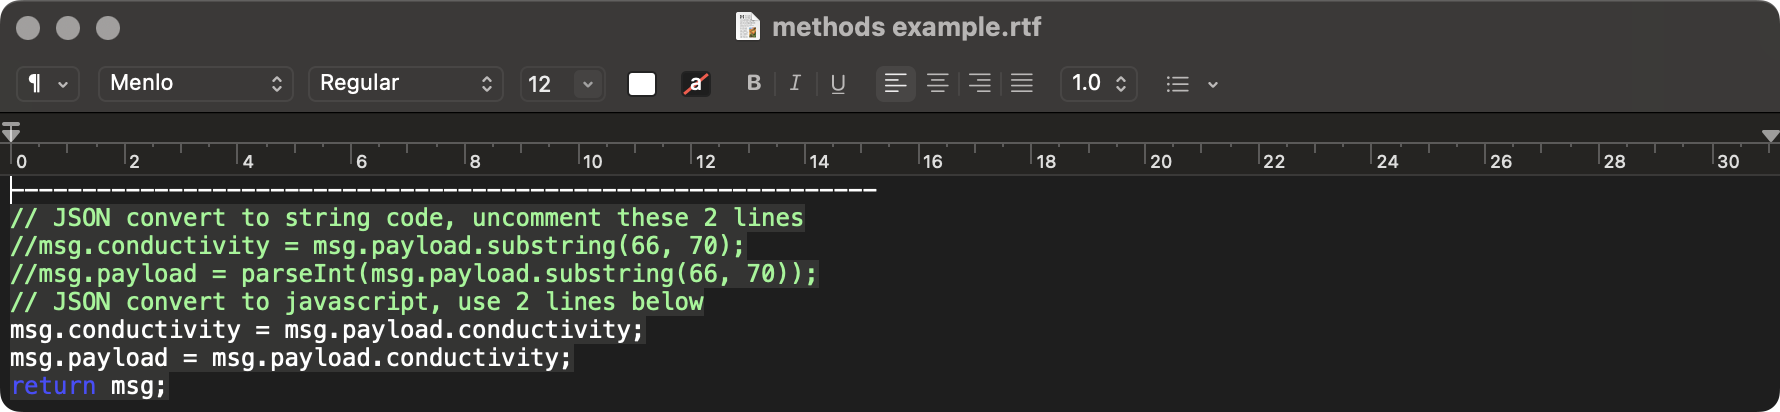
JSON converting to String:
Parsing the moisture value was tricky as the mqtt-daemon was sending the Sunlight value before Moisture, and since sunlight numerical values ranged between two and four digits, when light increased it was killing my pump code. I fixed the problem by re-ordering the data in /opt/miflora-mqtt-daemon/miflora-mqtt-daemon.py
My order changes in miflora-mqtt-daemon.py are as follows:

This puts light last, so when sunlight becomes strong, it doesn't break my pump code. For testing purposes, I set the pump to turn on when moisture got below 30%. I will likely be setting it to 15%.
JSON converting to JavaScript:

If you set JSON convert to Javascript object, you will NOT have to re-order any lines in miflora-mqtt-daemon.py
So success? Yes.
The Pi 4 consumes only 5.1 Watts on the Ubiquiti US-8-60W switch https://amzn.to/3iU0gDl of it's available 48 Watts, and far less than the delivered 15.4 Watts per port.

I will be doing extensive testing of my flow and adding OpenHAB using afterwards using the unattended command line install https://www.openhab.org/docs/installation/openhabian.html#other-linux-systems-add-openhabian-just-like-any-other-software. The unattended install is tailored to work for Raspberries and it indeed does work with no issues.
NOTE: be careful commenting out or configuring OpenHab SSH or you could lock yourself out.
You can download my finished flow (Basic watering.json) in the files section. Enjoy.
If you wire your pump to the first relay as I have done (see photo at top) then all you need to do is change your config.ini in /opt/miflora-mqtt-daemon/ directory to reflect the MAC address of your Xiaomi BLE sensor and make a single change in my NodeRED flow. You need to make sure the yourplantnamehere set in config.ini matches that in your NodeRed flow, but that's a trivial edit to the flow. Do as I describe and you should have it working. Easy!

QED.
If you get this far, please post in Discussion.
To connect all the plants to the water supply, I used a 50Ft Automatic Micro Irrigation System https://amzn.to/3wpK27X
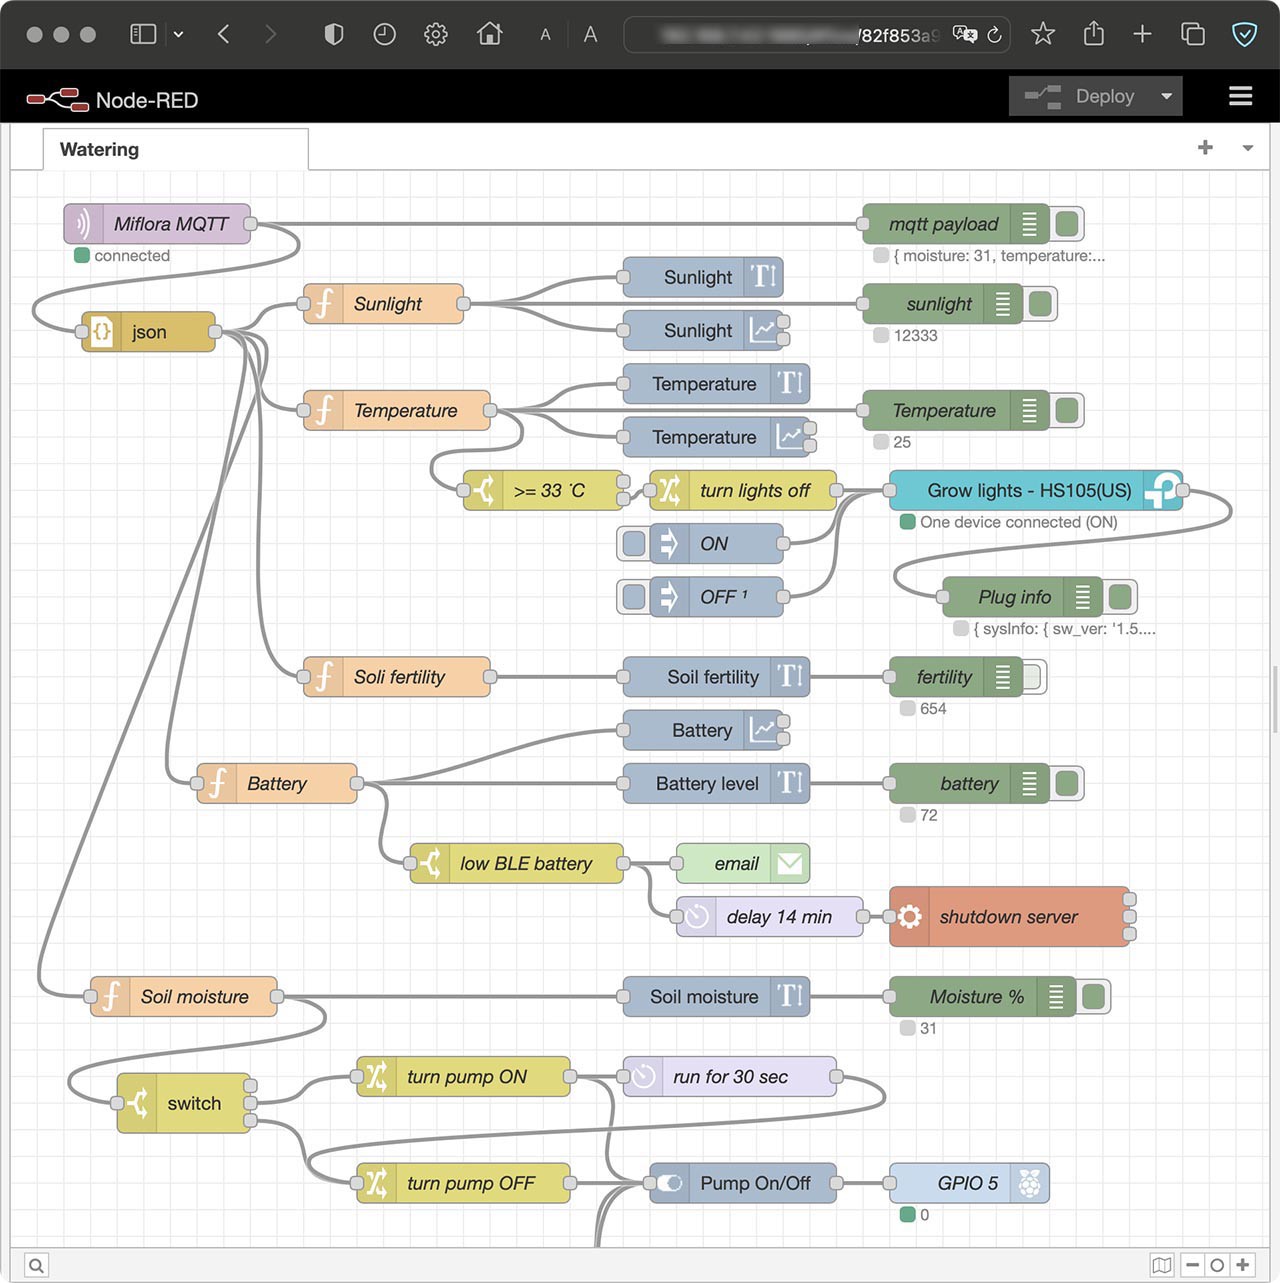
UPDATE Jan 5: I have updated my flow to include a TS-Link HS105 smart plug https://amzn.to/3J5y3UE . This schedules my lights and allows me to turn off my grow lights when the temperature gets too hot. The grow light I use is a Viparspectra P2000 https://amzn.to/3XWphwu
Other usefull stuff I use:
Rockwell cubes 3" x 3" https://amzn.to/40d5bQE
Rooting gel: https://amzn.to/3wATPIq
Trellis netting: https://amzn.to/40cOxAj
Nursery Pots with humidity dome: https://amzn.to/3XQQLEb
StepWell Super Soil SS-W Organic growing medium https://amzn.to/3Jx2kMa
Feb 18 UPDATE: The weak point of this system is running out of water and still running the pump, so before we add pH monitoring, we need to detect when we're out of water and NOT run the pump when this condition occurs.
So, wil be adding a Ultrasonic Distance Measuring Sensor HC-SR04: https://amzn.to/3Khs5k8 to the lid of my water bucket next.
Feb 28: Sensor HC-SR04 ordered, 2 - 6 week delivery time.
[UPDATE Apr 15] HC-SR04 arrived. Found breadboard jumper cable: https://amzn.to/3UHU2ET
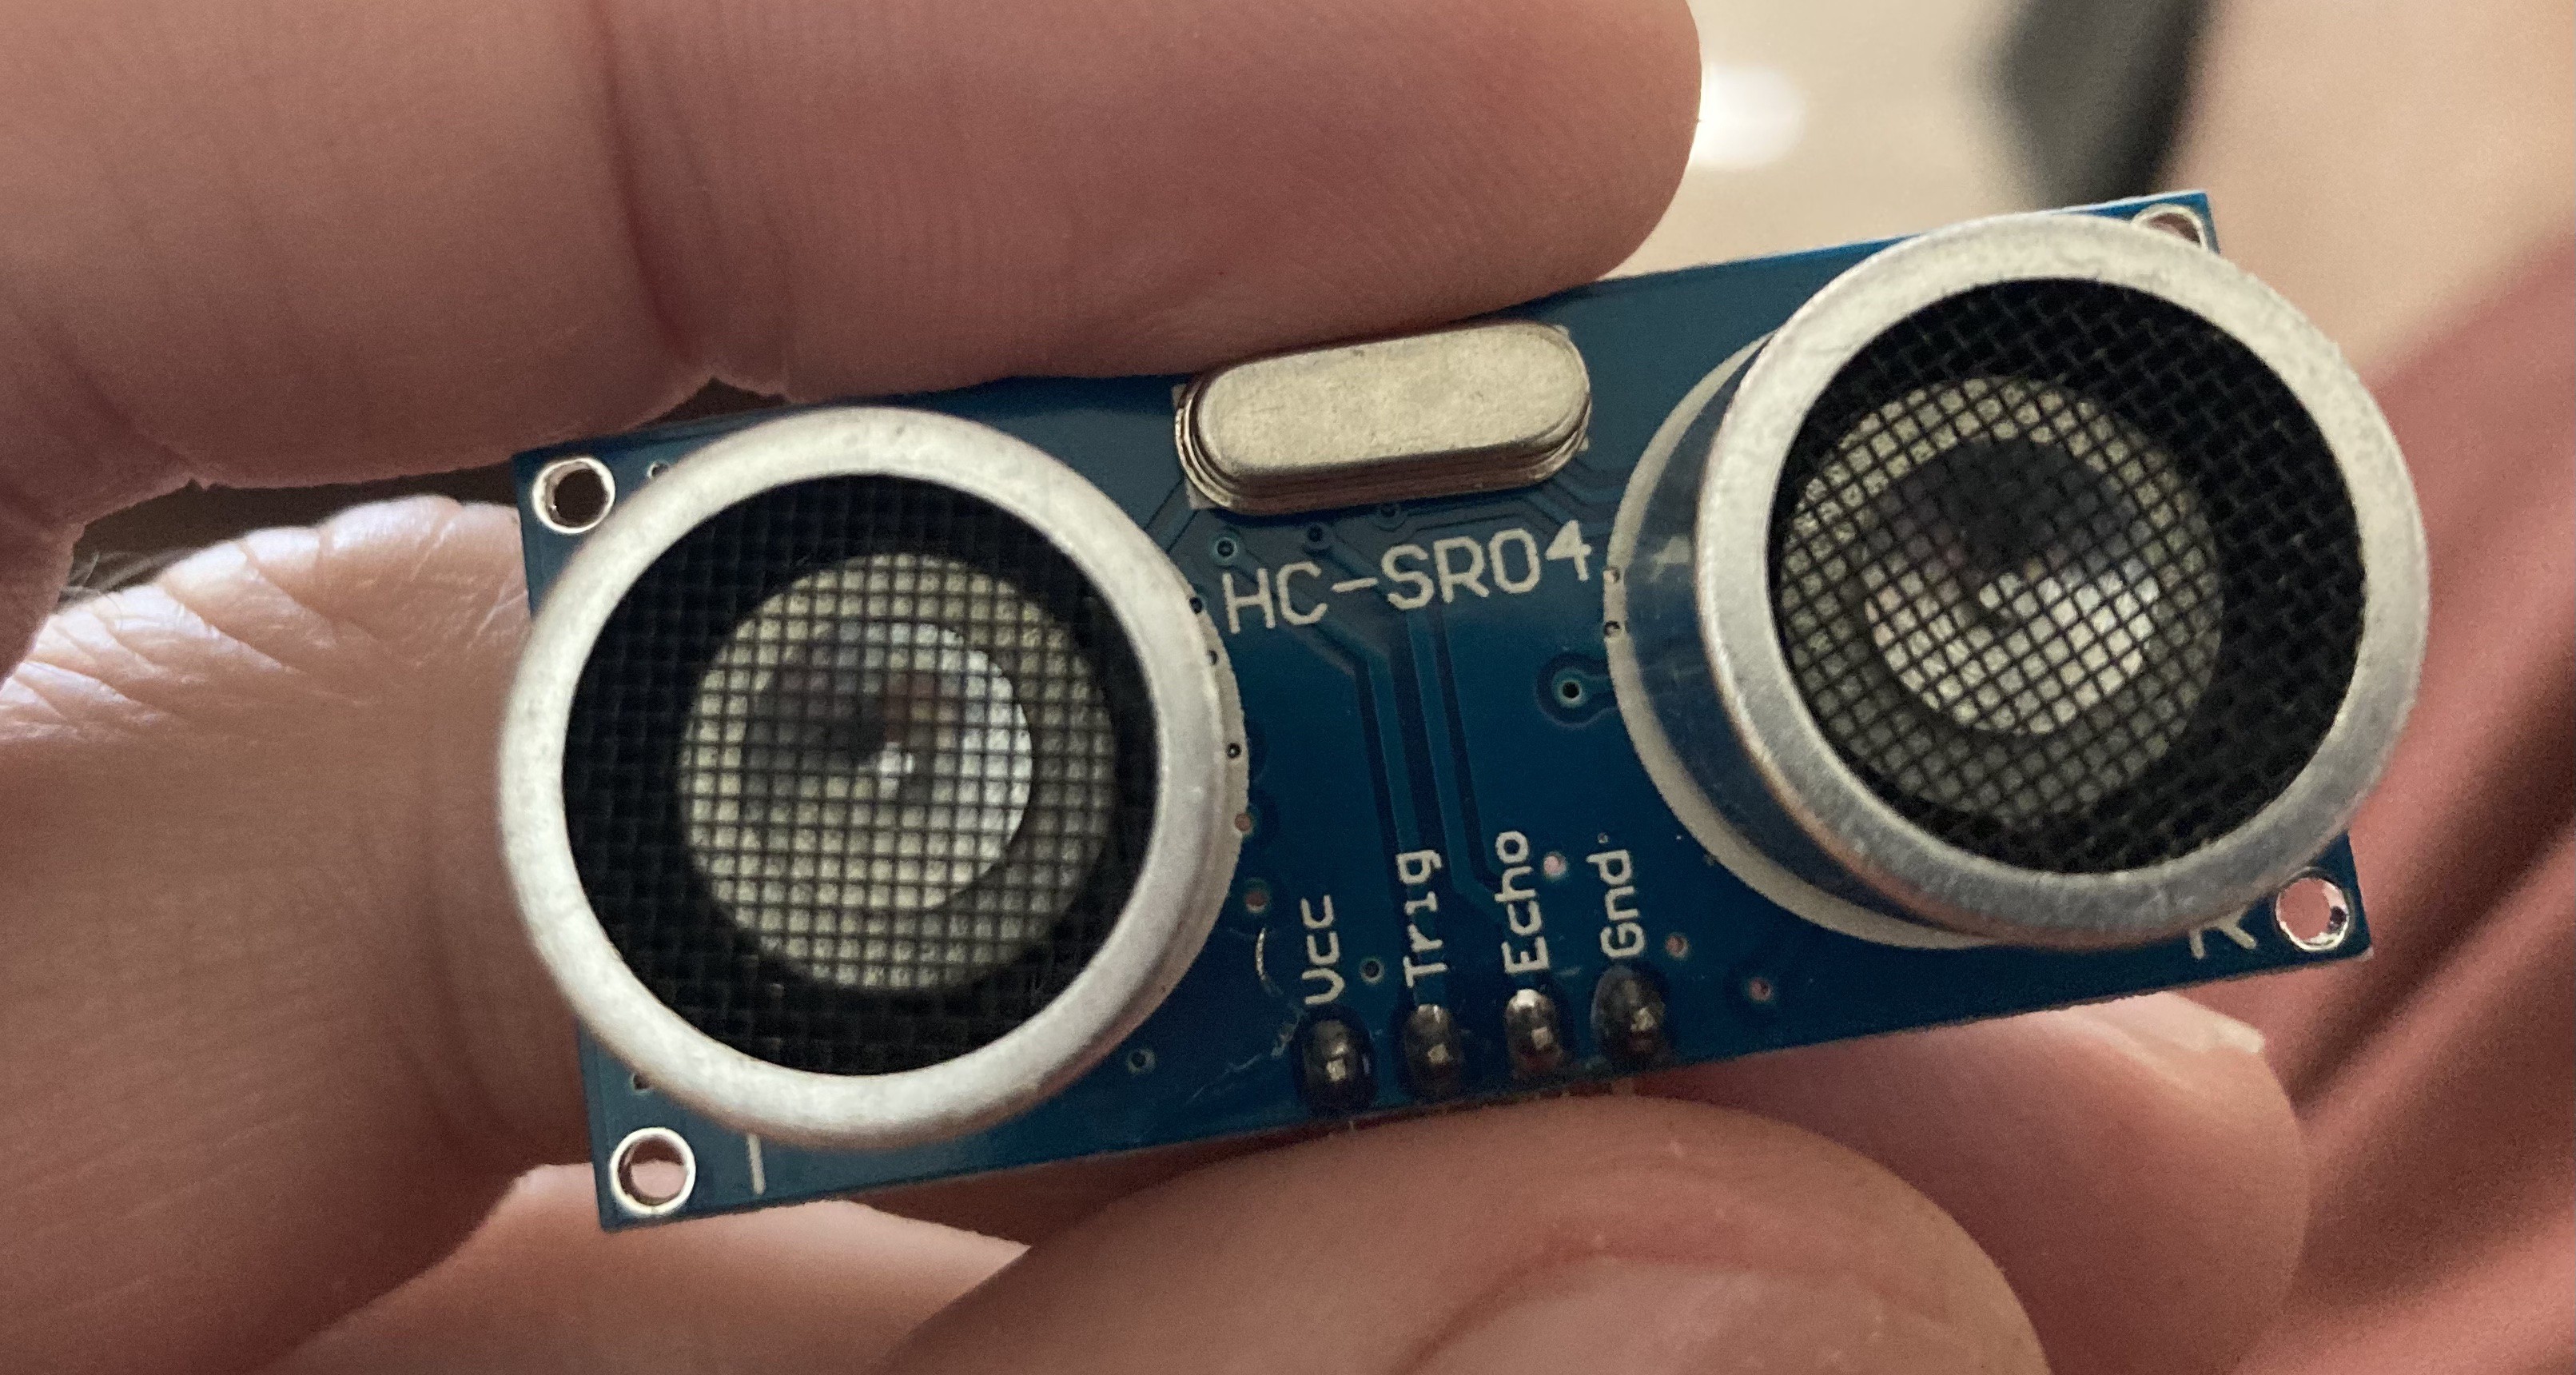
Wire the HC-SR04 to the pins on the Rhaspberry Pi as follows: Connect Pin2 to Vcc, pin3 to Trigger, pin5 to Echo and pin6 to Ground.
I used this jumper cable to connect the sensor to the Rhaspberry Pi https://amzn.to/40WVIvF .

To calibrate the node-red-node-pisrf NodeRed code, measure the height from the sensor (cm) to the empty level. Modify the code to reflect that distance, i.e. 32 cm in my case.
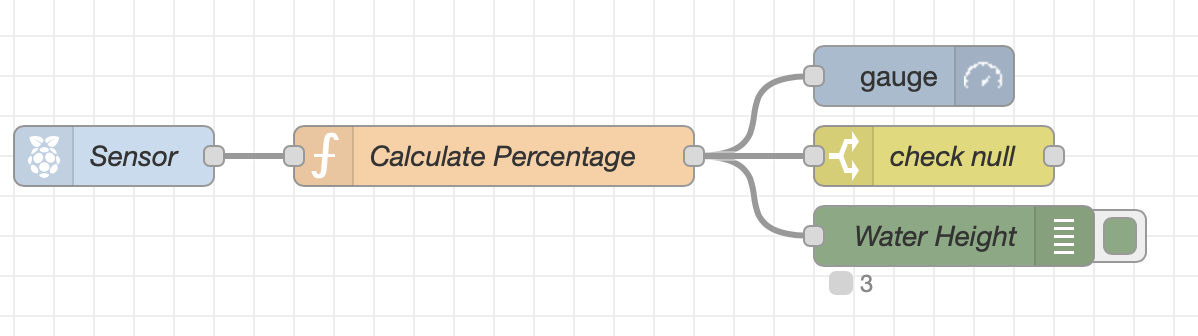
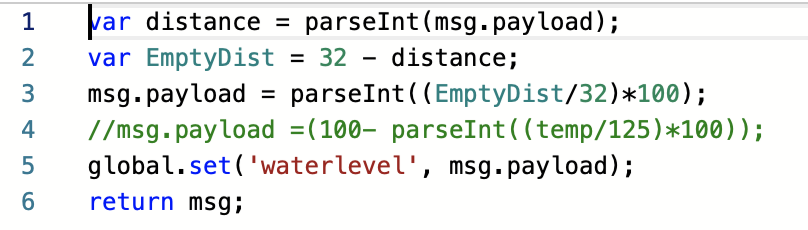
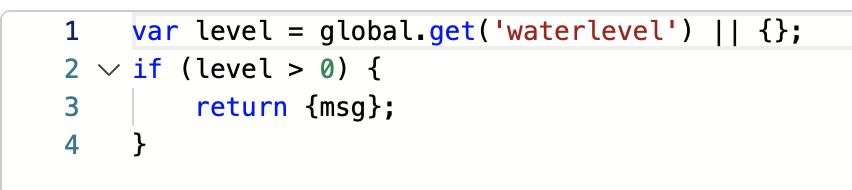
In my case, I don't want to run the pump if the water level reaches zero, so I write the height to global variable waterlevel and ONLY run the pump if there's enough water. Water height is shown in cm.

Checking water level Function:
Here's what my finished flow looks like, with the Ultrasonic Distance Measuring Sensor HC-SR04 https://amzn.to/3Khs5k8 and TS-Link HS105 smart plug https://amzn.to/3J5y3UE.

FUTURE PLANS: Considering adding an Atlas Scientific Lab Grade pH Probe https://amzn.to/3HYTl5s
using an Electrically Isolated EZO™ Carrier Board https://amzn.to/3I37Ogw and an EZO™ pH Circuit https://amzn.to/3jAXzqw
There's support for Atlas Scientific EZ boards if you install the node-red-contrib-ezo node in NodeRED.