Close
0%
0%

Portable Battery Pack for Light Electric Vehicle

Versatility. Just enough energy for 1 day's commute.

Similar projects worth following
This is not about yet another electric vehicle. This is about exploring perspectives that we normally can't as we're bound to what the market provides.

My approach here is the "just enough" amount of energy to get me through my daily commute. The consequence is that I can carry the battery pack and charge it anywhere. So I don't need a power plug wherever I park.

Later on attaching an OPTIONAL gas generator so that we can benefit from the current infrastructure.

Design goals are :

  • Light enough to carry it from parking spot to charging spot (office, home, etc)
  • Removable -- Park, battery removal/insertion procedure < 2 min.
  • Small enough to charge anywhere
  • Not an artisanal battery pack - instead, composed of a few safer and smaller RC Hobby batteries (Turnigy, Zippy, etc)
  • Serviceable battery pack - when one cell goes away, you shouldn't need to pay for a whole new pack, instead, just a fraction of it.

I purposedly started with a working electric motorcycle. There's plenty of good documentation out there about conversions, chassis, etc.

I'm in the school of thought that advocates for "don't reinvent the wheel". On the other hand, most wheels are one-size-fits-all and when it comes to Electric Vehicles, I'm yet to see an option that is not a huge commitment, financial and in terms of adapting your environment(s) to charge it.

In principle, a removable battery pack should enable you to use it in the same way as a gas vehicle. Park it anywhere. You'll still have to charge the pack, but that's assumed to be ok.

Note: I need to highlight the ZElectric guys, during my state of the art research I found that they do this business professionally in the best way I've ever seen - keeping it simple, straight to the point and still providing great specs in their vehicles. Not adding overly complex technological features (smart everything) and with that keeping the price down. For ~ $5k you can already get a high end electric bike from them, good for the highway.

PS: I'm cross-posting this material in Instructables purposedly to benefit from the different communities/platforms. I'll post the different steps as "logs" here. It helps to separate by subject/aspect of the project.

  • Next Steps

    Samir Dupont06/05/2017 at 05:29 0 comments

    Next Steps

    So we're at a point that the whole upgrade was done, tested and prototyped. It works. I'll start commuting with that and work on the next steps :

    • Find the right BMS+Charger approach
      • Provisory 5A/3h charger is already here
        • This guy actually gave me 1:30h of charging time. Not buying that it's doing 5A, but it's tricky to measure without the proper tools.
    • Design an aluminum case for the batteries + BMS
      • This will be a digital design I'll share here.
      • This should have a rail system counterpart to live inside of the bike. Should reduce battery removal/insertion from time from 2~3 min to < 30s.
        • Battery should fit the front port, protected from a key, very easy access. Picture to follow.

  • Prototype Pack

    Samir Dupont06/05/2017 at 05:26 0 comments


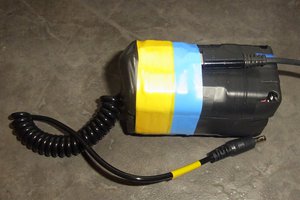
    More show than tell here. I did what I like the most. Got the job done as fast as I can, which we can afford here as it's the prototyping phase.

    A wood board to hold everything together, AWG 8 wire (spec'ed for the nominal average current) and the XT-90 connectors to match the batteries.

    I assume that you already know what needs to be done. If you don't it's probably not a good idea to be messing with this big LiPos without any protection circuit.

    Yes, it's a rig. I'm not proud of it. But it works, it got me 1~2 months ahead with actually testing the thing on the road. Don't worry. We'll get back to it to do the proper design, which is the whole focus of this project.

    Basic features will be taken into account in the final design these are :

    • Each of the 4 packs could be connected/disconnected/removed individually for balancing/maintenance
    • Fits the battery storage bay of the bike. Has anchors so that it can be strapped in place.
    • Can be carried by hand - not in the pictures but I have a small rope that works as a handle
    • Should be able to slide in and out from a Rail.

  • Using a BMS

    Samir Dupont06/05/2017 at 05:23 0 comments

    One thing I assumed and learnt that not so easy - beyond 6S it's very hard to find a fast enough charger that also balances.

    Most EV setups will require a BMS and it's a very bad idea to think you don't need one. First months will be fine, but once the first cell fails, you're in for a world of flames. You better have a way to detect that in time to retire the defective cell/pack.

    So it might be ok to prototype without a BMS, but put in your plans to get one. It's not that hard to install even if you barely know what you're doing : http://www.batterysupports.com/60v-672v-16s-100a-...

    If you're still thinking you can get away without it, consider the following scenario :

    Most stealth LiPo failures come from cells that due to age have a << capacity than the rest of the pack. You're charging and that one will charge "just fine", until it reaches 100% of its reduced capacity and the charger doesn't see that, keeps charging the pack. Voila - our cell goes over 4.2v and becomes a fire starter.

    A similar one but in the discharge scenario - you're riding your bike and the reduced capacity cell gets to 3.7v much faster than its neighbors. Your monitoring (whatever it is, unless it's per cell) won't catch it, you'll keep riding and guess what? Depleting LiPos under 3v also ends up in flames.

  • Design Considerations for the New Pack

    Samir Dupont06/05/2017 at 05:21 0 comments

    Here we'll discuss :

    • Distance
    • Calculate energy required
    • Finding the appropriate batteries to assemble the pack
    • Charging time

    I'll share my rationale and process. You could apply a similar approach by changing a few parameters to adapt to your case.

    First, knowing how much is sufficient is the core business. Let's start with distance. Ask your preferred map provider the raw distance of your commute. Keep that in mind and use this geographically less featured calculator :

    http://www.electricbikerange.info/Electric_bike_ra...

    Which also considers elevation gain. As this if for light bikes, make sure to specify a higher weight for your motorcycle. On the calculator, I got 6 Ah needed to go one way on my 60v battery pack. So the full commute will need 12 Ah.

    As usual, don't consider that this is all you'll need as there are always losses and safety reserves that are good to exist.

    Once you get fluent with these measurements of capacity, I found pretty helpful to translate the battery pack capacity to Wh. It's a much more comparable unit. Just multiply your Ah capacity and the pack voltage. I got ~960 Wh.

    It's much easier to compare to other electric vehicles and get a real world feeling on energy spent per mile. For example, I found that electric scooters should consume about 60 Wh per mile, given that electric bikes do much less and performance motorcycles do about 80 Wh per mile. This is a great ballpark value. use it to compare to your numbers from the calculator.

    Going to the physical world, I found a pretty good deal in hobbyking.com for a 16 Ah 4S battery :

    Specs :

    Minimum Capacity: 16000mAh

    Configuration: 4S2P / 14.8V / 4

    CellConstant Discharge: 10C

    Peak Discharge (10sec): 20C

    Pack Weight: 1290gPack Size: 173 x 74 x 45mm

    Charge Plug: JST-XH

    Discharge Plug: XT90

    The link will eventually break, but here it is :

    https://hobbyking.com/en_us/multistar-high-capacit...

    I got 4 of these for $50 each. Pretty good deal, total of $200 for the entire LiPo pack. That's rare and that's one of the reasons I wanted to go for a Hobby pack based design. It sells a lot and you can find spares and deals much more easily.

    That gives me the 16S I need, once I connect the 4 packs in series. It also allows me to disassemble the 16S pack into the smaller 4S ones and use a standard model plane 300W charger, which is what I did during all the testing period, before I bought the 16S no balancing charger.

    I don't think we even need to discuss current capacity here. Lead acid would need a lot of care. But using LiPo is just cheating. Peukert's law doesn't apply and if we're going for 16 Ah, 10C is 160 A , double than our maximum current. So you just need to be aware that your acceleration peaks are under the 10C (or higher) battery spec.

    For charging, you will usually will do pretty well charging at 1C in 1h. I preferred going the safer route and got a 5A charger for my 16Ah pack, which will give me roughly 3h charging time.

    For chargers, Aliexpress and the next step's BMS suppliers are pretty ok. I'm sure there are better ones, let me know in the comments!

    I'll fast forward to the current draw tests and let you have a bit of fun on how that turned out in the garage.


  • Dimension the LiPo Equivalent of Your Lead Acid Pack

    Samir Dupont06/05/2017 at 05:16 0 comments

    No matter what you had before, we need to figure out how to power the controller. Here's how :

    This is not exact business as batteries have a significant higher voltage when charged than when they're discharged. This is more subtle (and way less linear) in LiPos than in Lead Acid, so we need to be careful here.

    In my case, I had 5 x 12v Lead Acids. That gave me 66v charged and 57v discharged. Look at the Lead Acid discharge curve at ~2C for reference.

    While trying to provide a similar range, I went for a no matter how, 16S pack. That'd give me 67.2 charged and 59.2 discharged.

    I know, it's not exactly the same, but we can only work at increments of one cell. So that's the closest possible. Also, most circuits don't have a mandatory input voltage, is more of a range, as they generally have internal regulators and protections.

    If it was real electronics, we'd have all the specs from the manufacturer and be sure. As we're talking about cheap, brandless circuits we have to hope for the best and buy a 50 bucks replacement if something goes wrong.

    FWIW In the beginning of my LiPo journey, I thought that voltmeter readings would be close to useless or misleading. In practice they're pretty helpful due to the LiPo discharge curve. You just need to be very careful, as after it reaches 3.7v per cell, the discharge to damage will be pretty fast. Which is why most BMSs have a cutoff close to that point.

  • The Donor Bike

    Samir Dupont06/05/2017 at 05:13 0 comments

    Specs first, then you can read the story if you're more interested :

    • Purchase price : $700
    • Power : ~ 5 kW
    • Controller : 60v, 80A
      • In practice, you can give it up to 68v and it's happy. It's designed to take the charge/discharge curve of a Lead-Acid pack.
    • Brushless hub motor
    • Original battery pack 60v ; 40 Ah Lead Acid battery pack - 3 yo and a lot of abuse :
      • 8 months, no maintenance charge storage
      • When driving it you could feel that the battery pack was in the end of its life. Huge voltage sag and low current delivery after the first bursts.

    So I could feel that it was a good machine, it just needed some attention for it's battery pack. As usual with batteries, once they're damaged or old, there's little to do about it but getting a new pack. Perfect case for our project.

    Description for humans is - the batteries would actually last long, but any high current demand would make them kneel (voltage would drop from 62 to under 44). I could drive it for about 5 miles but whenever I'd try to climb a gentle hill, it wouldn't respond well to throttle.

    At night, lights would turn off when accelerating.

    One factor to motivate people out of Lead Acid for EVs is : look up Peukert's law for capacity reduction over high discharge rates. And that's what we do with EVs - average power is pretty ok, but "acceleration punches" are pretty demanding to the batteries. Lead Acid really doesn't like it.

    I know, decent LiPo packs are not cheap. Which is why it's great to go small. I can do my commute with 1 kWh and that costed me only $200 on a deal for Drone MultiStar LiPos. If I were to replace the original 40 Ah 60v lead acid pack I'd pay more than that.

View all 6 project logs

Enjoy this project?

Share

Discussions

Similar Projects

Does this project spark your interest?

Become a member to follow this project and never miss any updates