Close
0%
0%

Smart Plant

Monitor your favorite plant and get the state displayed on an e-paper. Simple, elegant, and with minimum energy consumption.

jonJon
Similar projects worth following
The Smart Plant is an electronic board designed to help gardeners monitor the health of their plants. With its advanced sensor suite, the Smart Plant can measure soil moisture, ambient light, air temperature and air relative humidity. In addition to its IoT capabilities, Smart Plant features a 2.9” e-paper display, allowing you to read your plant data at a glance.

Smart Plant is designed to be highly energy efficient, featuring deep-sleep features on its ESP32 microcontroller that allow its battery to last for weeks at a time. When it's time for a recharge, Smart Plant can be charged using a USB-C cable or a small solar panel, making it an eco-friendly choice for gardeners who want to minimize their environmental impact.

Overview

The Smart Plant was designed to be flashed with the ESPHome firmware, however it can be directly programmed through Arduino or ESP-IDF. And since the code is yours, so it's the data you gather, stream it to your Home Assistant server and automate your irrigation on the plant's demand! 

Want to get one?

After some readers inquired since the beginning if they could buy an assembled PCB, I started offering the boards through TIndie. However, since it took me more time than expected to prepare each kit to be shipped, I moved the kit preparation to Elecrow, where you can still buy it as a kit ready to be mounted.

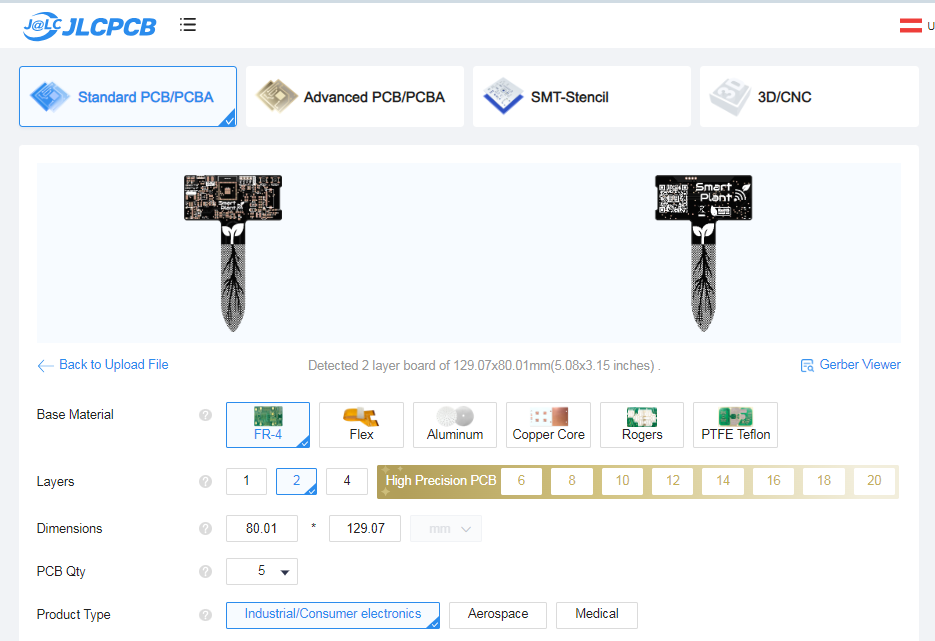
In any case, all the design files are available on my Github, and I have prepared an extended documentation page for any user willing to know more about the project

Specifications:

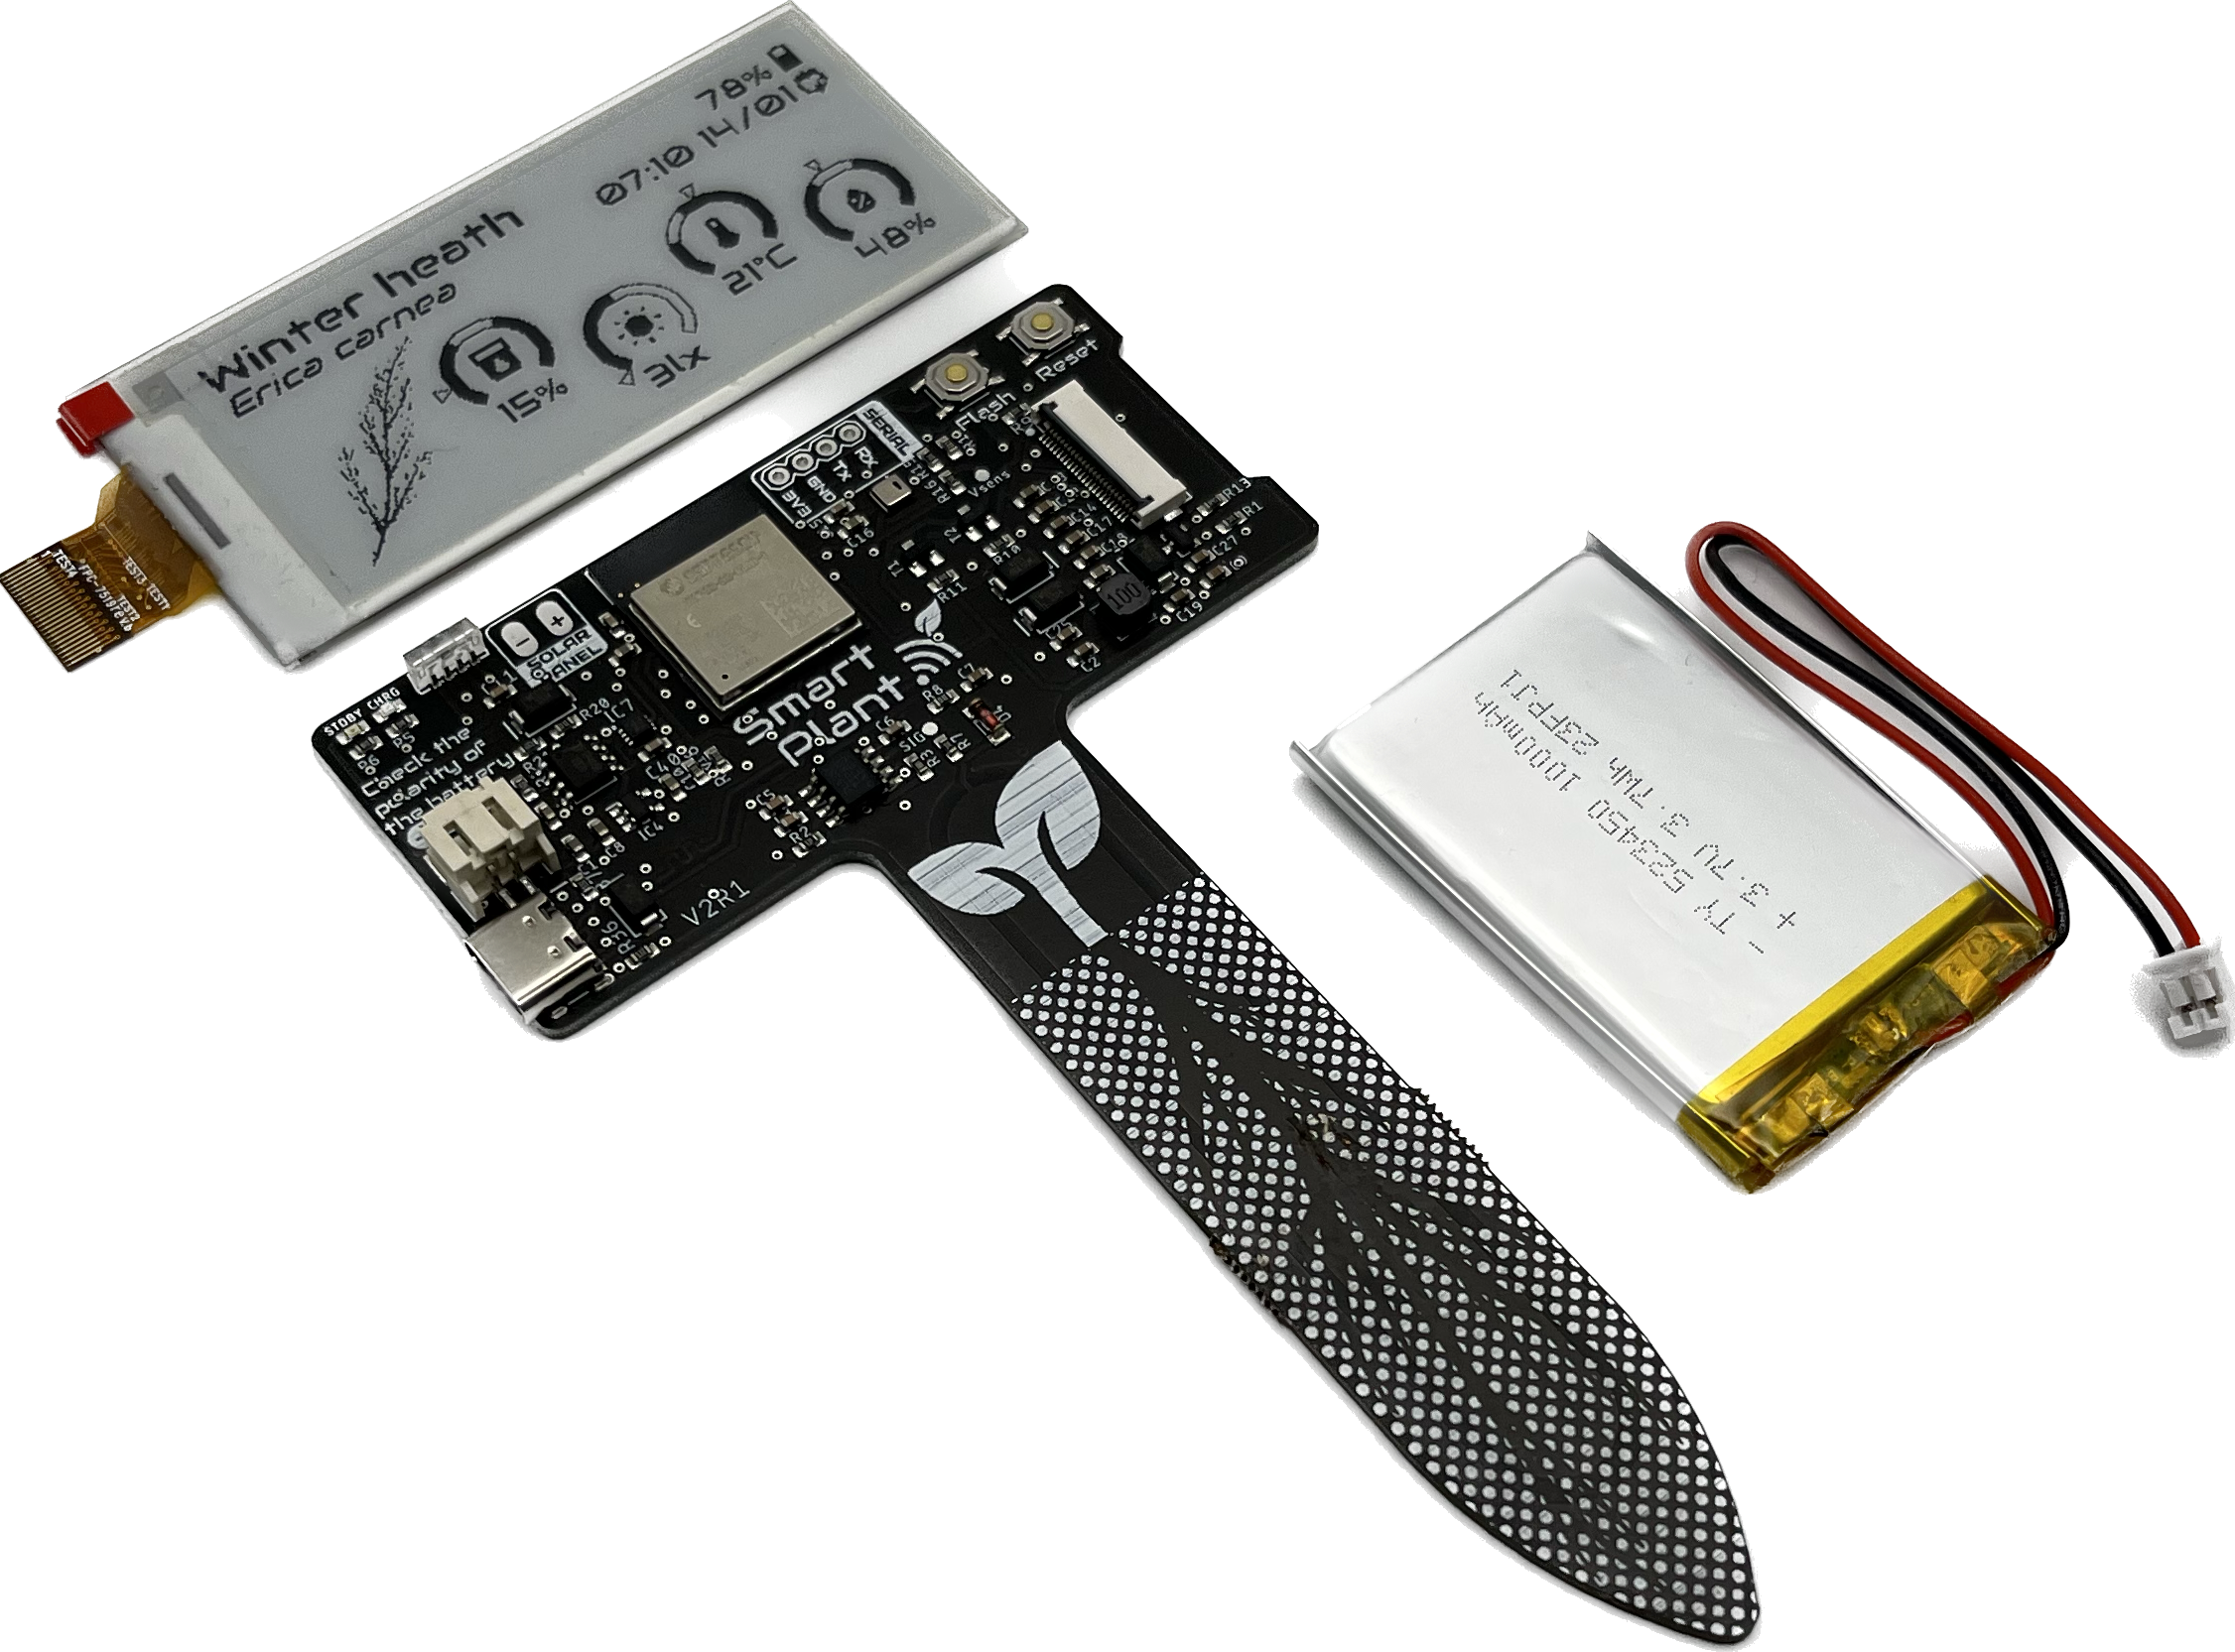
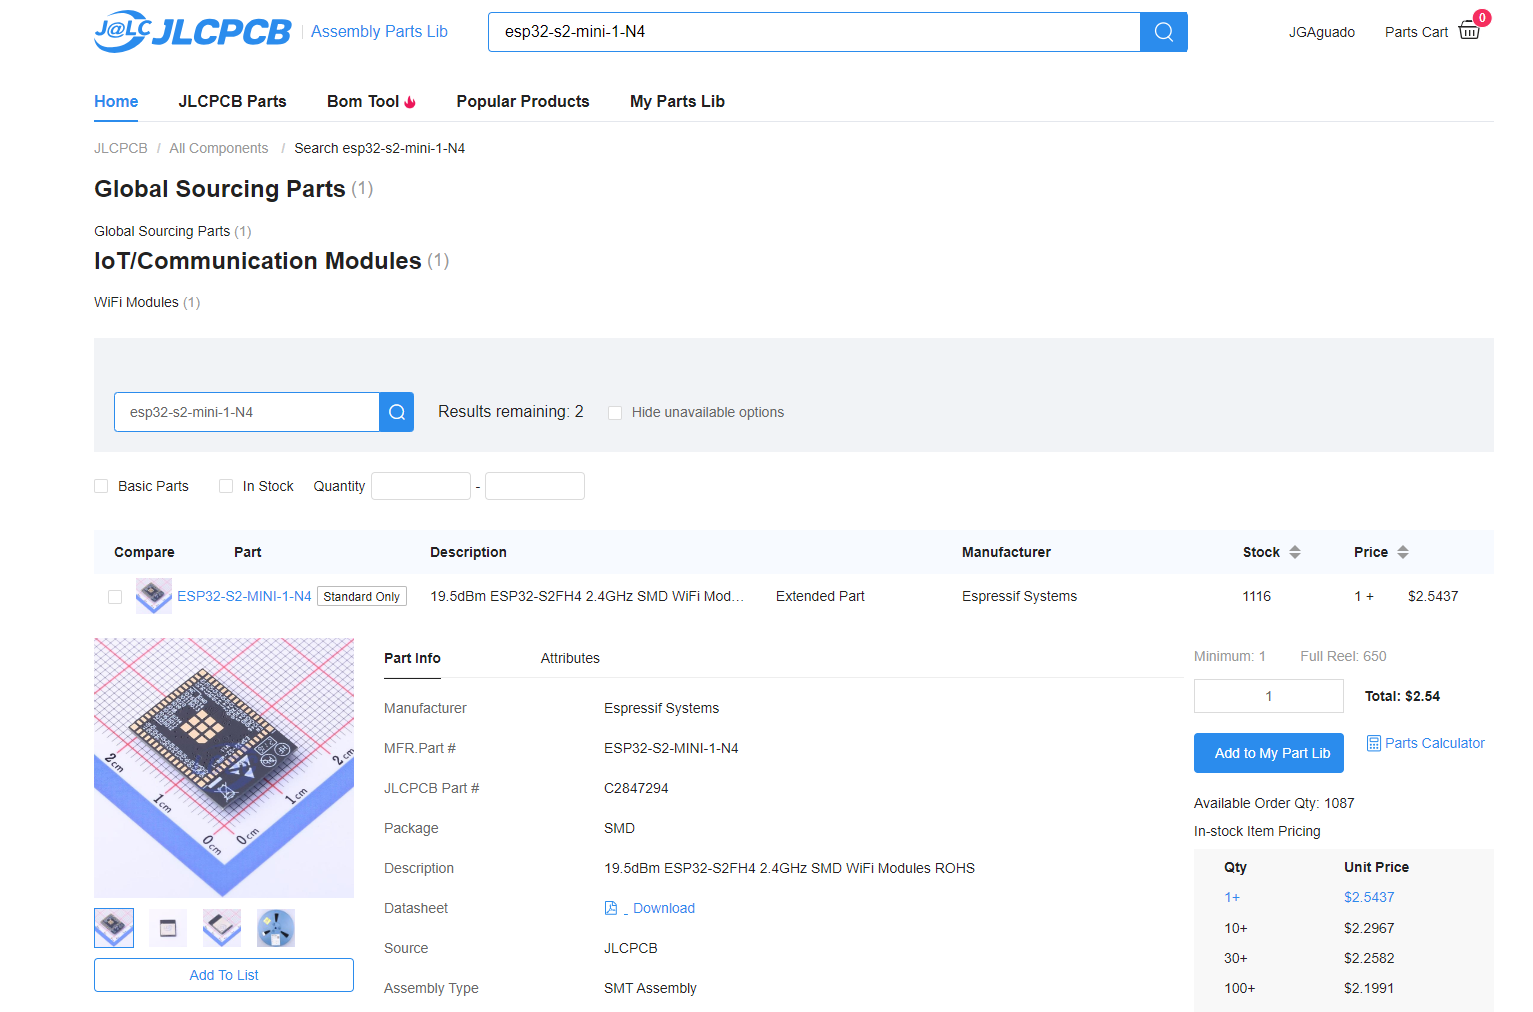
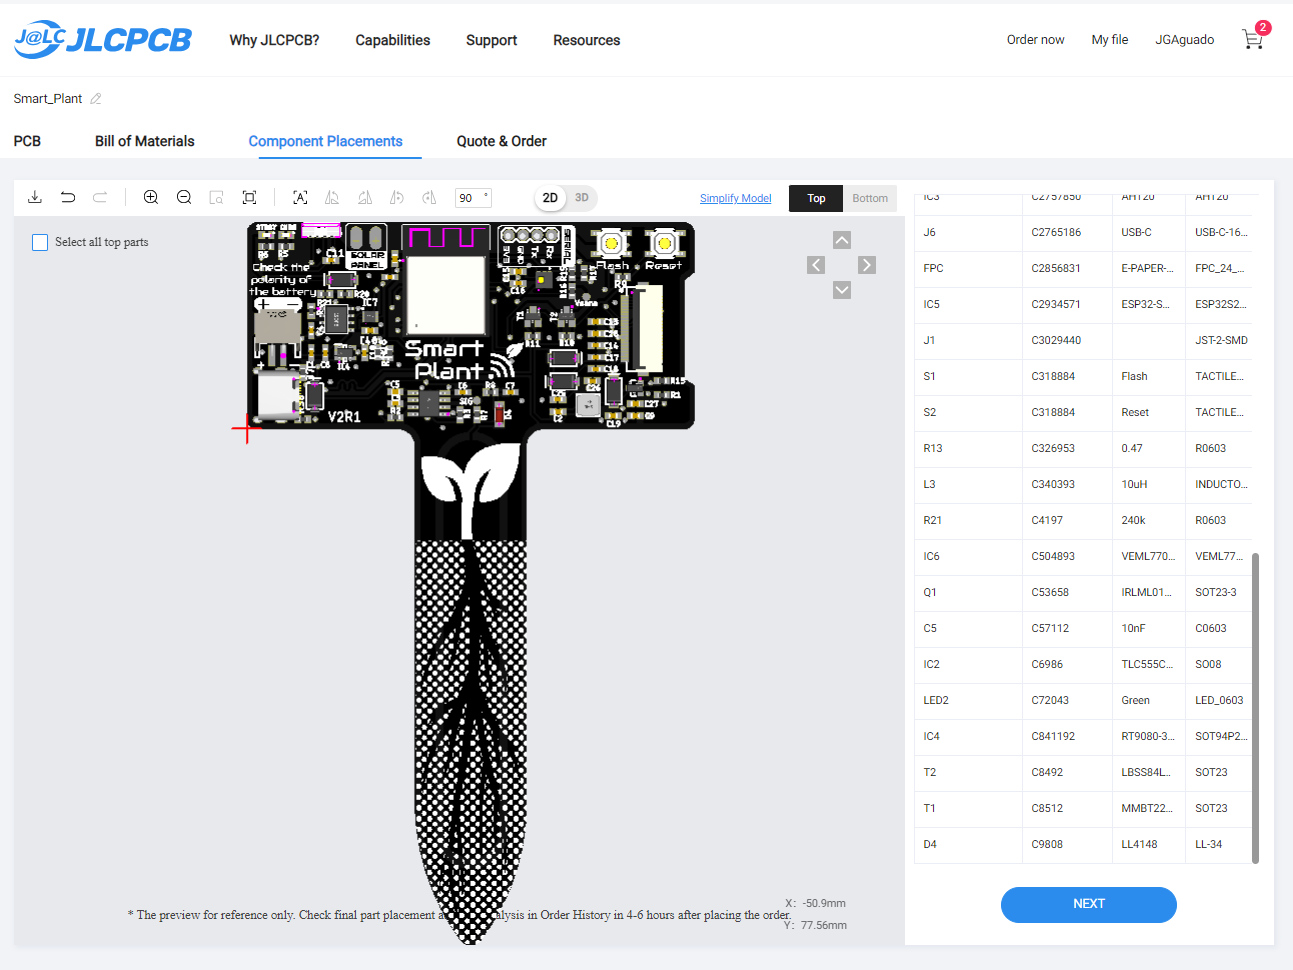
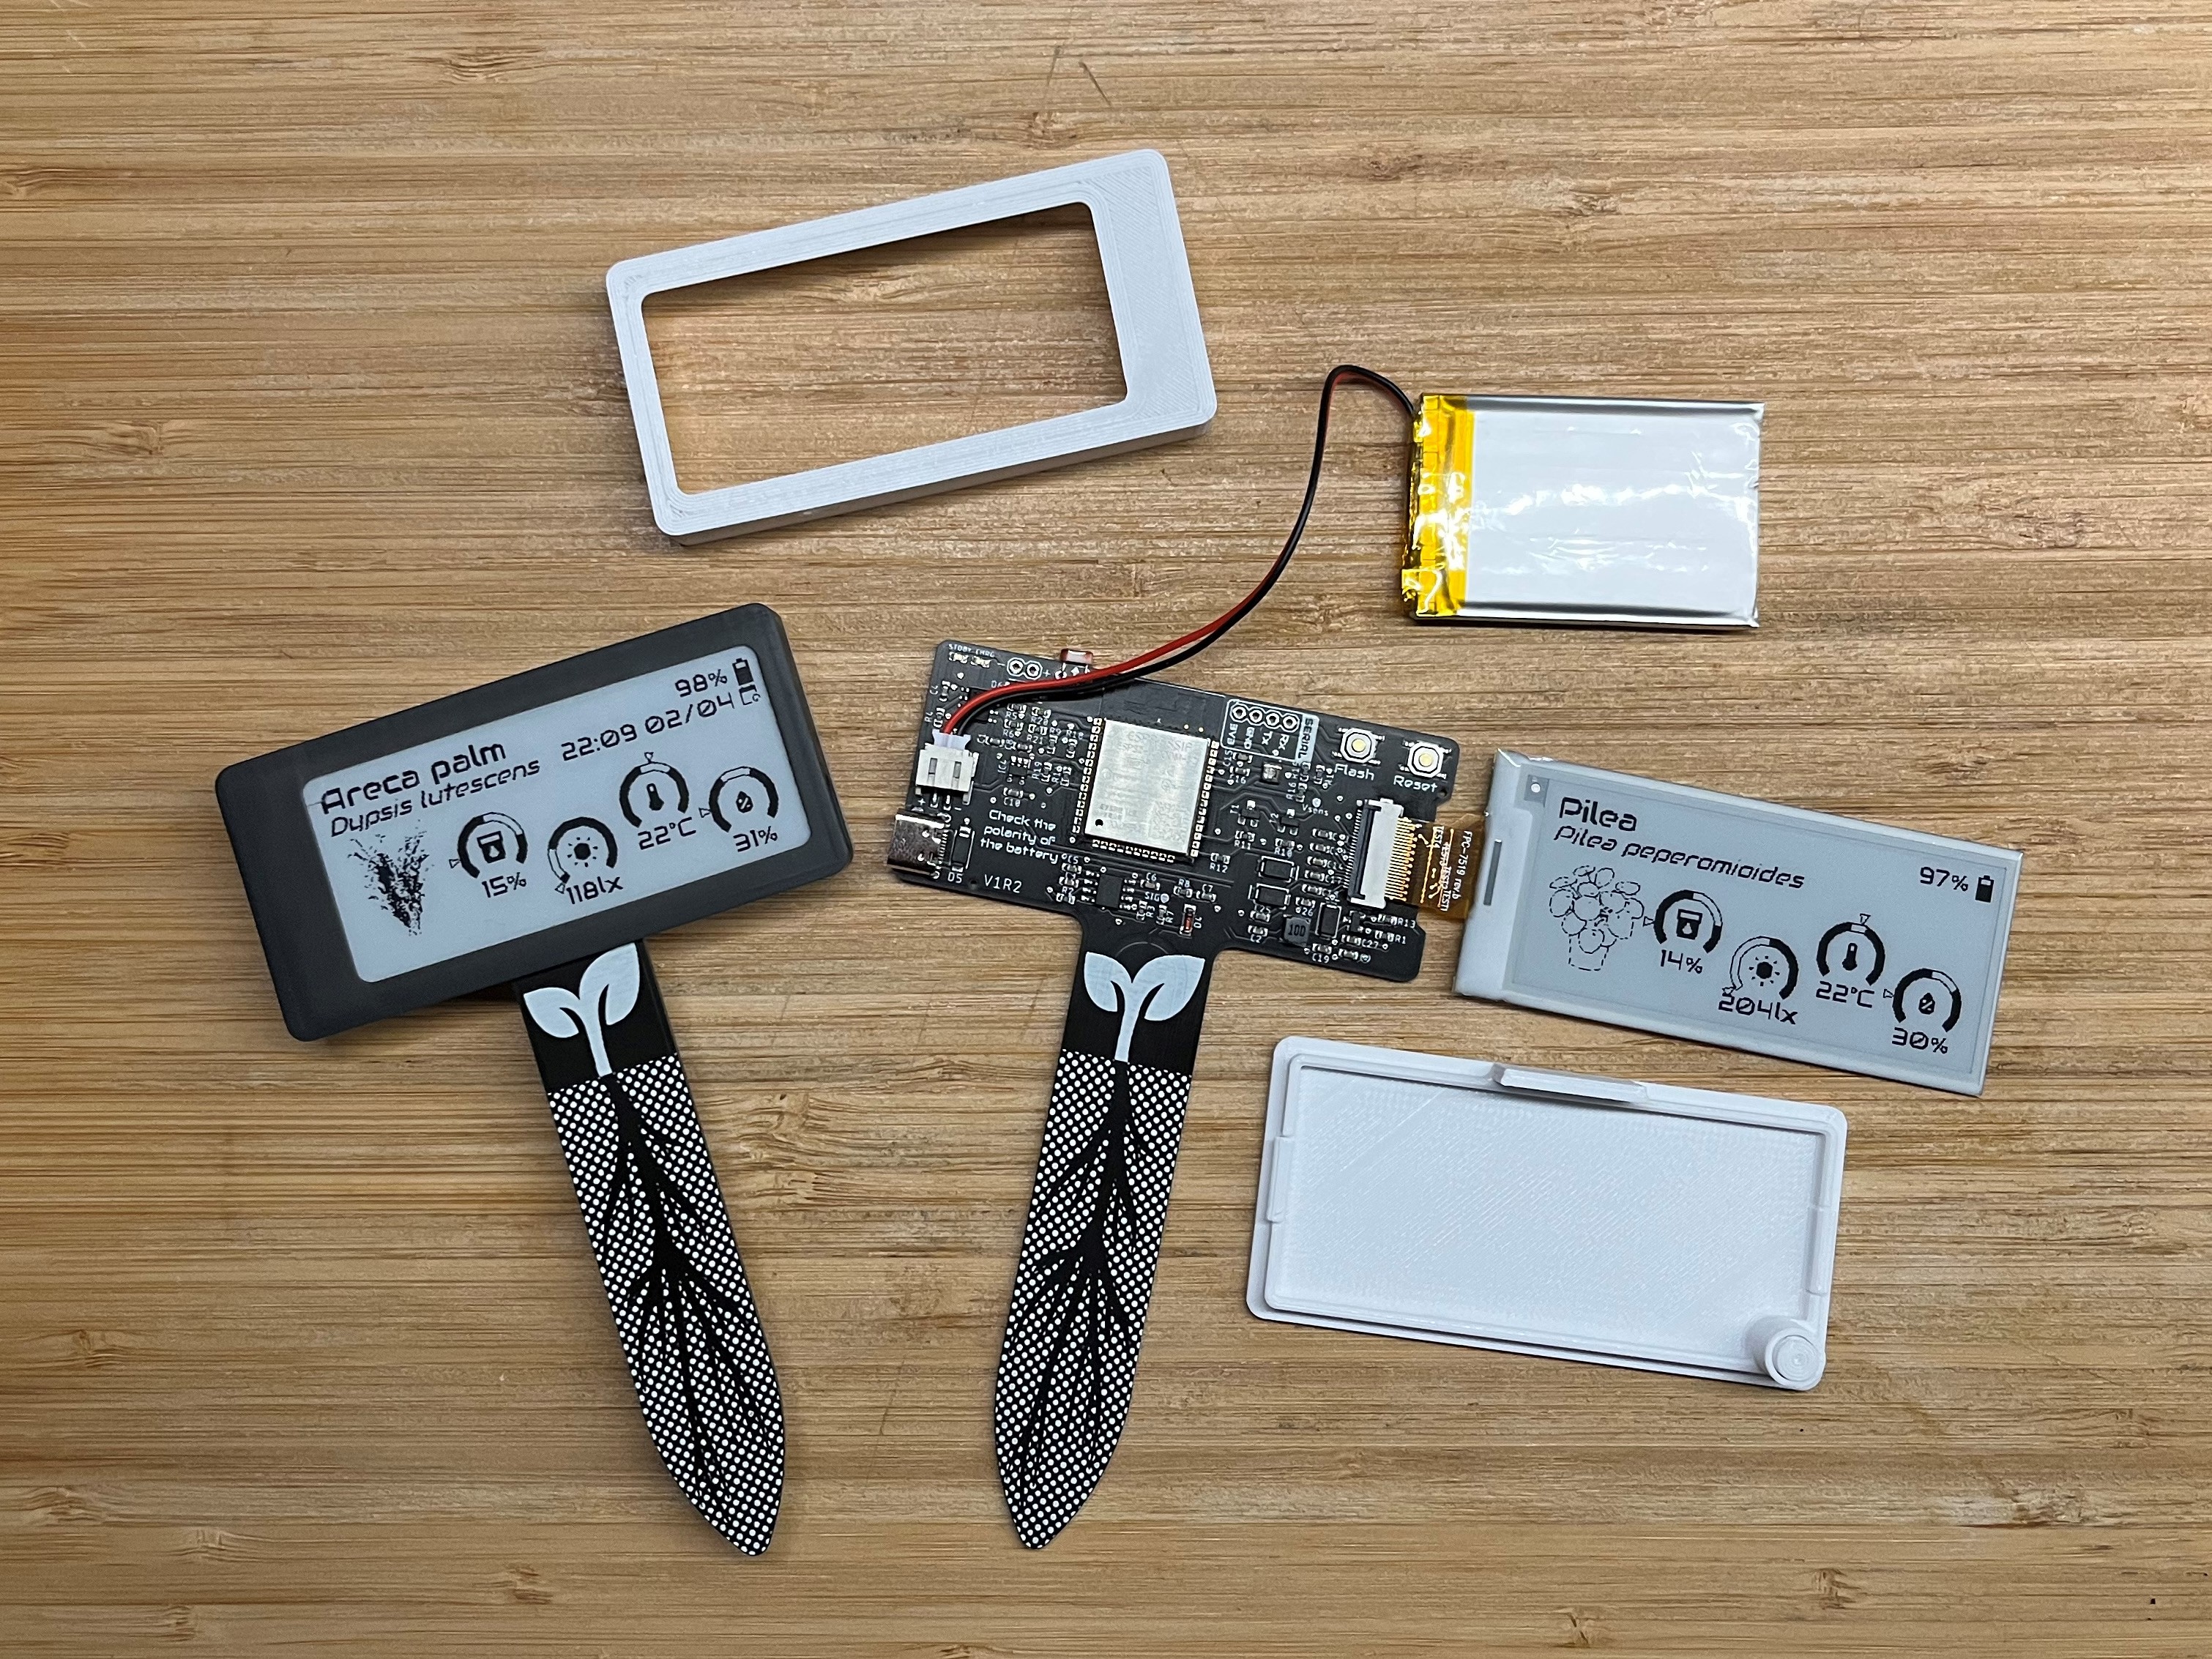
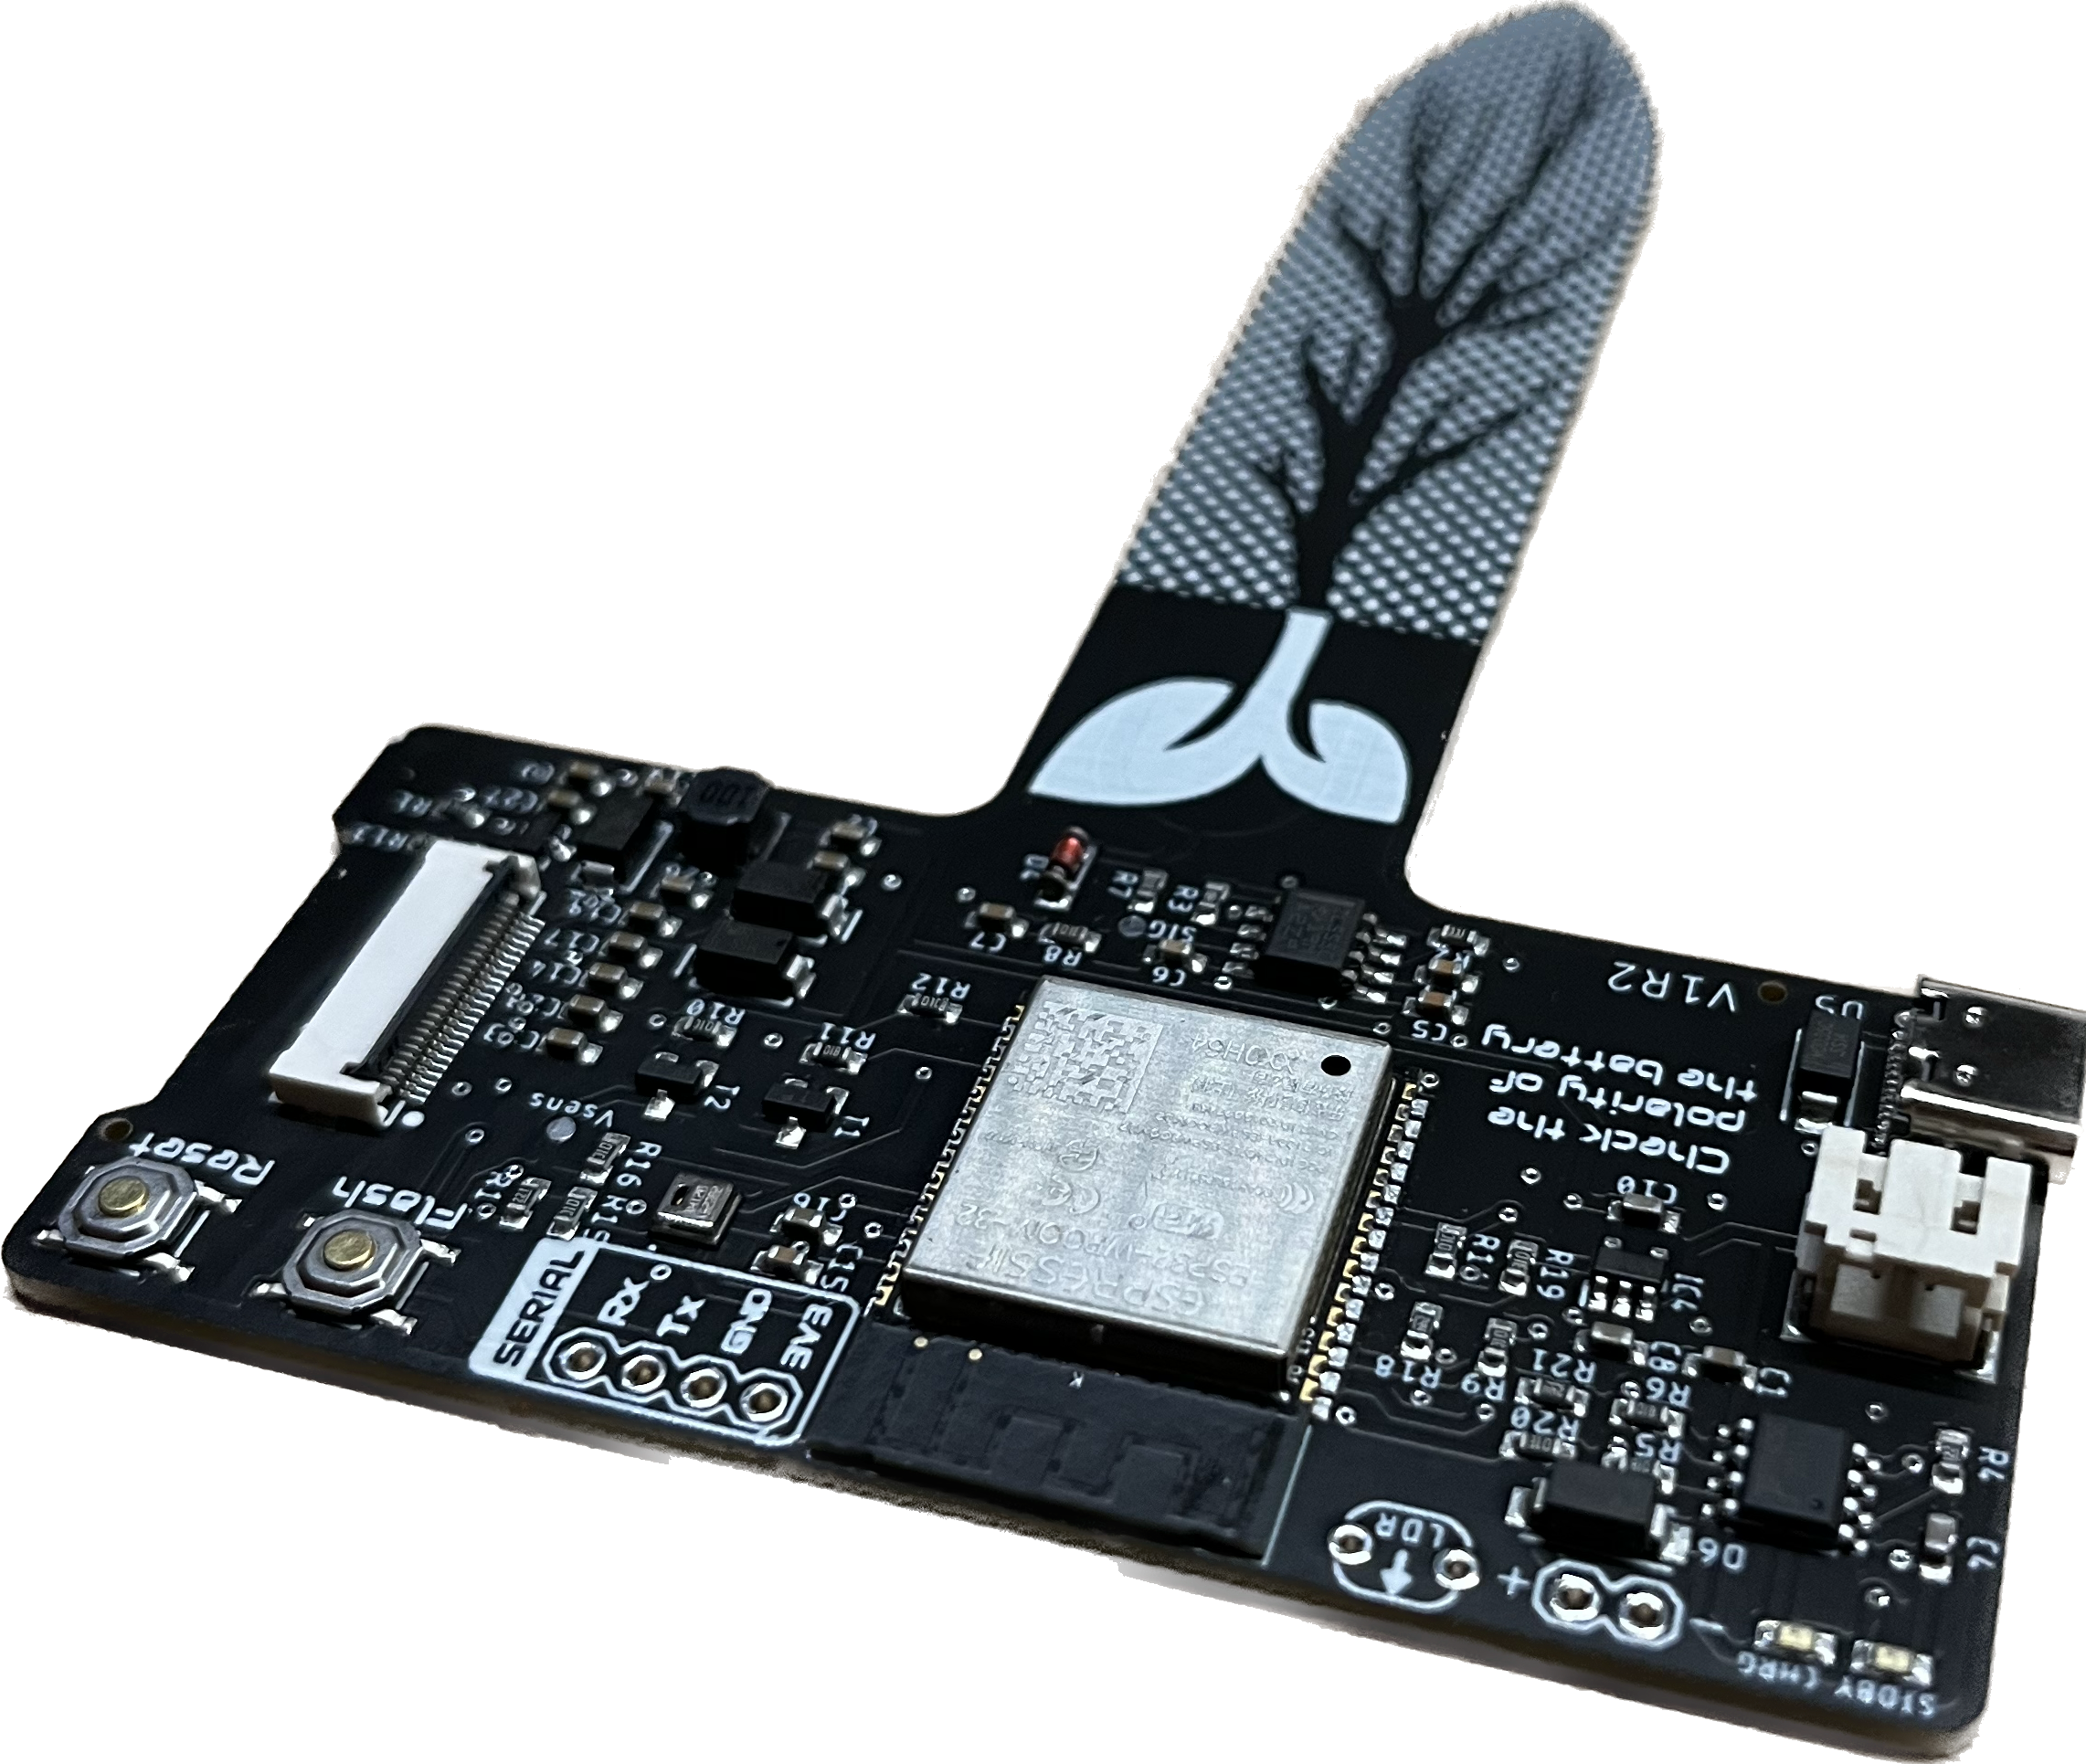
  • Microcontroller: ESP32-S2-MINI-1-N4R2 with 4 MB in-package flash and 2MB PSRAM
  • Firmware compatible:
    • ESPHome, highly recommendable for its native integration into Home Assistant
    • Arduino
    • ESP-IDF
  • Sensors:
    • Soil moisture: Capacitive probe built-in
    • Light: VEML7700-TR digital sensor
    • Air Temperature & Humidity: AHT20 digital sensor
    • Battery level: MAX17048 digital sensor
  • Power:
    • 3.7V 1000mAh LiPo battery
    • Charging through USB-C or solar panel (5V @500mA)
    • Deep-sleep mode consumption: 450-500μA
    • Standard mode consumption (10s awake, 1h deep-sleep): ~1mA
  • Interface:
    • USB-C for charging and programming
    • UART port
    • 2.4GHz Wifi
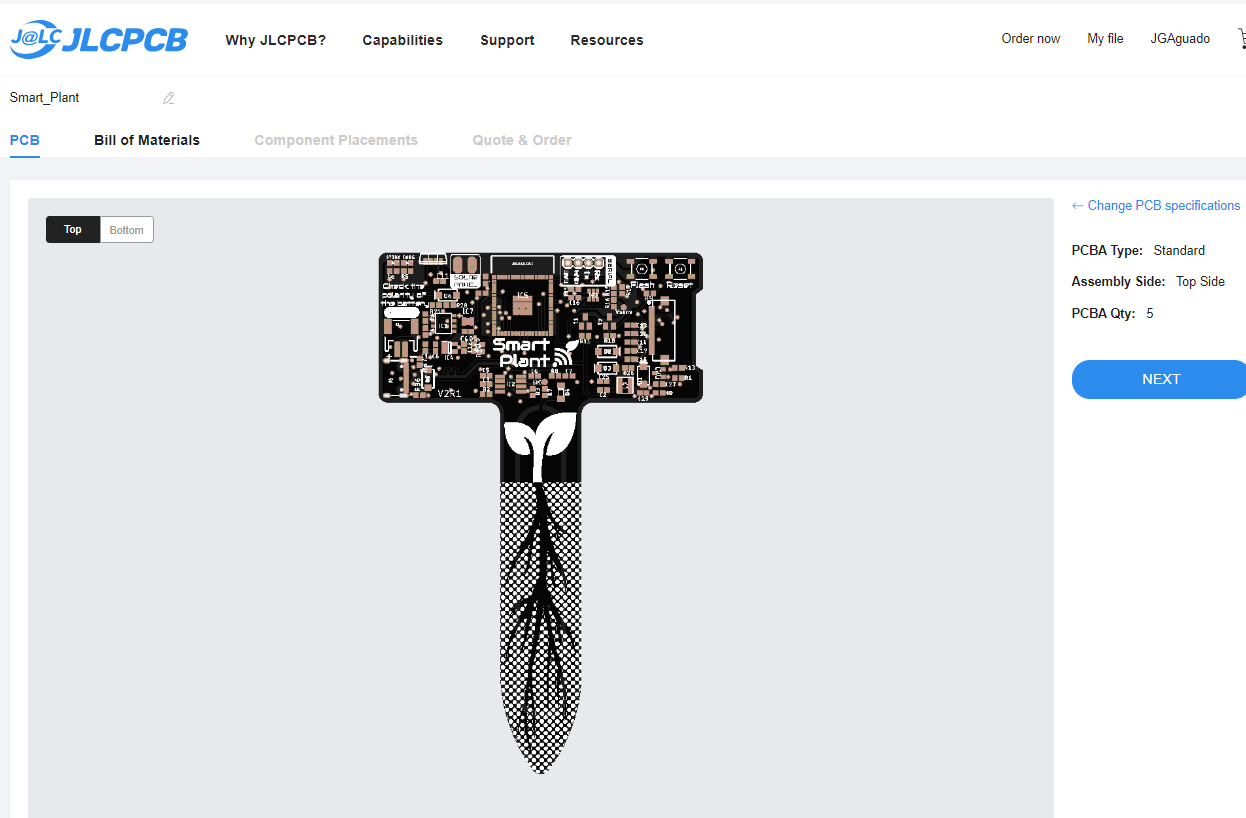
  • Display: 2.9" black & white e-ink from Waveshare
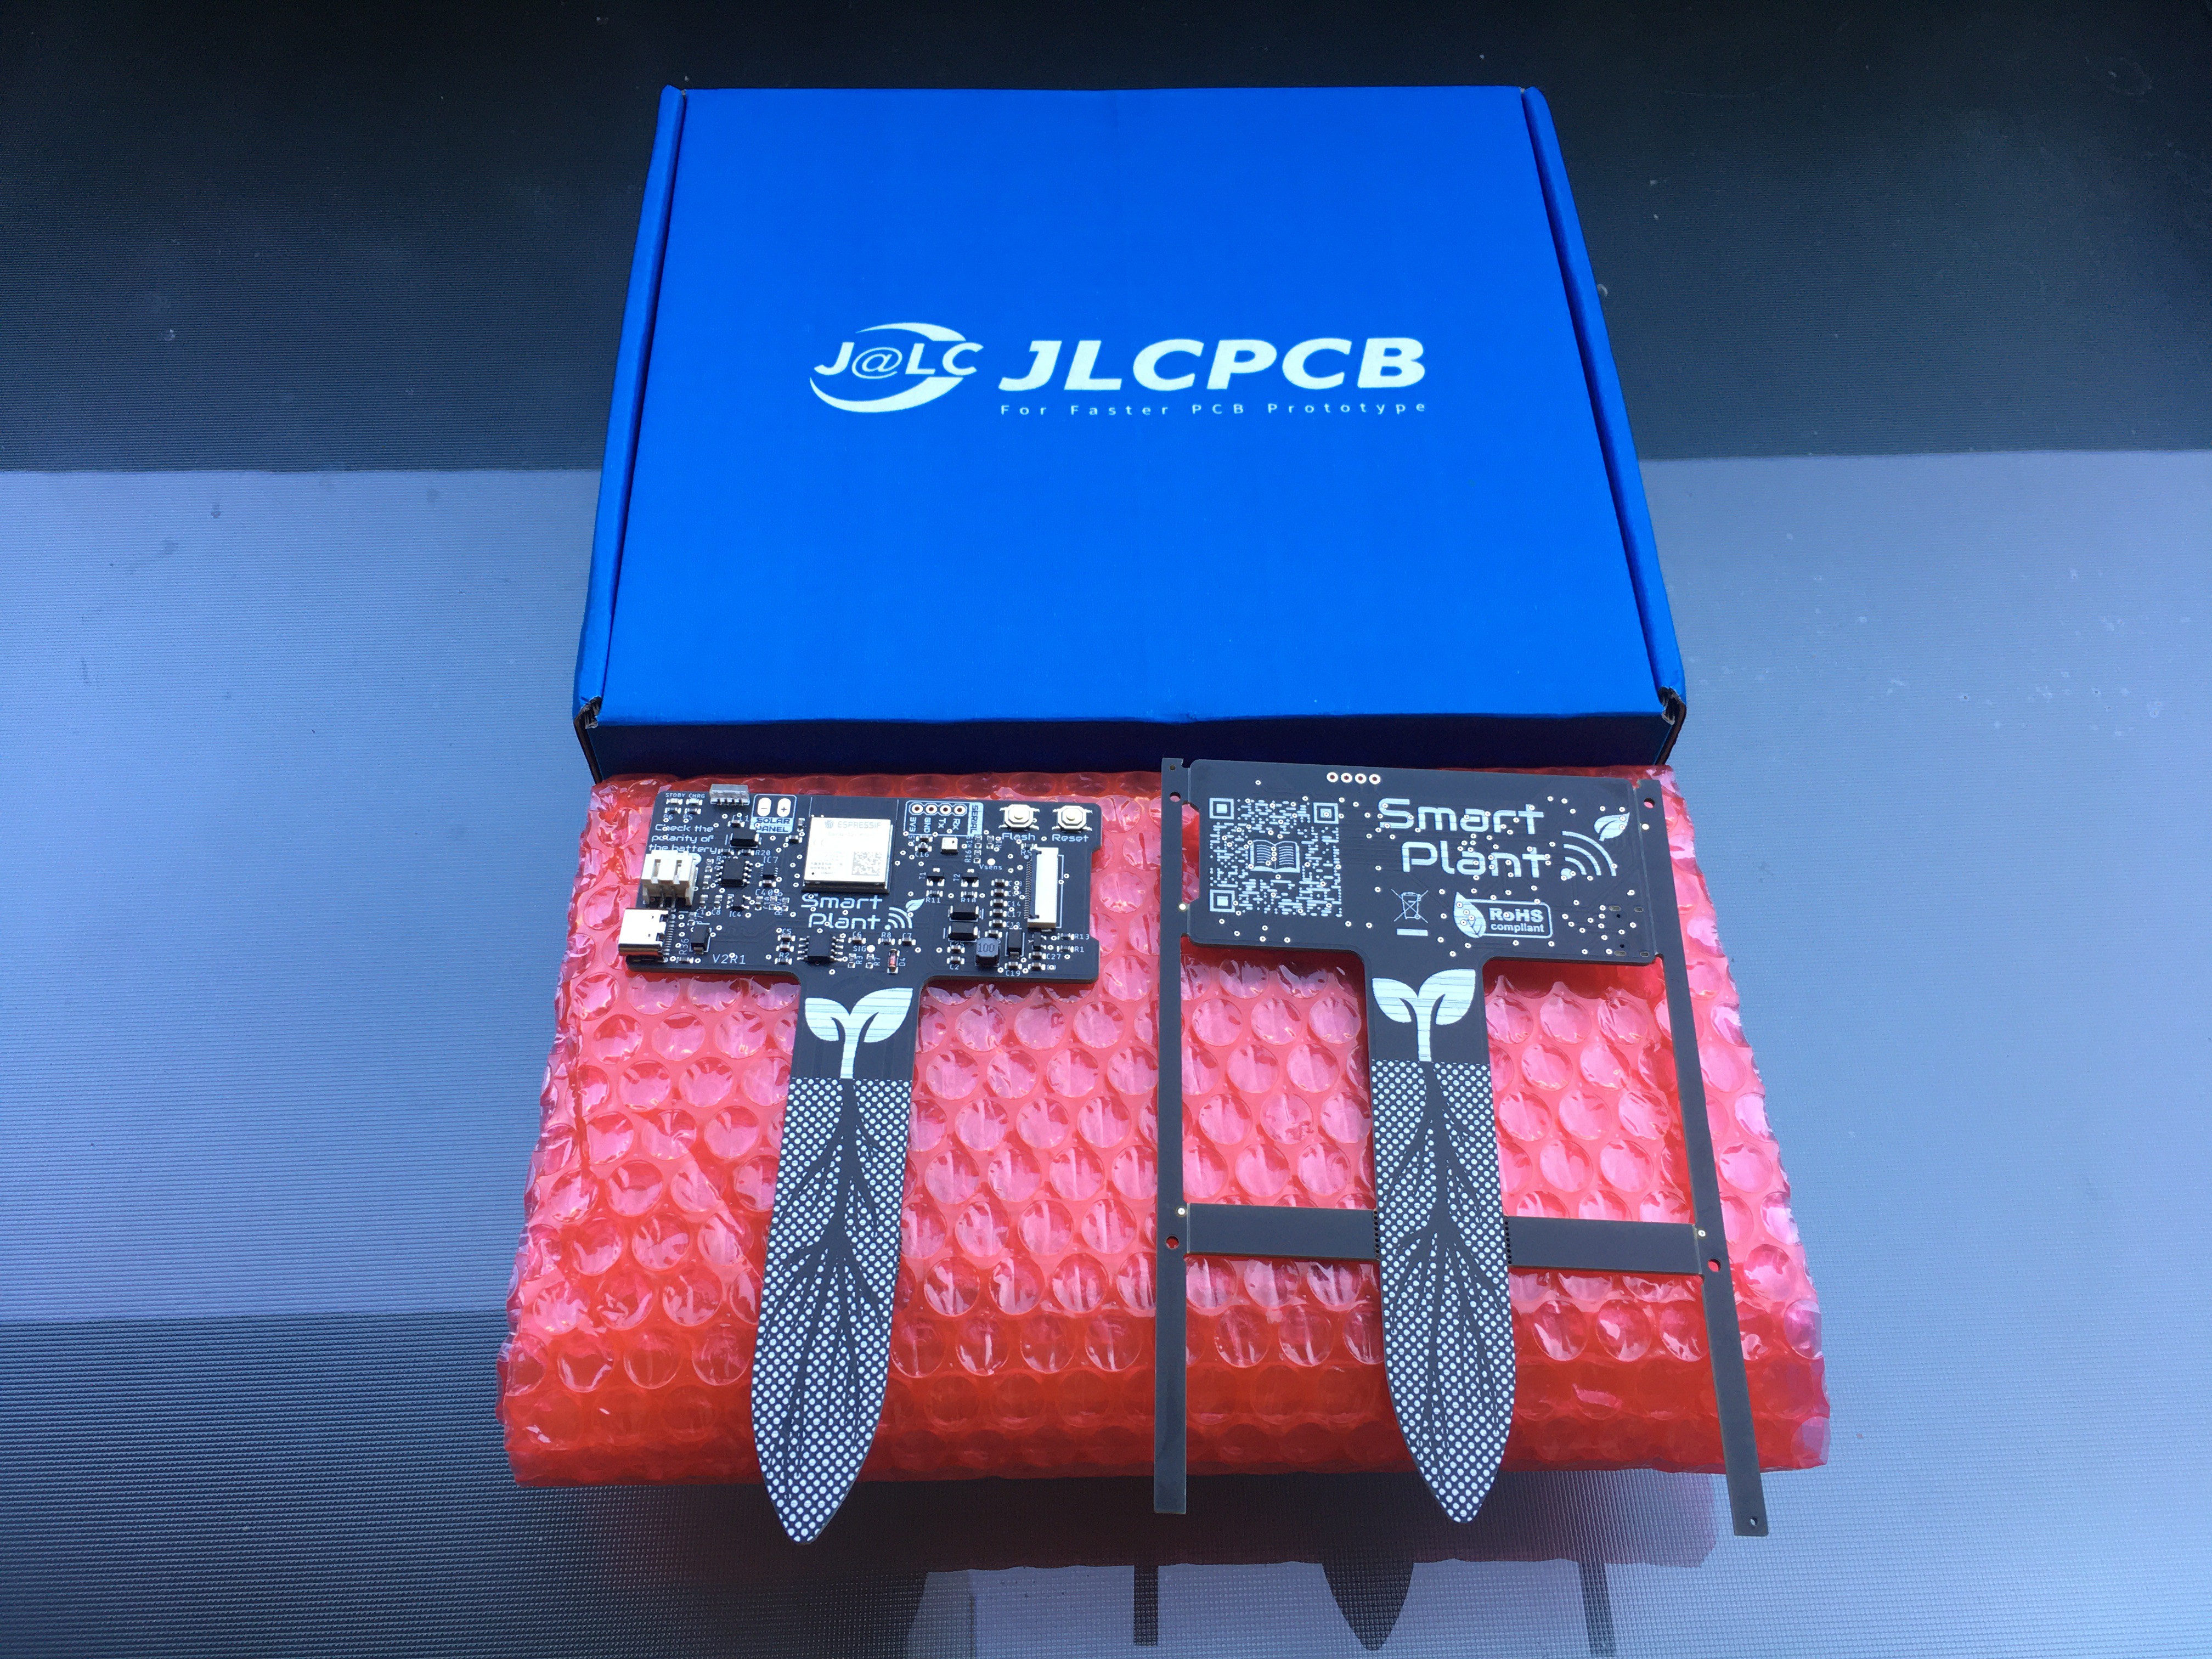
Version log:

  1. Version 0: Very early prototypes to serve as proof of concept. 
    1. V0R1: Protoboard with headers to be used as a shield for the TTGO T5 e-ink module
    2. V0R2: PCB designed to host the same module but with some additional THT components integrated 
  2. Version 1: First designs on black PCBs with a more aesthetically oriented design.
    1. V1R1: Integrated the ESP32-S module and a photodiode as a light sensor
    2. V1R2: Corrected previous power module and replaced photodiode with LDR
  3. Version 2:
    1. V2R1: Replaced ESP32-S with ESP32-S2, added battery level sensor and digital light sensor.

The story behind

I started this project because I was missing some features on the popular Xiaomi Mi Flora. Those devices, despite being very useful, lack a key point: readability. Every time I wanted to check my plant's health I had to go to their app... With time I learned how to implement them into Home Assistant, receiving the data via Bluetooth on my RPi 4 and plotting the graphs I needed on my custom dashboards...

One day, I realized one of my Xiaomi's sensors was missing on the balcony pots. After an inquisitive search party, I found out that one of the black ravens from my neighborhood just decided to add this gadget to his collection of stolen items... 

AI sketch of the suspected thief on the crime scene

With a pot missing a key instrument for the plant's survival, I decided to come up with an alternative gadget that, not only would keep the features of streaming the data into my Home Assistant setup, but also provide more of a  user-oriented readability features.

Daily usage: automations

I chose ESPHome as the main firmware for the Smart Plant, not only because of the direct support for the e-paper panel and the rest of the sensors on board but also because the integration into Home Assistant (HA) is immediate.

Through HA you can flash ESPHome directly on the Smart Plant and start logging the parameters from the first minute.  Additionally, you can prepare beautiful dashboards to display the data and set some automations.

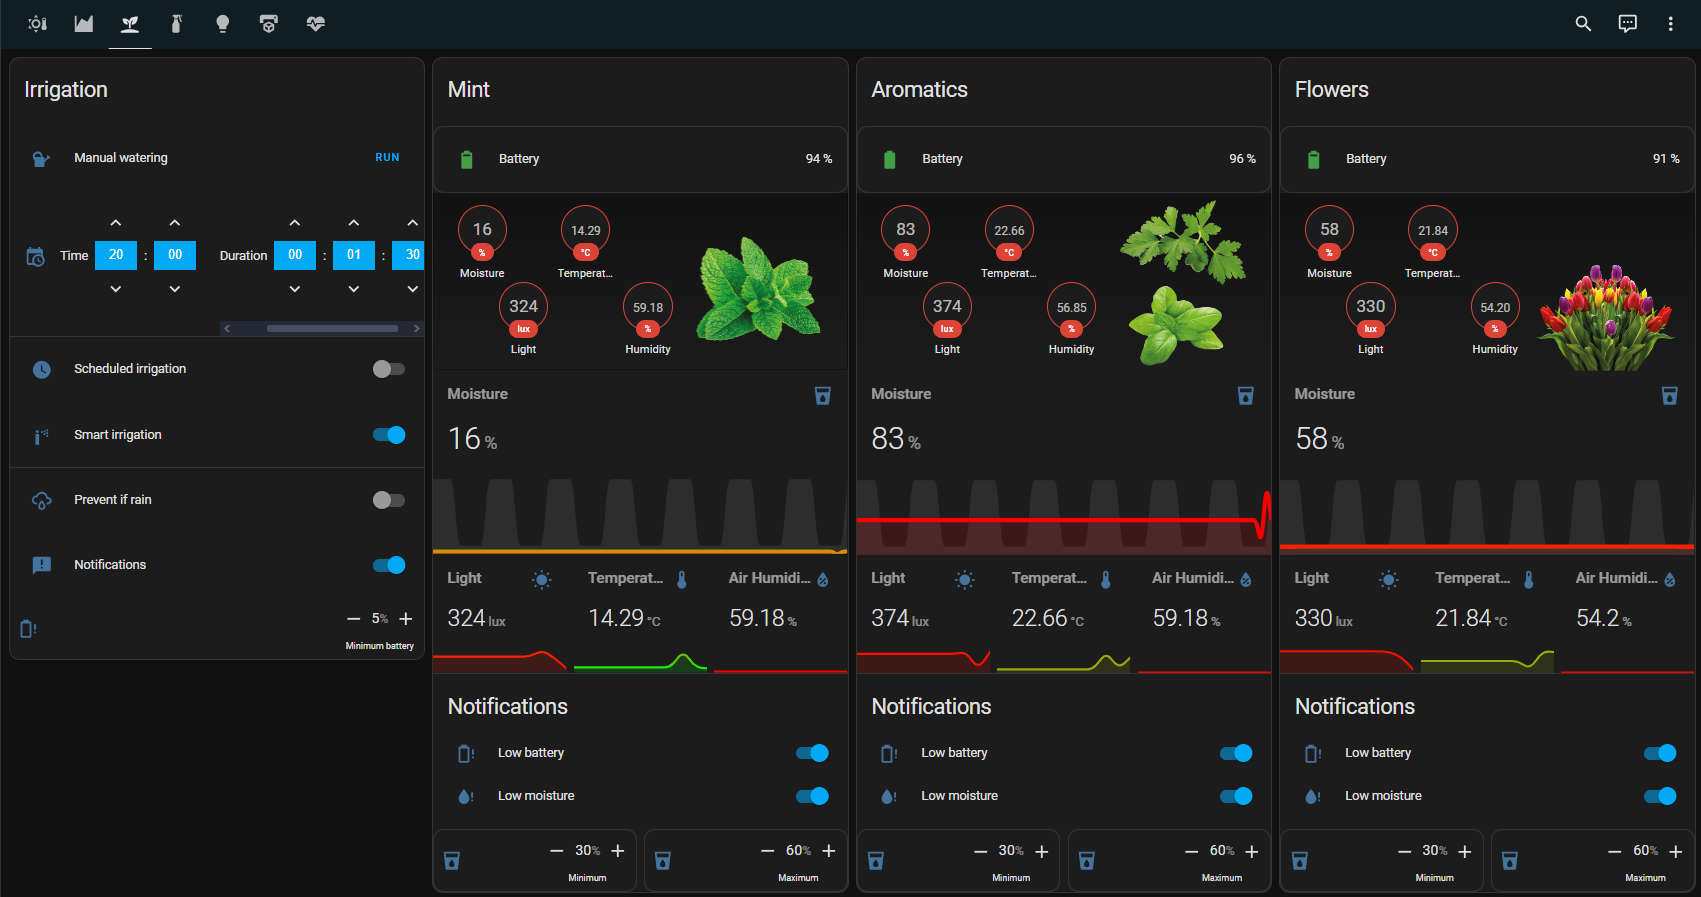
In summer, I have the Smart Plants on my balcony plants (4 different pots). Each of my pots have an individual irrigation pipeline that I control through my other project Smart Garden and the assistance of some automations programmed in HA. The automations do basically:

  1. At a certain time of the day (20:00), the system checks the moisture...
Read more »

  • 1 × Smart Plant board This is the designed board that host all the circuits and the components that bring the Smart Plant project alive
  • 1 × 2.9" e-paper display The recommend (and tested working) display is the `296x128, 2.9inch E-Ink raw display panel (https://www.waveshare.com/product/2.9inch-e-paper.htm) that you can order directly on the manufacturer.
  • 1 × 1000mAh LiPo battery The ideal dimensions shouldn't excess the 50x34x5mm in order to fit in the designed enclosure.
  • 1 × 3D Printed enclosure The one I designed, despite not being fully waterproof, does a good job protecting the electronics agains eventual spilled drops of water while watering the pot
  • 1 × Solar panel In addition to the USB-C, and with the aim of extending the service time between (USB) charges of the battery, the Smart Plant can be powered from a solar panel.

  • Smart Plant V2R1 for sale!

    Jon01/21/2024 at 20:06 0 comments

    Dear Hackaday community,

    Exciting news for all you green-thumbed enthusiasts! The Smart Plant project has reached a new milestone, and I'm thrilled to announce that Smart Plant Kits are now available for purchase on:

    Smart Plant Kits are available on Elecrow in a limited amount of units, so be fast and get yours! Each kit includes all the components you need to assemble your own Smart Plant device, along with detailed instructions to guide you through the process that you can find, as always, on the documentation.

    Don't miss out on this opportunity to make your plants the smartest on the block!

  • From PCB to PCB Assembly with JLCPCB

    Jon08/28/2023 at 17:16 0 comments

    As part of a recent partnership with JLCPCB, an excellent PCBs (and PCB Assembly) manufacturing service that has manufactured the previous versions of the Smart Plant, I would like to share my personal experience and the seamless process of ordering PCBs with them.

    1. Generate the Gerbers, BOM, and PnP files

    2. Upload the Gerbers on their online platform and select the options you want: soldermask color, thickness, surface finishing... quite a lot of options and a very low starting price of just $2 for 5 pieces under 100x100mm!

    3. If your project requires the assembly of components, here is where JLCPCB really stands out. Their internal access to thousands of components makes it very easy.

    My recommendation for lowering your expenses and optimizing your design is to take into account their stock (doesn't need to be 100% available since they can backorder components for you) since your preliminary design phase. This way you can estimate the costs of the components and get the datasheet and footprints directly from them.

    Also, in order to make the BOM export easier, if you use their ULP and for each component, you can add (in EAGLE) an attribute named LCSC with the value of the JLCPCB part #, there will be no confusion between components at the moment of ordering the PCBA. You can get to know more about this process in their tutorial

    4. Once you have finished with the selection of PCB features, you can select, on the PCB assembly process whether you need an Economic or a Standard process. Unless you need to mount specific components (like certain ESP32 modules) that might require particular reflow temperature curves, the Economic option is the way.

    5. Uploading the BOM and PnP, and verifying that all the components correspond with your intended ones, is very fast and easy. 

    In addition, you will be able to see a rendered image with the components in each place! 

    6. Before entering into production, their team will contact you in case they have questions regarding final positioning or polarities to avoid surprises and in a few days your order will depart from their facilities to you!

    Since they work with worldwide shipping companies, in just a few days you will receive their blue box containing the boards. They come exceptionally well-packed and protected.

  • V1R2 is here!

    Jon04/04/2023 at 14:51 0 comments

    Following up with the great interest of some of you, I have good news: the next revision of the Smart Plant is here, the V1R2!

    In this small revision, from which I ordered a first batch of 30 units, the following minor issues were fixed:

    1. The Battery Management system is now fully embedded in one board, allowing not just the charging of the battery and the 3.3V regulation with the minimum standby consumption (for the deep-sleep periods) but also monitoring the battery through the ADC port (GPIO35) of the ESP-32 and implementing diodes for protecting the charging from a solar panel and the USB-C port.
    2. The light sensor on the SMD factor has been replaced with a 5mm LDR footprint through-hole (THT) solderable. However, I haven't tested all the light conditions with a standard 5-10k GL55 photoresistor, but since it is a THT component the option to replace it with a 5mm photodiode is still there.

View all 3 project logs

Enjoy this project?

Share

Discussions

funky wrote 06/21/2023 at 12:18 point

I'm new with hackaday. Is there a way to order this device?

upd. Ach, found it, it was in the More → Tindle Marketplace menu: https://www.tindie.com/products/jgaguado/smart-plant/

Is the new batch expected?

  Are you sure? yes | no

bcmallory wrote 06/15/2023 at 03:34 point

Jon, is there room to add easily more data points (sensors) from a general standpoint without affecting the current specifications like battery life. I started a similar concept using Amazon Sidewalk sensor with the intention of  adding and expanding Wi-Fi limitations, like a greenhouse and used on a semi mass scale designed for commercial growth operations. For example the the legal medical cannabis industry. I’d love to learn more about your project and pick your brain.

  Are you sure? yes | no

Jon wrote 06/30/2023 at 11:53 point

I'm not sure I understood correctly your message, can you send me a PM?

  Are you sure? yes | no

DomoAlegres wrote 05/31/2023 at 19:09 point

Hi Jon,

I'm a bit of a learner.
I just got the "Smart Plant" card.
I have installed the ESPHome "Add-on" on my Home Assistant.
The Smart Plant card communicates well with my Home Assistant and I have already included it in my panel.
But I have a problem when trying to update it.
I get the following error and I don't know what is the problem.
Might be useful for other people too...
Thanks in advance.

--------------------------------------------

INFO ESPHome 2023.5.5
INFO Reading configuration /config/esphome/smart-plant-38d518.yaml...
INFO Detected timezone 'Europe/Madrid'
WARNING GPIO15 is a Strapping PIN and should be avoided.
Attaching external pullup/down resistors to strapping pins can cause unexpected failures.
See https://esphome.io/guides/faq.html#why-am-i-getting-a-warning-about-strapping-pins
Failed config

esphome: None
  name: smart-plant-38d518
  name_add_mac_suffix: False
  includes: 
    
    Could not find file '/config/esphome/libraries/icon-map.h'. Please make sure it exists (full path: /config/esphome/libraries/icon-map.h).
    - libraries/icon-map.h
  project: 
    name: smart.plant
    version: 1.2
  on_boot: 
    priority: 600
    then: 
      - lambda: Wire.begin();
        delay(100);
  build_path: .esphome/build/smart-plant-38d518
image: [source /config/esphome/.esphome/packages/a3053235/docs/source/files/configuration.yaml:77]
  - 
    Could not find file '/config/esphome/plant_labels/Lemon_tree_label_page_1.png'. Please make sure it exists (full path: /config/esphome/plant_labels/Lemon_tree_label_page_1.png).
    file: plant_labels/Lemon_tree_label_page_1.png
    id: page_1_background
font: [source /config/esphome/.esphome/packages/a3053235/docs/source/files/configuration.yaml:81]
  - 
    Could not find file '/config/esphome/fonts/Audiowide.ttf'. Please make sure it exists (full path: /config/esphome/fonts/Audiowide.ttf).
    file: fonts/Audiowide.ttf
    id: font_title
    size: 20
  - 
    Could not find file '/config/esphome/fonts/Audiowide.ttf'. Please make sure it exists (full path: /config/esphome/fonts/Audiowide.ttf).
    file: fonts/Audiowide.ttf
    id: font_subtitle
    size: 15
  - 
    Could not find file '/config/esphome/fonts/Audiowide.ttf'. Please make sure it exists (full path: /config/esphome/fonts/Audiowide.ttf).
    file: fonts/Audiowide.ttf
    id: font_parameters
    size: 15
  - 
    Could not find file '/config/esphome/fonts/materialdesignicons-webfont.ttf'. Please make sure it exists (full path: /config/esphome/fonts/materialdesignicons-webfont.ttf).
    file: fonts/materialdesignicons-webfont.ttf
    id: font_icon_battery
    size: 20
    glyphs: 
      - 󰁺
      - 󰁻
      - 󰁼

-------------------------------------------

  Are you sure? yes | no

Jon wrote 06/01/2023 at 12:21 point

Dear @DomoAlegres ,

Just the configuration YAML file isn’t enough and you might get an error asking for missing items (the fonts and the images). The reason is because on the configuration we are asking for some files (the fonts that you want for the digits or the icons and the background image with the plant and the gauges).

Therefore you need to upload into the folder with the configuration YAML file the required files. I strongly suggest using Visual Studio code and just drag and drop the items according to the structure mentioned on the esphome programming section (https://smart-plant.readthedocs.io/en/latest/programming.html)

Best regards,

Jon

  Are you sure? yes | no

DomoAlegres wrote 06/01/2023 at 16:05 point

Hi Jon,

Thanks for the reply.
I was following the Github "programming.rst" document, but not all the information appears there, but it does appear complete on the page you indicated (https://smart-plant.readthedocs.io/en/latest/programming .html) and had misunderstood the process to follow.
I'm going to follow the steps listed here.
An additional question: Is there a procedure to clear the parameters of the "Smart Plant" card and return to the factory settings?
Thanks and best regards.

  Are you sure? yes | no

michal wrote 04/14/2023 at 07:35 point

Hi Jon,

How do you handle time in your esp ? I can't see any external RTC, or XTAL for internal one. Do you get time from NTP ? What in case there is no internet connection ? 

My experience with internal RTC during sleep is very poor, it is not accurate at all.

  Are you sure? yes | no

Jon wrote 04/14/2023 at 08:05 point

Hi Michal, currently, the ESP's timekeeping relies solely on its internal RTC to keep the design compact and straightforward. And yes, you are right, the deep-sleep timing is not very precise. In my experience, I have observed a loss of around 1-2 minutes out of every hour, resulting in a deep sleep period that lasts around 58 minutes instead of 60. However, given that the clock's accuracy is not critical for my application, I do not see a compelling reason to integrate an external RTC into the current design.

  Are you sure? yes | no

mrwho wrote 04/12/2023 at 21:24 point

Looks great, but still has a weak point. These capacitive soil moisture sensors don't hold up for very long.
Sooner or later either water seeps through the PCB layers or the laquer coat cracks (usually
starting from the tip = mechanical stress) and destroys the copper layers.

A connector for spare parts would be an advantageous design.

  Are you sure? yes | no

Jon wrote 04/14/2023 at 07:55 point

Dear @mrwh, I appreciate your interest in the project. As you mentioned, while FR-4 (the fiberglass-reinforced epoxy laminate used as a substrate for my PCBs)  is not hygroscopic, it can absorb moisture over time, which can negatively impact the performance of the PCB. Applying a conformal coating, such as silicone or acrylic-based coating, can create a barrier between the board and the environment, ensuring long-term reliability and performance.


However, from my experience with the early-stage versions of the project (V0R1), I have found that the solution you suggested may be less reliable in terms of durability. Not only you can end up with corrosion in the connector metallic pins depending on the ambient moisture, but also, the connector itself would have to behave as a mechanical interface between the upper part (display, electronics, battery and enclosure) and the bottom soil moisture probe. This means that, every time you touch the device, the connector will be subjected to mechanical stress, increasing the chances to fail. 

  Are you sure? yes | no

Marius Schäfer wrote 04/12/2023 at 17:03 point

Great project!

  Are you sure? yes | no

Jon wrote 04/12/2023 at 17:50 point

Thanks Marius!

  Are you sure? yes | no

Giulio Pons wrote 04/12/2023 at 16:28 point

Very nice. I like it a lot.

  Are you sure? yes | no

Jon wrote 04/12/2023 at 17:01 point

Thanks Giulio!

  Are you sure? yes | no

seancriggs wrote 02/24/2023 at 16:27 point

Fantastic project! Well thought through and developed!

Curious, how long did it take you from concept to v1?

  Are you sure? yes | no

Jon wrote 02/24/2023 at 17:45 point

Hi Sean, thanks for your support! I would say around 6 months working intermittently on the weekends. I made some other boards in parallel to complement the "Smart Domotics" setup that I hope to post soon.

  Are you sure? yes | no

Dan Maloney wrote 02/24/2023 at 00:29 point

Hi Jon --

Very nice build, everything looks so well thought out! I wrote this up for the blog, should publish soon. Good luck in the contest!

  Are you sure? yes | no

Jon wrote 02/24/2023 at 10:10 point

Thanks Dan, looking forward to read it :)!

  Are you sure? yes | no

Similar Projects

Does this project spark your interest?

Become a member to follow this project and never miss any updates