IGV1-16 Car Compass
or: How I Learned to Stop Worrying and Love the Quaternions
or: How I Learned to Stop Worrying and Love the Quaternions
To make the experience fit your profile, pick a username and tell us what interests you.
We found and based on your interests.
right.3mf3D model of the case right side3mf - 377.57 kB - 03/13/2023 at 20:45 |
|
|
left.3mf3D model of the case left side3mf - 382.06 kB - 03/13/2023 at 20:45 |
|
Turns out, digital compasses are a bitch, doubly so in vehicles. The earth's magnetic field is tiny, especially compared to all the stray electromagnetism a car spits out with reckless abandon.
(There really aren't many things to show pictures of for this, so instead I'm just going to separate parts with some glamorous night shots of the compass. So if this all seems complicated, the photos might remind you that it was all worth it.)
When I first installed the compass module on my dashboard, instead of showing me the direction of north, it showed me the direction of my alternator. It could be useful if you live in a place where people regularly steal alternators out of cars, but that wasn't what I was going for.
So I had to find a way to both calibrate the compass to correct for all that "hard iron" and ideally get it as far away from any metal or electrical current as possible.
Luckily, I drive a Jeep Wrangler with a hard top made out of fiberglass. So I can stick an IMU reasonably far away from any metal. I'm talking to the sensor via I2C, which is only supposed to travel less than a foot or so. And I needed about 9 feet of wire to get the IMU to the best spot in my car furthest from things the magnetometer would consider "bullshit." Instead of converting to a longer distance protocol and then converting back, I used an Adafruit LTC4311 I2C Extender / Active Terminator. This thing just watches the I2C lines and if it sees a rise in voltage, it clicks on a much beefier MOSFET to help the lines get to the level they were trying to get to. It works great (but also note that it only works up to a 400KHz I2C clock, the 1MHz clock speed might work sometimes but might be unreliable.)
The cable is just 5 strands of wire wrap wire twisted together with a power drill and a few inches of heat shrink every couple feet. I did this to keep it thin enough to shove it under the plastic moulding in my car without having to remove it. Taking that stuff off without damaging it is such a pain.
Originally I was using an MPU-9250 9 DOF IMU, the microcontroller would get the sensor readings form the gyroscope, magnetometer, and accelerometer over I2C and then apply a Mahony Filter (similar to a Kalman Filter) to convert those raw readings into a heading.
The problem was, those kinds of filters need to be constantly fed new data and recalculated at around 400-2000Hz to be remotely accurate. Which would be totally fine if that's all the microcontroller was doing, but I'm also running a display that is timing sensitive as well.
The real bottleneck was I2C, the STM32L432KC runs at 80MHz and has a hardware floating point unit, so it could do the math more than fast enough. More annoying is that the I2C read times aren't consistent, sometimes it would take like 400 uSec which was longer than the hold time for a column on an IGV1-16, so I would end up with these moving stripes of brighter pixels where the reads took longer (how long you hold on each column determines the brightness of the display, to a point.)
Eventually I searched for a better solution and came upon Pesky Products' USFSMAX Module. What's cool about this thing is that it has a MAX32660 microcontroller onboard that gathers all the data from the IMUs and does all the math continuously so the heading stays accurate even if the main microcontroller isn't asking it for data.
The way they programmed the MCU as a kind of virtual EEPROM makes dealing with it exactly like reading data form any other I2C thing. Just send it an address and it responds with the contents of that register.
Here are repositories for that give a ton of information about this particular module and sensor fusion in general.
Example sketches for the USFSMAX module
A rundown of all you'd ever want to know about motion sensing
Read more »When I first moved to Henderson, NV I decided to play through Fallout: New Vegas to get a feel for my new town since map in the game is reasonably accurate (I live somewhere between Black Mountain and Hidden Valley.) But what's important is this:
This is the most ridiculously useful thing. It gives you so much information about where you are, just by the way it scrolls around makes it feel like there's a solid, fixed universe that you're moving within.
So I needed a compass for my car, I guess not *needed* but the 8 cardinal (so I guess cardinal-and-a-half?) directions my car's built-in compass gives me weren't enough to really give that feeling of moving in relation to some static firmament like you get in Fallout.
So unlike most of my projects where some cool display is the starting point, this one actually started with the "need."
Jeeps have this nice tray on the top of the dashboard that I can't put anything in that isn't black because it will reflect onto the windshield and drive me crazy.
So I figured that would make an excellent spot for a compass. An early idea was to use this Realorama slide viewer as the enclosure, and have some kind of display facing towards the curved mirror on the back. It would have looked awesome but getting it to fit and be visible would probably never be as clean as I wanted.
Another early idea was printing the compass on a loop of 35mm film, backlighting it with a display that can show markers and stuff, and having motors move the film around on the sprockets as the heading changes. And for extra credit; a big linear reading ammeter on top of everything to mark locations. But that's a lot of mechanics and getting it to be anything but fiddly would be a huge undertaking. I may still do that for something else.
So eventually, while casually browsing through eBay for whatever sexy old electronic doodads I may find, the universe gave me what I needed to make this compass happen.
An IGV1-16 plasma scan display. Baller.
Now the question was how to drive it. The datasheets for these things give a little bit of information, but not really enough to get an idea of what signals it needs and why. I know they sell these with the driver boards but my experience with those things is that they're almost always way more trouble than they're worth, especially if you want anything other than text from a font preloaded into a ROM chip.
Luckily, these are an exact knockoff of a Burroughs Self-Scan, which has tons of information floating around. I wasn't sure about how exact at first but I just decided to pretend it was and just run with it.
I wrote whole thing here on the theory of operation but it got so long that now it's its own separate log
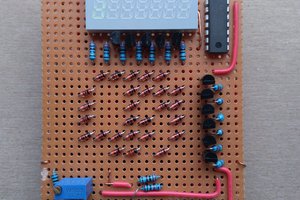
Now that you're back from reading that whole thing, you can see that really all I needed was a board that takes the 11 signals from the microcontroller, and buffers them up to the high voltages that the IGV1-16 works with.
Here's the schematic of each of the data drivers (just imagine this 6 times)
There's a pullup resistor to +250V built into the display.
And here's what the Scan Cathodes look like
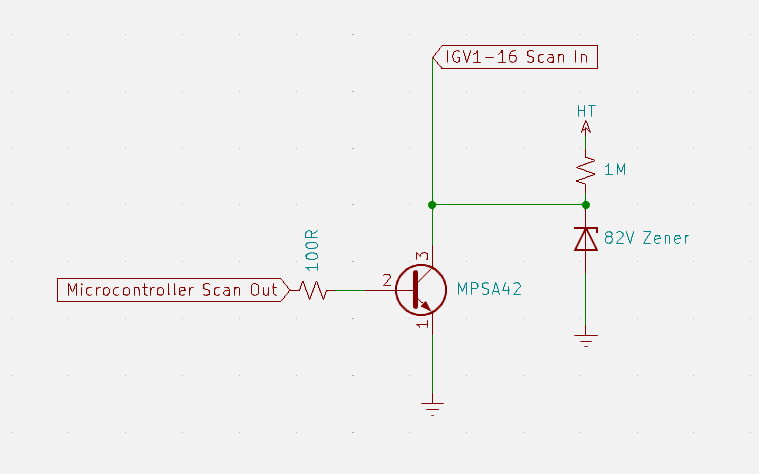 The Reset (or blank) line can optionally be slightly different (it's not in this project though)
It's just pulls down to -80V instead of GND (if you want to reset quicker, like the rest of them (there might be another resistor between the zener and transistor)
So I built it all on a breadboard
not pictured - the smell of burning transistors
The first transistors I used weren't quite up to the task. I don't remember what they were, but don't use them.
The boards here are (from center to top right), display lines, scan and reset lines, HV module, and an unseen Arduino-like board off to the left.
This one had the High Voltage too low, so the plasma dots weren't...
Read more »IGV1-16s and also Burroughs Self-Scan
Here's a quick overview of how these work. This is how I understand it and could totally be wrong, but at least I was right enough to get it to work.
I'm writing this because a lot of the descriptions of the theory of operation seem to be written in stuffy-1960's-engineer-in-a-suit speak, and they aren't really clear about why anything's happening, they are usually more concerned with how to get it to show stuff. The should really be called Practicalities of Operation, amirite?
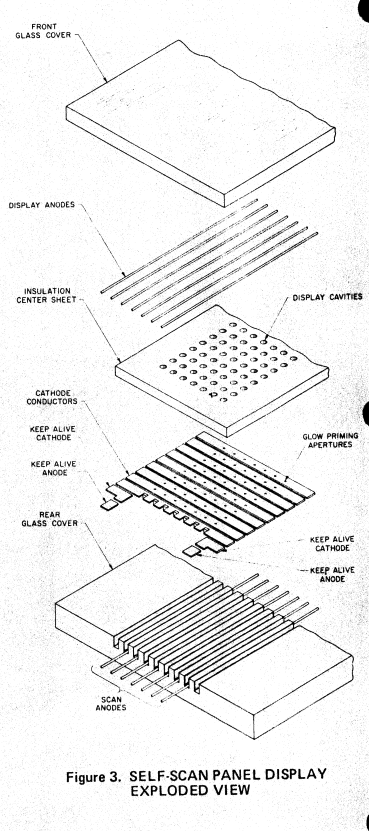
Here's what all that looks like in real life. Notice the plasma dots are still lit up behind the Insulation Center Sheet.
We have 7 Scan Anodes that run longways down the length of the display, and they're held at 250V. That's enough voltage to each make a single dot of plasma between the Scan Anode and the Cathode in the thin (almost vacuum) neon atmosphere inside. That dot of plasma will be at the nearest Cathode that provides a path to ground, the other nearby Cathodes stay at 82V, which is 82V less enticing to the plasma.
When we pull the Reset Cathode all the way to ground (it says -100V but ground seems to work if you give it more time at ground) that's a better path to ground than the 82V on the other Cathodes, so now we have all our plasma dots lined up on the left side of the display.
(The display anodes are not shown in this diagram)
Now we stop pulling the Reset Cathode to 0V and pull the first set of Cathodes down to 0V, this makes the whole column of 7 plasma dots move over to the next Cathode. You see in the diagram that every 3rd Cathode is wired together, we can do this because the plasma dots aren't going to skip over the nearest Cathode to get to the next one, which is great because otherwise we'd need another 108 wires going to the display for each Cathode.
So cool, we have a column of plasma dots that we can move along the display, but we're still not showing anything because the plasma dots are still behind the Insulation Center Sheet. To light up a dot that can be seen on the display, we have to drive the corresponding Display Anode to an even lower voltage to suck the plasma dot through the Display Cavity and onto the front of the Insulation Center Sheet*.
So in the end, here the sequence:
move our row of plasma dots one column
drive the Display Anodes to show the pixels we want
wait ~200 uSec for your eyeballs to slurp up those photons
*do the previous 3 steps 111 times until you reach the last column*
pull the Reset Cathode low to bring the plasma dots back to the left column
*repeat*
Here's all that in Timing Diagram form
So yeah, this thing is a Persistence-Of-Vision display, which makes it really hard to take nice pictures and videos of the car compass. I promise it looks way better in person.
*in reality the plasma dots are being pushed away by the Display Anodes because they're pulled to 250V at rest, but I think looking at it as High Voltage -> Medium Voltage, Medium Voltage -> 0 Voltage is much easier to conceptualize.
Here's a page with links to all the datasheets I'm referring to:
http://ferretronix.com/tech/nixie/self-scan/
Create an account to leave a comment. Already have an account? Log In.
Become a member to follow this project and never miss any updates
 Jake P
 xres0nance
 svofski
👍 Cool display! Best reason to hack, just for the heck of it. Tempted to get that display model but I promised myself I wouldn't go looking for retro tech before using up what I have in my junk, er spares, box. Looking forward to reading the tech details.