 Kaili Hill
The Adventure Begins
The enthralling tale of Dreamdrive64 finds its origin in the PicoCart64 project. In the sun-soaked summer of 2022, I embarked on a thrilling new chapter, fueled by an abundance of free time and an unwavering passion for custom hardware projects. This venture promised an exciting opportunity to contribute, learn, and grow.
As autumn leaves began to fall in 2022, I emerged as the sole active member of the project. However, I was far from lonely, as the project's lively Discord community brimmed with inspiring individuals eager to share their knowledge and expertise. I am eternally grateful for their infinite patience and invaluable experience.
Driven by an aspiration to forge a unique creation, I decided to infuse the project with a dash of personal branding. Embracing its open-source roots, I envisioned this as the first genuine product that I could proudly build and sell. Thus, the Dreamdrive64 was born, ingeniously crafted upon the foundation of PicoCart64's "v2" hardware.
Project Background
The PicoCart64 was a straightforward PCB that allowed users to solder a Raspberry Pico (or clone) and flash a small ROM onto it. While functional, its capabilities were limited, supporting only one small ROM at a time.
In contrast, the "v2" hardware featured a bank of eight PSRAM chips, providing 64MB of non-persistent storage for loading ROMs from an SD card. The design also included two RP2040 chips responsible for communication with the N64, the SD card, and the PSRAM. An ESP32 was integrated into the board, offering the potential for innovative wireless features or simply empowering developers to get creative.
The v2 branch was quite basic. Both RP2040 chips were booted from the same flash chip, and a rudimentary test setup enabled reading from the SD card, writing/reading to the PSRAM in SPI mode, and loading code from flash into RAM. While the foundation was set, significant work remained to transform it into a fully-fledged ROM cart.
Overview
The psram and flash, are connected via the rp2040's qspi lines. These lines are typically only used to communicate with flash. A demux is included on the board to address the individual psram chips. The two rp2040's we will call MCU1 and MCU2. The following is the broad overview of the connections:
MCU1
- N64 bus
- 16 address/data lines,
- 2 address [high,low] latches,
- 1 read line
- 1 write line
- 1 dat line (joybus)
- 1 for the "cold reset" line
- 2 gpio connected to MCU2 for inter-mcu comms
- 3 pins to address the demux
- 1 input enable pin to control the demux ouput and toggle/disable the flash.
- QSPI pins connected to flash and psram
- CS line is connected as input to the demux
MCU2
- 2 pins for CIC communication to the n64
- 1 pin for the "cold reset" line
- 1 pin connected to MCU1's 'RUN' pin
- 2 pins for comms with MCU1
- 6 pins for SD Card comms
- 6 pins for comms with the ESP32
- 3 demux address lines
- 1 input enable pin to control demux ouput and toggle/disable flash.
- QSPI pins connected to flash and psram
- CS line is connected as input to the demux
MENU ROM
I wrote a menu using the open source n64 sdk, libdragon, that contains a simple file explorer to browse the contents of the SD card and load a selected rom file.
The Dreamdrive64 has it's own address space with which a rom can interact with. In my case I added the ability for the rom to pass through filesystem commands to read from the sd card.
These requests flow: ROM->N64->MCU1->Serial comms->MCU2->SD card->disk_read->MCU2->serial comms->MCU1->N64->ROM
BOOT
- MCU2 is connected to the USB port and the wiring of the demux is setup such that it will always boot from flash
- Program is copied from flash to MCU2's ram
- MCU2 disables flash access and asserts MCU1's run pin
- MCU2 starts CIC communication stalling until cold reset is asserted
- MCU2 init's serial inter-mcu comms and await's MCU1's commands
- MCU1 starts, loads the N64 bus while loop and await's the N64's requests.
- MCU1 starts serial comms to MCU2.
Challenges
The most significant...
Read more »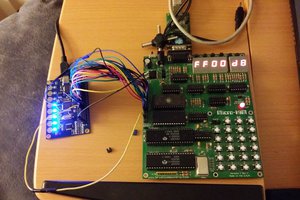
 Jac Goudsmit
 Marcel van Kervinck
Hello, I'm a dumb dumb, Is it more orientated towards developers and gamers shouldn't be concerned with choosing this over the PicoCart64? thanks!