 Nicholas DiPatri
roboGaggia - TL;DR
This project is a hardware-hack of the amazing Gaggia Pro
Although it's an amazing machine, the Gaggia requires a number of manual steps to get you from beans to a hot latte:
- You have to periodically pour water into the top of the Gaggia to refill the water reservoir. This can be an inconvenience if your Gaggia is under a kitchen cabinet.
- After you've loaded the portafilter with coffee grounds and put a cup under the group head, you have to wait until the brew heater achieves the correct temperature before you can click the 'brew' button.
- While brewing, you need to remember the weight of your coffee grounds so you know how much to brew. You need to either weigh your resulting coffee using an external scale or approximate the output by counting the seconds of your extraction.
- After brewing, you then have to manually switch the 'steam' button and wait for the heater to achieve the steam temperature.
- After steaming, if you want to brew again, you have to go through the process of extracting water to cool off the heater - the heater is always on with the stock Gaggia, so cooling off the heateater takes a while.
The above five steps are rather tedious and time consuming. It would be nice if I could load the Gaggia with fresh ground coffee, push a button, then walk away to attend to other things in my morning routine. When I return, I want my shot done and the machine ready to steam. These modifications do this.
Other things to note about the stock Gaggia Pro:
- The thermostats which measure the brew and steam temperatures employ a simplistic 'Schmitt Trigger' control algorithm which means the target temperature can vary quite a bit from shot to shot.
- When brewing, the water pump operates at a fixed rate, so there is no 'pre-infusion' period where the portafilter is filled with low-pressure water before the high pressure water is used to extract the espresso shot.
In an attempt to mitigate the above Gaggia short comings, I've implemented the following features:
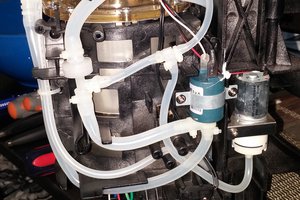
- Integrated scale that fits in the drip tray
- Dual PID temperature controllers
- PID flow-rate controller that implements Pre-Infusion and a fixed Flow Profile.
- Live flow telemetry sent to Adafruit.IO for flow analytics
- Auto-Fill water reservoir
- Auto-Shutoff
- Microcontroller-based automated brew process that eliminates the need for the Brew or Steam buttons.
- Cool-down feature to assist in cooling down the heater for alternating between brewing and steaming. This is important for single-boiler machines such as the Gaggia.
- Clean feature which automates much of the rather tedious process of backflushing the Gaggia's grouphead with Cafiza cleaner.
- All additional electrical features are installed on a separate printed circuit board (PCB) which is attached on the back of the Gaggia. The designs for this PCB are included in this repo with instructions on how to get the board fabricated.
Disclaimer
This project involves modifying a perfectly safe commercial espresso machine. These modifications absolutely make your espresso machine less safe. It involves both water and electricity. Please proceed at your own risk. This is a dangerous modification! If you don't do it right, people will die over a cup of coffee!
These instructions assume you are proficient in handling both DC and AC electrical components and plumbing. If you are not, this is not the project for you at this time, sorry! Learn with other projects and then come back to this one :-)
Also, I know absolutely NOTHING about proper coffee. It's quite possible everything I'm doing here is wrong, so don't yell at me. Anything I do know, I've learned by watching the awesome coffee videos from James Hoffman
Parts List
I will explain in detail how each of these are used. Here is a list of all major components needed for this modification and links to where you can acquire them. The brown parts in the above Robo Gaggia diagram are all 3D printed. I designed them using Fusion 360. Below, I've...
Read more »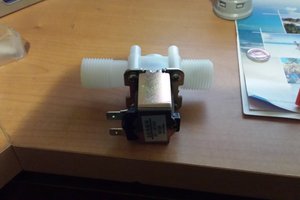
 AndyMac
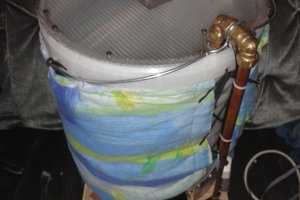
 Morning.Star
 Engin
Engin