In most cases, a fence or a garden wall is not enough to prevent unwanted animals visiting your garden. This is particular true for gardeners who like to grow vegetables. Animals such rats and birds might see your vegetables as free food. Or your neighbourhood’s cat might have taken a liking to your lawn as its personal toilet.
One solution to deter these “unwanted guest” is by shooting at them with a water gel pellet. The garden defender has a webcam that continuously scans your garden. When an “unwanted guest is detected”, the garden defender with aim and shoots.
Features
-
Detect unwanted guests: OpenCV and a deep learning algorithm “YOLO” were used for object detection.
-
Aim and shoot: When an unwanted guest is detected, will aim and shoot
-
Garden surveillance - large field of view: Robot will continuously move the webcam left and right to maximize the field of view when an unwanted guest not detected.
Build
Components
Tools
- 3D printer
- Tweezers
- Soldering Iron
- Glue for plastic parts
- Phillips screwdrivers
- Hex key set (Millimetric)
- Sandpaper
Build and assembly
1.- 3D print STL file
2.- Using the soldering iron insert the threaded inserts into the plastic parts. They must be flush.
3.- Build blaster: Insert Neopixel led rings with their cables on blaster cases, and route the cables.
4.- Add the servos cable and route it inside the blaster case
5.- Place the camera and blaster inside de blaster case. Double check that the cables are routed correctly.
6.- Align the camera cable and close the blaster case. Optionally, you can add cord protector wire loom.
7.- Add x7 M3 screws using a hex key M2.5.
8.- Paint plastic parts. Optionally, first, use a primer.
9.- Add x4 feet into the main base and secure them with x4 M5 screws using a Hex key M4.
10.- Add the switch into the main base and secure it with x2 M2 screws using a Phillips screwdriver.
11.- Add the servos driver into the main base and secure it with x2 M2 screws using a Phillips screwdriver.
12.- Add the relay modules into the main base and secure it with x2 M2 screws using a Phillips screwdriver.
13.- Add the Raspberry Piinto the main base and secure it with x2 M2 screws using a Phillips screwdriver.
14.- Connect the servos cable.
15.- Add one of the two servos into the main base and secure it with x4 M2 screws using a Phillips screwdriver.
16.- Press fit the bearing into the cover.
17.- Snap the cover into the main base and secure it with x2 M4 screws using a Hex key M3.
18.- Add the second servo into the link and secure it with x5 M2 screws using a Phillips screwdriver.
19.- Press fit the link into the bearing and secure it with an M3 screw using a Hex key M2.5.
20.- Add the servo’s base into the blaster and secure it with x4 M2 screws using a Phillips screwdriver.
21.- Press fit the magazine base into the blaster.
22.- Press fit the lights diffusers into the blaster (both sides).
23.- Connect the servo’s cable.
24.- Add the blaster into the assembly and secure it with x8 M2 screws using a Phillips screwdriver.
25.- Finally, add the magazine to the blaster.
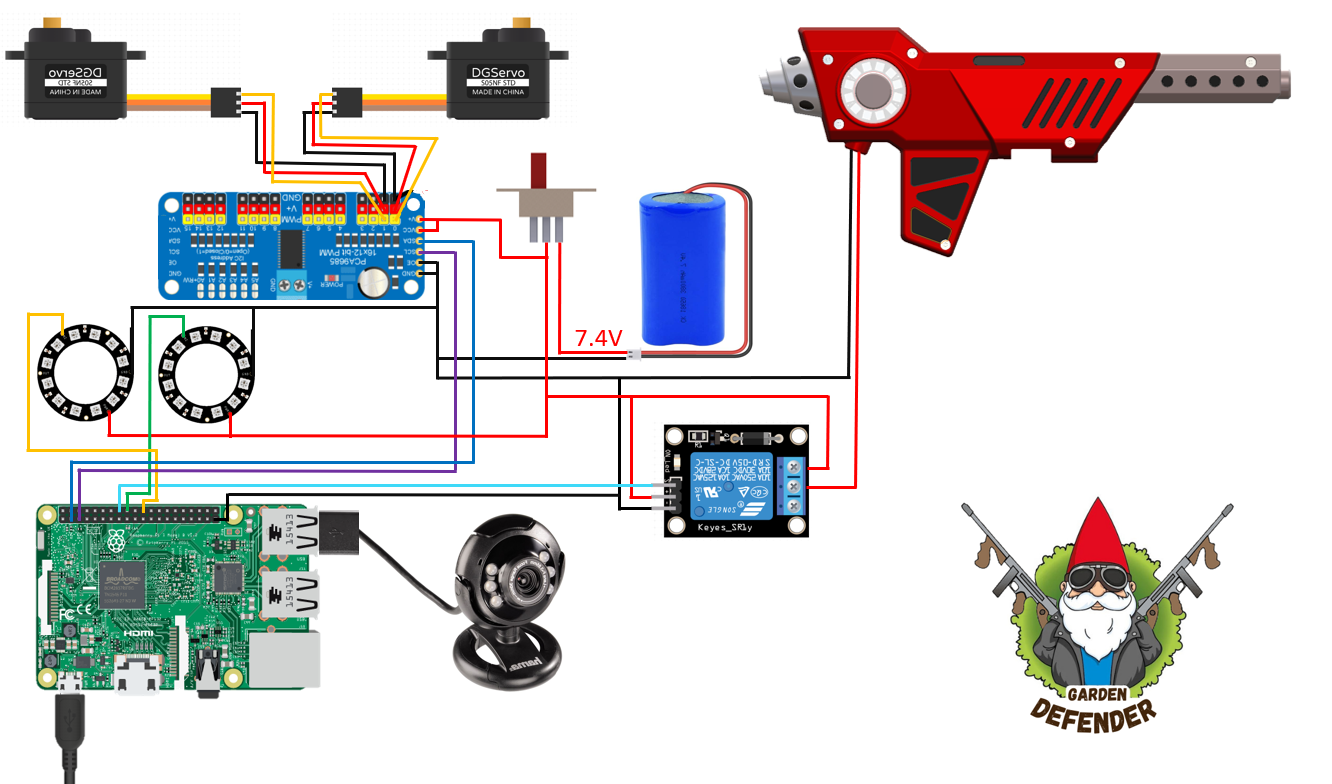
Connection Diagram

3D Models
Go to the GitHub and download the 3D Files in the “Mechanical Design/STL Files” Folder
https://github.com/Ernestoflores27/Garden_Defender
or download them from Printables:
Drivers setup
Required packages:
- Raspberry Pi OS (previously called Raspbian): https://www.raspberrypi.com/software/
- Cmake: https://cmake.org/download/
- Pigpio: https://kalitut.com/control-gpio-pigpiod-commands/
- PCA9685: https://www.adafruit.com/product/815
- OpenCV for C++ with DNN support: https://opencv.org/
Installing Raspberry Pi OS:
- Download package.
- Install Raspberry Pi OS on your PC.
- Insert SD card into your PC.
- Open Raspberry Pi Imager.
- In Operating system select: Raspberry Pi OS (32-bit)
- In Storage select your SD card.
- Select setting and add your WIFI name (SSID) and password.
- Finally, click on Write.
Installing Cmake on RPI:
1.-Open terminal.
2.-Installation:
cd
sudo apt-get install cmake
3.-Verification:
cmake --version
Installing Pigpio on RPI:
1.-Open terminal.
2.-Installation:
cd
sudo apt-get install pigpio
3.- Verification:
pigpio --version
Installing PCA9685 on RPI:
1.Follow the installation as shown here: https://github.com/vanvught/rpidmx512/tree/master/lib-pca9685
Installing OpenCV on RPI:
1.-Open terminal
2.-Download:
wget <https://github.com/sol-prog/raspberry-pi-opencv/releases/download/opencv4rpi2.1/opencv-4.1.0-armhf.tar.bz2>
3.-Extract:
tar xvf opencv-4.1.0-armhf.tar.bz2
4.-Move folder:
sudo mv opencv-4.1.0 /opt
5.-Remove folder:
rm opencv-4.1.0-armhf.tar.bz2
6.-Install requisites:
sudo apt install libtiff-dev zlib1g-dev
sudo apt install libjpeg-dev libpng-dev
sudo apt install libavcodec-dev libavformat-dev libswscale-dev libv4l-dev
sudo apt-get install libxvidcore-dev libx264-dev
7.-Add OpenCV to the system library path:
cd ~
echo 'export LD_LIBRARY_PATH=/opt/opencv-4.1.0/lib:$LD_LIBRARY_PATH' >> .bashrc. .bashrc
8.-Clone config file:
git clone <https://gist.github.com/sol-prog/ed383474872958081985de733eaf352d> opencv_cpp_compile_settings
cd opencv_cpp_compile_settings/
sudo cp opencv.pc /usr/lib/arm-linux-gnueabihf/pkgconfig
cd ~
rm -rf opencv_cpp_compile_settings/
Code
Go to the GitHub:
https://github.com/Ernestoflores27/Garden_Defender
Also, you can see the documentation in the following link: https://ernestoflores27.github.io/Garden_Defender/html/index.html
GUI
Garden Defender has two different modes that can be switched in the GUI pressing Q:
-
Manual mode: You can use the arrow keys to move the Garden Defender and the space key to shoot.
-
Automatic mode: It will be surveilling, once it detects, it will auto aim and shoot.
 Mael Dorne