Close
0%
0%

Integrate 315MHz RF Outlet with RPi and OpenHAB

Control the Defiant 1 Outlet Receiver from Home Depot via Raspberry Pi and OpenHAB. This also appears to be marketed as GE 18278 on Amazon.

Similar projects worth following
1.8k views
Control the Defiant 1 Home Depot RF outlet receiver for integration with OpenHAB. This project covers purchasing parts, wiring them together, sending commands, subscribing to MQTT event, and wiring up the MQTT in OpenHAB.

There seems to be a many year history of people replaying RF signals using a variety of devices. It was pretty fun to figure out how this works, and I'm posting this project to inform anyone with this actual physical switch as to the final way to easily control this device.

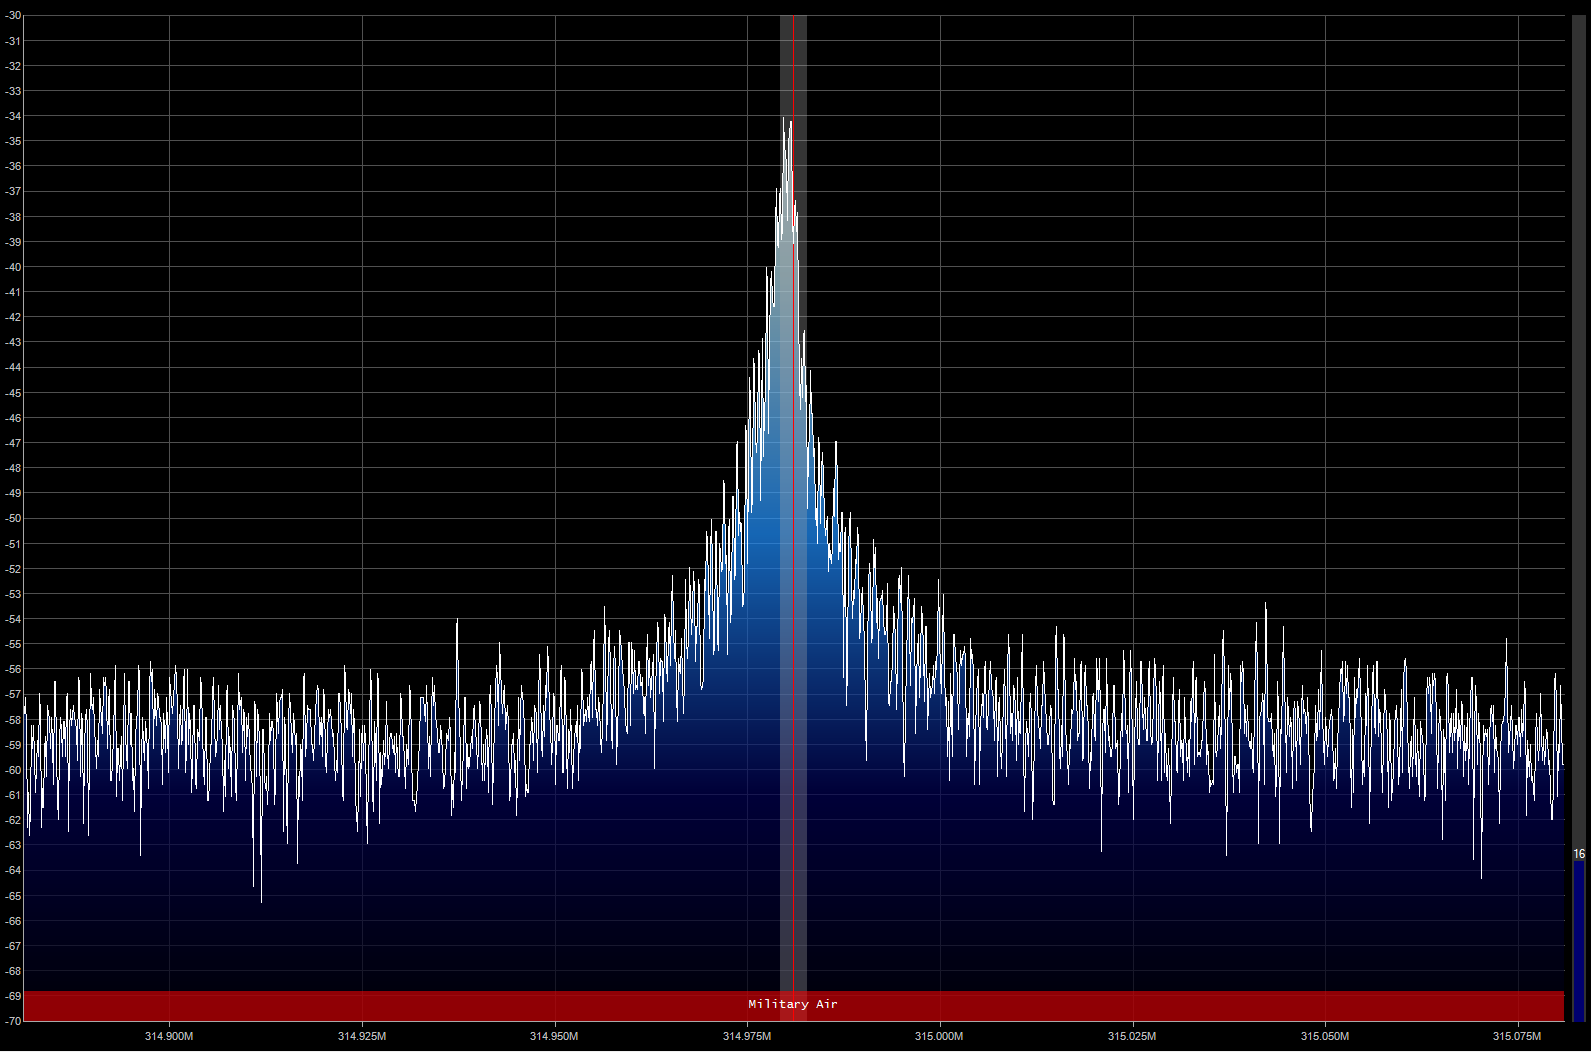
In the build steps, I show the process I used, which differs slightly from the way that most people have combined the tools in the various walkthroughs I link to. In particular, tuning SDR# settings to display a usable signal so we can manually demodulate it was kind of a challenge.

I've also integrated the sending of the signal using MQTT and OpenHAB. This particular button switch is not as robust as I'd like it - because there's no distinct ON and OFF, OpenHAB doesn't know the true status of the switch at any given point.

Hat tip to a similar project, Infrared IR, 433mhz and MQTT on ESP8266 bidirectional gateway 433nIRtoMQTTto433nIR, which allows raw sending of RF commands via MQTT. I think this could be useful and fast way to replicate a bunch of different signals directly from OpenHAB.

fzz - 3.34 kB - 01/19/2017 at 18:30

Download

  • 1 × Raspberry Pi 3 An older model will probably work just as well. Loaded with Raspbian and powered, connected to local LAN.
  • 1 × 315MHz Transmitter Referenced as WRL-10535 SparkFun and TWS-BS-6 in docs - $4
  • 1 × 315MHz grounded outlet receiver with keychain remote Defiant 1 Outlet (Home Depot) or GE 18278 (Amazon) - about $20
  • 1 × (Optional) Software Defined Radio (SDR) for testing. I used an RTL-SDR.com one from Amazon

  • The answer

    Paul Whitaker01/20/2017 at 14:31 0 comments

    After wiring you can use RCSwitch to send the string "101010101001101101100100" on 315MHz and get it to turn on or off. It's the same command for both since it's a single button switch.

    1. Wire up the transmitter
    2. Follow steps to Download and Install WiringPi
      https://projects.drogon.net/raspberry-pi/wiringpi/download-and-install/
    1. Git clone https://github.com/r10r/rcswitch-pi
    2. Edit send.cpp and replace it with this code

      #include "RCSwitch.h"
      #include <stdlib.h>
      #include <stdio.h>
      
      int main(int argc, char *argv[]) {
          /*
           output PIN is hardcoded for testing purposes
           see https://projects.drogon.net/raspberry-pi/wiringpi/pins/
           for pin mapping of the raspberry pi GPIO connector
           */
          int PIN = 0;
          char* code = argv[1];
       
          if (wiringPiSetup () == -1) return 1;
              printf("sending code[%d]\n", code);
              RCSwitch mySwitch = RCSwitch();
              mySwitch.enableTransmit(PIN);
      	mySwitch.setRepeatTransmit(2);
              mySwitch.send(code);
              return 0;
      }
    3. Run "make"
    4. Run ./send 101010101001

View project log

  • 1
    Step 1

    These instructions demonstrate how to do an RF replay "hack" against an unknown transmitter signal. This process may work for other types of signals as well.

    First, gather details about the transmitter. In the US, the FCC publishes technical details regarding the radio signals used by each legal device. In the case of the Defiant 1, the RF keychain transmitter had a printed label with the code AG2AA-001. Googling this yielded a set of documents filed with the FCC.

    This mentioned a frequency of 315MHz and a modulation technique of ASK, which is Amplitude Shift Keying. Basically the signal strength goes up or down based on a string of binary digits in a specific order. As AM audio, this sounds like a tone kind of like an old school modem. After some googling, I learned the signal for these type of transmitters is usually encoded using OOK (on-off keying). Based on this, we know there is an encoded string of bits being sent over 315MHz using some established standard. We an figure out what the string is and send it on the same frequency, to replace the transmitter key fob.

    This particular receiver only gets one type of signal. For an on/off switch with two buttons, there would be two different signals. A fan controller or something like that could have a bunch of different signals.

  • 2
    Step 2

    Tune a software defined radio (I used this one) using SDR# (if you're on Windows) or another software application to 315MHz and push the keychain button a few times. You should notice a signal.

  • 3
    Step 3

    There are a number of automated ways to demodulate the signal, including: rtl_433 (walkthrough) if you're on linux and your transmitter works on 443MHz, gnu radio (walkthrough) (walkthrough #2) (walkthrough #3) (video class on this), HDSDR, gqrx, OOKtools. This one is simple so we can do it visually. I happened to choose SDR# so here are the settings I used for that.

    Let's record audio and see what the signal is. Change the SDR# settings to:

    Settings (gear icon)

    Sample rate: 1.8 MSPS
    RF Gain: 0dB
    Offset Tuning: Unchecked
    RTL AGC: Unchecked
    Tuner AGC: Unchecked
    Frequency correction: 0

    Tuner

    314.981MHz
    Tune to center of signal

    Radio

    Bandwidth: 3404
    Order: 1000
    Squelch: 47 (Checked)
    Lock Carrier: Checked
    Snap to Grid: Checked (12.5 kHz Step Size)
    Anti-Fading: Unchecked
    Correct IQ: Unchecked
    Swap I and Q: Unchecked

    Audio

    Filter Audio: On

    FFT Display

    View: Spectrum Analyzer
    Resolution: 2048

    Recording

    Mode: Sample 32 bit IEEE Float
    Audio: Checked
    Baseband: Unchecked

    Click "record" then press the button a few times. This creates a file in the sdr# folder.

View all 12 instructions

Enjoy this project?

Share

Discussions

Similar Projects

Does this project spark your interest?

Become a member to follow this project and never miss any updates