Our team worked with the Moreton Bay Environmental Education Center to redesign their system measuring Secchi Disk depth. Our priorities were making the system efficient, accurate, inclusive, and safe.
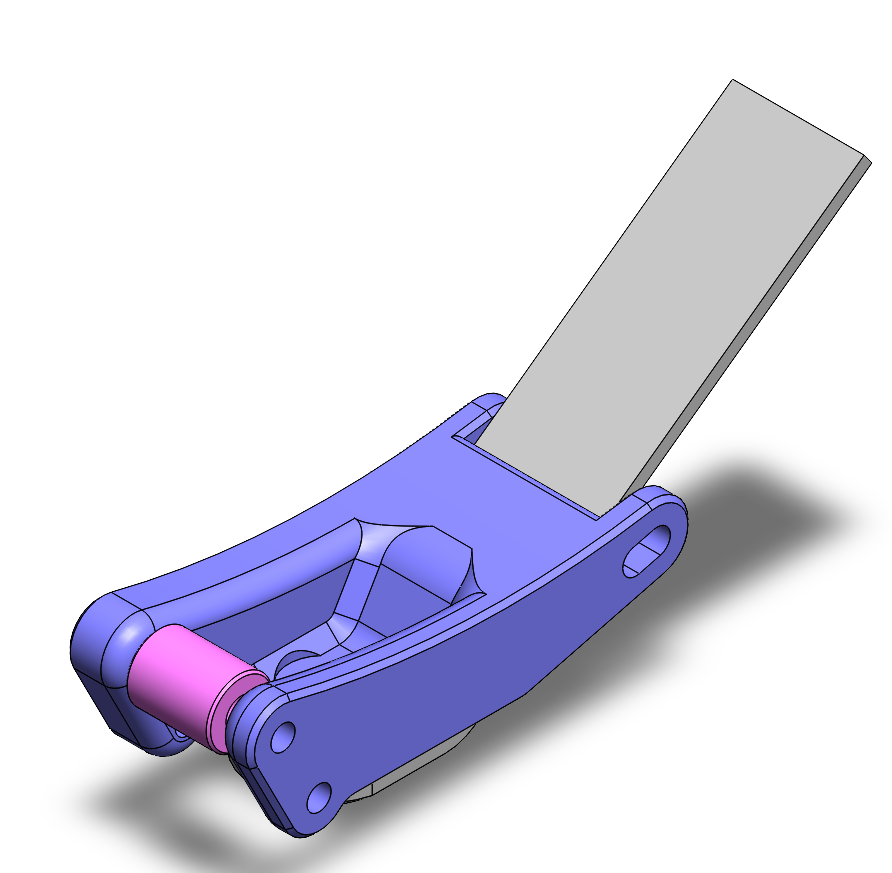
SolidWorks parts contains 3 bodies. One approximating level wind geometry that is part of the reel, one for the body of the feeder part and one for the roller.
Existing clamp system can connect to the boat railing directly. With the new system, it's ideal to have the reel sit at an angle so that younger students can read measurements more easily.
2
Feeder
Our feeder mechanism is fully 3D printed from ABS plastic, because of its UV resistant capabilities. It was designed by Eli Patten, our program manager. The goal of this piece was to ensure the measuring tape would feed smoothly into the reel, without any twists or folds.
Because we built on top of the existing reel mechanism, we designed it such that the feeder could be clamped onto the existing metal clamp extension (gray in the photos) via an existing hole. This connection includes a M5 screw and washer on one side, and fender washer and nylock nut on the other. After being screwed in there, the feeder can be further secured via the slot shaped holes on the back of the part. Adjust the angle of the feeder such that the slots are above the clamp extension and fasten using a M5 bolt. Ensure that the screw is pulled in against the arm to tightly hold the two together. From there the two cylindrical rollers (pink) can be placed using a M5 screw, washers on either side of the roller, and two jam nuts. Run tape measure over the cylinder, and then repeat the process with the top roller mechanism.
3
Tape Connection
To fabricate this connection we overlapped the two sections of tape by 150mm, applied the glue* to the overlapping sections, and left the connection to dry for 24 hours with a weight on top. The glue we used was a marine grade adhesive specifically made for fiberglass and plastics. After the glue was dry, we used an industrial sewing machine with a marine grade thread and followed a box-x pattern to add an extra level of durability to the connection, while maintaining the flexibility of the tape. We used five box-x stitches for each connection.