 Harsh
HarshESP8266 Based NeoPixel Dashboard
This is an ESP8266 based Neopixel dashboard, it shows current time, can show a custom message and have upto 41 prebuild effects.
Moreover, the color and brightness of the message as well as time can be changed. The speed of the message scroll as well as effects can also be changed dynamically. The time is RTC backed and The whole dashboard is LiIon Battery Backed.
Get the Code on GitHub
The construction consist of following basic parts.
- ESP8266 based NodeMCU, any other board can be used (https://shop.pimoroni.com/products/adafruit-feather-huzzah-with-esp8266-wifi)
- NeoPixel matrix (https://goo.gl/zl7i5V)
- LiIo Battery (From Amazon)
- RTC for time keeping (From Amazon or Ebay)
- Battery charging circuit (The one found on ebay, or Amazon)
- Front and Back plates from Pimoroni (https://shop.pimoroni.com/products/pibow-modification-layers)
The connection is straightforward, The Data In Pin of the matrix is connected to the D3 pin of NodeMCU. and the 5V Pin is connected to the 5V of battery charging circuit. This is to make sure that we do not fry the ESP. Protection diode needs to be placed between all the points, but I was lazy enough not to use one, as who cares even if I loose a cheap NodeMUC. All the connection are totally up to you, this is not the only way you can use it.
The Magic lies in the Code, The meat lies in the code. Code is everything !!!!!!......
Before uploading the code make sure, you have the ESP9266 Arduino Core and that you have connected the ESP8266 to WiFi at least once, and do remember to use the libraries that I have included in this repository, the one that I have used have been modified a bit to be able to use it properly. The description is below.
Original Library
- Adafruit_GFX (https://github.com/adafruit/Adafruit-GFX-Library)
- Adafruit_NeoPixel (https://github.com/adafruit/Adafruit_NeoPixel)
- Blynk (https://github.com/blynkkk/blynk-library)
- WiFiManager (https://github.com/tzapu/WiFiManager)
- AsyncPing (https://github.com/akaJes/AsyncPing)
- NTPClient (https://github.com/arduino-libraries/NTPClient)
- RTC_By_Makuna (https://github.com/Makuna/Rtc)
- ArduinoOTA (InBuilt)
- Simple-Timer (https://github.com/jfturcot/SimpleTimer)
Modified
- 1Adafruit_NeoMatrix (https://github.com/adafruit/Adafruit_NeoMatrix)
- WS2812FX (https://github.com/kitesurfer1404/WS2812FX)
Now once you open the main file, go to the _defines.h_ and insert yout blynk app token in the bottom last paramater named _auth_
Then upload the code to the ESP.
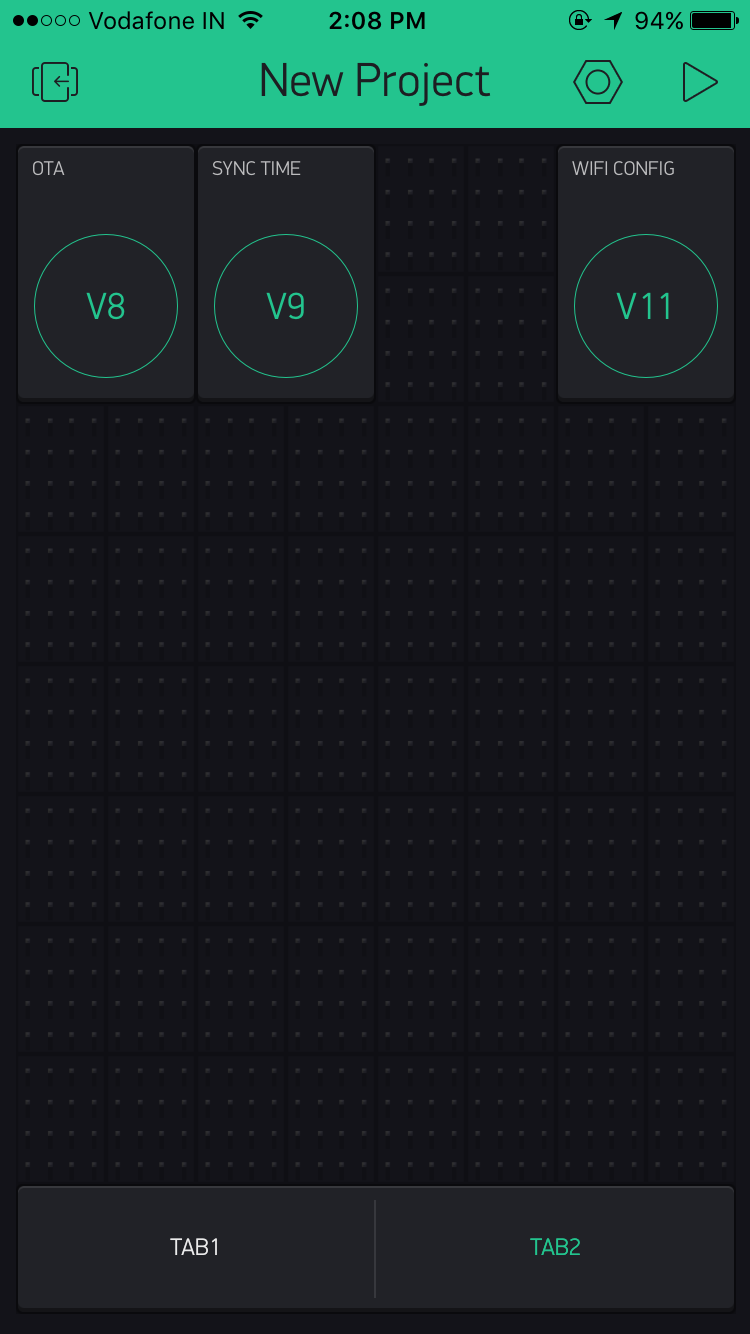
Arrange the Widgets according to the following image making sure that you have used the exact same virtual pin, and if you want to use your own setup, you are good to go, just make sure to make chages in the defines.h file accordingly.
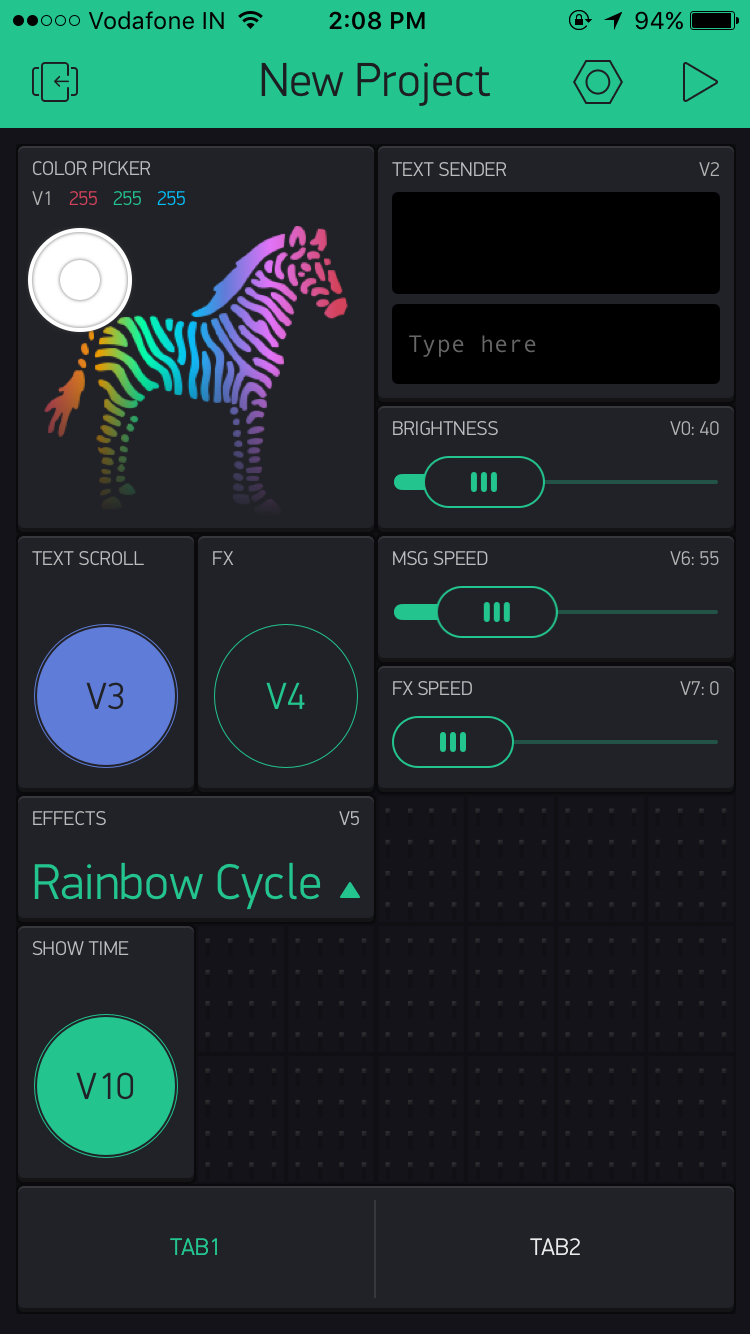
After that is done, now you need to manually add the list of effects in the effect list drop down widget, as follow in the same order.
STATIC
BLINK
BREATH
COLOR WIPE
COLOR WIPE RANDOM
RANDOM COLOR
SINGLE DYNAMIC
MULTI DYNAMIC
RAINBOW
RAINBOW CYCLE
SCAN
DUAL SCAN
FADE
HEATER CHASE
THEATER CHASE RAINBOW
RUNNING LIGHTS
TWINKLE
TWINKLE RANDOM
TWINKLE FADE
TWINKLE FADE RANDOM
SPARKLE
FLASH SPARKLE
HYPER SPARKLE
STROBE
STROBE RAINBOW
MULTI STROBE
BLINK RAINBOW
CHASE WHITE
CHASE COLOR
CHASE RANDOM
CHASE RAINBOW
CHASE FLASH
CHASE FLASH RANDOM
CHASE RAINBOW WHITE
CHASE BLACKOUT
CHASE BLACKOUT RAINBOW
COLOR SWEEP RANDOM
RUNNING COLOR
RUNNING RED BLUE
RUNNING RANDOM
LARSON SCANNER
COMET
FIREWORKS
FIREWORKS RANDOM
MERRY CHRISTMAS
The Blynk Library make some blocking network calls, to make sure that it is connected to the blynk server, but when we are making certain projects like this one, we want Blynk to be an helper not the main king, that completely stops all other executuion if it is not able to find its master.
So, in this program I have used a neat trick, I have used an AsyncPing Library that helps to make sure that the device is connected to the internet and not just connected to the WiFi. This is achieved by making the Blynk.connect() call only to be executed when the Ping to the Google Server returns true. This ensures that the sketch completely do not become a blocking sketch, but there are some catch, such as when the blynk server itself is down, than it will stop the sketch, as the device is able to access the internet, but not the blynk server. Some Changes can be made to the sketch, so that if the connection to the blynk server is not achieved, then wait for sometime like 1 hour before reconnecting. So let cut short the crap and let me show you the trick.... Use this library AsyncPing (https://github.com/akaJes/AsyncPing)
#include <ESP8266WiFi.h>
#include "AsyncPing.h"
AsyncPing ping;

//Check if internet is up an running.
bool pingCheck = false,
     blynkConnected = false;

//Check if Blynk needs to be connected or not, only if internet is up and running, not only wifi.
void blynkCheckEvent()
{

  if (blynkConnected == false && pingCheck == false)
  {
    ping.begin("8.8.8.8");
  }

  if (blynkConnected == false && pingCheck == true)
  {
    Blynk.connect();
  }
}

void setup()
{
  Blynk.config(auth);
  if ( Blynk.connect())
  {
    blynkConnected = true;
  }
  //The code to make sure that the reconnect code is non blocking, this is achieved by this awesome library that helps us ping in an async manner.
  ping.on(false, [](const AsyncPingResponse & response) {
    if (response.total_recv > 0)
    {
      Serial.println("Ping Sucessfull");
      pingCheck = true;
    }
    else
    {
      pingCheck = false;
      Serial.println("Ping UnSucessfull");
    }

    return true; //doesn't matter
  });
}

void loop()
{
  if (Blynk.connected())
  {
    blynkConnected = true;
    Blynk.run();
    pingCheck = false;
  }
  else
  {
    blynkConnected = false;
  }
}