Close
0%
0%

Deep Thought

Creating an ominous terminal that responds to voice input with quotes from Hitchhikers Guide to the Galaxy

Similar projects worth following

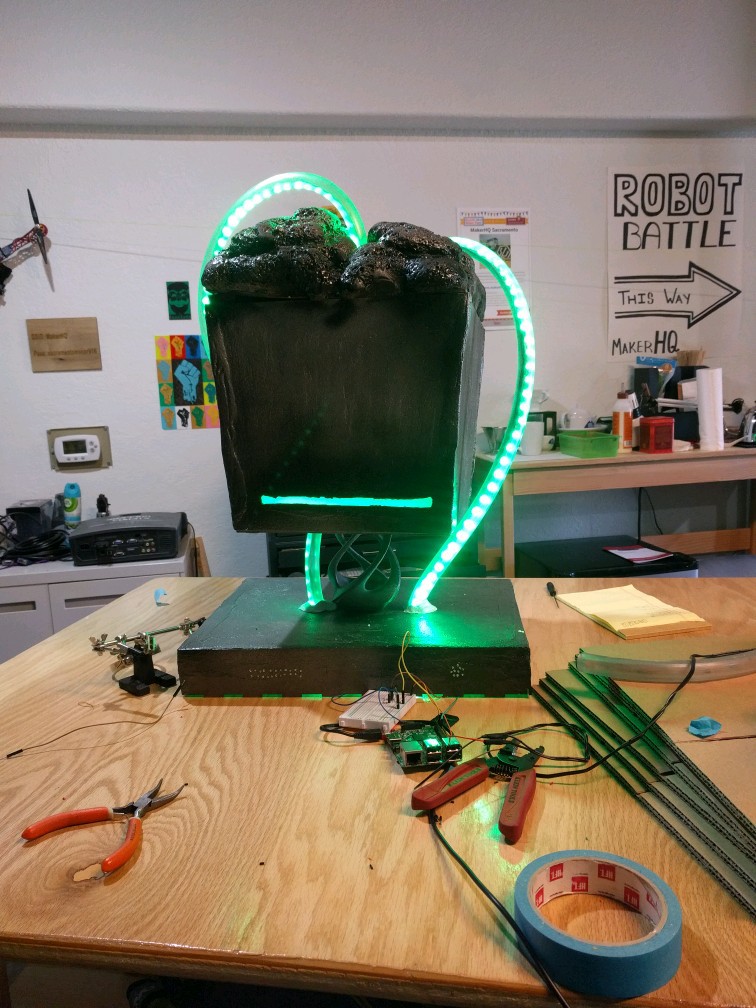
Deep Thought is your normal, somewhat-creepy talking brain that gives you all the answers you ever need to know!

This project utilizes speech recognition, Neopixel LED Strips, and the Raspberry Pi to bring us the beginnings of our own little home-baked personal, all-knowing assistant. Who needs Alexa when you have Deep Thought?

The video above is our prototype, getting Deep Thought to recognize certain patterns in order to respond with the correct phrases according to Hitchhiker's Guide to the Galaxy. We hope to add some more functionality to Deep Thought in the coming weeks and give him a permanent role in our makerspace!

cardboard_model.jpg

Our box outline made of cardboard! Let's decorate this thing.

JPEG Image - 464.04 kB - 02/11/2017 at 22:37

Preview
Download

cardboard_model2.jpg

A slight idea of the proportions of the final project.

JPEG Image - 449.89 kB - 02/11/2017 at 22:37

Preview
Download

project_plan021017.jpg

Cara's awesome plans outlining what we're going to do.

JPEG Image - 253.51 kB - 02/11/2017 at 22:37

Preview
Download

  • 1 × Lasercut Body
  • 1 × Raspberry Pi
  • 1 × LED Strip
  • 1 × Microphone

  • Getting to MVP

    Richard Julian03/06/2017 at 16:00 0 comments

    After the design and implementation of the LEDs, I knew it would just be some programming work to create some optics with the lights and get voice input, process it, and then have Deep Thought respond accordingly.

    Essentially, I just took some example python scripts for both the Speech Recognition library (using the pocketsphinx integration) and then the examples provided with the rpi_ws281x library for Neopixels and modified them to do my bidding. At this point, it is insanely janky and will take a little more focus to make Deep Thought's codebase extensible and sensible. Similarly, I'm using Festival Text to Speech, which, while charming, has some serious limitations. However, the British voice we found and settled on is by far one of the best I've ever heard for TTS.

    On the hardware side of things, probably the biggest hiccup was getting the Raspberry Pi to output audio over the USB dongle audio jack. As I, and seemingly many people have learned, audio out of the 3mm jack + GPIO pins == craziness. There is considerable interference coming out of the speakers when you use the audio jack, and if you play any sound, for instance, the Neopixels will respond, but not in the way anyone wants them to! So, it took a quick couple of rounds of googling to get the proper configuration for USB-based audio.

    A couple of issues still linger with Deep Thought. Most notably, my Neopixel code is throwing some sort of error on free() on exit of the code (maybe a memory leak or something?). Additionally, speech recognition is tough. Our trigger word was "Hello Deep Thought" or "Hello" and we learned big time that you have to specifically say "Hello" in a manner that both emphasizes the H in that word and then also ends on a rising tone (as you'll see by my _very_ enthusiastic hello in the video). Pocketsphinx is very good at getting certain words and phrases understood, especially for something free and open source. The processing time, however, for pocketsphinx is quite long! Hopefully, when giving deep thought function, we can fix this.

    Either way, Cara and I had a blast working on this very odd art project! It really is pretty cool to have your own Alexa and man I really hope if the personal assistant craze continues, we see some really amazing open source alternatives to what we have currently. It really is like IRC bots, but in real life!

  • Progress Photos

    MakerHQ03/04/2017 at 01:41 0 comments

  • Project Design

    MakerHQ03/04/2017 at 00:12 0 comments

    We loosely modeled our project on the image above. We used some creative license to reimagine Douglas Adam's supercomputer Deep Thought from Hitchhiker's Guide to the Galaxy.

    Using makeabox.io (which was troublesome), we laser cut the base and polyhedron head from 3mm plywood. The neck was fashioned from a 3D printed vase found on Thingaverse (http://www.thingiverse.com/search?q=sculpture+08&sa=). We modeled brains using insulation foam and created an aged, weathered appearance using wood putty and spray paints.

    Richard then created the LED effects using rpi_ws281x library (https://github.com/jgarff/rpi_ws281x) on a Raspberry Pi. Deep Thought is able to recognize speech using the SpeechRecognition Python library (https://github.com/jgarff/rpi_ws281x) and Pocket Sphinx (https://pypi.python.org/pypi/pocketsphinx).

    The LEDs are activated when Deep Thought is given an important question to ponder, such as "What is the meaning of life, the universe and everything?" When Deep Thought responds, after about 7.5 million years or so, it will provide an appropriate answer, like 42.

  • LEDs, Speakers, and Raspberries

    Richard Julian02/22/2017 at 19:25 0 comments

    After lasercutting the wooden body, Cara and I started working on the requirements for the interactive electronics components of the project. We had the following requirements:

    • Deep Thought recognizes speech to answer specific questions in accordance with quotes from HHGTTG
    • Deep thought speaks the answers in a computer generated voice
    • Deep thought has a mouth that lights up with speech.
    • When Deep Thought is being spoken to, LED strips will make it appear that the words are being processed into the central part of Deep Thought.

    We started getting work on exploring localized speech recognition software for the Raspberry Pi (testing on my personal linux box first). We found the pocketsphinx library for python and a good speech recognition wrapper for it. After some initial testing, we realized that we would simply seek out some key words to determine which response to give to the question. Therefore, this isn't very complicated speech recognition, but hey, it gets the job done!

    Next up was working with the LED strip. We're envisioning a sort of cyberpunk, gritty Deep Thought and thought having neural pathways lit up with green LEDs would be awesome. We're still in the phase of testing all of this, but we came up with a couple of prototypes for possibilities with the LEDs.

  • Laser Cutting the Body

    MakerHQ02/18/2017 at 22:52 0 comments

    Here is the cutting of the base. We used Fusion360 and BuildaBox.io to create the files.

  • Ideation and Design

    Richard Julian02/12/2017 at 00:53 0 comments

    Yesterday and today, we've been working on our idea for Deep Thought. It started with Cara thinking of a personal-assistant like device to live in our makerspace. Us being us, we got to thinking what a good ominous device would look like for the space, and boom! Deep thought was born.

    So, in our research, we realized that Deep Thought hasn't really been concretely imaged and we have a bit of wiggle room when it comes to what our end product can look like. Looking at the image search results, we did want to follow the trope of a large box-like frame resting upon some sort of neck.

    Being in a makerspace and wanting something physical, we immediately started with everybody's favorite waste materials: cardboard. You can see in the photos we made a super rough, tapered cardboard cube to act as our replica base.

    Today, we've started using the lasercutter to make a wooden version of our prototype! Our goal is to start working on texturing, displays, and outputs this week!

View all 6 project logs

  • 1
    Step 1

    Build a box for the head. No, really, we used a box-making website for a laser cutter box and then modified it to have uneven sides. We will upload our STL files that we used for laser cutting. There is absolutely no reason why you can't make this box out of cardboard or whatever material you have lying around. You will need to decide what size mouth you would like and make sure to cut it out. We found it super handy to be able to take the head off to access the lights embedded in the head.

  • 2
    Step 2

    Construct the base and the neck. Yet again, we simply used a laser cutter and box-making software to make a base to hide all of the components (Raspberry Pi, Speakers, Microphone). Make it about twice the length of the box. For the neck, you can absolutely get creative here and use anything you find inspiring. For us, we used a 3D Printed sculpture from Thingiverse, Sculpture #08.

  • 3
    Step 3

    Add Tubing for Lighting. Yet again, this can be as creative as you want. We were a bit conservative with lighting. I acquired some wide, transparent acrylic tubing from a hardware store for about $7 that was perfect for the Neopixels. Cut holes throughout the base and the box for the tubing and then, for further points (and possibly better structure), use some sort of putty or sealant around the tubes.

View all 6 instructions

Enjoy this project?

Share

Discussions

Similar Projects

Does this project spark your interest?

Become a member to follow this project and never miss any updates