 agp.cooper
DeltaCad Macro Completed
All I can say it was a bit of a marathon getting the code working reliably. The issue is that the underlying processes (wire-framing) is not unique/deterministic. Asking the macro to sort out lazy chine offsets was a dead end.
Why migrate from the spreadsheet version previously presented? After all it works! The reason is that even simple designs take forever to code and it is just too hard for more complex projects. The new DeltaCad macro version handles simple hulls easily and the more complex designs are slow but doable.
Design Process
The process consists of two macros/files:
- BoatOffsetTable.xlsm
- BoatOffsetTable.bas
The Excel file and macro allow you to enter the offset table and then to export the design to a CSV file for DeltaCad.
The DeltaCad macro imports the CSV, draws the design and unfolds (develops) the hull.
Note: DeltaCad can be purchased for US$40 from https://www.deltacad.com.
Workflow
DeltaCad does not have a suitable table entry process which is why Excel is used. Below is the Excel offset table for the “Mini-Kayak”.
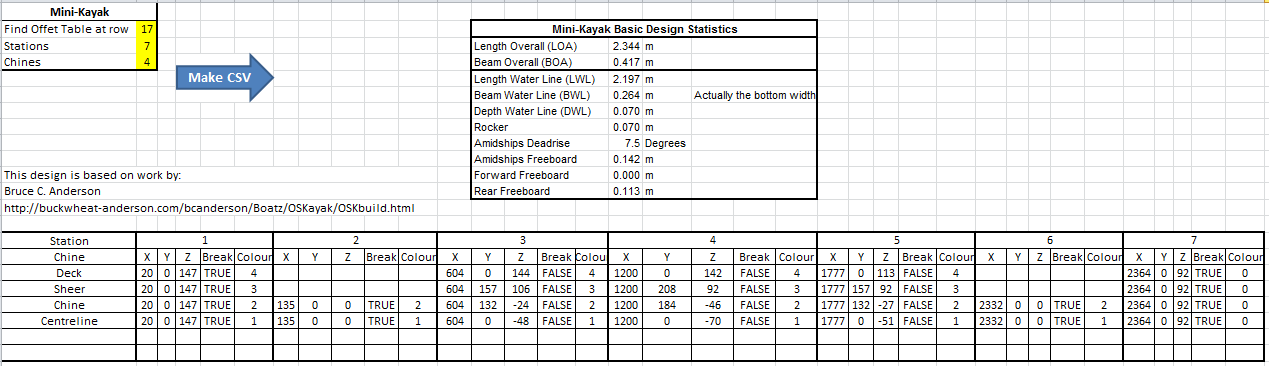
“Mini-Kayak” is an adaptation of work by Bruce C. Anderson (http://buckwheat-anderson.com/bcanderson/Boatz/OSKayak/OSKbuild.html). The actual design is too small to be of practical use as a Kayak (refer to Anderson’s webpage).
The above offset table has three additional features over an offset table:
- Chines have a colour for easy identification.
- Chines can be invisible (and ignored) if the colour is “0”.
- Chines can have a “break” or a sharp bend.
Notes:
- The design is in millimetres.
- The stations are rounded to the nearest millimetre.
- Any duplicate stations are deleted.
- Stations within 5 mm of each other will have “breaks” automatically added.
- Colour 0 is not processed.
- If an interpolated value appears wrong or wildly off then you will need to add “breaks” to the chine stations near the problem area.
- No curvature checks are made, the design may not be developable (i.e. the plywood may break).
The offset table is exported to DeltaCad as a CSV file. The name of the CSV file is the same as the Excel WorkSheet name. To execute the macro just click the blue “Make CSV” arrow as shown above.
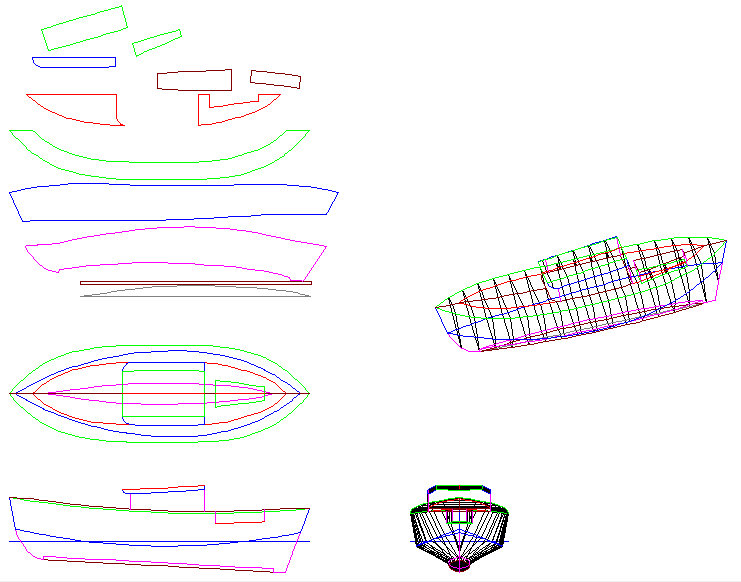
In DeltaCad the macro (“BoatOffsetTable.bas”) is run to import the CSV file and draw the design. For complex designs, the actual process is iterative (i.e. chine by chine). Below is the imported and unfolded “Mini-Kayak” showing the main drawing components.
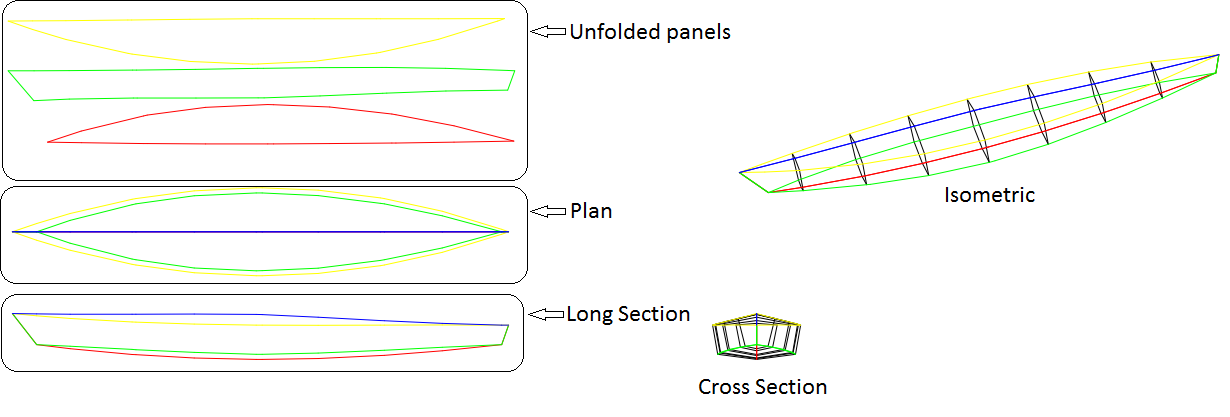
Note: The unfolded panels are the cut-outs for the design and only one side is shown.
Macro Options
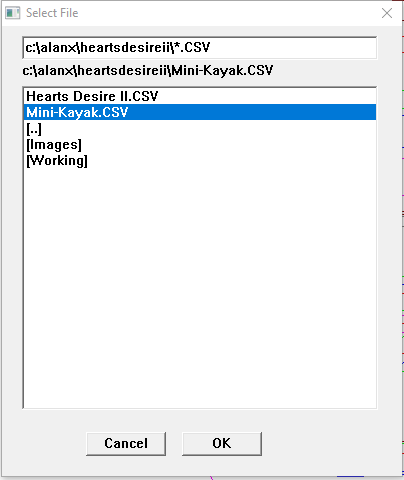
When you run the DeltaCad macro, it first presents a file manager window. It starts in the DeltaCad macro directory. You will need to navigate to your working directory (i.e. where the Excel file is located) and select and okay the CSV file. For the “Mini-Kayak” it is called “Mini-Kayak.CSV”, as shown below.
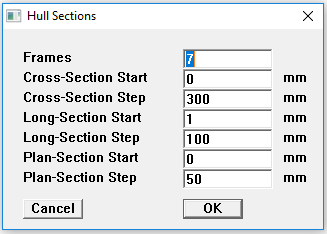
The macro then presents the “Hull Sections” options box. Set the number of frames to 7 and zero the remaining entries as shown below. This option adds additional frames to the hull model.
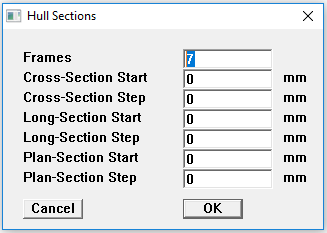
You should see the following design.
Other Options
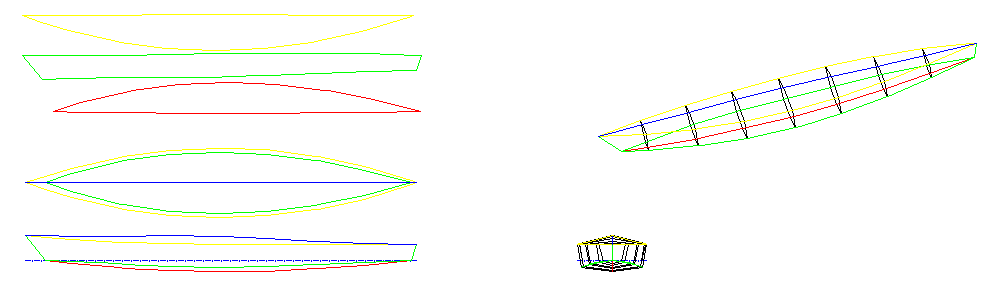
If the “Frames” entry is set to zero then the offset table as entered in Excel will be drawn as below.
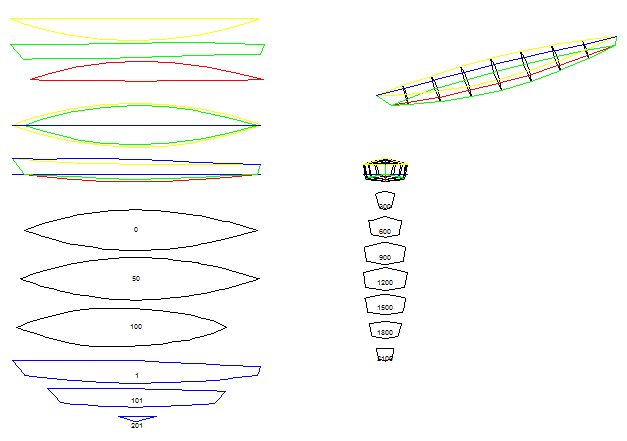
The other option entries, create different sections (cross, long and plan) through the model. For example the following options, shown below, also draw a series of cross-sections, long sections and plan slices.
More Complex Designs
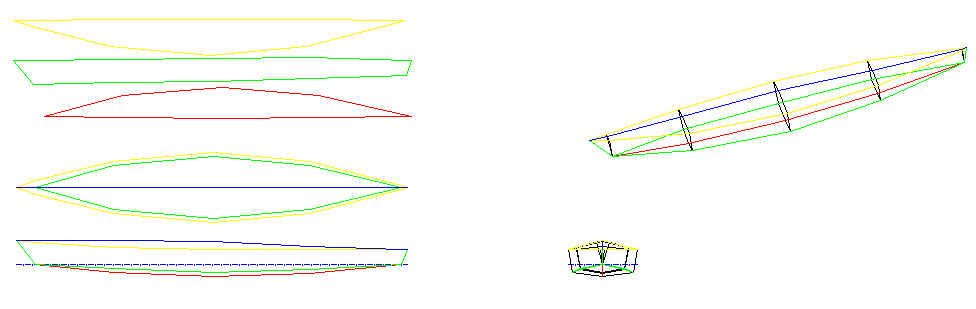
The program is capable of more complex designs but the offset table entry process is rather time consuming. Shown below is “Heart’s Desire II” a design by William Atkin.
Back to the Pontoon Design
Okay, I have generated the pontoon design file in DeltaCad, what next? No big deal, digitise "shapes" over the pieces I want (delete the all the segments when done) and lay them out. Only took about 30 minutes. Below is the cutout design on a single sheet of 4 mm marine plywood:
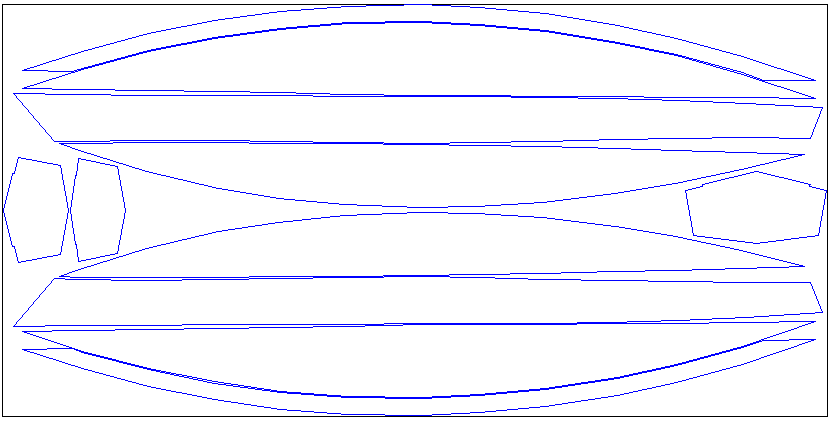
What is now remaining is to generate (i.e. write a macro to generate) a set of text offsets for marking out the shapes on the plywood (the black box in the image above).
The Pontoon Bridge/Spars
Not a big deal here. Just have to decide what I want it to look like before designing it.
Files
I have uploaded the two files. If you have DeltaCad then have a play.
Update
I have re-edited the cut-out design to align most points with 100 mm spacing. The reason for this is to minimise the measurements required to loft the design:

I have added two breasthooks (red) for the sheer chine join (i.e. "harpin").
Here is an image of the very first mini-canoe I built some 15 years ago. You can see that I use a harpin to keep it's shape. You can also see the copper wires that stitch the hull together before the seams are epoxied.
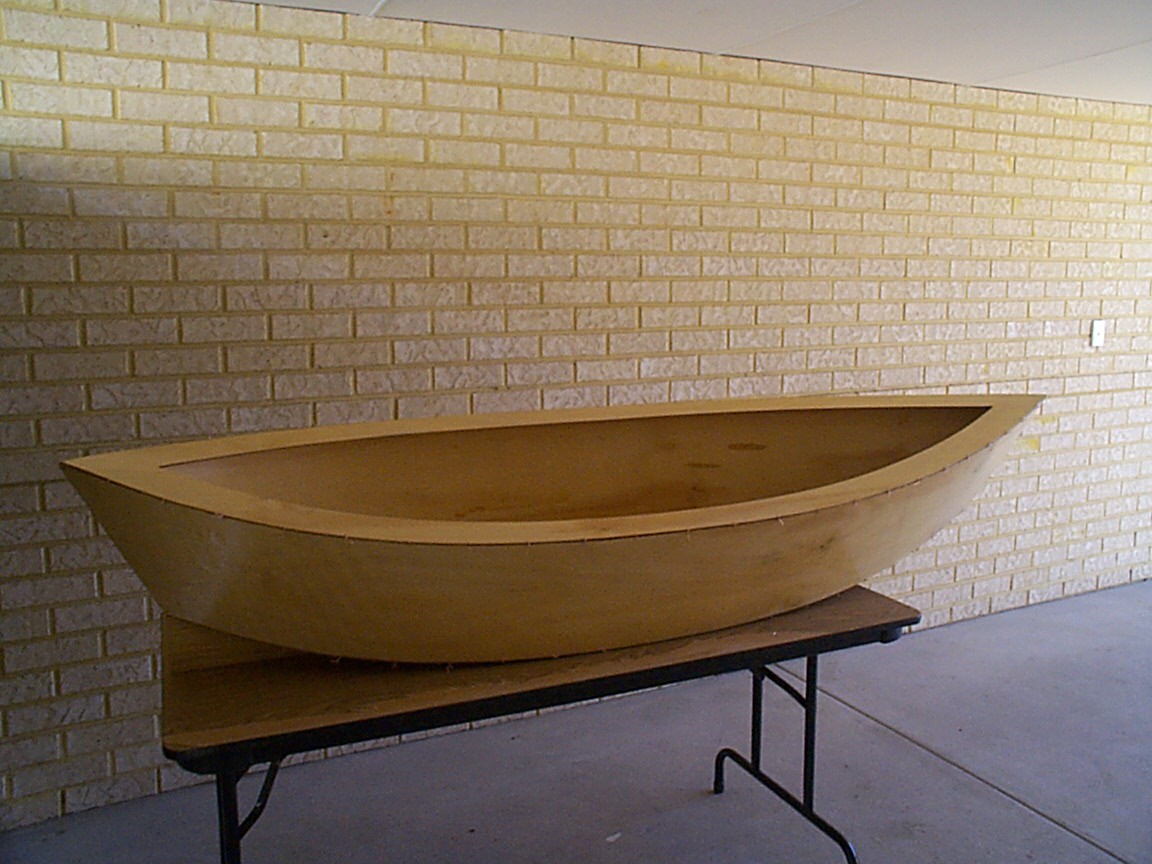
This image shows the epoxied seams (no fibre-glass tape reinforcement was used in this design) :
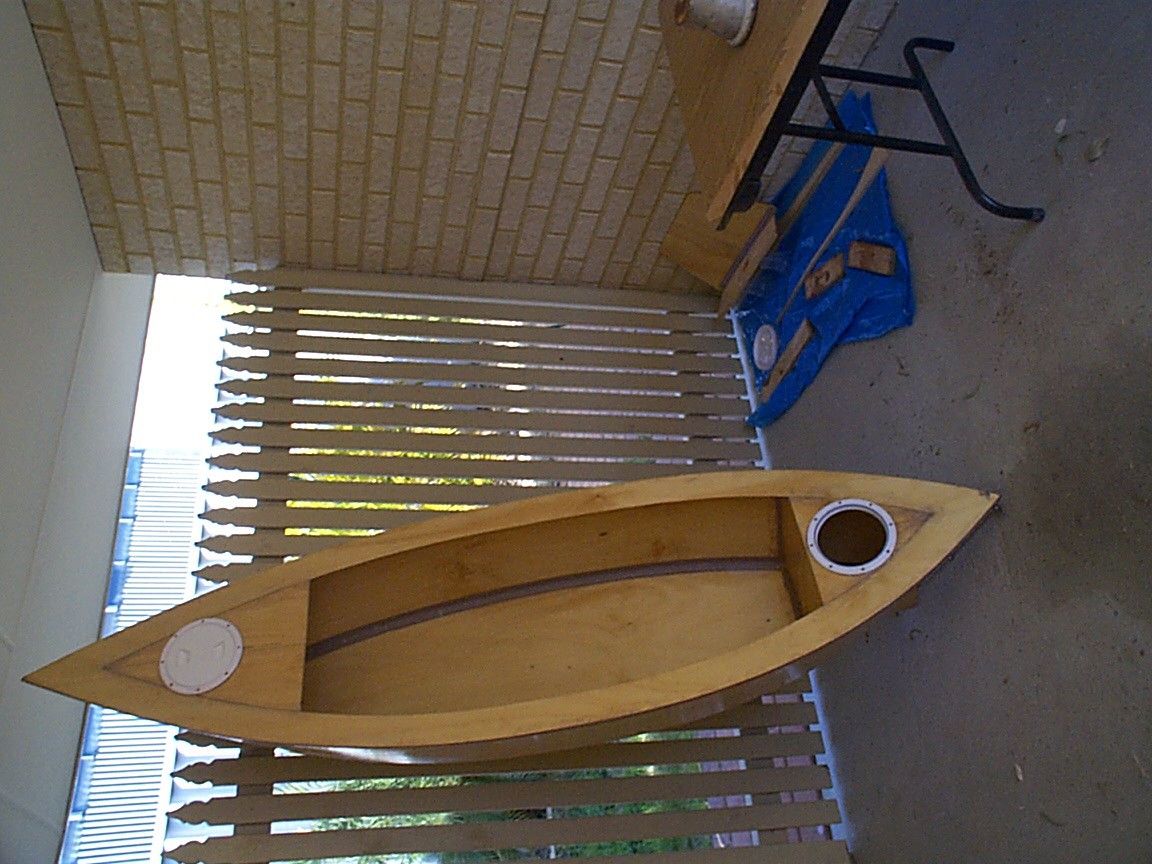
This canoe was too small (i.e. tippy) to be usuable.
Export Layout Offsets
Finished the export macro. It orders the points by column so that a column is marked at a time (i.e. without moving the measuring tape). With 456 points it is pretty important get the process of lofting efficient.
Here is the code:
Option Explicit
Sub Main
Dim ot As Long
Dim Shape(6144) As Double
Dim num As Long
Dim color As Long
Dim lt As Long
Dim lw As Long
Dim Layer As String
Dim XP(10000) As Double
Dim YP(10000) As Double
Dim Clr(10000) As Long
Dim I As Long
Dim J As Long
Dim K As Long
Dim N As Long
Dim Flag As Boolean
Dim TX As Double
Dim TY As Double
Dim TC As Long

' Get Shape Data
N = 0
ot = dcGetFirstObject("")
While ot <> dcNone
  If ot = dcShape Then
    num = 3072
    dcGetShapeData Shape(1), num, color, lt, lw, layer
    For I=1 to num
      N = N + 1
      XP(N) = Int(Shape(I*2-1)+0.5)
      YP(N) = Int(Shape(I*2)+0.5)
      Clr(N) = color
    Next I
  End If
  ot = dcGetNextObject
Wend

' Sort Data
K = N
While ( K > 1)
  K = Int(K / 3) + 1
  For I = K + 1 to N
    TX = XP(I)
    TY = YP(I)
    TC = Clr(I)
    J = I
    Flag = True
    While (Flag)
      Flag = False
      If (J > K) Then
        If (XP(J - K) > TX) Then Flag = True
        If ((XP(J - K) = TX) And (YP(J - K) > TY)) Then Flag = True
        If ((XP(J - K) = TX) And (YP(J - K) = TY) And (Clr(J - K) > TC)) Then Flag = True
        If (Flag) Then
          XP(J) = XP(J - K)
          YP(J) = YP(J - K)
          Clr(J) = Clr(J - K)
          J = J - K
        End If
      End If
    Wend
    XP(J) = TX
    YP(J) = TY
    Clr(J) = TC
  Next I
Wend

' Export Data
Open "LayoutOffsets.CSV" For Output As #1
Print #1, "XP, YP, Clr"
For I = 1 to N
  Print #1, XP(I);", ";YP(I);", ";Clr(I)
Next I
Close #1

End Sub
AlanX
Discussions
Become a Hackaday.io Member
Create an account to leave a comment. Already have an account? Log In.