28/02/2017
The project is based, on server side, on php, and data will be stored as json on side folder.
The project documents tree is simple :
- remotes : this folder will contain every remotes configurations as a json list of 'remote-inputs'
- values : this folder will contain every remotes actual values as json files
- remote-inputs : this folder will contain every user made inputs. This can go from a slider to a color picker, to anything someone may need. The documents to create a 'remote-input' will be described later on
A data base will contain every remotes names and passwords, so that each remote stay independant one from another.
On the arduino side, there will of course be a need from an internet access, and a json parser. I'm still working on this part...
For the time being, the E-duino website isn't operational, except for the testing remote. After a few try of connection with the arduino, it seems the weight of the json files to download isn't too much to do it 2 or 3 times a second, which gives a good rate.
I'm considering making a way for the arduino to only ask for a specific component, in a way to remove the need of a json parser.
For the moment, I'd just like to get a few feedbacks about the idea, and I think this is the place :)
01/03/2017
After some more research, I came out with a working prototype, a single led being controlled over internet.
For simplification, I created a new php page from which the arduino can download directly the value of a specific input. This permitted me to download data 4 times a second. Of course, it does not have to use a frequency that high. I believe I'll be able to come out with a working remote editor by the middle of next week, and maybe, a way for other users to create remotes by then. About the inputs, anyone should be able to submit some as soon as possible. To do so, I'll make a detailled explication in a side folder, and on the website.
I'm still looking forward for suggestions, if you have some :)
Just found out about log section, see more down there...
 Joshua Conway
 Rob Lauer
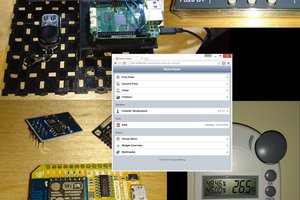
 SUF
SUF