Washing Machine Conversion
Converting a Manual switched washing machine in to a Arduino powered smart washer.
Converting a Manual switched washing machine in to a Arduino powered smart washer.
To make the experience fit your profile, pick a username and tell us what interests you.
We found and based on your interests.
AgitatorClip.stlthe agitator clip was broken so I created an STL and printed it. Ideally i would have liked to do this in nylon but did not have any on hand so opted for ABS. seems to work prety well.simplify3d_stl - 134.36 kB - 03/08/2017 at 09:35 |
|
Last night I was finishing some washing and thought about ways to make this thing smarter.
Maybe adding a flow meter to the pump so when the train cycle has finished and there is no more water being pumped out the spin cycle ends.
Using something like this.
https://www.aliexpress.com/item/OKD-HZ32DN-flow-sensor/553216447.html?spm=2114.01010208.3.30.4OhXxy&ws_ab_test=searchweb0_0,searchweb201602_3_10065_10068_433_434_10136_10137_10138_10060_10062_10056_10055_10054_302_10059_10099_10103_10102_10096_10052_10053_10050_10107_10051_10106_10084_10083_10119_10080_10082_10081_10110_10111_10112_10113_10114_10078_10079_10073_10070_10122_10123_10120_10126_6000000_10124-10119,searchweb201603_3,afswitch_1_afChannel,ppcSwitch_2,single_sort_0_default&btsid=95ce6e22-2276-410e-aa3b-e31e7aa06c15&algo_expid=490d3712-fcab-49f7-b477-65a36b9380a1-3&algo_pvid=490d3712-fcab-49f7-b477-65a36b9380a1
The other thought was to add an actual water level sensor. There is a tube at the base of the tub that goes upwards to the existing sensor/switch, you dial up the water level and when that level is reached the switch triggers but I was contemplating adding one of these instead.
MPX5010GP
https://www.aliexpress.com/item/MPX5010GP-MPX5010-INTEGRATED-PRESSURE-SENSOR-100-New-Original/32770095909.html?spm=2114.01010208.3.10.SzOVcb&ws_ab_test=searchweb0_0,searchweb201602_3_10065_10068_433_434_10136_10137_10138_10060_10062_10056_10055_10054_302_10059_10099_10103_10102_10096_10052_10053_10050_10107_10051_10106_10084_10083_10119_10080_10082_10081_10110_10111_10112_10113_10114_10078_10079_10073_10070_10122_10123_10120_10126_6000000_10124,searchweb201603_3,afswitch_1_afChannel,ppcSwitch_2,single_sort_0_default&btsid=4ab2fe85-22d8-4c53-8395-634a306b0075&algo_expid=73d7dae1-8ab8-4988-b25a-1a3c4d99cfe5-1&algo_pvid=73d7dae1-8ab8-4988-b25a-1a3c4d99cfe5
Only other thing that would be cool is a sensor to work out just how much washing is in the machine but I cant really see any way to do this at the moment as it cant really be based on weight as clothes have different weights and an optical sensor would not really work as things like sheets when you put them in tend to sit a little higher but then compress more when they are wet.
This is the MOV that was across the relay contacts.
Looks like it got a little toasty.
Still suffering from a bit of noise or some form of instability, its similar to what I was finding using the Mini Pro to drive a stepper. Checked the PSU and that is nice and stable so when in doubt fall back to what worked to solve the stepper issue I had and that was swap out the Mini Pro for a Nano.
I suspect there is something in the Mini Pro design that makes it a little more susceptible to interference but I guess after a few more cycles we will soon see.
The only other issue it could be is that one of the salvaged caps I used for the R/C circuit has decided to start failing. When i finalise things I may add a few MOV's to the mix
6 loads of washing and it is running as expected without any issues, I have even had the guts to leave it plugged in with the power on for 2 days now.
Now its time to pretty things up and start working on some additional features and more advanced code with a few safety features and maybe hook up the lid switch again
Given most of the routines are time based I have decided to make use of probably one of the best librarys i have found. Chrono as it has all the features required and the developers are prety quick to respond to any issues.
LOL: And as luck would have it ,after completing 6 loads of washing and hanging it out to dry it started to rain :( given the urgent need for some clothes I decided to use the dryer and to my dismay that stopped working. I can see another hack coming in the near future but for now the problem was the tensioner for the drum belt had work out at the door clip had broken. Thankfully I have a 3D printer on hand so printing up a new clip and a new tensioner was a simple process.
Sure enough the snubber seems to sort out most of the issues however the snubber for the spin cycle needed to be connected in parallel across the motor and not across the relay as the actuator seems to use an asynchronous motor and is really low current. Putting the snubber across the relay was causing the R/C circut to feed enough power to run the motor even when it was turned off.
I could adjust the values however did not have the components here to do that.
It seems that the water valve solinoids do not need snubbers in place.
Now to test the machine on a full wash cycle then back to making a more advanced version of the code with a few additional features like gentle wash and an extended spin rinse cycle as firing water in to machine while it is spinning seems to cause the clothes to rinse out a lot better than just fill, agitate and spin.
Now for some code, I will add the final version later as there are a pile of additional timer routines but for now I am testing the stability of the system. There seems to still be some RFI issues when the spin cycle ends and the actuator drops the brake but I also ran out of parts to make a snubber for the actuator so this fault should go away once the additional snubber is n place.
Yes i know its full of while loops but I wanted this to be as simple as possible for testing purposes.
#include <Bounce2.h>

// Constants for Control Pins
const int LedPin =  13;         // LED Pin
                                // Washingmachine Sensor Pins
const int WaterLevelPin = 2;    // N/C Switch to sense the water level If it goes open then stop everyting.
const int LindSwitchPin = 3;    // Goes OPEN circut if the lit is opend. E-STOP
const int SpinSensorPin = 12;   // When the spin locking pin is in place this is short
                                // IN# are the relay inputs for the Duinotech 8 Channel Board
const int CWPin = 4;            // IN1 - Clockwise Pin
const int CCWPin = 5;           // IN2 - Counter Clockwise / FAST SPIN Pin.
const int SpinActuatorPin = 6;  // IN3 - Pull the locking pin in for the spin cycle
const int ColdWaterValve = 7;   // IN4 - Cold Water Valve
const int HotWaterValve = 8;    // IN5 - Cold Water Valve
const int WaterPumpPin = 9;     // IN6 - Water Pump
                                // Control Pannel Pins
const int StartPin = 10;        // Restart After and Error
const int RestartPin = 11;      // Restart After and Error

// Control Variables
int ledState = LOW;             // ledState used to set the LED
int CWState = LOW;              // Clockwise Relay State
int CCWState = LOW;             // Counter Clockwise Relay State
int SpinState = LOW;            // Spint Actuator State
int ColdState = LOW;            // Cold Water Valve State
int HotState = LOW;             // Hot Water Valve State
int PumpState = LOW;            // Water Pump State
int incomingByte = 0;

int MachineCycle = 0;
int WaterLevel = 0;
int SpinEnabled = 0;
long AgitationCounter = 0;
long BallanceCounter = 0;
long RinseCounter = 0;
long SpinCounter = 0;
long EmptyWater = 0;
long SoakCounter = 0;


// Instantiate a Bounce object
Bounce debouncer = Bounce();

void setup() {
  Serial.begin(9600);                   // Serial Communications for Debuging
  pinMode(StartPin,INPUT_PULLUP);       // Pin to use for the Start Button
  debouncer.attach(StartPin);           // After setting up the button, setup the Bounce instance :
  debouncer.interval(40);                // interval in ms

 // set the digital pin as output:
  pinMode(LedPin, OUTPUT);              // Onboard LED on pin 13
  pinMode(WaterLevelPin, INPUT_PULLUP); // Enable Pullup for WaterLevel Sensor
  pinMode(LindSwitchPin, INPUT_PULLUP); // Enable Pullup for Lid Switch

  pinMode(CWPin, OUTPUT);               // Clockwise Motor Control
  pinMode(CCWPin, OUTPUT);              // Counter Closkwise Motor Control
  pinMode(SpinActuatorPin, OUTPUT);     // Spin Actuator Solinoid
  pinMode(ColdWaterValve, OUTPUT);      // Cold Water Valve
  pinMode(HotWaterValve, OUTPUT);       // Hot Water Valve
  pinMode(WaterPumpPin, OUTPUT);        // Water Pump
  pinMode(StartPin, INPUT_PULLUP);      // Start Button
  pinMode(RestartPin, INPUT_PULLUP);    // Restart/Resume after Error
  pinMode(SpinSensorPin, INPUT_PULLUP); // Enable Pullup for Spin Sensor

}

void loop() {
  debouncer.update();                   // Update the Bounce instance :

  int value = debouncer.read();         // Get the updated value :
  if ( value == LOW ) {
    Serial.println("Washing Cycle Started");
    MachineCycle = 1;                    // If the button is pushed start the machine
  }

   // send data only when you receive data:
  if (Serial.available() > 0) {
    incomingByte = Serial.read();       // read the incoming byte:
    Serial.print("I received: ");       // say what you got:
    Serial.println(incomingByte, DEC);
  }

if(incomingByte == 48){
  Serial.println("Stop Machine");
  MachineCycle = 0;
}
  // If we receive a 1 run this
  if(incomingByte == 49){
    Serial.println("Start Machiner");
    MachineCycle = 1;
  }

  if(MachineCycle == 1){

  Serial.println("Filling Machine with Cold Water for Wash Cycle");
    while(digitalRead(WaterLevelPin) != 1){
      //Fill the machine
          digitalWrite(LedPin, HIGH);                   //Start Filing
          digitalWrite(ColdWaterValve, HIGH);           //turn...
Read more »
After writing some code and making the thing work then connecting the motors things were not working as I would have expected. The arduino started to lock up and do some really weird things and the USB would drop out for no reason.
I re-wrote the code several times thinking that it was something I had done then made s really simple for loop that did the same thing.
It turns out that the motors when running on 240V and connected to the relay was creating some RFI that was getting picked up by the arduino's clock causing it to lock up and do some weird things.
So I decided to lineament a snubber circuit made up from a .47UF cap and a 1W 47ohm resistor connected across the relay points. in theory it should be connected in series to the motor but this was not working correctly and made little difference
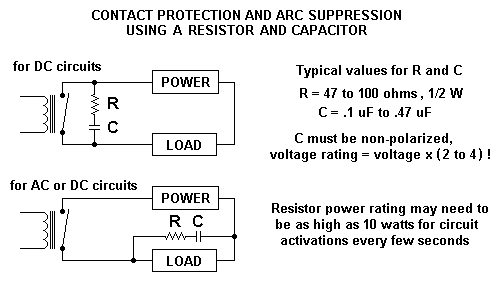
Why they don't build this on the the duinotech board in the first place is any ones guess as most people using this board would suffer from the same problem.
| Arduino Pin | Function | Relay Connection | Washing Machine |
| 2 | Water Level | Black N/C | |
| 3 | Lid Switch | Not Used Yet | |
| 4 | Motor CW | IN1 | A5 - RED |
| 5 | Motor CCW | IN2 | A2 - WHITE |
| 6 | Spin Actuator | IN3 | A4 - YELLOW |
| 7 | Cold Water Valve | IN4 | CV - WHITE |
| 8 | Hot Water Valve | IN5 | HV - BLACK |
| 9 | Water Pump | IN6 | A6 - WHITE - PP |
| 10 | |||
| 11 | Run Switch | ||
| 12 | Spin Sensor | A7 - Purple A9 - Purple to GND | |
The first step was to start tracing all the wires and rip out the old controller.
Essentially the motor in this one is a 3 wire AC motor, this uses a starter cap and a common neutral. One winding causes the motor to rotate CW the other CCW.
There is a kind of actuator that pulls in the a locking pin to engage the spin cycle when the motor is run CW.
Care must be taken with this as unlike most things that have been wired up form some reason the simpson 711 wires are all labled BUT one end of the wire will say one thing then when it enters the connector it will say something else the at the termination point it will be labeled somehting else again.
I decided to base my wiring on the plug labels.
A1 = Blue = Common Neutral wire for Motor, Spin Actuator and Water Pump.
A2 = White = Starter Capacitor and CCW Motor
A4 = Yellow = Spin Actuator
A5 = Red = Capacitor and CW Motor
A6 = Black = Water Pump
A7 = Purple = Spin Engaged Switch
A9 = Red = Spin Engaged Switch
White CV wire = Cold Water Valve
Black HV wire = Hot water valve
Purple = COM = Common Water Level Sensor
Black = NC = Normally Closed Water Level Sensor
Brown = NO = Normally Open Water Level Sensor
Inside there is also a microswitch for the lid however for the moment I have no bothered connecting this.
Create an account to leave a comment. Already have an account? Log In.
I love the whole idea, totally custom wash cycles.
I'm just now getting into Arduino, but I think I'm completely hooked!
Now I just have to get my girlfriend onboard! LOL
The washing machine has now been retired :( After a reasonable amount of service it decided to spring a leak and its time to strip it down and use the motor and other bits for another project.
I have SO been here. As a single parent and then sole carer for the last 20 years I have killed several washing machines. I replace brushes in the motor and belts but anything else costs more than an engineer to replace... Grrrr... ;-) So I have taken to rescuing my friends' machines too. I hate things designed to fall apart and electively avoid them but white goods manufacturers, oh, boy do they have me.
This, I never thought of doing. When my current machine dies, its getting a Boris Brain... Epic! Thanks for posting dude.
After my last two green washers I am tempted to go buy as dumb a washer as I can find and do what you did. I want some things washed in hot water and rinsed in hot water or at least warm as well.
I would also like to stop the sound of grinding boulders in the gear box and get it to spin long enough to get the water out of the clothes instead of saving electricity and water a leaving dirty clothes.
@Gordon Couger I hear you on that note. there were more than a few times I wanted a cycle a little different to the norm. A really long soak cycle would be nice as well.
setting things up this way seem to open up all kinds of options.
The temptation to actually build a custom control board with the 6 required relays or even sold state switches is prety high along with the required protection for the EMF etc as that seems to have been the most problematic.
Hmm, Maybe even have a CF slot in it so you can run a specific wash program something similar to sending GGODE to the CNC machine.
Ok, I can see this project is going to get away on me.
Optoisolate the solid state motor relays and solenoid valves then read the cycle times from a file on a SD card or WiFi them in with EMS8266. With the AC optoisolated from the board you can run the computer on a battery and insulate it from the washer and not worry about any tramp voltage. You need some kind of interlock to keep from turning on two things at once.
I worked on a CAN network that had 77 Volts AC of tramp voltage on the dialectical ground that got MUNGED during a remodel. I found out one day when I sweated though my shirt to actual ground and got bit. The net works and 6 computer worked fine with tramp voltage all over them.
The old washer were just a sequencing switch.
Hi,
great idea but it could be really hard to implement the correct sequence.
Some time ago my girlfriend and I had the idea to buy an additional washing machine for her textile-dyeing hobby where you need to wash with cold water. Since most machines do not have such a program I though it could be quite easy to implement a simple washing sequence using an Arduino.
My last project (not posted it yet) was to replace a broken mechanical relay box of a waste oil burner with an Arduino - meanwhile it's working good and I'm still optimizing the software.
By the way I would strongly recommend to use an Arduino UNO or even a larger version with more pins and to add a LCD/Button shield to have the possibility to implement some kind of an interface. I guess you have plenty of space inside the washing machine and so you don't have to save space by using the "Mini" version. In most projects you really need more pins than expected.
I still have plenty of pins for an LCD and buttons :)
I used the Min Pro because i have a pile of them here for other projects.
The goal was to make this as simple as possible, there is one button you press to initiate and one dial you use to set the water level. hose full of boys there is no such thing as delicate wash :)
Timing has been a fun thing to look at, most washes agitate for 8 to 15 minutes.
the empty cycle can me calculated based on the within reason as can the spin time.
I added a spin rinse cycle that works better than I had expected, when the spin is up to speed water is jetted in to the machine after the wash cycle and it really pushes out any excess soapy water from the clothes.
then its a quick rinse cycle with agitate and its all done.
I may put a few LED's on so someone can see the status of the cycles but in all honesty the idea was to keep in as simple as possible.
Become a member to follow this project and never miss any updates
 Dan Fruzzetti
 Daniel Roseman
 Max-Felix Müller
Washing services offer professional garment care, using top-grade equipment for thorough cleaning and stain removal. Count on them for fresh, pristine clothes that maintain their quality wash after wash.