 Neil K. Sheridan
This is probably the easiest way to perform transfer learning on an off-shelf model (InceptionV3 here) in order to add our additional elephant classes, and thus build elephant detector software. We're using scripts from the TensorFlow github repository https://github.com/tensorflow/tensorflow . These are all licensed under Apache License, Version 2.0 (the "License") unless otherwise stated.
GETTING STARTED
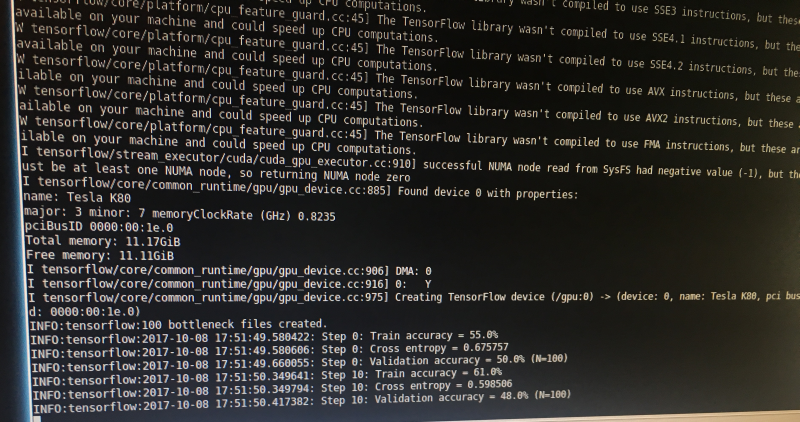
We are using a machine with a GPU. In this case a NVIDIA Tesla® K80 GPU. So TensorFlow is installed alongside with CUDA® Toolkit 8.0, cuDNN v6, and NVIDIA CUDA Profile Tools Interface, giving GPU-support. So it's really fast at doing this work! This is an Amazon EC2 virtual machine. We went over how to get started with these in this log https://hackaday.io/project/20448-elephant-ai/log/56127-instructions-for-using-ec2-instance-to-train-object-detector-in-progress . It just covers things like setting the correct permissions for your keypair (which people have trouble with), using SSH, and SCP. I'll try and add a full guide to using Amazon EC2.
PREPARING IMAGES
For this example, we are using two additional classes of elephants: herd_elephants, and lone_elephants. So we set up a directory structure as follows:
+ elephant_images
+ herd_elephants
+ lone_elephants
Go ahead and place the corresponding elephant images into the sub-directories. It doesn't matter what the image file names are. The labels for the new classes are taken from the directory names. Don't worry about the image sizes. Those used in this example are around 2048*1536 in size.
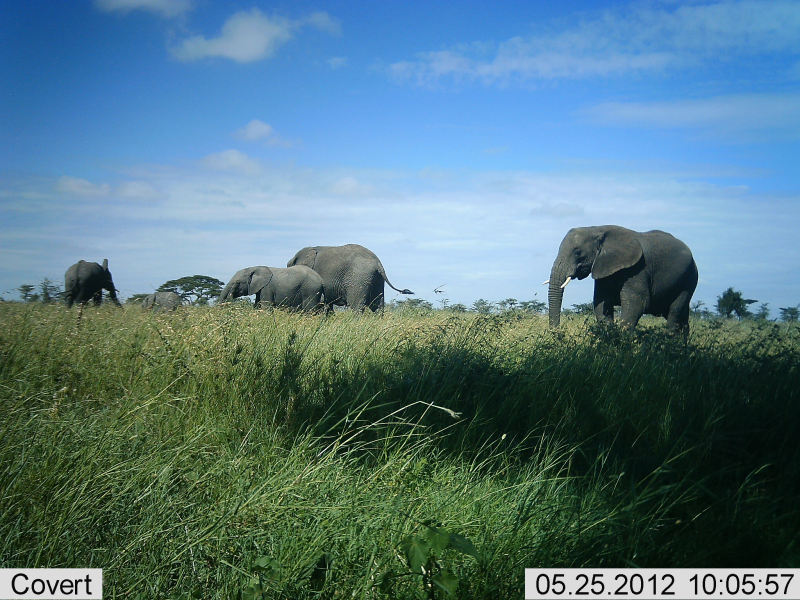
Here's an example of a herd elephant image (for the herd_elephant class):
Here's an example of a lone elephant image (for the lone_elephant class):
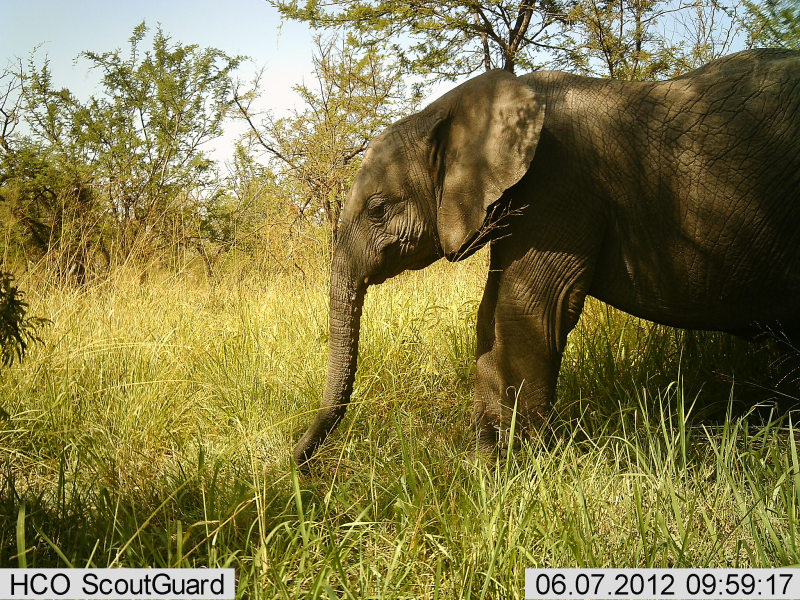
* this image and the other training images are used for training with permission from the Snapshot Serengeti Project. The images are acquired from automated camera traps.
I used GIMP to crop the images. I removed the camera trap data from the bottom.
Ok, so once you've sorted all your elephant images, you can upload the directory containing them to your virtual machine using scp. Or not if you are doing it locally. We went over the use of keypairs in the earlier guide [https://hackaday.io/project/20448-elephant-ai/log/56127-instructions-for-using-ec2-instance-to-train-object-detector-in-progress]. Just remember to set the correct permissions on these! In this example the keypair.pem is in current directory.
scp -i myAmazonKey.pem -r elephant_images ec2-user@mec2-50-15-16-67.compute-1.amazonaws.com:~/.
RETRAINING THE OFF-SHELF MODEL
We are going to use retrain.py from the TensorFlow github repository and its dependencies to perform transfer learning on Inception V3 to add our new elephant classes. So go to your virtual machine now.
1. First you can clone the TensorFlow github repository to get the code. It gets quite a bit we don't need but at least you won't get mixed up! You can just get the code you need instead if you want!
git clone https://github.com/tensorflow/tensorflow.git
2. Now let's look at the retrain.py code! You can find it in ' tensorflow/tensorflow/examples/image_retraining/' Here is is -> https://github.com/tensorflow/tensorflow/blob/master/tensorflow/examples/image_retraining/retrain.py
Here are the libraries it uses, in case you don't want to bother cloning the entire github:
from __future__ import absolute_import
from __future__ import division
from __future__ import print_function
import argparse
from datetime import datetime
import hashlib
import os.path
import random
import re
import sys
import tarfile
import numpy as np
from six.moves import urllib
import tensorflow as tf
from tensorflow.python.framework import graph_util
from tensorflow.python.framework import tensor_shape
from tensorflow.python.platform import gfile
from tensorflow.python.util import compat
3. Anyway, let's go ahead and use it! What shall we pass to it? Here are some of the important arguments it can be passed. Yes, there are quite a few! And even more if you take a look at the code!
 '--image_dir',
      type=str,
      default='',
      help='Path to folders of labeled images.'

      '--output_graph',
      type=str,
      default='/tmp/output_graph.pb',
      help='Where to save the trained graph.'
'--output_labels',
      type=str,
      default='/tmp/output_labels.txt',
      help='Where to save the trained graph\'s labels.'
  )
      '--summaries_dir',
      type=str,
      default='/tmp/retrain_logs',
      help='Where to save summary logs for TensorBoard.'
  )

      '--how_many_training_steps',
      type=int,
      default=4000,
      help='How many training steps to run before ending.'
  )

      '--learning_rate',
      type=float,
      default=0.01,
      help='How large a learning rate to use when training.'
  )

      '--testing_percentage',
      type=int,
      default=10,
      help='What percentage of images to use as a test set.'
  )
      '--validation_percentage',
      type=int,
      default=10,
      help='What percentage of images to use as a validation set.'
  )
      '--eval_step_interval',
      type=int,
      default=10,
      help='How often to evaluate the training results.'
  )
      '--train_batch_size',
      type=int,
      default=100,
      help='How many images to train on at a time.'
  )

      '--test_batch_size',
      type=int,
      default=-1,
      help="""\
      How many images to test on. This test set is only used once, to evaluate
      the final accuracy of the model after training completes.
      A value of -1 causes the entire test set to be used, which leads to more
      stable results across runs.\
      """
  )

      '--validation_batch_size',
      type=int,
      default=100,
      help="""\
      How many images to use in an evaluation batch. This validation set is
      used much more often than the test set, and is an early indicator of how
      accurate the model is during training.
      A value of -1 causes the entire validation set to be used, which leads to
      more stable results across training iterations, but may be slower on large
      training sets.\
      """
 '--architecture',
      type=str,
      default='inception_v3',
      help="""\
      Which model architecture to use. 'inception_v3' is the most accurate, but
      also the slowest. For faster or smaller models, chose a MobileNet with the
      form 'mobilenet__[_quantized]'. For example,
      'mobilenet_1.0_224' will pick a model that is 17 MB in size and takes 224
      pixel input images, while 'mobilenet_0.25_128_quantized' will choose a much
      less accurate, but smaller and faster network that's 920 KB on disk and
      takes 128x128 images. See https://research.googleblog.com/2017/06/mobilenets-open-source-models-for.html
      for more information on Mobilenet.\
4. Let's get started! We'll stick with the defaults mostly. For instance we are using InceptionV3 as the architecture. But let's alter '--output_graph' (help='Where to save the trained graph), '--output_labels',(help='Where to save the trained graph's labels.'), and we certainly need to set '--image_dir'.
Here we go! We scp'ed the elephant_images to root, so we'll set that as image_dir. And we'll dump the output graph and output labels to root too! We're ready to go now! Make sure you are in the directory containing retrain.py and issue the command:
python retrain.py --image_dir ~/elephant_images --output_graph ~/output_graph.pb --output_labels ~/labels.txt
Now we should be on our way to retraining InceptionV3 with our new elephant classes!
5. Once we've finished we should find output_graph.pb and labels.txt in root! Don't forget to check out labels.txt , and see if it contains the labels/classes of herd_elephant and lone_elephant!
RUNNING IMAGE CLASSIFICATION WITH THE RETRAINED MODEL
6. Great! Now we can see what happens when we try image classification with the model we made using our new elephant classes!
We are going to use label_image.py to do this https://github.com/tensorflow/tensorflow/blob/master/tensorflow/examples/image_retraining/label_image.py -- go ahead and have a look at it. It's in the image_retraining directory if you cloned the repository.
Here are the libraries it uses (nothing exciting or to mix us up!):
from __future__ import absolute_import
from __future__ import division
from __future__ import print_function
import argparse
import sys
import tensorflow as tf
So, it has argparse! What arguments are we going to pass to it?
We'll just pass these:
  '--image', required=True, type=str, help='Absolute path to image file.'
    '--num_top_predictions',
    type=int,
    default=5,
    help='Display this many predictions.'
    '--graph',
    required=True,
    type=str,
    help='Absolute path to graph file (.pb)')
    '--labels',
    required=True,
    type=str,
    help='Absolute path to labels file (.txt)')
So, --image is going to be the image we want to classify! --num-top_predictions is how many predictions we want as to what that image might be classed as. Whilst --graph is path to graph file output_graph.pb, and --labels is going to be path to labels.txt
You can scp an elephant image from your local machine, or wget one from something you found via google images search etc to use as the testing image for classification. Try an image of a herd of elephants and see if that gives a prediction of herd_elephants! I
7.
Ok, so let's run the code passing the arguments! The output_graph.pb and the labels.txt and the image to classify are in the local directory.
python label_image.py --graph=output_graph.pb
  --labels=labels.txt
  --image=elephant_photo_you_found.jpg
8.
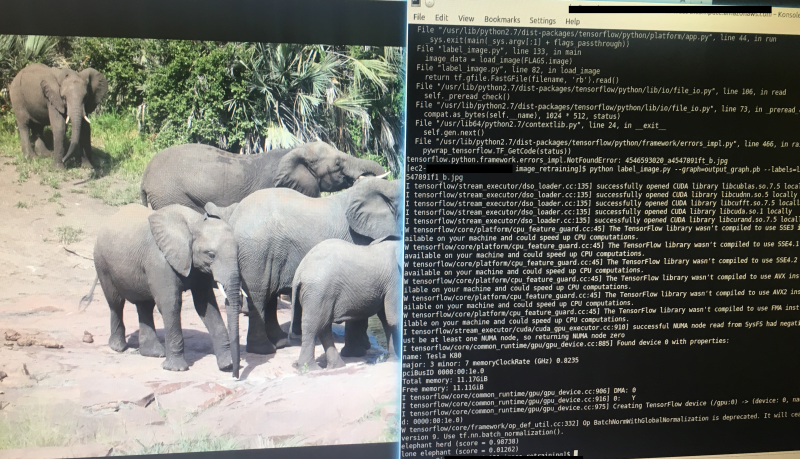
Here's what I got for a random herd of elephants photo I downloaded! "elephant_herd" score was 0.98737.
Right! So hopefully that worked! Now it is just a case of choosing appropriate images for your new classes, increasing the number of images, and adjusting the hyperparameters that are passed to retrain.py!
For instance, you could adjust the '--learning_rate' hyperparameter/argument. This controls magnitude of the updates to the final layer of the CN during retraining. The default was 0.01. Using a smaller value might increase precision, but take longer for the retraining. I'll cover hyperparameters in another log.
You might want to use TensorBoard too in order to visualize what's going on/debug/see how the hyperparameter optimisation is going: https://www.tensorflow.org/get_started/summaries_and_tensorboard
HOW MANY IMAGES PER CLASS
We certainly want the same number of images per class - else the model is going to be skewed to the certain class that has more images! I'm using 1000+ per class.
WORKING WITH THE OUTPUT FROM LABEL_IMAGE.PY
So this is important for our final code! We want to tell the rest of the program if we got an elephant! So we need to extract the score and make sure this is above 0.90. And we also want to keep track of the elephant types, so we can send these to the system users in SMS or other message!
# Sort to show labels in order of confidence
    top_k = predictions.argsort()[-num_top_predictions:][::-1]
    for node_id in top_k:
      human_string = labels[node_id]
      score = predictions[node_id]
      print('%s (score = %.5f)' % (human_string, score))
So that's our relevant bit of code from label_image.py :
For node_id in top_k i.e. the prediction number (node_id) in the top 5 predictions (top_k) it will write the label (i.e. the elephant class) to human_string and the prediction (e.g. 0.98732) to score. And then it prints them.
So the easiest thing for us to do is alter that slightly by sending these to some new variables:
first_prediction_class = labels[1]
first_prediction_score - predictions[1]
second_prediction_class = labels[2]
second_prediction_score = predictions[2]
Now we could make those all global variables, so we can access them outside the function, or we can get the function to return them in a list. For this we shall set up a list to put them in with:
detected_animals_list = [ ]
Then we populate the list with these variables:
detected_animals_list[1] = first_prediction_class
detected_animals_list[2] = first_prediction_score
detected_animals_list[3] = second_prediction_class
detected_animals_list[4]= second_prediction_score
Then we get the function to return the list i.e. return detected_animals_list
So this is the rough initial concept I came up with for taking required code from label_image.py, adding additional required code, and making it into a function to incorporate in the final detection device code:
def load_graph(filename):
	#this is the graph file that we get after retraining the off-shelf model with our
	#new elephant classes
  """Unpersists graph from file as default graph."""
  with tf.gfile.FastGFile(filename, 'rb') as f:
    graph_def = tf.GraphDef()
    graph_def.ParseFromString(f.read())
    tf.import_graph_def(graph_def, name='')
def run_graph(image_data, labels, input_layer_name, output_layer_name,
              num_top_predictions):
  with tf.Session() as sess:
    # Feed the image_data as input to the graph.
    #   predictions will contain a two-dimensional array, where one
    #   dimension represents the input image count, and the other has
    #   predictions per class
    softmax_tensor = sess.graph.get_tensor_by_name(output_layer_name)
    predictions, = sess.run(softmax_tensor, {input_layer_name: image_data})
    # Sort to show labels in order of confidence
    top_k = predictions.argsort()[-num_top_predictions:][::-1]
    first_prediction_class = labels[1]
    first_prediction_score - predictions[1]
    second_prediction_class = labels[2]
    second_prediction_score = predictions[2]
    #for node_id in top_k:
     # human_string = labels[node_id]
     # score = predictions[node_id]
     # print('%s (score = %.5f)' % (human_string, score))
    detected_animals_list = [ ]
    detected_animals_list[1] = first_prediction_class
    detected_animals_list[2] = first_prediction_score
    detected_animals_list[3] = second_prediction_class
    detected_animals_list[4]= second_prediction_score
    return detected_animals_list
# load image
  image_data = load_image(filename_for_image)
  # load labels
  labels = load_labels(filename_here)
  # load graph, which is stored in the default session
  load_graph(filename)
  run_graph(image_data, labels, FLAGS.input_layer, FLAGS.output_layer,
            FLAGS.num_top_predictions)
#return the detected animals list
return detected_animals_list
Discussions
Become a Hackaday.io Member
Create an account to leave a comment. Already have an account? Log In.