Close
0%
0%

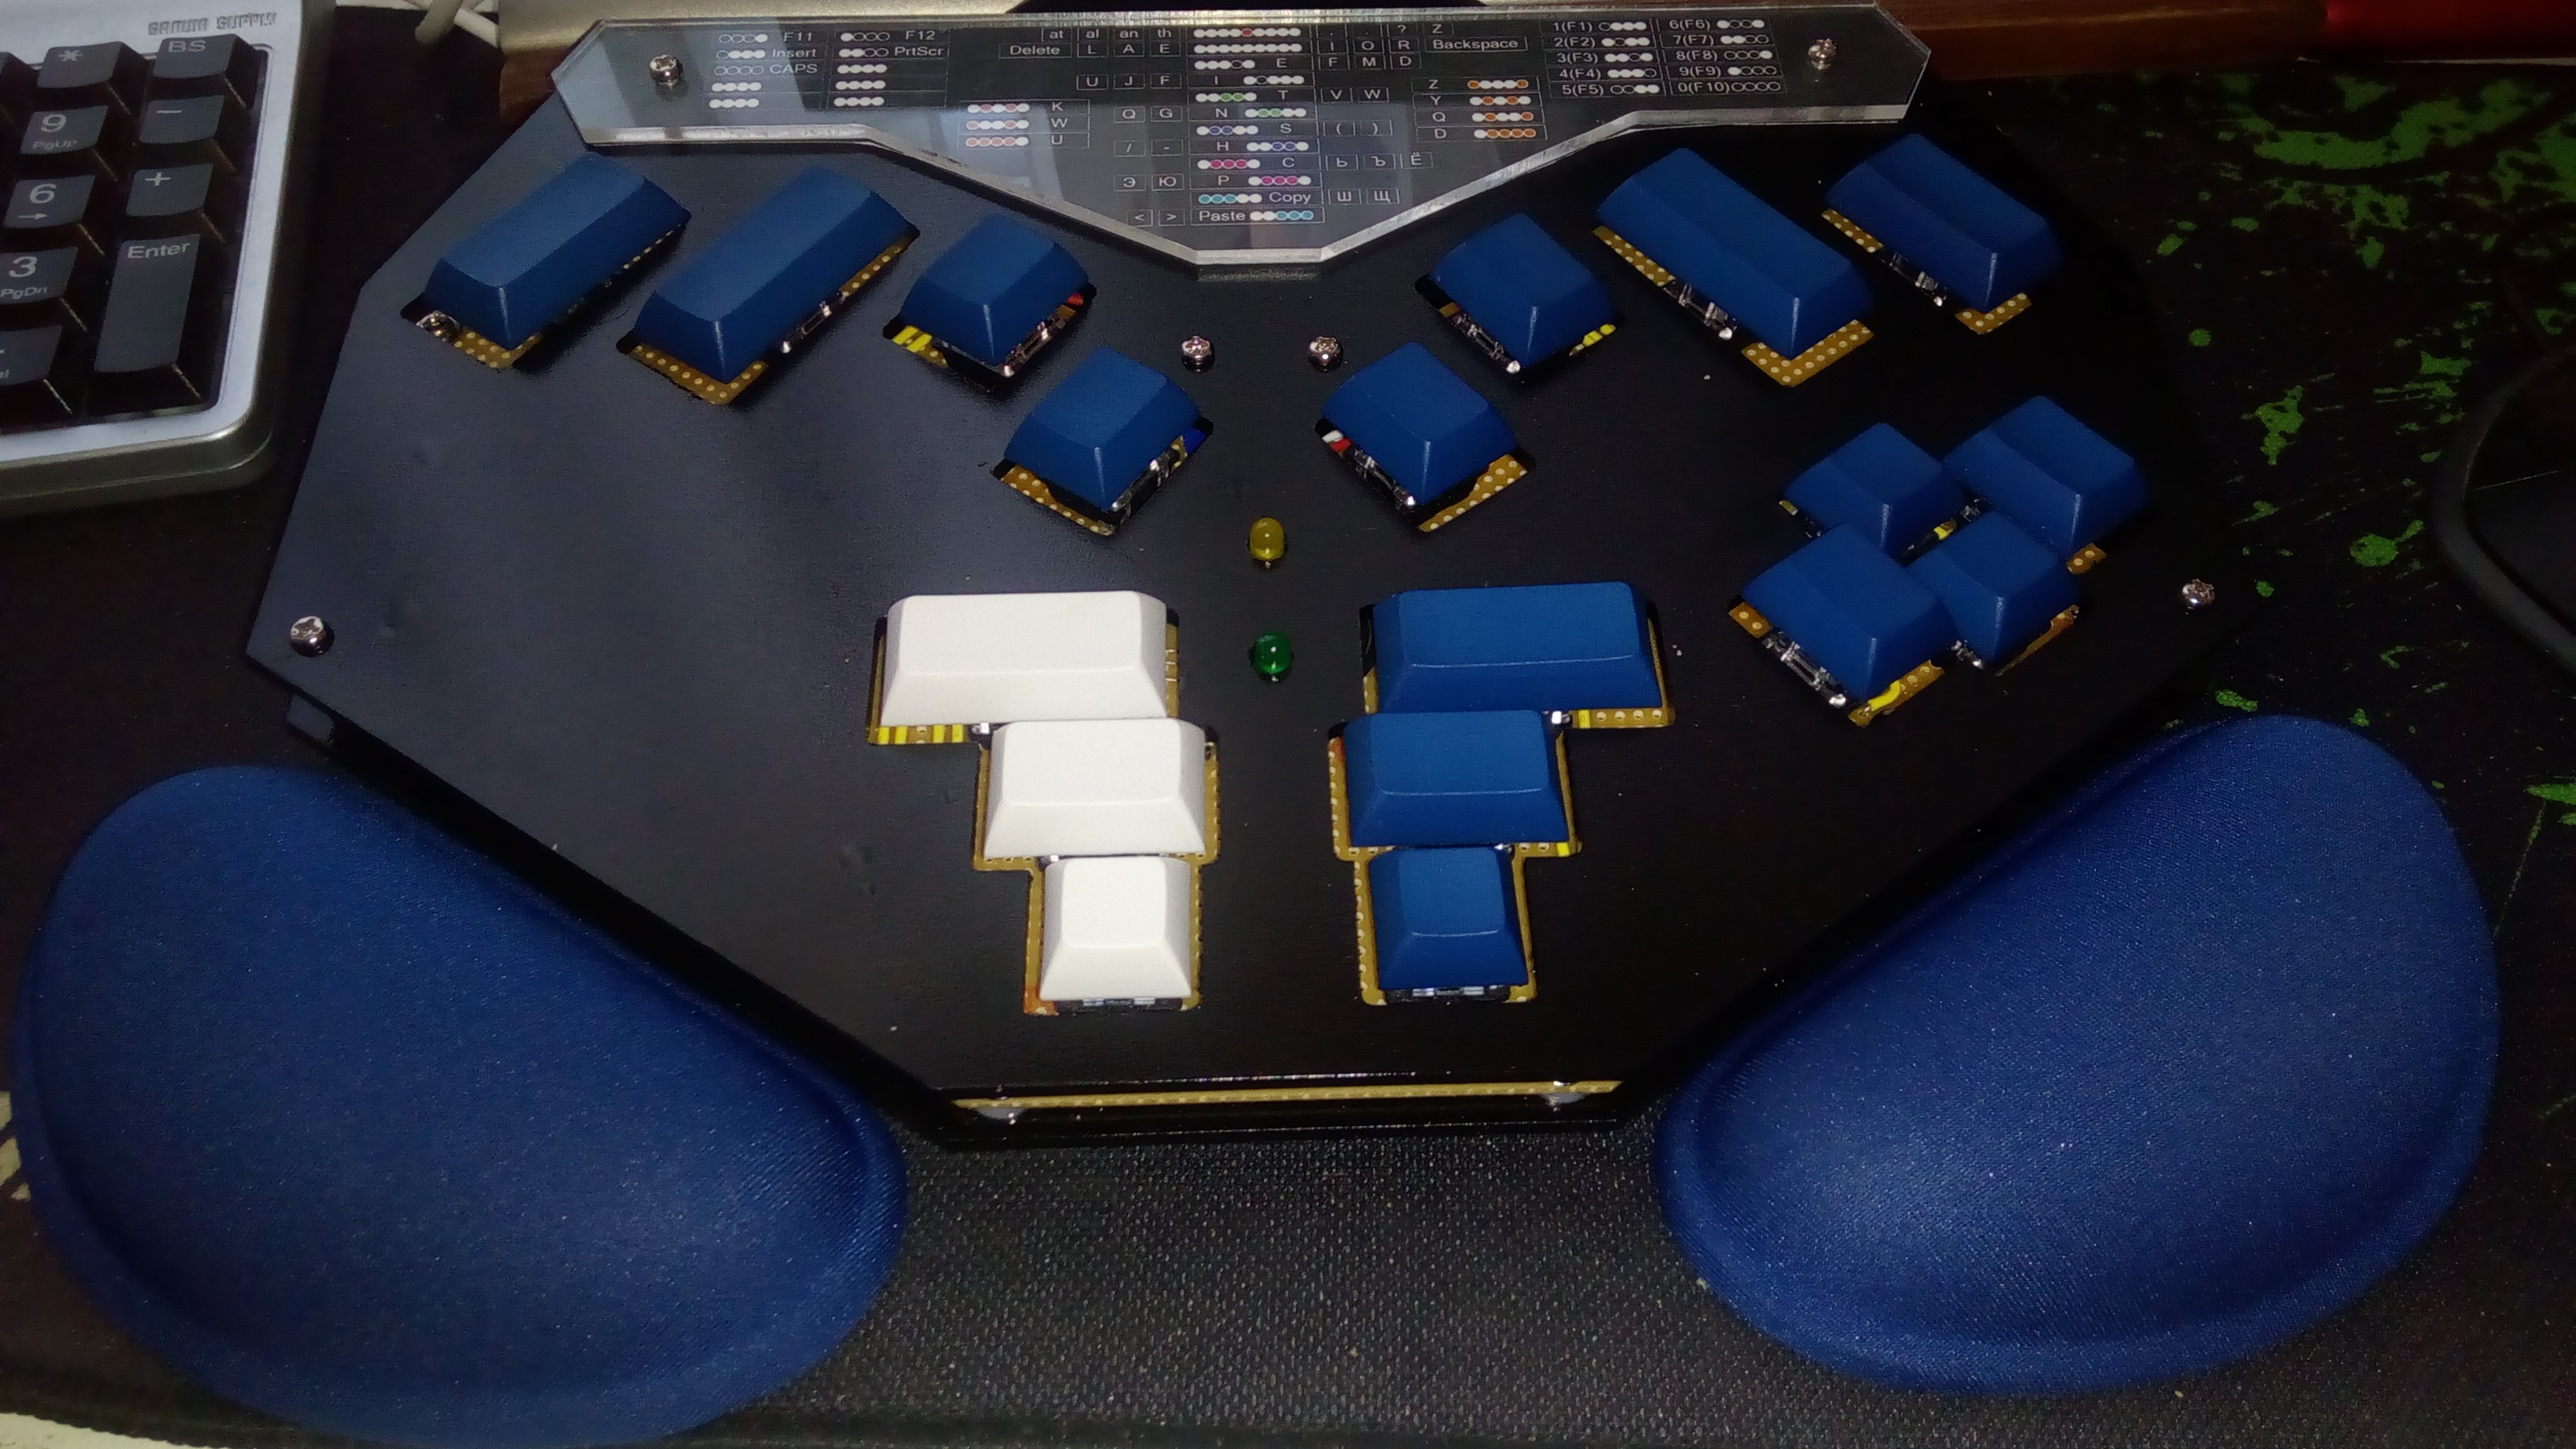
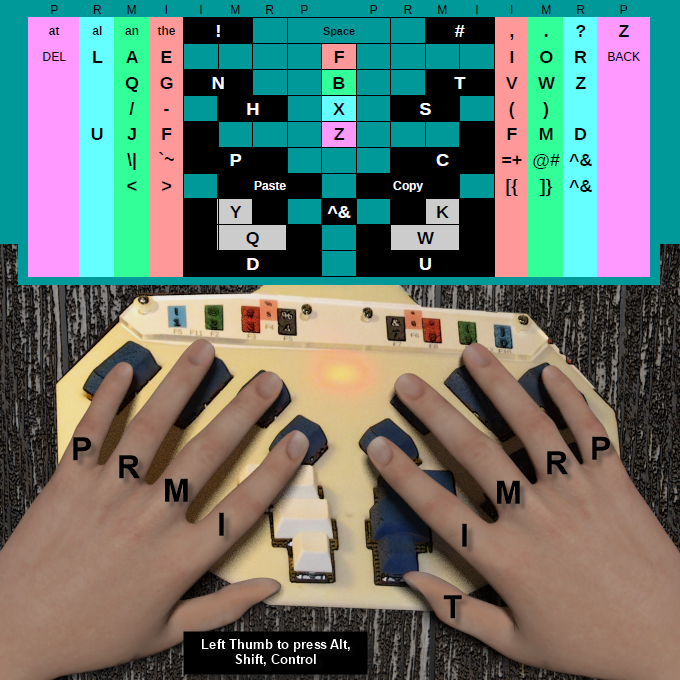
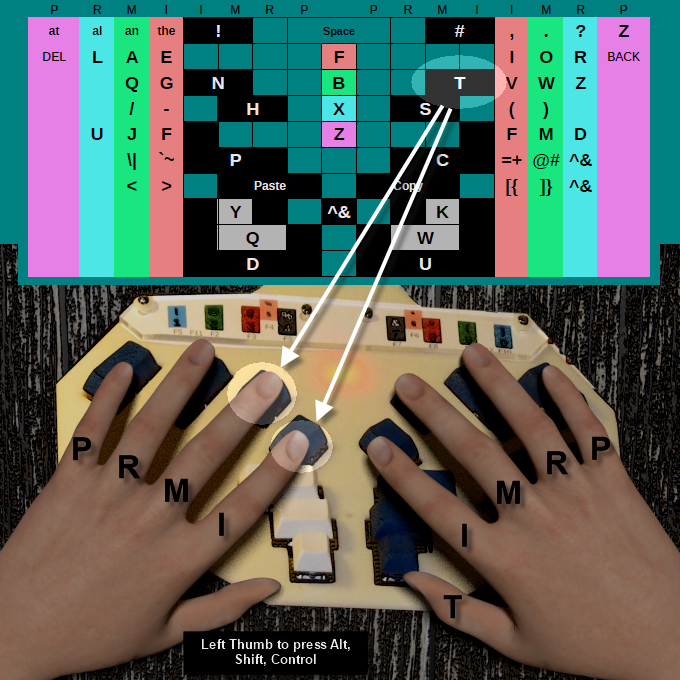
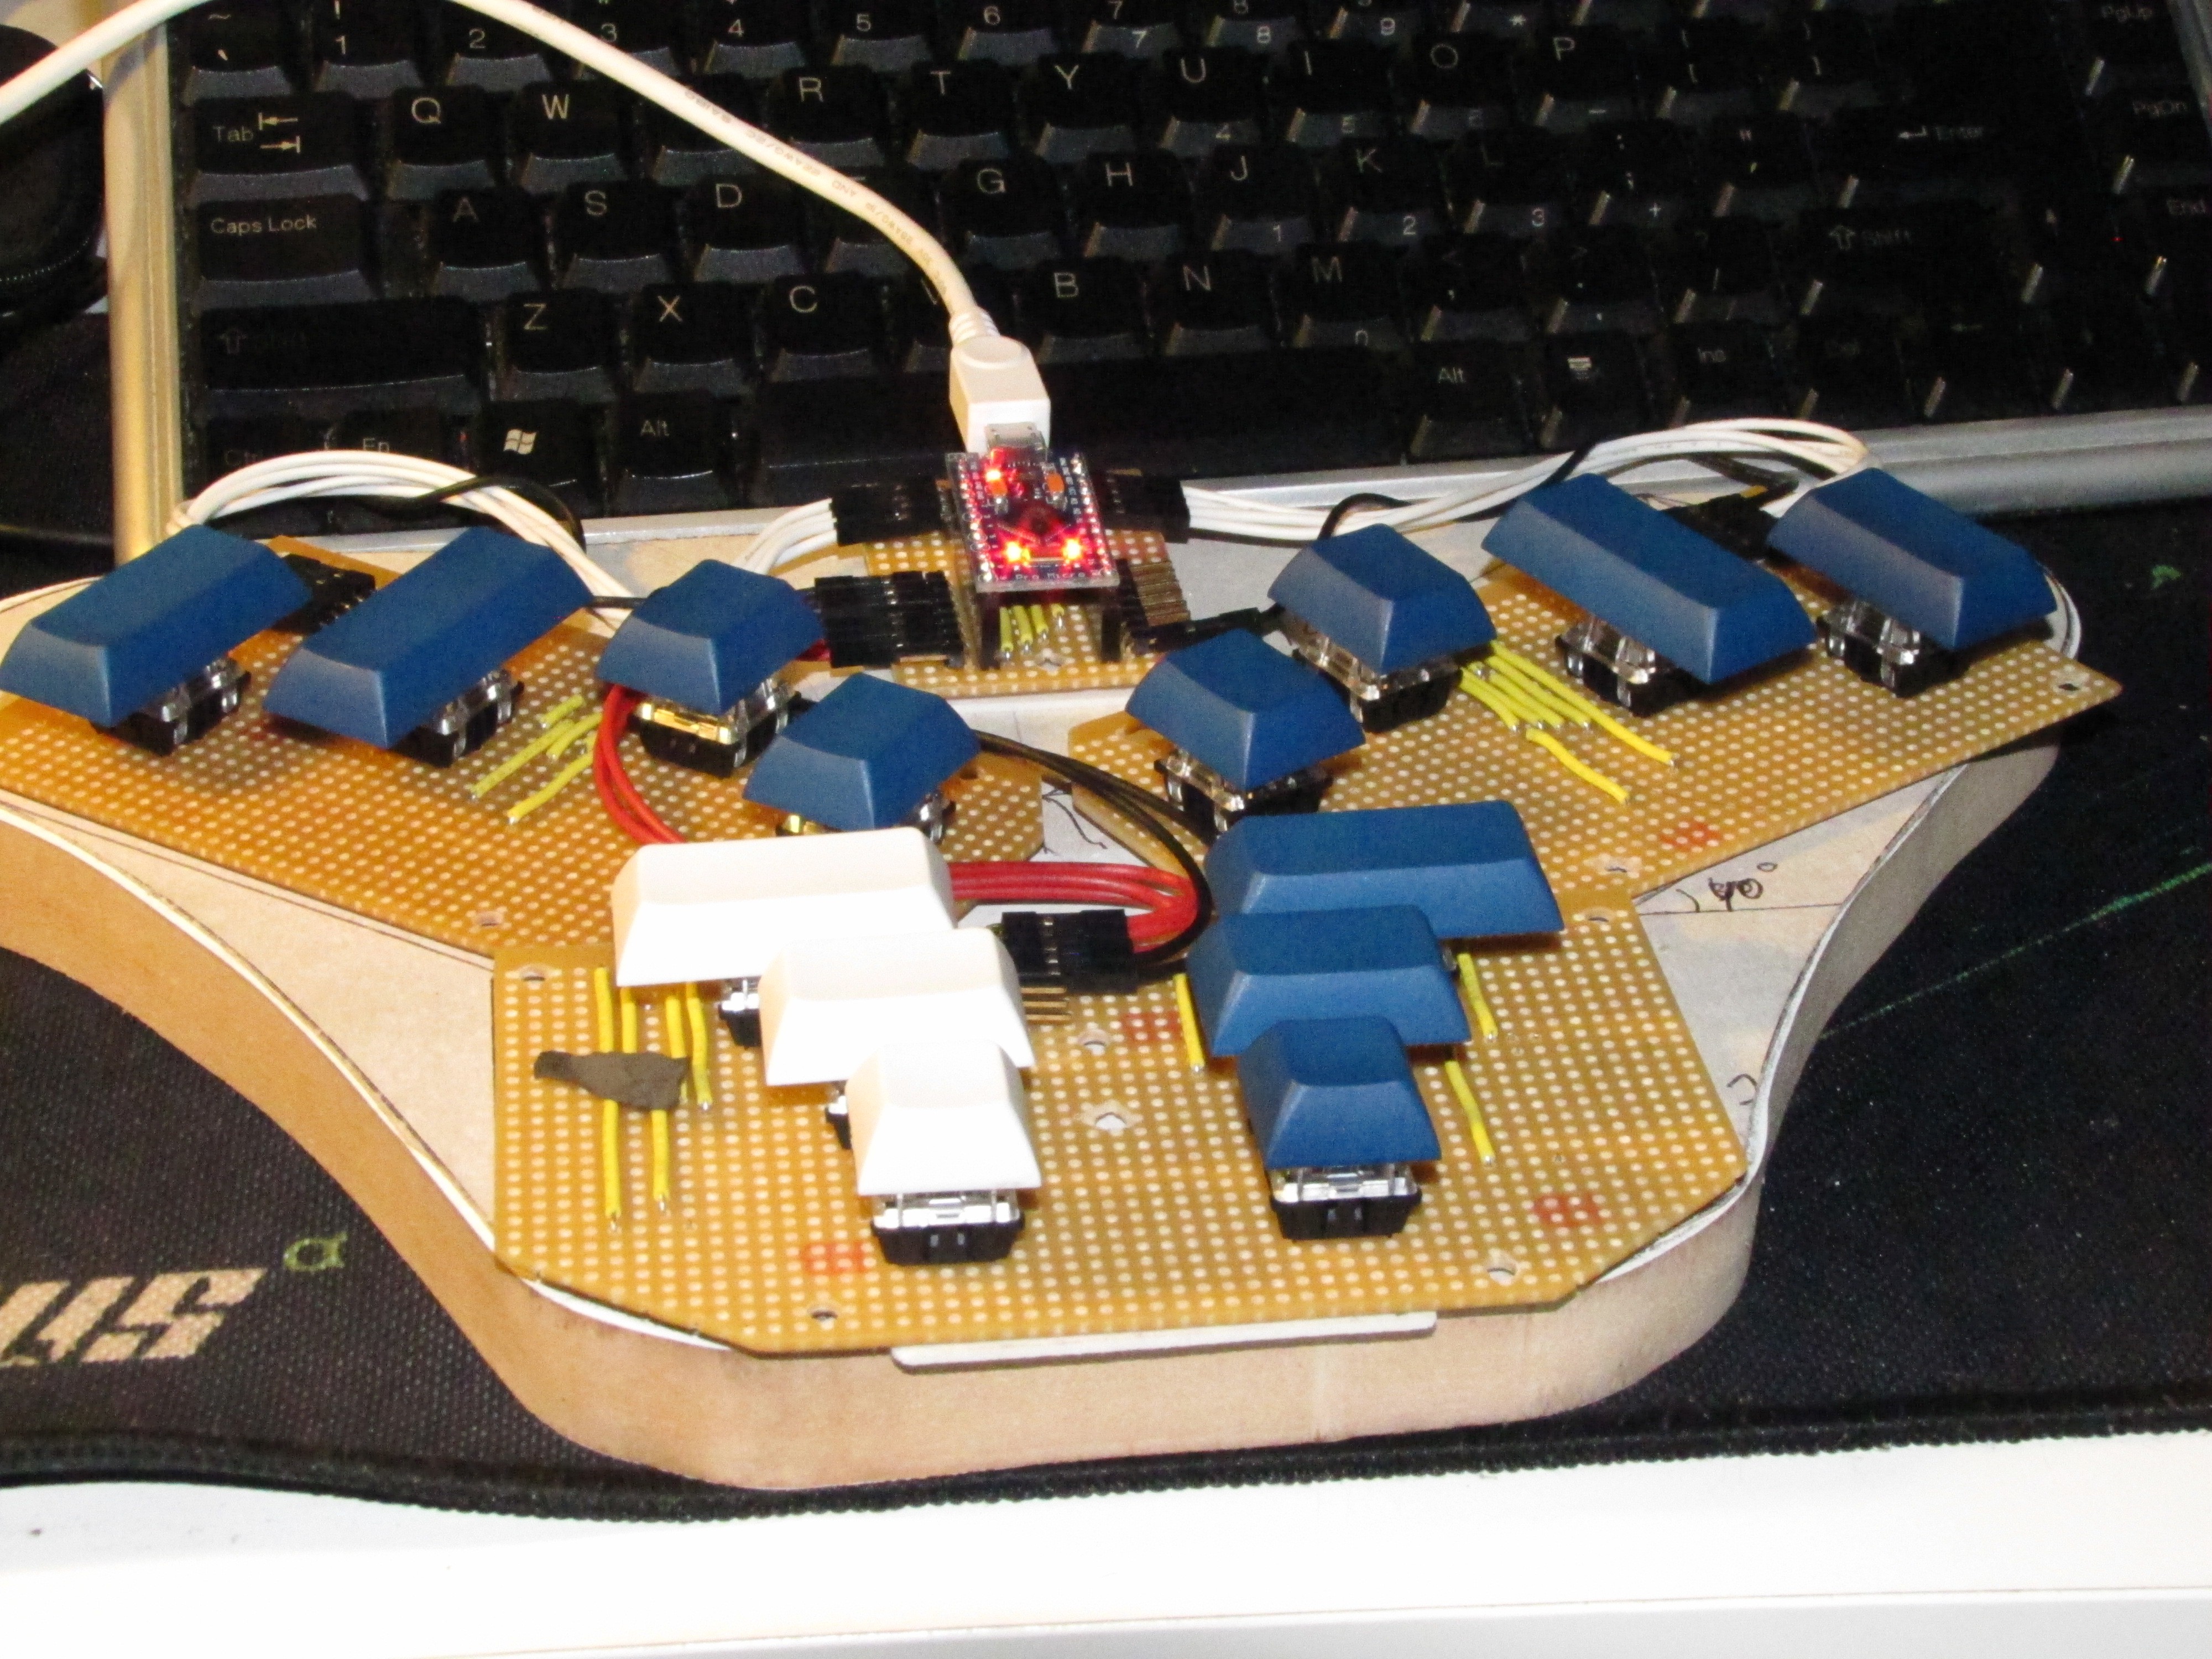
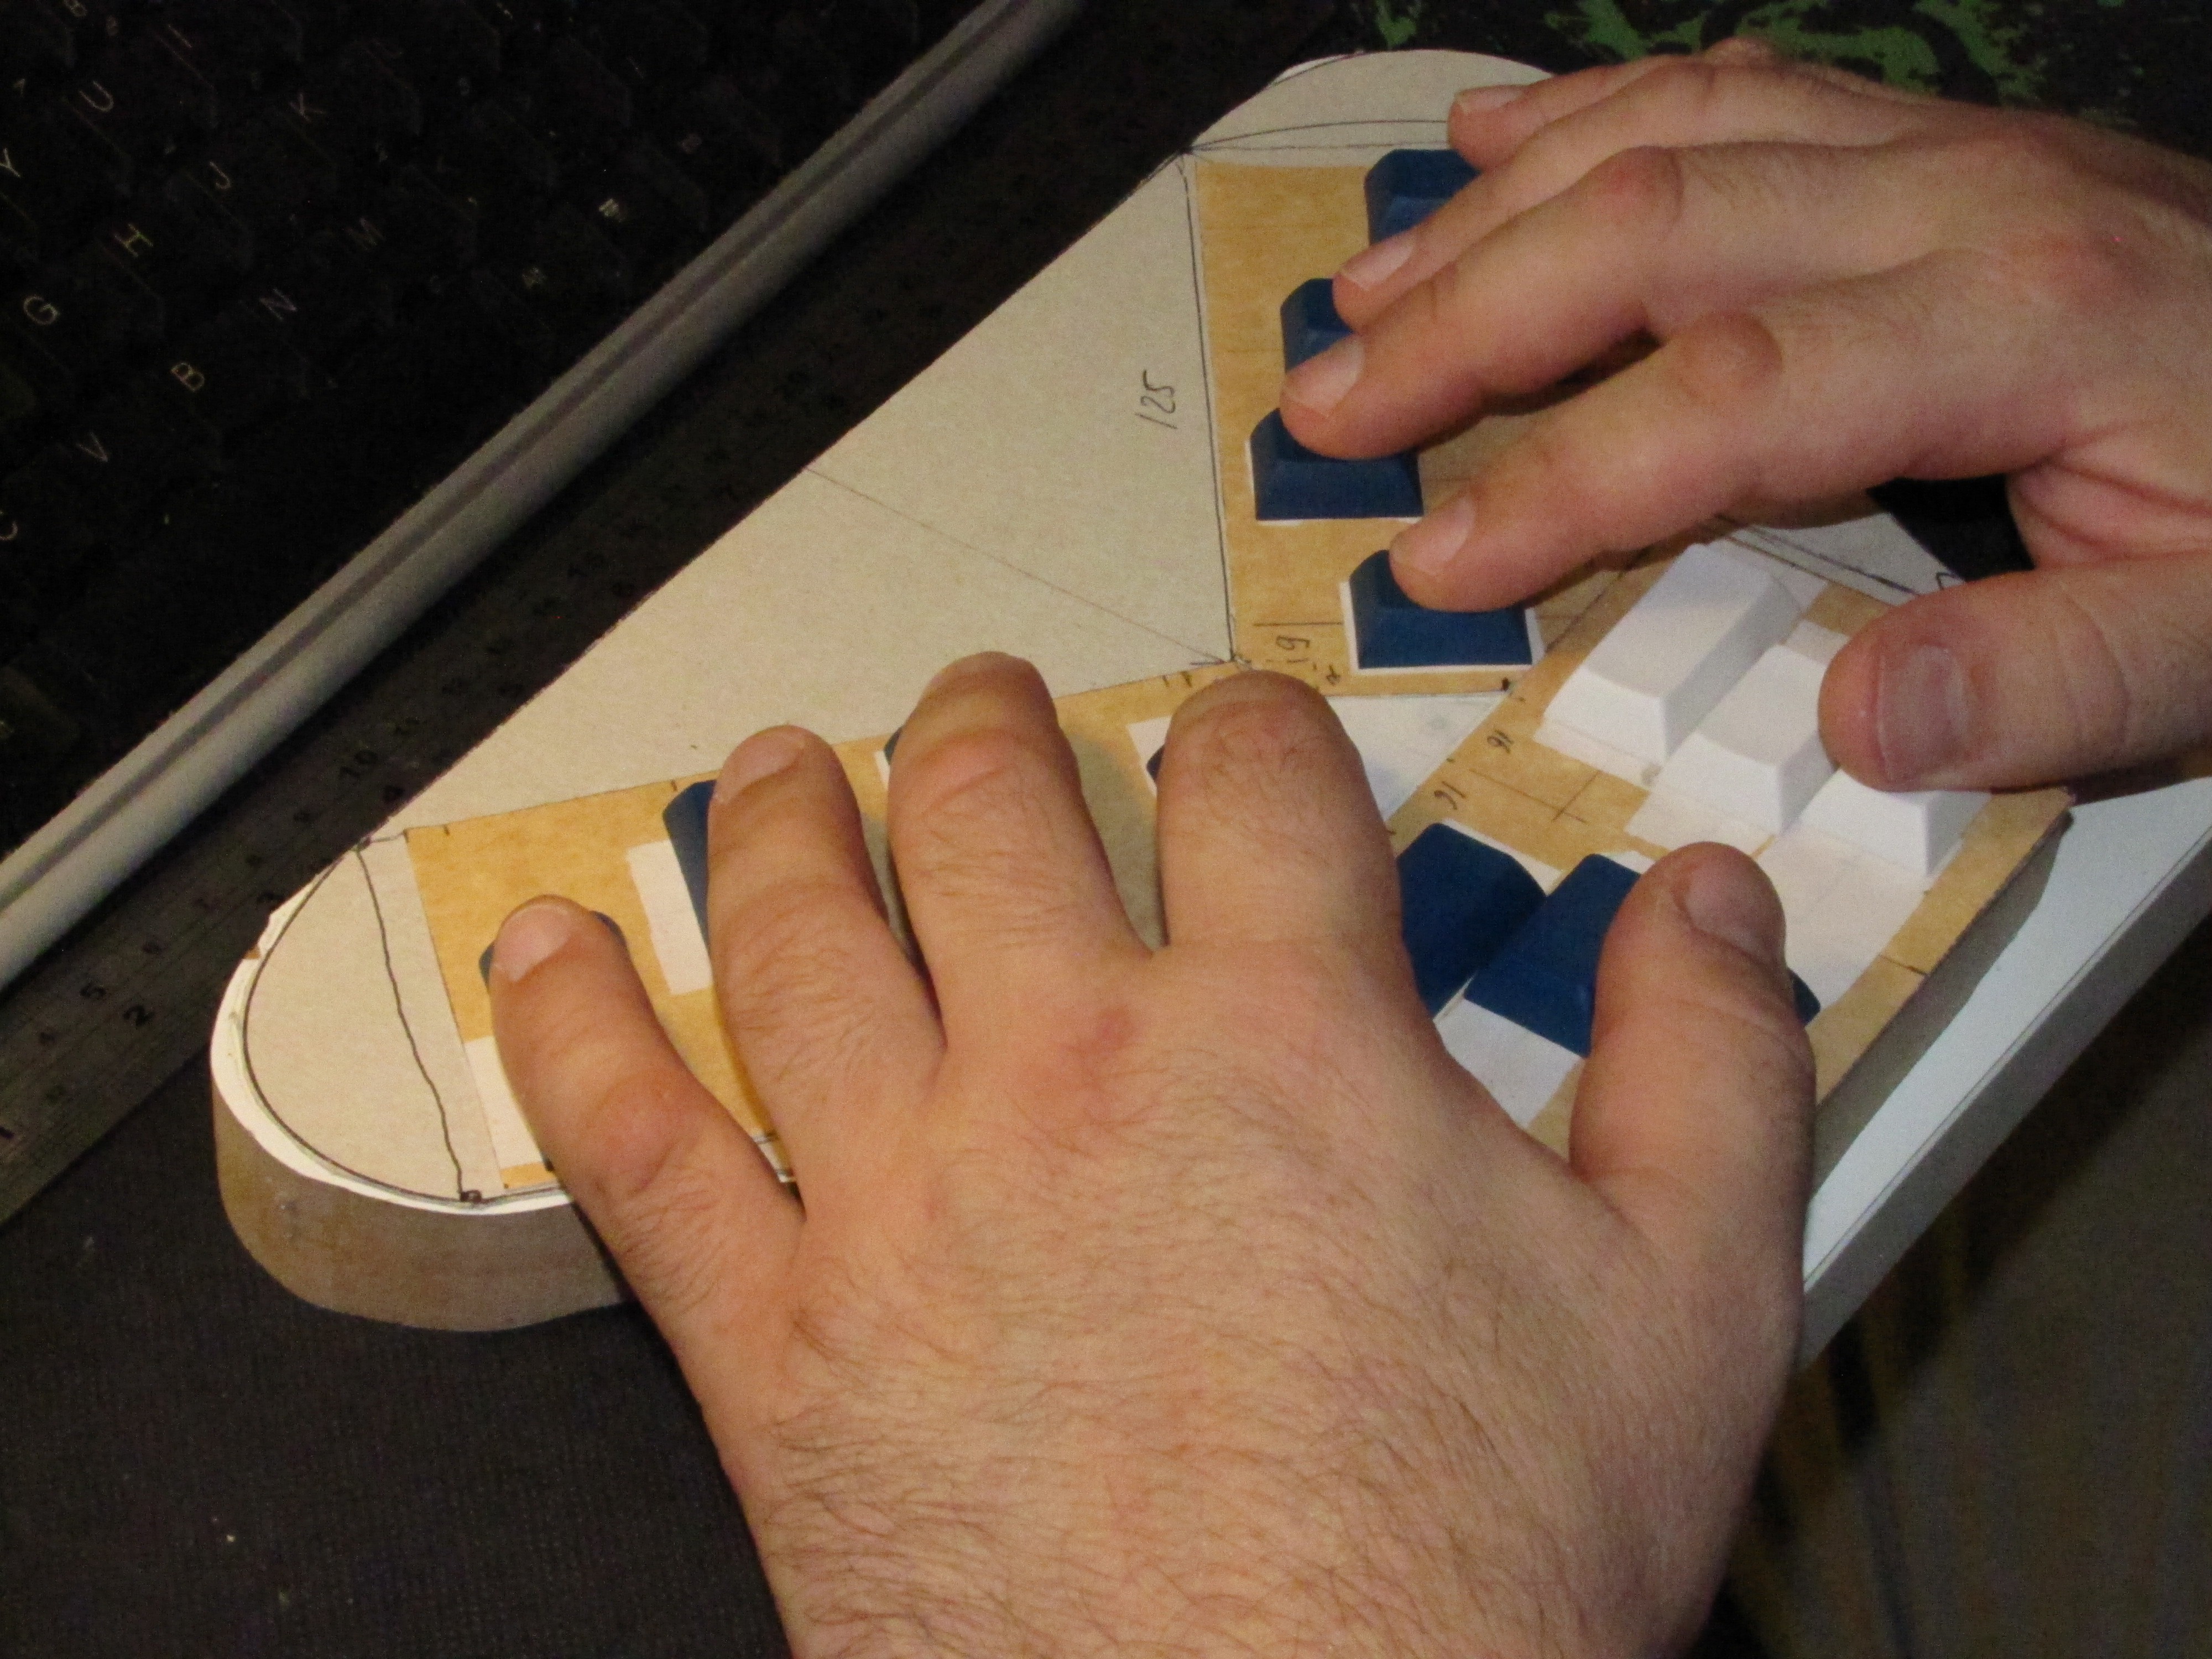
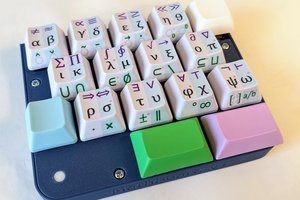
Two-handed chording keyboard

Filling the vacuum in high quality chording keyboards market.

Similar projects worth following
Medics may disagree, but it seems that constantly bending fingers back and forth while touch-typing by the 10-finger method is the second reason (besides the poor posture) why people have carpal tunnel syndrome. In such sense, "ergonomic" keyboards help just a little.

The main drive for this project was not to type faster than speech, but to type at reasonable speed whole day with no strain. In practice, I seldom exceed 20 WPM (just cannot think GOOD code that fast!), but can maintain this for many hours - without ever bending a finger.

sketch_wambat_mark2.ino

The "final" version, with all keys' assignments.

ino - 21.07 kB - 04/29/2017 at 03:26

Download

WAMBAT_Graphics.png

The button reminder for the keyboard top.

Portable Network Graphics (PNG) - 61.27 kB - 04/29/2017 at 03:25

Preview
Download

Wiring.png

Final wiring diagram. Note my $3 Arduino had defective pin 5, so I reassigned some lines around.

Portable Network Graphics (PNG) - 158.29 kB - 04/29/2017 at 01:57

Preview
Download

07_Label_Cut.nc

Use 1/8 in tungsten single-flute end mill bit for cutting Plexiglass on CNC

Network Common Data Form (NetCDF) - 1.66 kB - 04/25/2017 at 09:54

Download

06_Label_Drill.nc

Use 3 mm drill bit for drilling on CNC

Network Common Data Form (NetCDF) - 393.00 bytes - 04/25/2017 at 09:54

Download

View all 15 files

  • 18 × Cherry MX-Clear keys
  • 18 × Assorted keycaps
  • 2 × Prototype PCB, lines, predrilled
  • 4 × 5-pin FF connectors
  • 1 × Micro USB cable

View all 15 components

  • The Final Build

    ptrav04/29/2017 at 06:02 0 comments

    Used the long weekend to finalize the project.

    Based on the Prototype 2 experience, the thumb board 3 had been moved 11 mm away from the finger boards and 2 mm higher. The finger boards 1 and 2 changed angles from 40 to 36 degrees. The CNC files are published.

    Modified base:

    Boards installed:

    And everything eventually comes together! Note two silicone mousepads used as hand rests.

    I am comfortably reaching 25-30 WPM continuous, with up to 50 on a 1-minute test. This is a 50 % improvement over my standard QWERTY four-finger input. Most important, in many years of computer use I am typing totally touch-type, without looking down at the keys.

  • Learning To Type

    ptrav04/20/2017 at 01:36 0 comments

    This is a brief explanation on how to learn chords. The method works for me.

    The fingers are named PRMI-T-IMRP: Pinky,Ring,Middle,Index (Left) - Right Thumb - Index,Middle,Ring,Pinky (Right). Left thumb is holding Alt, Shift, Control. Right thumb is for Fun, Num, Shift.

    To enter, for example, T, press _MI-_-___:

    For G, press __I-_-IM__:

    Z is infrequent letter, so it is assigned to P__-_-__P:

    For people like me, who have trouble with pinky synchronization, two alternatives provisioned _MI-_-_R_ and _MI_-T-__P. The latter is convenient if a word starts with capital Z after a space.

    The "manipulation" chords are in the separate column on the charts. The example below is for PRINT SCREEN

    ("from left to right and top to bottom"):

    DELETE button is P__-_-__, and BACKSPACE is __-_-__P.

    There are dedicated chords for COPY (Control-C) and PASTE (Control-V):

    PRM_-_-__ - grab selection with left hand (COPY)

    ___-_-_MRP - release with right hand (PASTE)

    The double quote: "" is __MI-_-IM__. Just remember this nice fellow:


    1. I started by learning the primary chords and punctuation for 40 minutes:

    Real oiler lair,
    Oil or ore are a lie.
    Oral lier -- lira ear?
    Ale or roe are a lire!
    Earl or liar are a role;
    Air rail oiler:

    2. On the same day, added two-finger chords (1 hour):

    horse tail
    loan shift
    herbalist inflators
    tensorial baritones
    life boats hail stone
    tail bones orientals
    forestial inflaters
    botaniser labor
    fire boats
    halftone abolisher
    frost line relations
    biathlon loafer
    obtainers refashion horntails
    shift table sabotier
    inflater laborite
    alerions inflate
    boar or fish
    flariest searobin
    seafront notaries
    baronets foresail tables
    insolate rats in holes
    banisher liberates laborists
    hotlines on the inflation
    oriental lots
    sortable orbitals
    reinstal airholes
    aera borealis
    relation brothels
    lifeboat shoals
    antihero florist

    3. On the next day, added the rest of the chords, with 1-hour practice. By the day end the entry speed was at 10 WPM.

    By that time, the table was not needed for the letters, although I kept it handy for characters like @#$&`\~|=^/*

  • Prototype 2 Completed

    ptrav04/15/2017 at 07:16 0 comments

    This prototype keyboard was not difficult.

    Pressing two keys simultaneously is comfortable; pressing three is OK, but four buttons at once is tiring. Personally I found both the BAT and the Microwriter (CyKey) layouts tiring in a long run. Some letters, such as P in CyKey, require almost 350 gram of force with the “MX clear” switches. ASETNIOP probably does not have this problem as the buttons are pressed on the screen, and there is no additional weight on your fingers.

    At the end I decided to reassign keys U and D from the initial layout, but I've kept the four-finger combinations for backward compatibility.

    The main difficulty were chords with the ring finger of the opposite hand. My version: since both ring and pinky share the same muscles, the brain has less capacity to handle them. After about two days with the new keyboard, all keys were remembered, although I still confuse sometimes I and O. Numbers, function keys, basic punctuation, including the parenthesis, were mastered. The print speed increased to about 10 words (50 characters) per minute.

    Immediately, one problem was apparent. It turns out that for normal work on editing code you need "arrows" with a repeater. Moving and precise adjustment of the cursor to the place in the "one-touch-one-shift" mode is inconvenient.

    I got the impression that the chord keyboard failures are closely related to the developers' desire to do everything exclusively with chords. Sometimes you can't do without the "classical" arrows!

    The solution was to implement additional hardware. The keys were sold in sets of 20, and I had used only 14 for now.

    Using the same technique as before, I added arrows as shown below. Simultaneously the boards were transferred from the chipboard to a Delrin sheet (the 1 meter square plate was bought at a TIP - in the other life it was a manicure salon advertisement.)

    The board was cut on X-Carve

    The current assignment is positively more convenient (at least as my preference goes) than the one-handed BAT keyboard or the Microwriter.

    Retrospectively, selecting the MX Clear for Control, Alt, Shift, and Space was a mistake; a "clicky” MX Blue would feel better. But as is the keyboard does not look too bad.


  • Boards built

    ptrav04/05/2017 at 07:55 0 comments

    Initially three boards were built: one for the thumbs and two for the fingers.

    As the project is experimental, I decided to make separate components - with electrical connectors and M3 bolt holes. The pre-drilled "line" PCBs with 2.5 mm holes fit perfectly to the selected button size.

    For each button, three PCB holes should be expanded, and one additional 1 mm hole drilled through the trace. The latter is tricky to do with the classic electric drill, so I've used a high-speed Dremel (wear eye protection!)

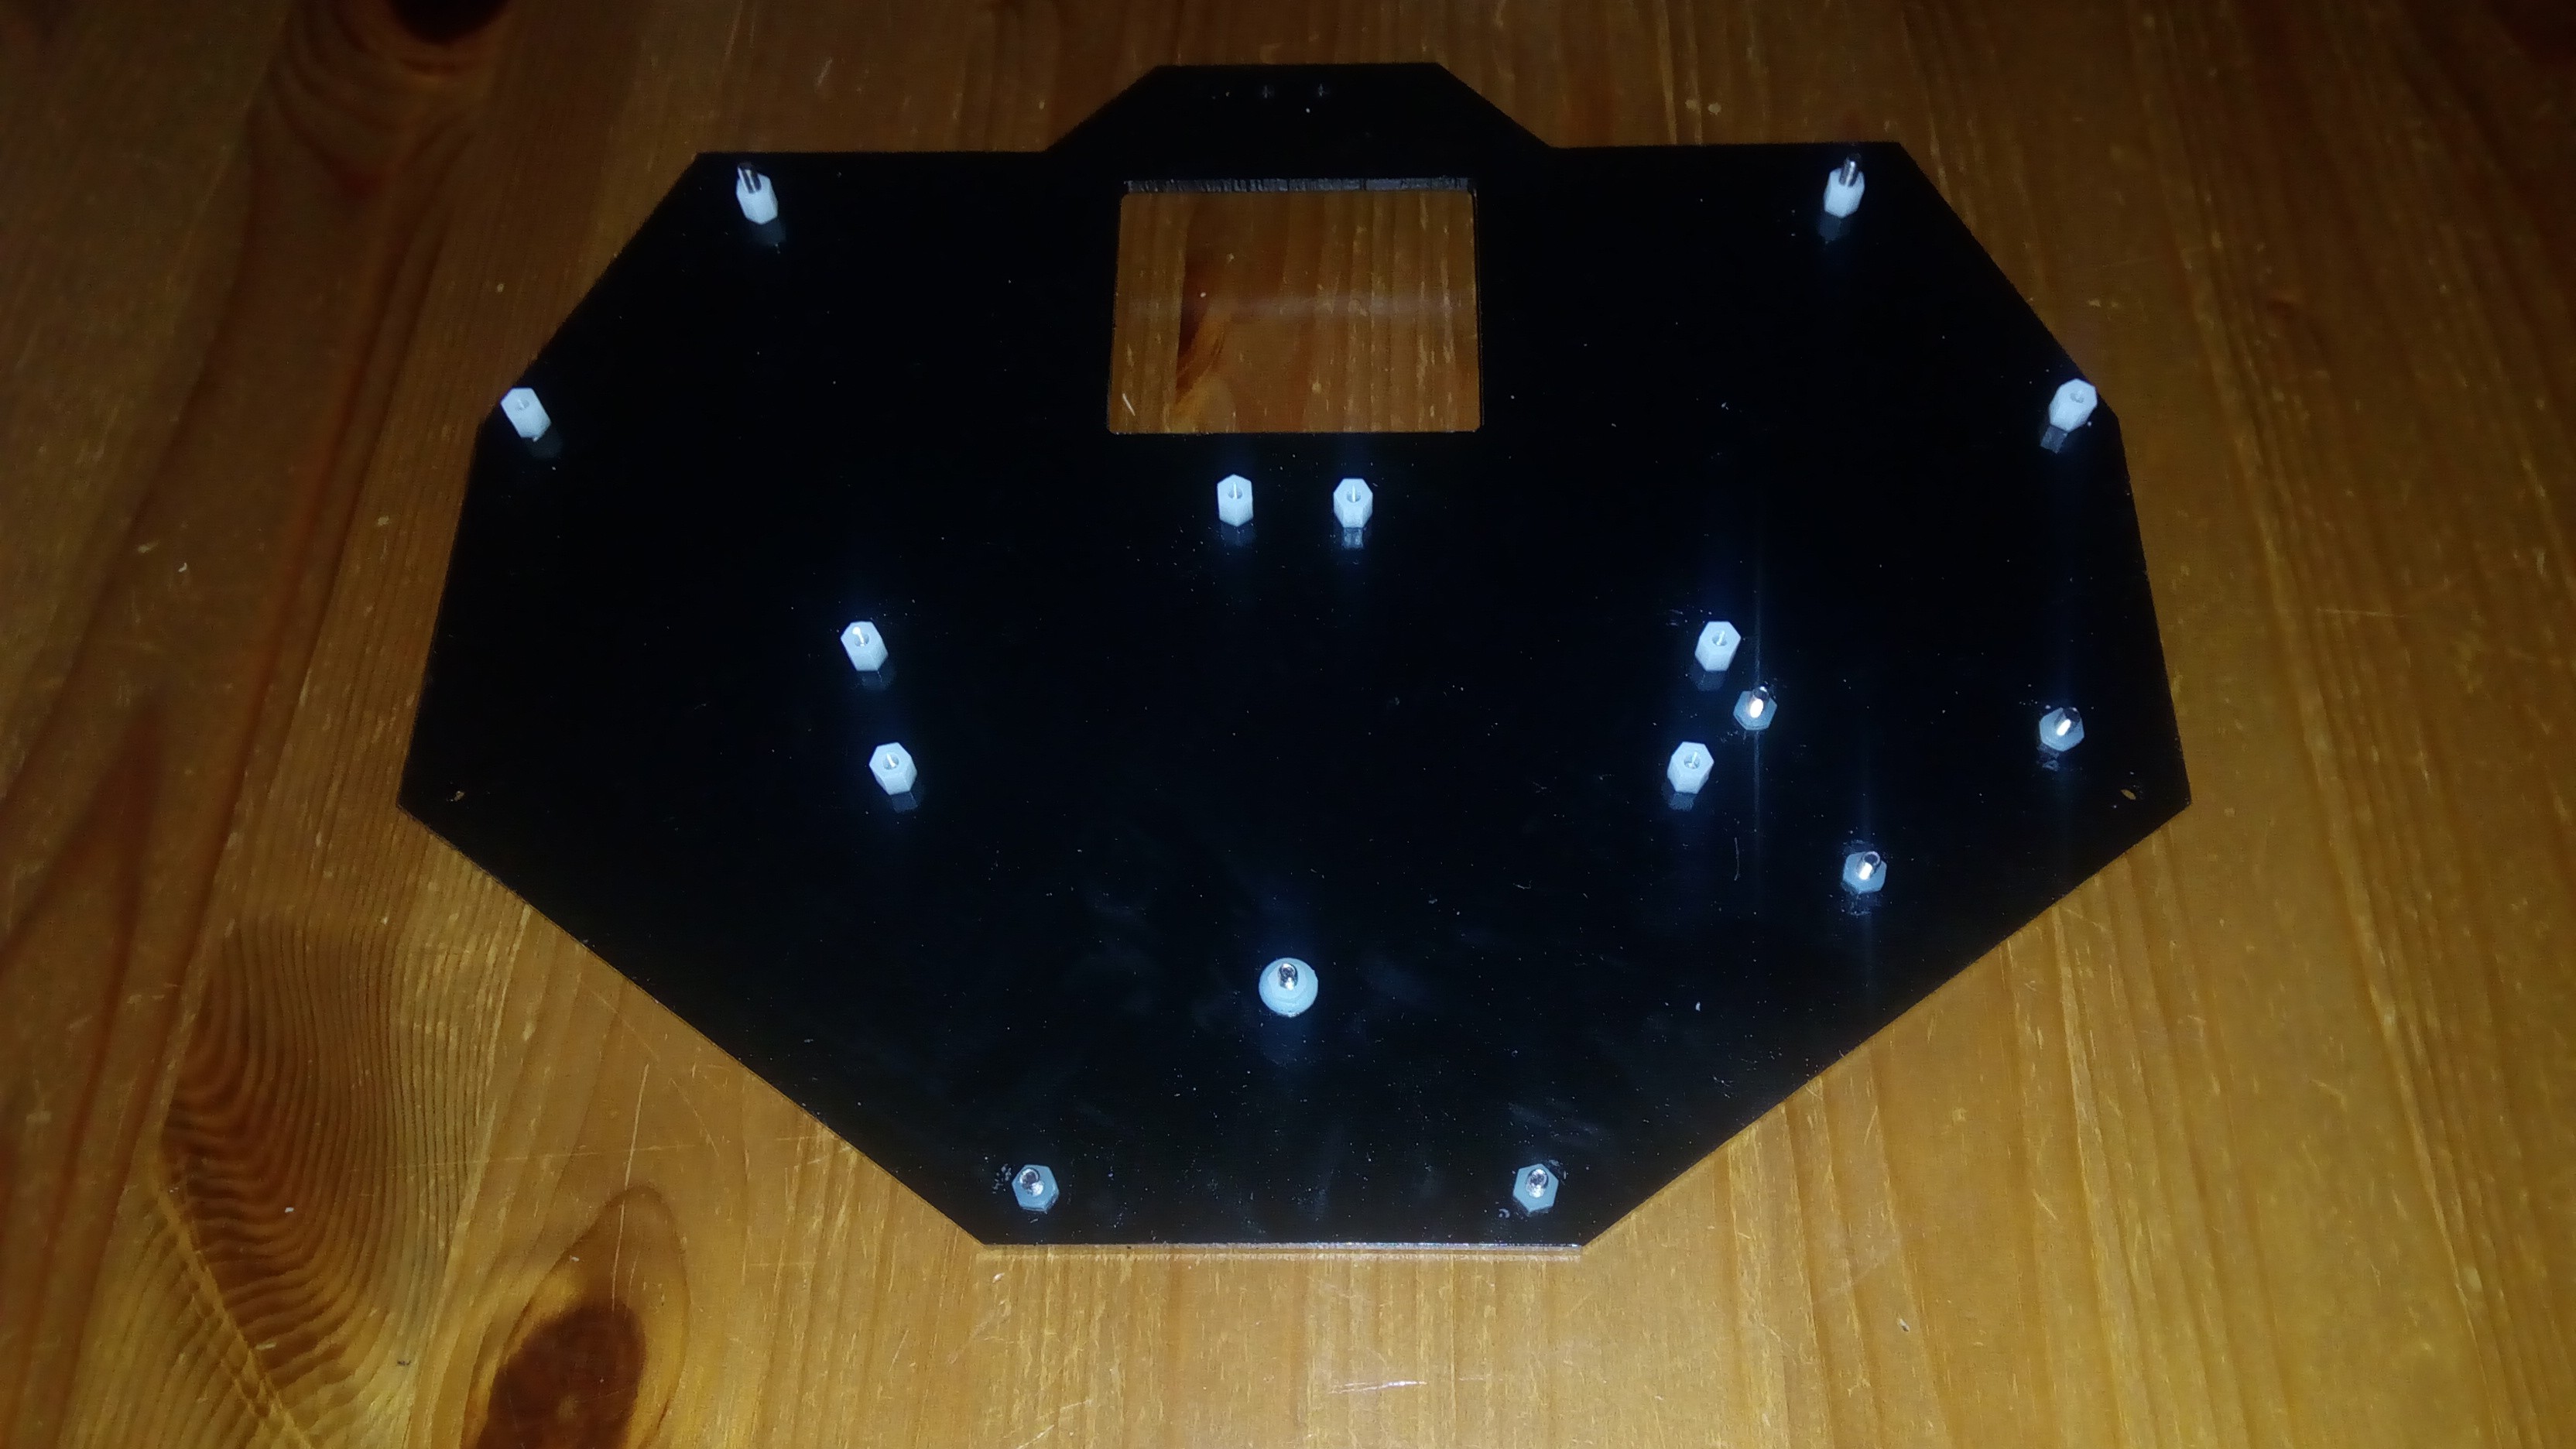
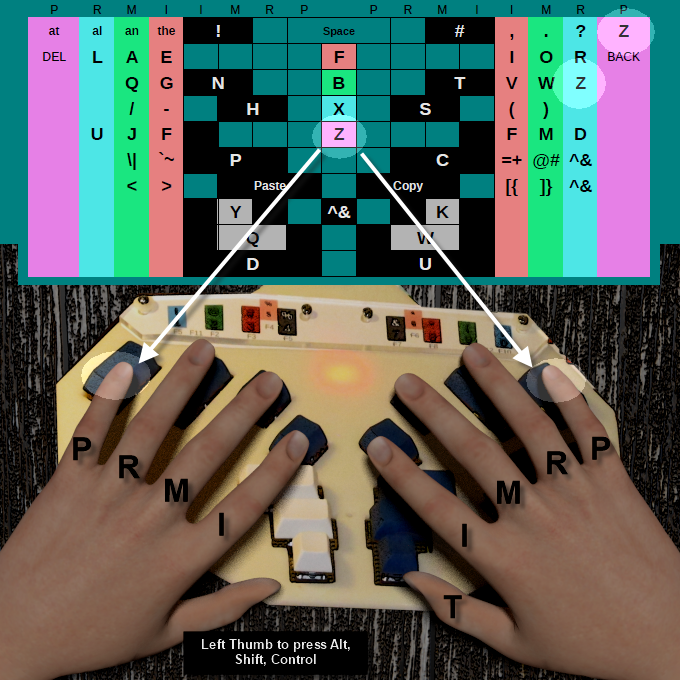
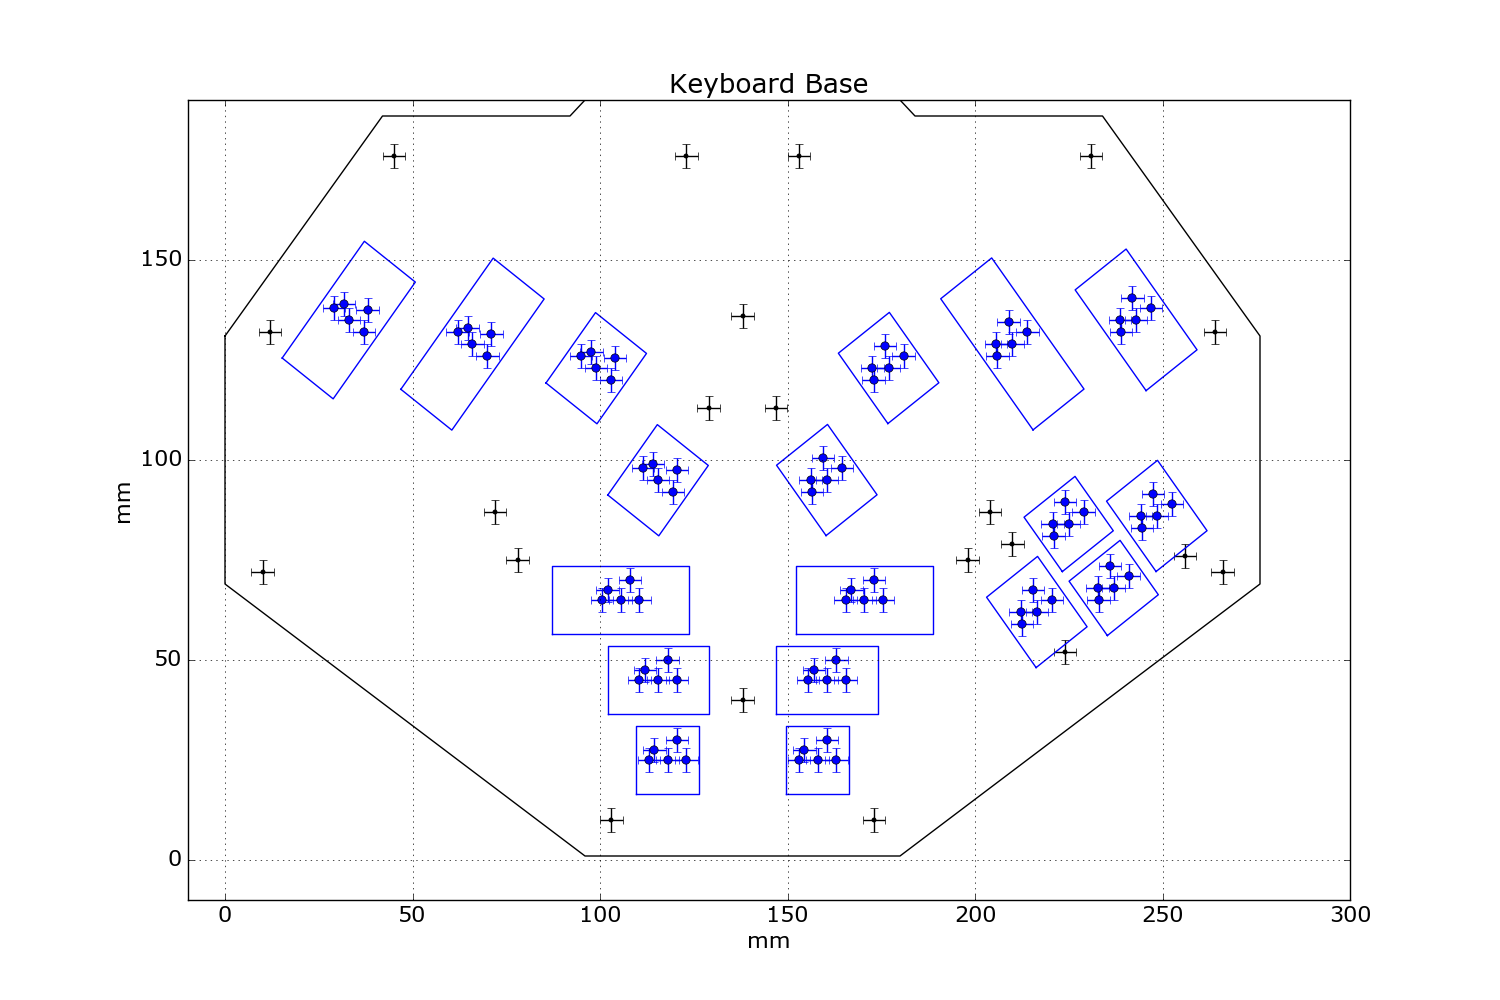
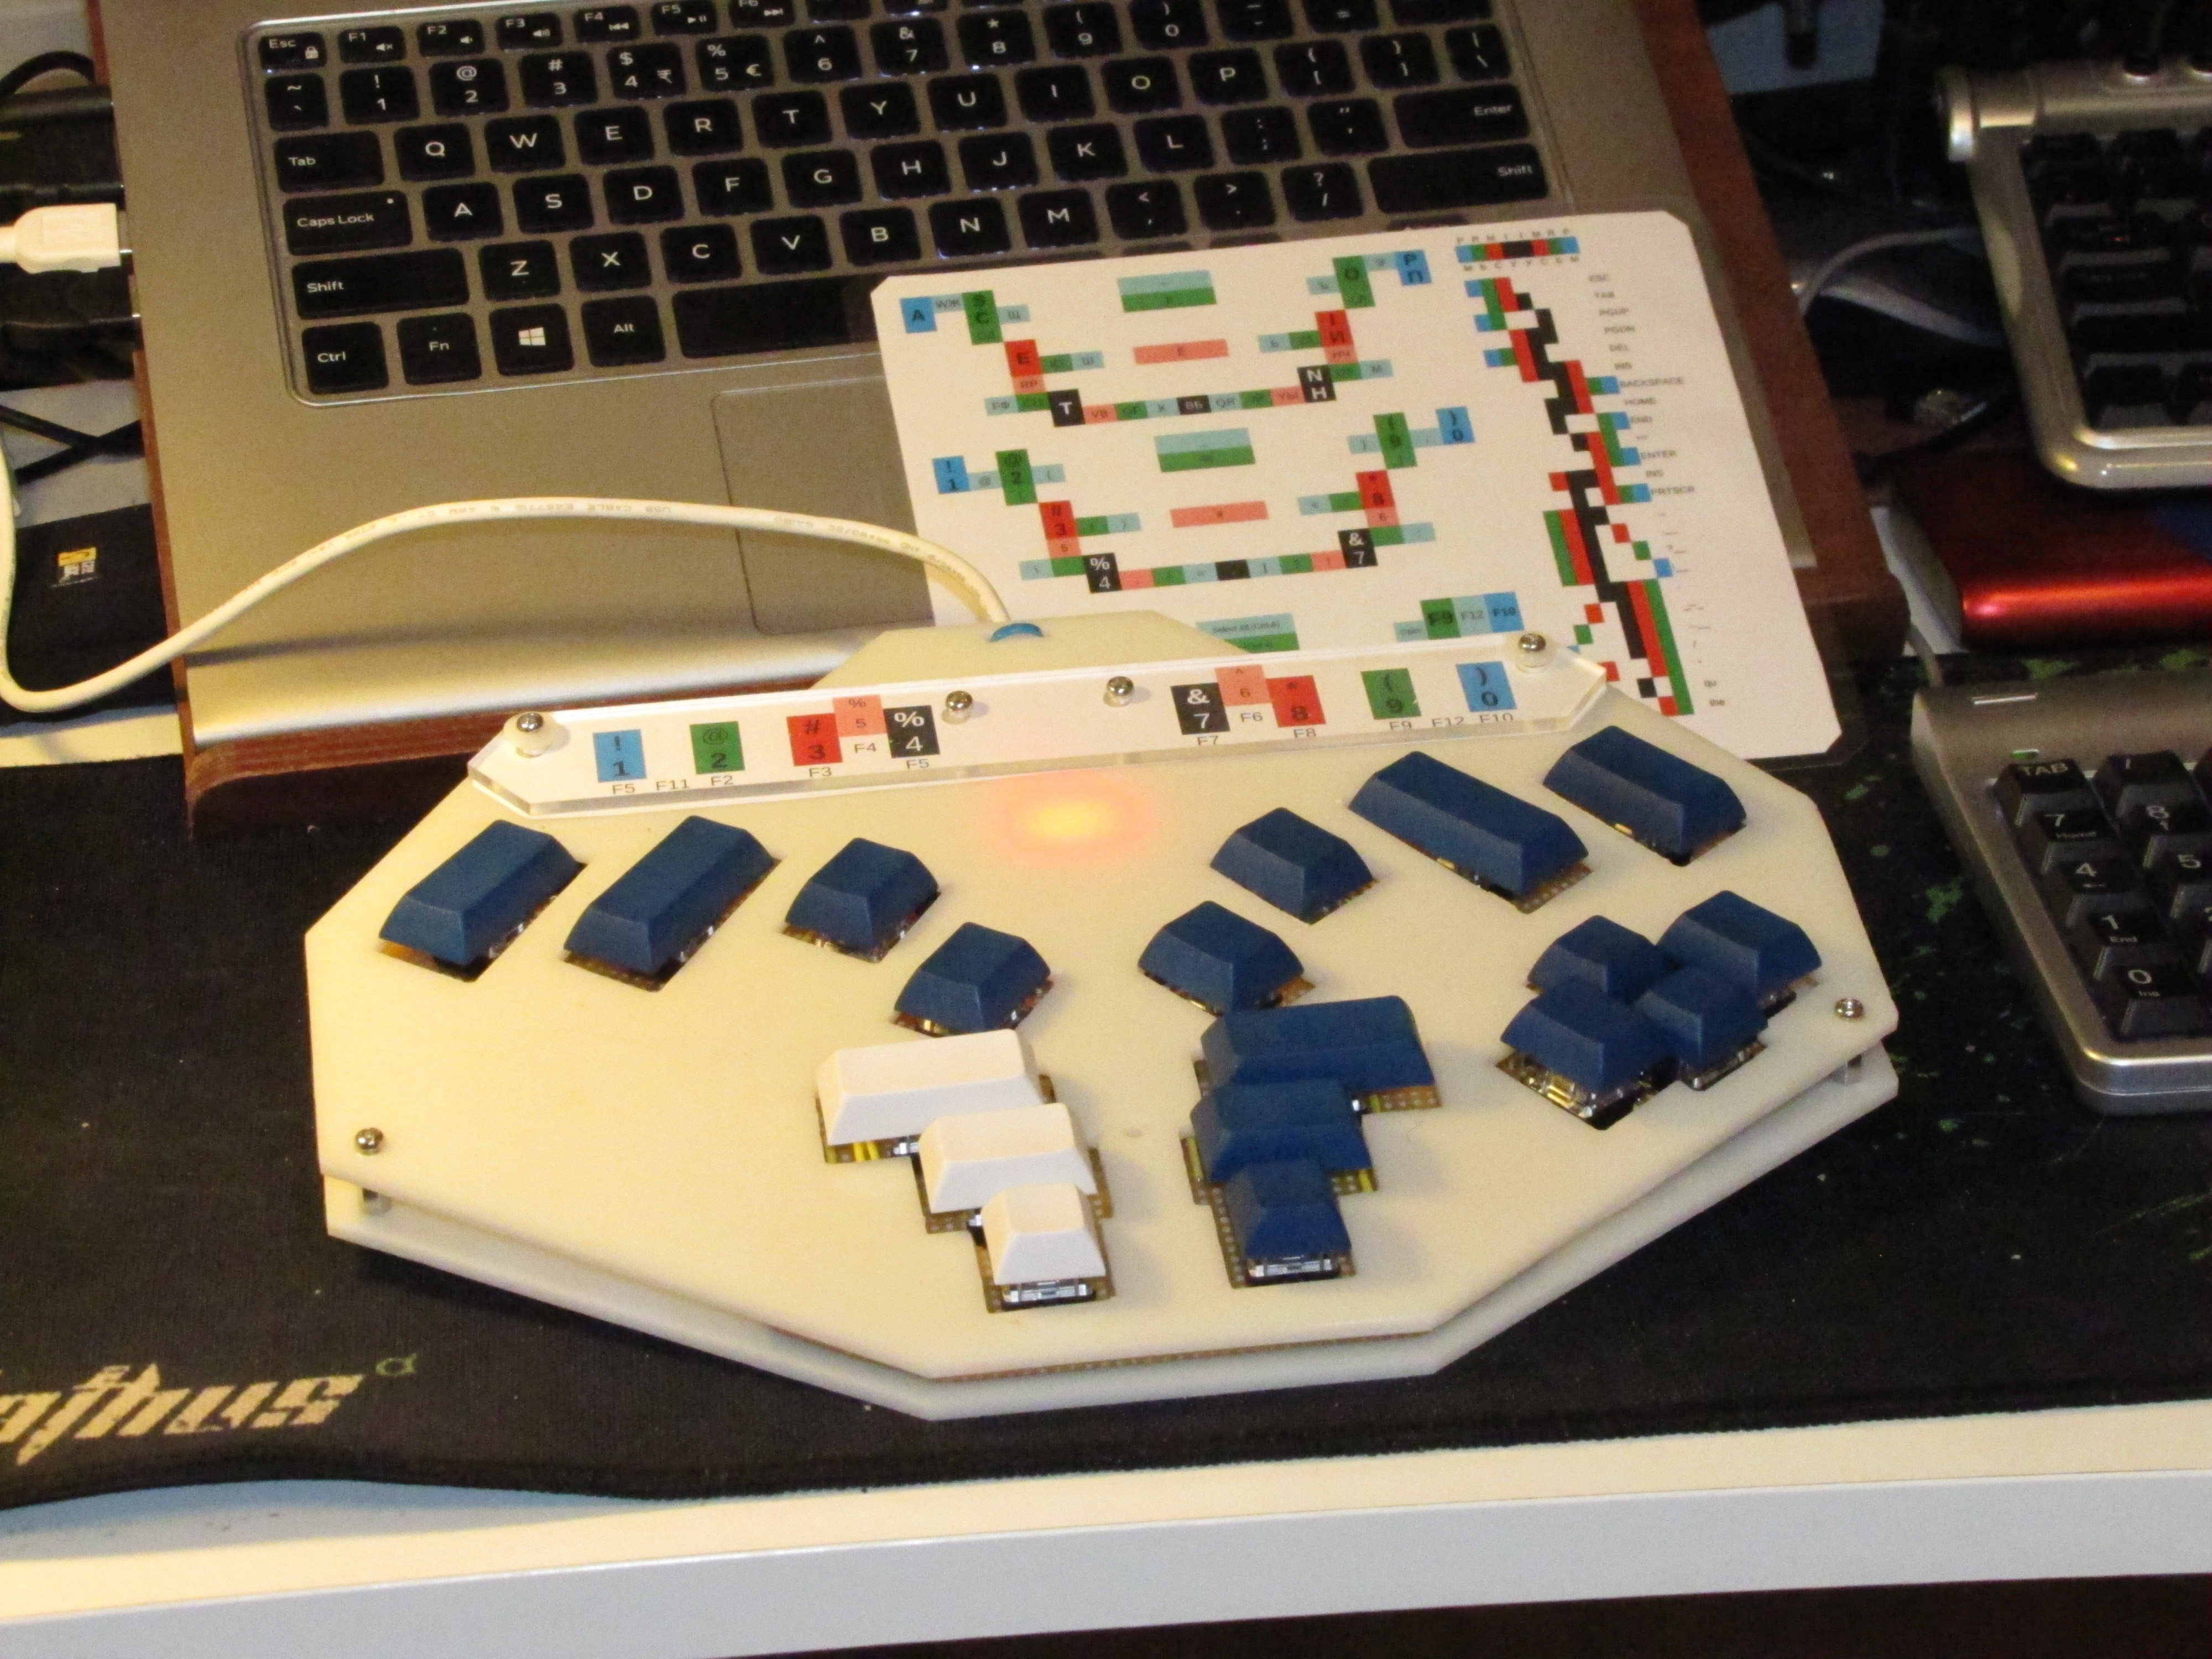
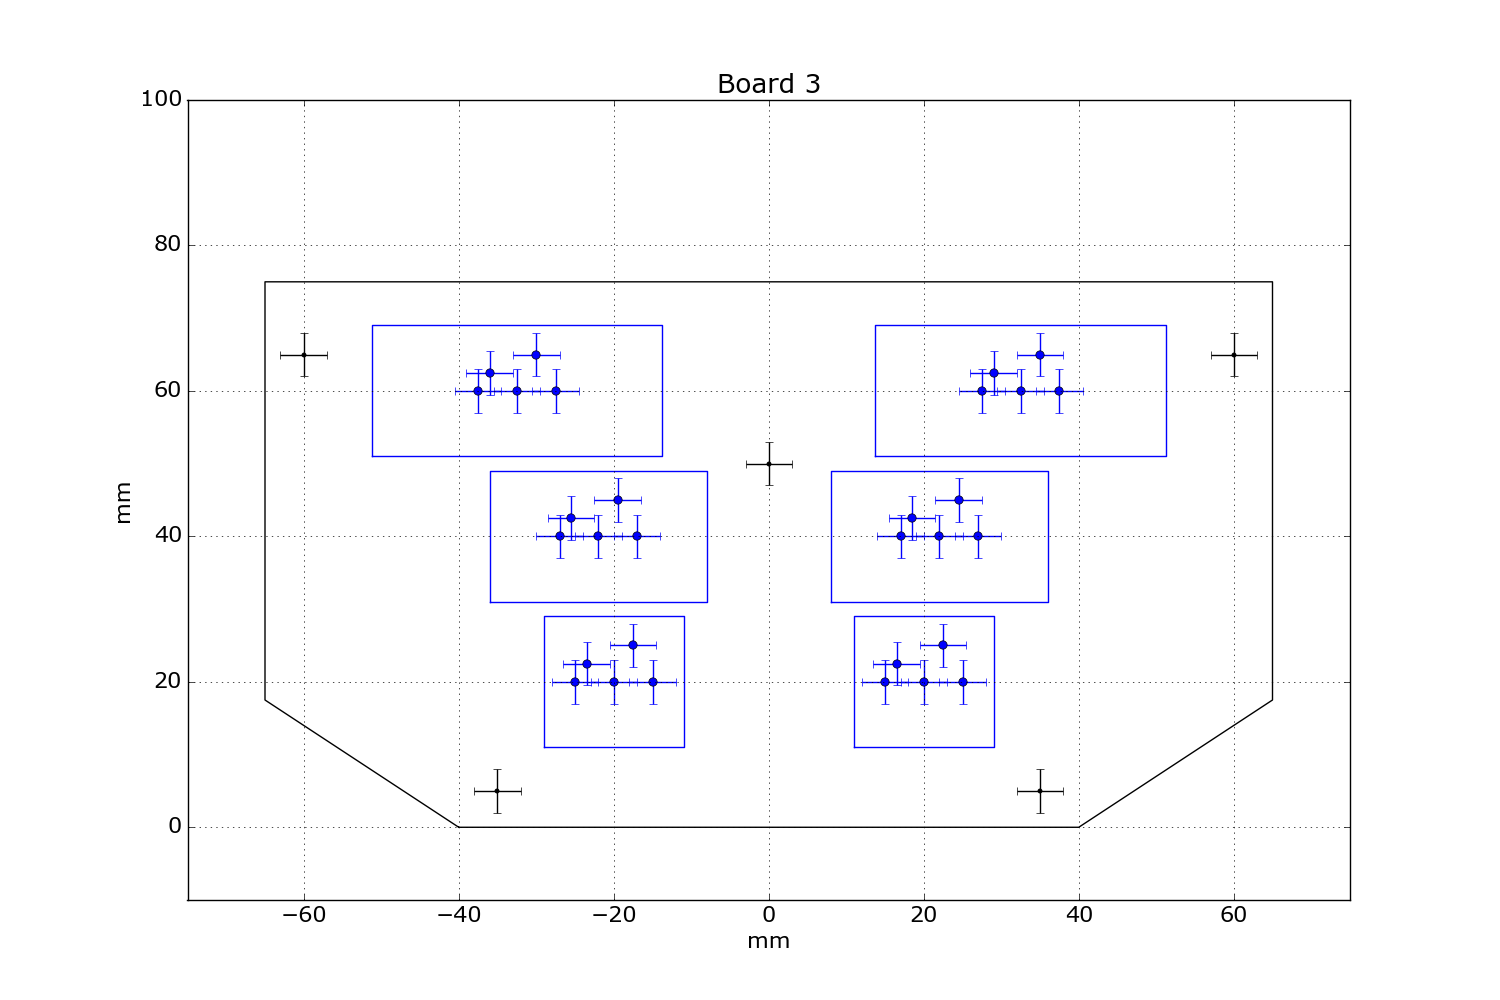
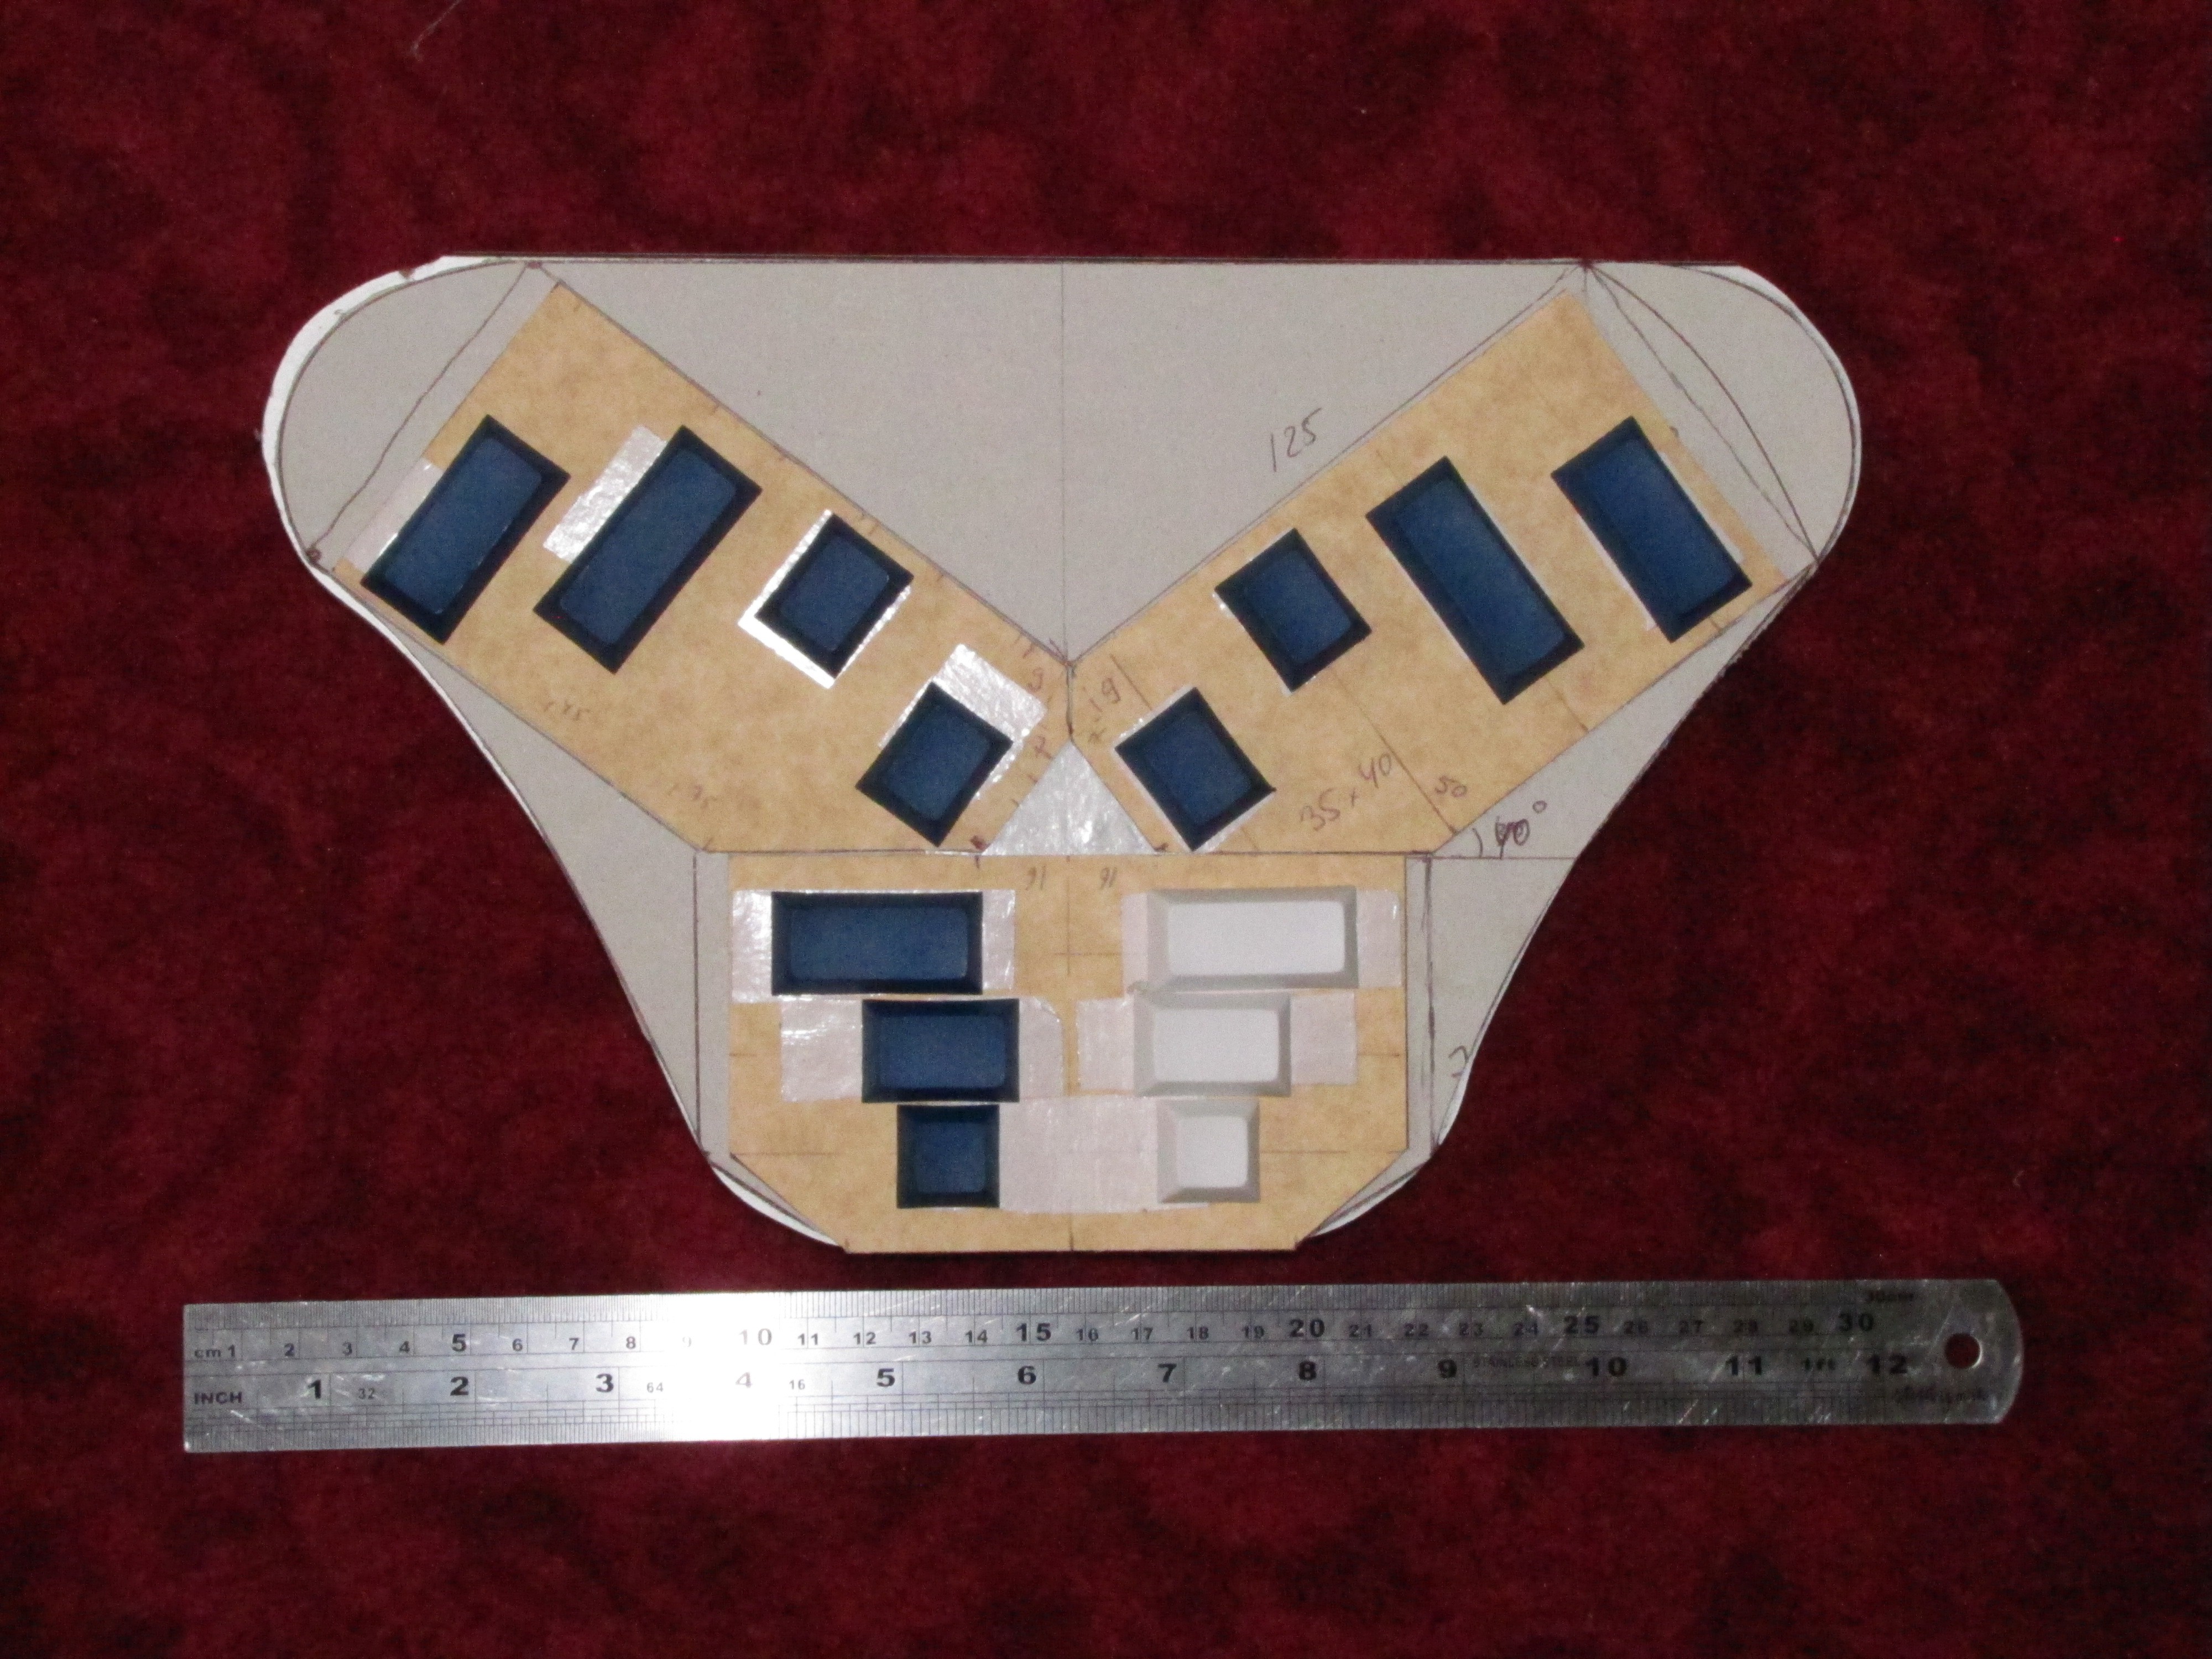
    The PCB drawings are as following:

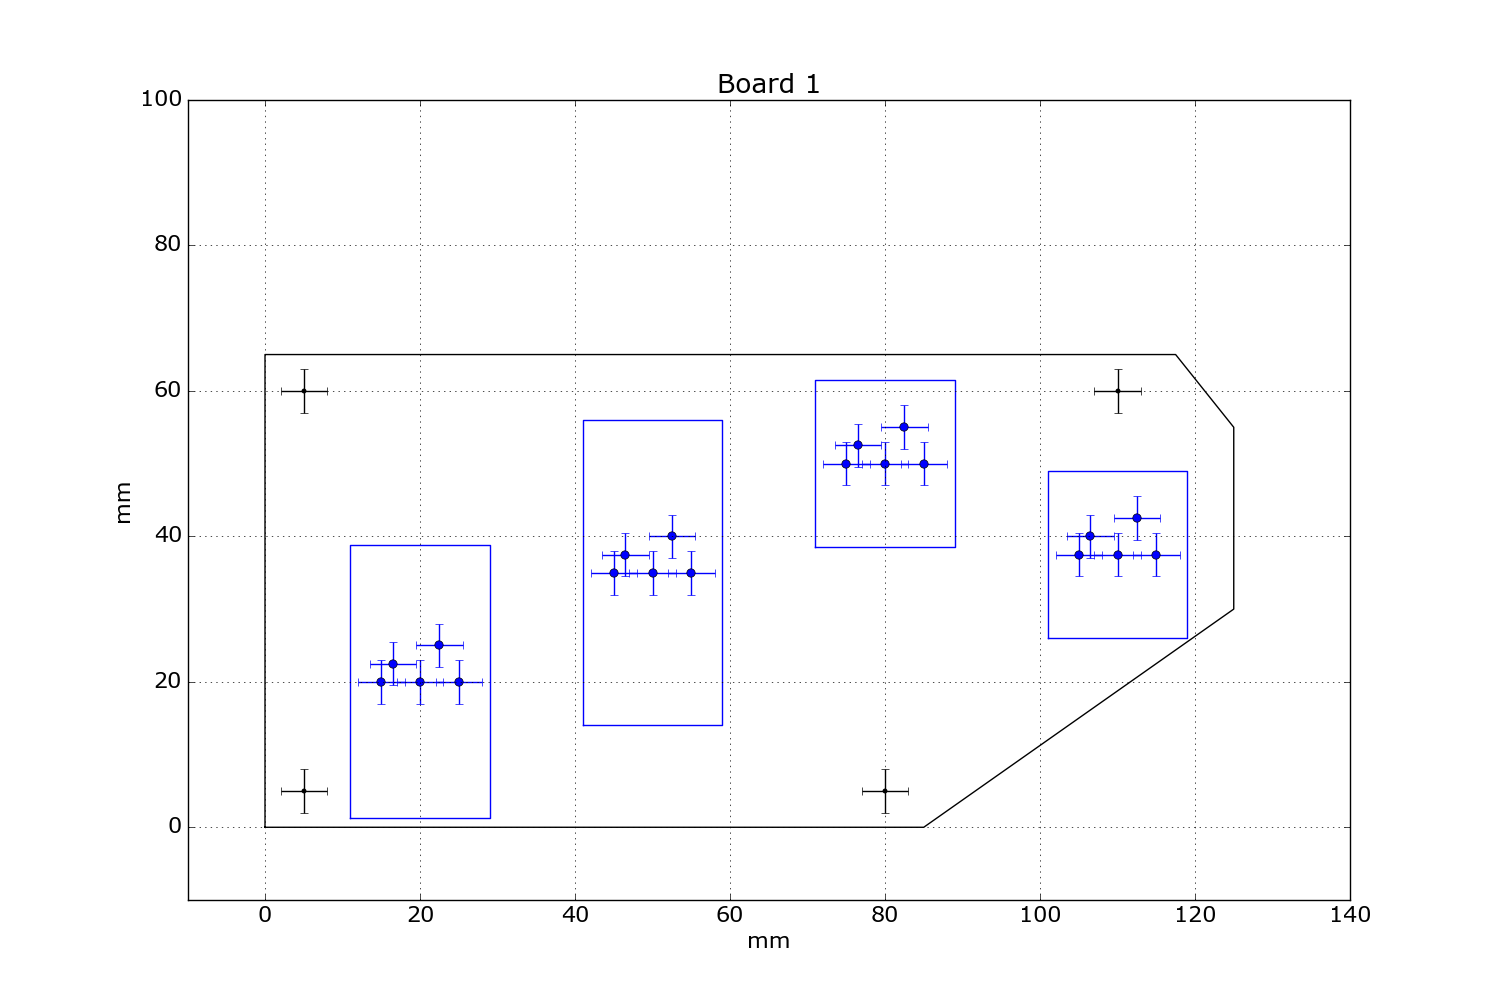
    1. Left finger board
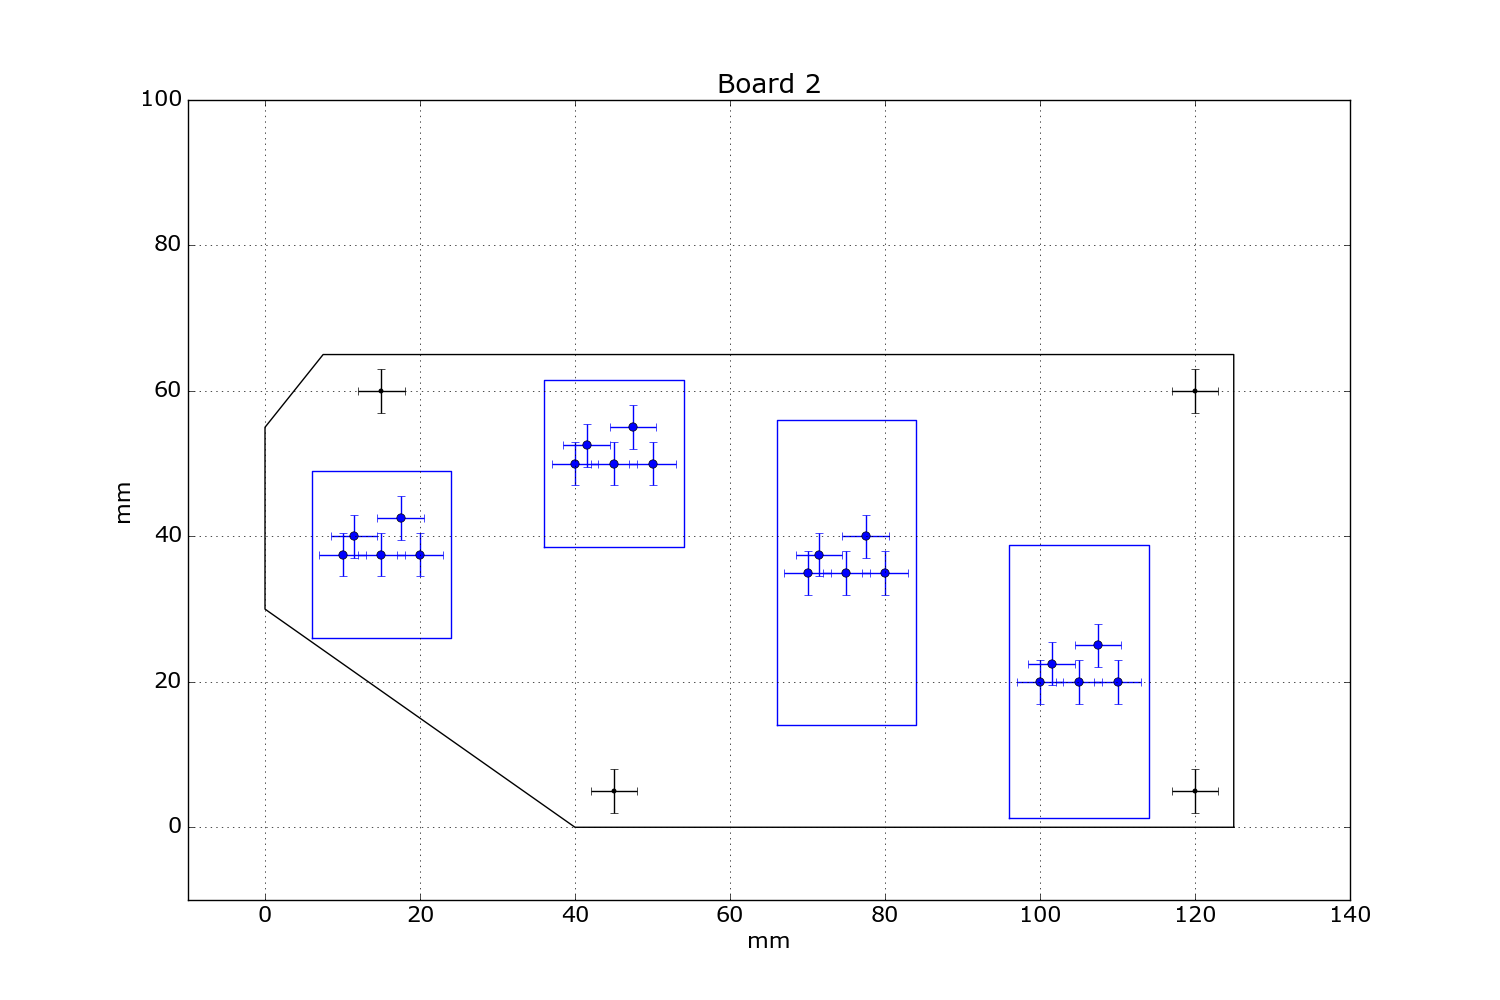
    2. Right finger board (a mirror image of #1, but pins are different)

    3. Thumb board

    The schematics is as following (the standard approach for Arduino keyboards):

    Note the diodes protecting from the false closures.

    The operational mockup looked as below (the original mockup board was used for the base):

  • Design completed

    ptrav04/03/2017 at 05:59 0 comments

    The basic requirement was to build a blind-typing chording keyboard for individual use. The proposed design should be for a desktop use (not a handheld) and should allow reasonably fast data entry for programming languages and common text entry. All function keys and their combinations with Alt, Control, Shift, Win should be supported. Additionally, the keyboard must support 2nd language entry with Cyrillic alphabet.

    The basic conceptual design:

    • 3 keys under the left thumb are used as Alt, Control, and Shift.
    • 2 keys under the right thumb are "Fun" and "Num" -- used for inputting numbers and functions keys. The last key at the left thumb is a Space.
    • 8 keys under the other fingers are used for the "chorded" input:

    Here the fingers are recorded as PRMI-IMRP: Pinky, Ring, Middle, Index

    1. Eight letters from one-key inputs, as suggested by ASETNIOP
    2. Twenty-six letters from two-key inputs, but unlike ASETNIOP, combinations PM and MP are not used. Personally I have trouble lifting the ring whilst pressing the middle and the pinky. The BAT keyboard explicitly avoided such combinations. Together with the single-finger buttons, this gives 34 combinations, sufficient for both Russian and Ukrainian scripts.
    3. Several three-key and four-key combos are used for the punctuation marks, carefully avoiding the PM, MP, PMI, and IMP.

    A mockup was built, first with cardboard, then with chipboard. The latter served also for the initial prototype testing. The keycaps were held in place with two-sided scotch. For my rather short fingers, the optimal horizontal spacing seemed to be 30mm, the hand angle -- 40 degrees.

View all 5 project logs

  • 1
    Step 1

    Decide if you need a stationary chorded keyboard. This piece is designed for those who work at the comfortable desk! If you look for a "wearable" chorder, there are other devices around. This design presumes full use of both hands, but may be modified for one-handed operation, similar to the BAT Personal or CyKey. You may even convert it into a cool gaming keyboard by adding SZXC under the left hand.

  • 2
    Step 2

    Assemble materials. If possible, try the mechanical switches to suit your hands. I used the Cherry MX Clear for all buttons. Perhaps, MX Blue would be better for Alt, Control, and Shift. Anyway, for the top boards you need "Tactile", and for the bottom "Clicky" or "Linear".

    You will need suitable for electronics soldering iron, a Dremel machine and/or small electric drill, hacksaw with fine teeth, a coping saw, pliers, screw-driver, metal ruler and a scratcher, eye protection. CNC machine is optional.

    For programming Arduino, the latest IDE from https://www.arduino.cc/en/Main/Software

  • 3
    Step 3

    Decide on the finger spacing and button sizes. The best way is to put real keycaps over a piece of carton, but if the keycaps are not available, cut "buttons" from thick packing plastic. The standard button size is 18x18 mm.

    After finalizing the layout, cut the PCBs to size (round the size up to the PCB holes) I ended up with the finger spacing of 30 mm (center to center) and the board angle of 36 degrees (do not trust the photo!)

    After cutting, measure the PCBs carefully. The hole spacing may is most likely not 2.5 mm, but 1/10 inch (2.54 mm). Over the PCB size, the length accumulates into an extra length.

View all 6 instructions

Enjoy this project?

Share

Discussions

Walter Fabian Rodriguez Salazar wrote 09/18/2020 at 18:05 point

Good morning, first I congratulate you on this spectacular project, I have been looking for information to do something similar for a long time and I have a question: is it possible to change its behavior to the way the ASETNIOP colemak keyboard works? (http://www.asetniop.com/layouts/)

PS: Sorry about my English, I'm Latin American

  Are you sure? yes | no

RandyKC wrote 04/27/2017 at 21:56 point

Is your project compatible with Plover?

https://github.com/openstenoproject/plover/wiki

  Are you sure? yes | no

ptrav wrote 04/29/2017 at 01:56 point

You positively can write a sketch that uses Plover-like techniques, although my intention was to produce a keyboard suitable for programming work (F5 button is more frequent than Y; semicolon is not a bad literature, but a compulsory punctuation -- and has more use than a comma, etc). As a sidekick it is good for writing in Cyrillic, which uses different key mapping comparatively to the Plover.

The fundamental difference between Plover and this implementation is that WAMBAT is not phonetic, but deterministic, and in this sense closer not to Steno machines, but to Velotype ideology (although has nothing to do with the Velotype layout). "The typist has complete control over the spelling of the words." http://www.velotype.com/en/

  Are you sure? yes | no

JohSchneider wrote 04/21/2017 at 19:27 point

ah, now that clarifies things - thnx for the explanatory log entry!

  Are you sure? yes | no

ptrav wrote 04/15/2017 at 06:00 point

Sorry for delay - held on some project at work. Will update logs shortly.

  Are you sure? yes | no

JohSchneider wrote 04/16/2017 at 07:49 point

thnx!

i'm trying to figure out how to read the tables, but am a bit confused why there are three, sometimes four, columns for the chording fingers (PRMI of the left hand plus IMRP of the right) - shouldn't there be only one column?


another question: the sketches (.ino) do match the pdfs? - eg 'Layout_Mark_5.pdf' represents the mapping in 'sketch_gkos_mark5', likewise 'Key Layout Screen.png' matches 'sketch_arcos.ino'

  Are you sure? yes | no

ptrav wrote 04/20/2017 at 01:48 point

I have added the log on typing.

Yes, the sketch names correspond to the layouts; I work now only on my own layout called WAMBAT M1. GKOS M5  and ACRUS left for backward compatibility - some may find them useful, or someone may already learn GKOS-"Classic".

  Are you sure? yes | no

JohSchneider wrote 04/14/2017 at 12:55 point

nice project!

could you post or link to the keyboard layout labels/printouts and the keycode-table that are visible in the photo of the completed version?

  Are you sure? yes | no

Similar Projects

Does this project spark your interest?

Become a member to follow this project and never miss any updates