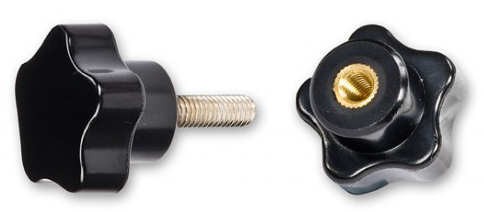
I needed some star knobs for upcoming projects. You can buy a large variety at almost any hardware store but they're not cheap. A bit of Googling and Youtubing (?) showed that it was possible to make your own using only a drill press and the power of geometry! I apologise to my high school math teacher for not paying more attention because "I will never need that boring stuff".
Tools & materials needed:
- a drill press. Using a hand drill would be very challenging!
- 2mm drill bit, 16mm spade bit and 50 to 60 mm hole saw bit
- an awl (a nail will do as well)
- Dremel sander or sandpaper
- MS Paint or pen and paper
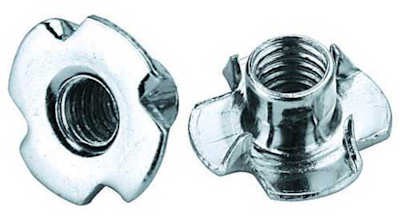
- one M6 tee nut
- a bit of scrap wood. Anything except MDF and particle board will do.
You start by drawing a circle. Divide it up in 5 equal parts (draw a baseline, draw a second line at a 72 degree angle, add a third line at 144 degrees etc) and draw a crosshair on the intersections of the circle and lines. Add a crosshair in the center and we're done.
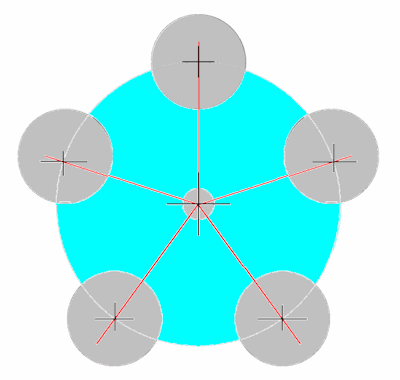
I set the diameter of the circle at 56 mm. If you set it too small, the knob will become quite small and fiddly and it will be more difficult to avoid "chip out" or splitting of the wood. I printed this pattern on paper and glued this to a thin strip of parquet. After drying, I used the drill press to carefully drill 2mm holes at all six crosshairs. Now the template is ready for use!

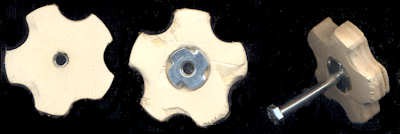
Place a piece of scrap wood (10 mm thick) under the template and use an awl to mark the crosshair points on the wood. Drill a 2mm guide hole at each of the marked locations. Put a 16mm spade bit in the drill and drill out the grey areas from top to bottom. Turn over the workpiece and make a 2mm deep counter-sink in the center. Flip the workpiece back up again.
Switch to a 56mm hole saw bit. They're a bit scary to work with but as long as you keep the RPM's in check and don't rush the job it should be fine. The hole saw will saw out the knob and it's guide bit will put a 6mm hole at the center. Put the guide bit dead center of the work piece and slowly drill all the way through from the top to bottom. Now pry the knob from the (sharp object! look out!!!) hole saw. Turn it over and insert the tee nut. Take a wooden mallet and subtly whack the tee nut pins down into the central hole and counter-sink.
Use a Dremel or a stick with sandpaper to take off the rough edges and sand the top till it's nice and smooth to your touch. Unless you want to paint or varnish your knob - this is best done BEFORE you insert the impact nut BTW - we're done. Total cost: two dimes for the tee nut.
VARIATIONS: you can also embed a bolt or screwnut depending on the task the knob has to perform. Bolts and washers can be expoxied to the wood and you can saw out a small circle of wood and glue it on the top to hide a bolt. Add a 6mm hole and you can glue it to the bottom as a spacer.
Discussions
Become a Hackaday.io Member
Create an account to leave a comment. Already have an account? Log In.