 Milad
MiladIn this post, I will go over details to drive the robot manually using keyboard and command line.
I won't go over the details of setting up raspberry pi Raspbian OS as there are many good tutorials and it's not the main point of this project.
Once you download Raspbian OS and setup the OS then you can go ahead and power your raspberry pi.
Once you login automatically then you can go ahead and connect to your wi-fi network.Once you are connected to internet then you can enable SSH and camera module.
You can enable SSH and camera module using Raspberry Pi Configuration if you use GUI and following command if you use command line:
sudo raspi-config
Next update your system's package list by entering the following command:
sudo apt-get update
And upgrade all your installed packages to their latest versions with the command:
sudo apt-get dist-upgrade
Next find the IP-address of your pi using following command:
sudo ifconfig
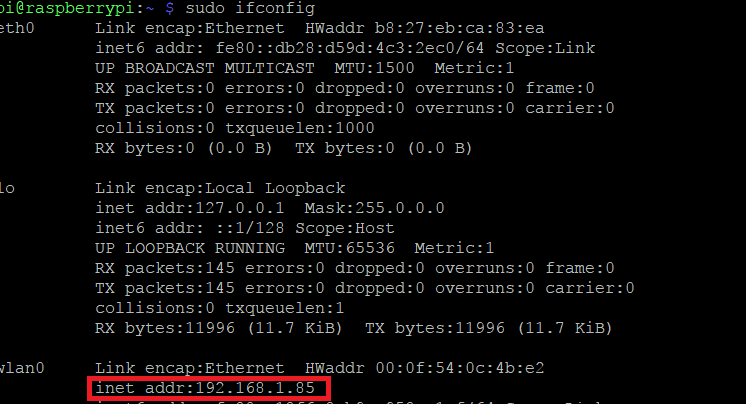
As you can see my IP-address of raspberry pi is 192.168.1.85.
Now go ahead and download robot_cmd.py from github repository of this project in your computer.
This code lets you drive the robot using keyboard keys through SSH.
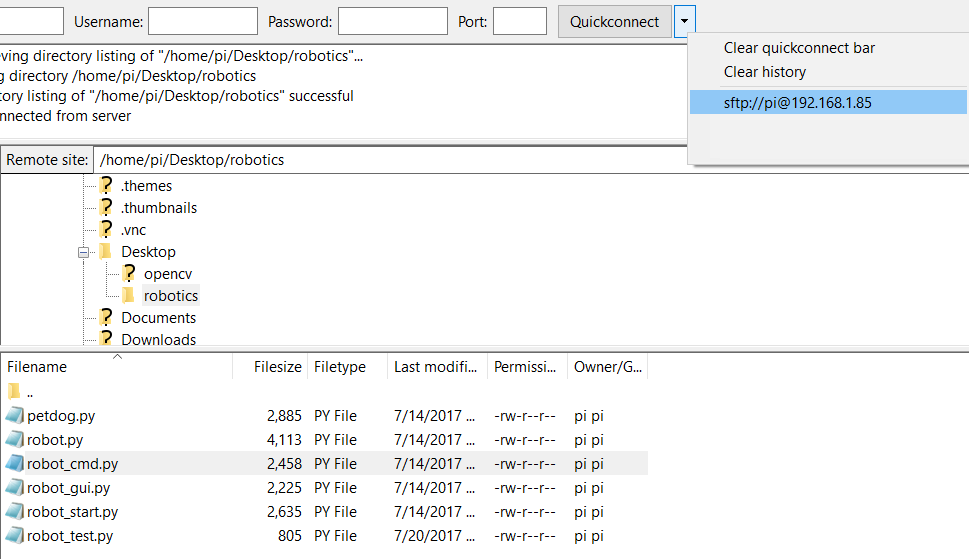
I use PuTTY as a SSH client because I use a windows machine which you can find a complete PuTTY tutorial on it on raspberry pi website. You can use fileZilla to transfer downloaded code from github repository in your computer to your raspberry pi as it's shown below.
You can now run robot_cmd.py using following commands:
sudo python robot_cmd.py
Now using following table as controller guide to drive the robot:
| Character | Action |
| w | Move forward |
| s | Move reverse |
| a | Turn Left |
| d | Turn Right |
| q | Pivot Left |
| e | Pivot Right |
| x | Exit |
Double check that your robot behave according to the guide otherwise you may need to switch wires of your DC motors connected to L298N dual H-bridge module.
Finally, I go over the code and explain how it works:
def init():
    gpio.setmode(gpio.BOARD )
    gpio.setup(7, gpio.OUT)
    gpio.setup(11, gpio.OUT)
    gpio.setup(13, gpio.OUT)
    gpio.setup(15, gpio.OUT)
    gpio.setup(16, gpio.OUT)
    gpio.setup(18, gpio.OUT)
    gpio.output(16, True)
You first need to set gpio mode to the Board to use GPIO pin numbers using following:
gpio.setmode(gpio.BOARD )
Now you setup GPIO pins as output and enable pin #16 to enable DC motors.
    gpio.setup(7, gpio.OUT)
    gpio.setup(11, gpio.OUT)
    gpio.setup(13, gpio.OUT)
    gpio.setup(15, gpio.OUT)
    gpio.setup(16, gpio.OUT)
    gpio.setup(18, gpio.OUT)
    gpio.output(16, True)
The GPIO pins needs to cleared and reset at the end of each action by setting up status of GPIO pins to false:
def clean_up():
    gpio.output(7, False)
    gpio.output(11, False)
    gpio.output(13, False)
    gpio.output(15, False)
    gpio.output(16, False)
    gpio.cleanup()
Now I explain the functions to move forward and reverse:
def forward(tf):
    gpio.output(7, False)
    gpio.output(11, True)
    gpio.output(13, True)
    gpio.output(15, False)
    time.sleep(tf)
    clean_up()
GPIO pin numbers 11 and 13 are set to True as they are responsible for moving DC motors forward.The pin numbers 7 and 15 are set to False as they are responsible for moving DC motors backward or reverse.
The input parameter tf defines how long the motors will turn.
time.sleep(tf)
time.sleep(time) function defines how long the motors have to turn before stopping using following clean_up function.
The function to move the robot backward works the same way except you set GPIO pins 7 and 15 to True and GPIO pins 11 and 13 to False.
def reverse(tf):
    gpio.output(7, True)
    gpio.output(11, False)
    gpio.output(13, False)
    gpio.output(15, True)
    time.sleep(tf)
    clean_up()
Now how does the turn_left function work? Well,That's easy! You just enable GPIO pin #13 as it turns forward both DC motors on the left side of robot.
def turn_left(tf):
    gpio.output(7, False)
    gpio.output(11, False)
    gpio.output(13, True)
    gpio.output(15, False)
    time.sleep(tf)
    clean_up()
The pivot left function pivots the robot or turn the robot around z-axis counter clockwise.To achieve this,the motors on right side need to turn forward while the motor on left side turn in reverse direction or backwards. The output status of GPIO pin number 11 and 15 are set to True to achieve this as it's shown below in pivot_left function.
def pivot_left(tf):
    gpio.output(7, False)
    gpio.output(11, True)
    gpio.output(13, False)
    gpio.output(15, True)
    time.sleep(tf)
    clean_up()
The following code enables the program to perform robot movement actions and keep listening to keyboard strokes without exiting the program.So it calls getch() to perform action based on character entered and move to next line and listen for next character.
def main():

  while True:
        print("\nKey: '" + getch() + "'\n")
The initialize function needs to be called every time you enter a character to make sure GPIO pins are initialized and setup.You need to reset the and initialize GPIO pins after each action otherwise raspberry pi throws errors that the pins are being used.
def getch():
  import sys, tty, termios
  init()
  sleep_time = 0.050
termios provides an interface to the POSIX calls for tty I/O control.
The sleep_time is set to 0.05 seconds to achieve the best possible performance but it can be changed to customize response time.
The following line makes sure only one character is read at a time.
ch = sys.stdin.read(1)
The conditional statements are used to perform actions based on entered character.
     if (ch == 'w'):
        forward(sleep_time)
    elif ch == 's':
        reverse(sleep_time)
    elif ch == 'a':
        turn_left(sleep_time)
    elif ch == 'd':
        turn_right(sleep_time)
    elif ch == 'q':
        pivot_left(sleep_time)
    elif ch == 'e':
        pivot_right(sleep_time)
    elif ch == 'x':
        clean_up()
        sys.exit()
    else:
        clean_up()
        pass
    init()
This includes the explanation of manual control code of the robot and in next post, I will go over the petdog code which enables the robot to follow a tennis ball.
Discussions
Become a Hackaday.io Member
Create an account to leave a comment. Already have an account? Log In.