 deʃhipu
I got the blinking (actually breathing) support added to the IS31FL3733 library during the PyCon.US sprints, so now you can have a nice hardware blinking cursor. Back from the conference, and I started working on the next prototype.
Since I want it to have sound (simple 8-bit "pew pew" sounds, as the name implies), I looked around a bit for some kind of dedicated sound-generating chips. Turns out they are all pretty old, coming from old game consoles and computers, and not actually that easy to program. So I decided to put an 8-bit microcontroller on the board for generating the sounds. And of course, once I have the microcontroller there, I can drop the keyboard chip, as that microcontroller can also handle the keys.
So here's my list of requirements for that chip:
- at least 6 GPIO pins with internal pull-ups for the buttons,
- hardware I²C slave peripheral,
- at least 8-bit timer for sound generation with a decent speed,
- internal oscillator,
- small enough to fit on this board,
- easy to program,
- already in my drawer,
- cheap.
The minimum number of GPIOs is thus 10 (6 for keys, 2 for I²C, 2 for the speaker), so that rules out the ATtiny85 and friends. Looking through what I had on hand, I finally narrowed down my choices to two chips: STM8S003f2 and ATmega8. The first one is very cheap, the second one I already know quite well. I decided to start with the STM8, because it's always a nice bonus to learn something along the way.
So I re-created my dev environment and flashed the blinking LED sketch on a STM8 development board. So far so good. Then, just for kicks, I tried the UART example for it, but it didn't work correctly -- the speed was all wrong. Oh well, it's not like I'm going to need that. I even found a nice example of an I²C slave for this chip online.
Then I realized that I need to make sure it actually fits on the board with all the required components. But to determine the required components, I need to actually use a bare chip, not this dev board. So I found a universal breakout board, and soldered one of the chips on it. Then I tried the blink example on it. Hmm, strange, it programmed fine, but the pin only goes up and down a fraction of a volt -- something is fishy. I checked all my connections multiple times, tried the same code on the dev board, used shorter wires for the required capacitor, etc. -- but nothing. It almost looks like that time when I forgot to switch a pin to output on an AVR and was just toggling a pull-up. Several hours and a couple of datasheets and application notes later I decided to throw the towel. I used up all my motivation for the day.
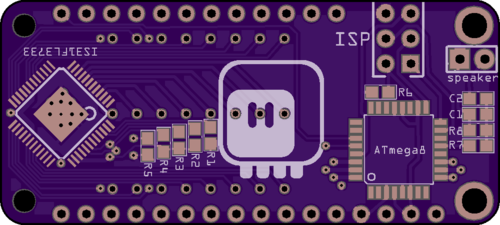
Next day I started work on the ATmega. I already had a bare ATmega8 chip nicely soldered to a PCB -- one of #D1 Mini Tote old prototypes, so I used that. Just added a piezo on PB1 and an ISP header for easier programming. I also used the I²C slave code that I had from that robot -- it's nice for timing-critical stuff like sound, because it doesn't use interrupts. A few lines of C added and I can read the pins from the D port through I²C -- the key handling is done. (Perhaps I will add some de-bouncing there later on). Yay.
Encouraged with this small success, I proceeded to playing with sound. The plan is to be able to send a bunch of parameters, similar to what you can play with at http://www.bfxr.net/, and then have the chip play that, possible mixing multiple channels if the sounds overlap. But I started with a simple PCM sound playback, basing the code on http://avrpcm.blogspot.ch/2010/11/playing-8-bit-pcm-using-any-avr.html. That worked pretty well, especially after a few simplifications and some tuning. And it started to sound really good once I replaced the piezo with a tiny speaker I got for that.
In fact, it worked so well, that for I moment I considered just having a set of few fixed sounds, hard-coded as PCM data in the chip's flash, and triggered with I²C. But after a few calculations and experiments with lower baud rates I realized that I would need to use a larger ATmega328 for this, and decided to leave it as an emergency plan.
I started to play with generating the sound data myself. I got the square wave, the saw wave, the triangle wave, and even some noise (my bit-shifting and xor-ing some values). I got a frequency slide, and a slide on top of that -- which gives the nice laser sound. I even got a nice clear coin sound. Good.
So the next step is to define a struct that will hold a single sound effect, with all its parameters and variables, and then write some code that generates samples from that. Then some simple code to send those effect over I²C and add them to a list, and some mixing code, and I should be good.
Discussions
Become a Hackaday.io Member
Create an account to leave a comment. Already have an account? Log In.