-
1Step 1
Google Home is a great tool to turn everyday automation and the smart home into speech-triggered workflows. With the power of AI assistants like Google Assistant, the internet of things becomes more responsive and more flexible to our daily fluctuating needs.
We will show you in this project how you can use the voice-recognition feature of your Google Home speaker (or alternatively of your Google Assistant enabled smartphone) combined with the powerful automation skills of Prota OS and IFTTT to turn your home into JARVIS-like smart home.
FEATURES
- Turn your lights into smart light for cheap and trigger them by voice-command
- Trigger your current appliances by voice-command
- Turn old speakers into smart music speakers
- Turn an old webcam into a smart cam and receive a voice-triggered snapshot of any room you want to monitor
FOR WHOM
- Anyone who owns a Google Home hub or Google Assistant enabled smartphone (among which Google Pixel, Samsung Galaxy S7, HTC 10& U Ultra, LG G5 & V20, Sony Xperia XZ, Huawei P9)
- Anyone who wants to learn more about smart home while using already owned or unexpensive equipment
This project can be done in an hour, with no tech/coding skills and for less than $40!
-
2Step 2
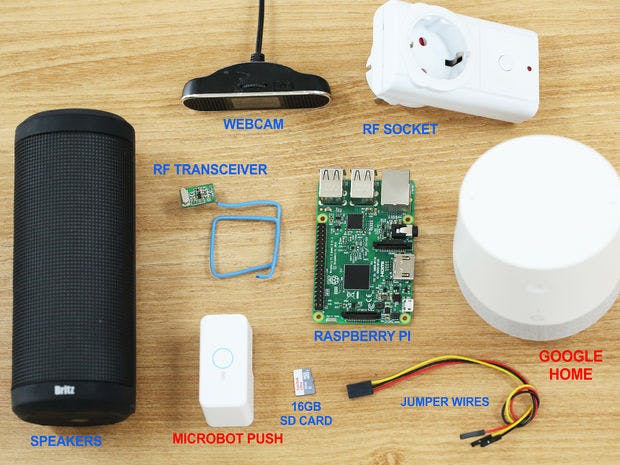
Step 1: REQUIRED COMPONENTS
![]()
- Raspberry Pi 2 or 3 // ~$25-$35
- 16Gb SD card // ~$9
- Any speaker with AUX cable = $0
- An old webcam = $0
- A USB stick = $0
- RF transceiver for RPi ($3) + antenna to solder OR RF transceiver module with antenna included ($15)
- RF switches (you can find 5 switches for $25 here)
- OPTIONAL: MicroBot Push wireless button pusher ($49 here)
+ Your Google Assistant enabled device
-
3Step 3
Step 2: SETTING UP PROTA OS FOR RASPBERRY PI
Prota OS can be downloaded for free on https://prota.info/prota/pi/. It’s only 3.8GB and easy to burn on a SD card (make sure to use a 16GB card).
Follow the instructions of Raspberry Pi foundation to write the OS image on your SD card.
- Extract the .img file from the zip folder
- Plug in your SD card
- Download and open Etcher, select the image and the drive and start the process.
That’s it!
![]()
Once Prota OS is burned on the SD card, you can follow this simple installation guide to set up your Prota hub (less than 1 minute!). You only need to define its name and password, your time zone and your email address and the rest is completely automatic!
That’s it! In less than 15 minutes and with no hassle, you transformed your Raspberry Pi into a Smart Home automation hub!
-
4Step 4
Step 3: CREATING YOUR SMART LIGHTS SYSTEM
The connectivity of your Raspberry Pi allows you to create easily your own unexpensive DIY smart light systems which will later connect to your Google Voice. It’s a great alternative to much more expensive solutions like Philips Hue.
To do that we need to connect a RF (radio frequency) antenna to your Raspberry Pi, configure it then pair it to RF sockets.
![]()
This step is only needed if you want to connect a RF socket to your bedside remote.
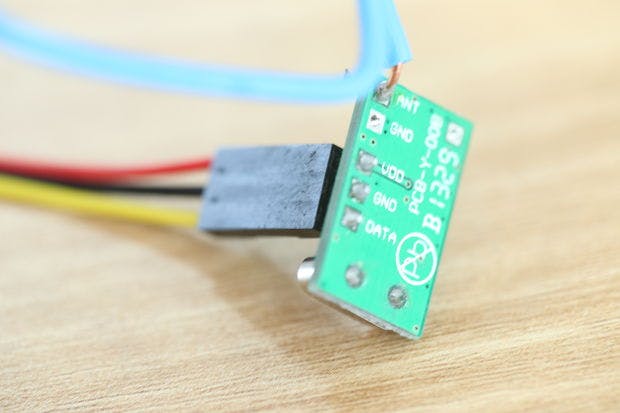
If you have opted for a RF module and a DIY antenna, you need to solder them together.Make sure the soldering connects the antenna to the ANT port on the RF transceiver.
![]()
You can have more information on how to make an external antenna in this article. Keep in mind that the required length of your antenna will depend on the frequency of your RF socket. Our OS supports 433, 477 and 315 MHZ.
Once soldering is done, plug three jumper wires to your RF transceiver (433/477/315 MHZ).
VDD = Electric current (5V) GND = ground (select a ground PIN) DATA = has to be connected to GPIO23
![]()
You can connect those three jumper wires as we did on PIN 2 (5V), PIN 6 (GND) and PIN 16 (GPIO 23).
![]()
The last step is to connect the configured antenna with the RF socket.
- Open App Libraries and download ON/OFF app
- Click on “Add socket”
- Type-in the details, select “On Board” and click on “Done”
![]()
- The app will start scanning the surrounding sockets. Press and hold on the socket’s button until the LED blinks
- When the LED stops blinking and stays on solid red, it means your Prota Pi has paired with your socket. You can then press on “Remember”
![]()
You can now try turning it on and off via the app interface.
Alternatively, you can also very easily connect your WeMo smart plug via ON/OFF by selecting “WeMo Switch” in the New Device interface above.
-
5Step 5
Step 4: CONNECTING YOUR OLD SPEAKERS
We will now turn your old speakers into smart speakers by connecting them to your Raspberry Pi. With a USB stick with all your favorite music plugged into your Prota Pi, your playlist can be automated, for instance when you trigger it with a Google Home voice-command!
- Plug your Raspberry Pi to your speakers via an AUX cable
- Plug your USB stick to your Raspberry Pi’s USB plug
- Go to App Libraries and download Volumio app
- Open Volumio
- Click on the bottom left button “Browse”
- There you will be able to select the songs and radio stations you want to play and/or add to a playlist
![]()
The shared folder contains the audio files added on your USB stick.
![]()
Your smart speakers are set! Now, an automation can start playing your favorite music, for instance when you voice-command it.
-
6Step 6
Step 5: SET UP YOUR RETROFITTED WEBCAM
![]()
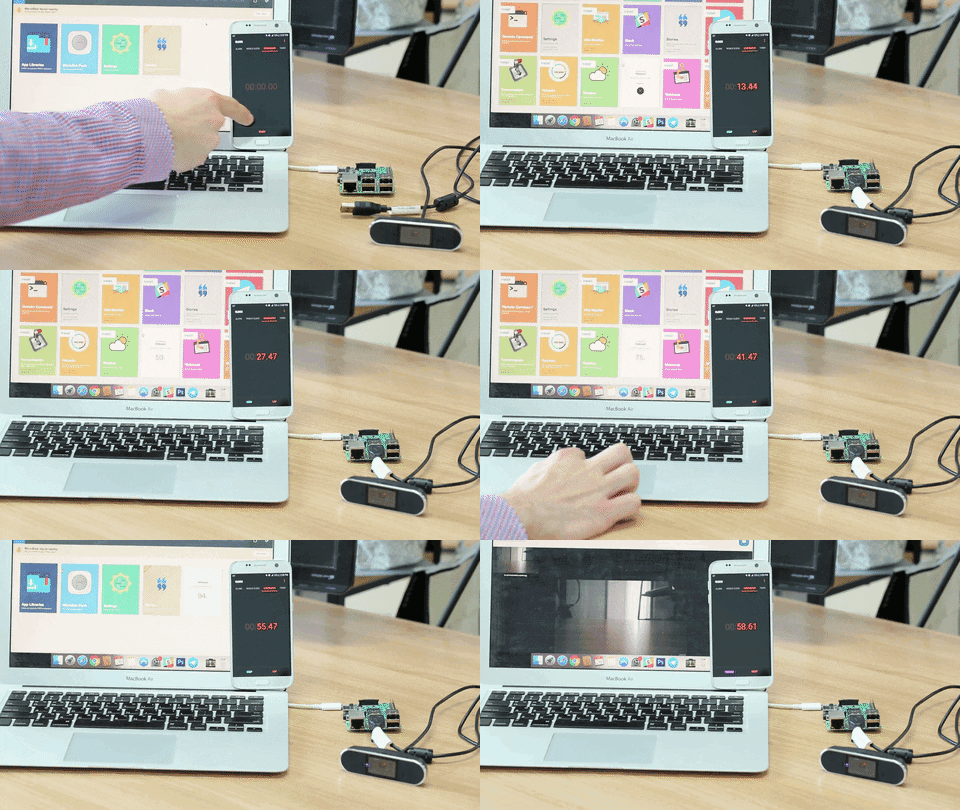
There is nothing more simple than turning an old webcam into a smart cam with Prota OS!
It’s so simple you can actually do it in 60 seconds and just few clicks (see above).
- Plug your old webcam
- Open App Libraries
- Download Webcam app
- Open Webcam app
Now that your webcam is turned into a smart cam, you’ll be able to get a snapshot from it whenever you want, by simply triggering an automation workflow that would take the snapshot and send it to you. We will do that and connect it to your Google Home in step 7.
You can install your webcam in a specific room you want to monitor, either when you’re in another room or even when you’re at the office or on the go. It’s great to monitor your baby’s room when baby is sleeping or to monitor your house or the outside of your house.
If what you want to monitor is too far away from where you want to install your Prota Pi or if you want to monitor your baby but don’t expose him/her to any electronic devices, you can buy inexpensive USB extension cables for that purpose.
-
7Step 7
Step 6: TURN YOUR COFFEE MACHINE/GARAGE DOOR INTO a SMART DEVICE
![]()
MicroBot Push is a wireless button pusher that allows you to turn any appliance that uses buttons into a smart device.
It’s a great way to retrofit your old appliances and trigger them remotely, for instance with your Google Home. We recommend you install it on appliances or buttons you can either hardly reach or to trigger buttons that are in another room. For instance, placing it on your garage door button will allow you to open the garage door with a simple voice-command from your living room or from your car with your smartphone.
First, let’s do the pairing.
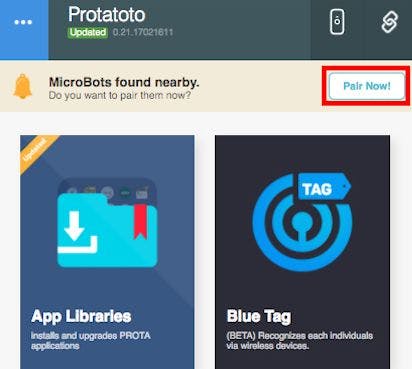
- Turn on your MicroBot (the switch is on the back)
- Access your Prota Space and go to the homescreen
- Click on the “Pair now” button and follow the instructions to pair the MicroBot
![]()
Then place your MicroBot Push on your appliance’s button and try it. Nothing else to do! Via IFTTT, you will be able to pair directly your MicroBot Push to Google Assistant via an applet (see next step).
-
8Step 8
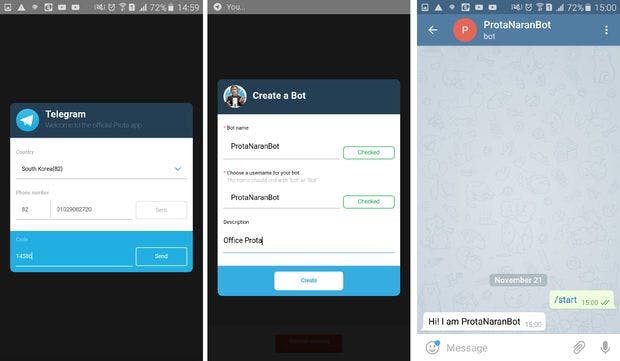
Step 7: SET UP YOUR TELEGRAM BOT
A Telegram bot is a virtual assistant that you can create on Telegram messenger app.
![]()
- Download Telegram app on your smartphone and create an account
- Download Telegram app on your Prota Pi (in App Libraries)
- Open the Telegram app on Prota and click on “Request Authorization”
- Set a name and username for your bot, then click on "Create"
Your bot is now created!
-
9Step 9
Step 8: AUTOMATE!
Time to create all the automation workflows for this project in order for Google Home to be your main smart home interface!
To do so, we need to connect our Prota features to IFTTT applets through automation storylines on the Stories app of your Prota Pi.
- Download IFTTT app from App Libraries
- Open Stories app
- Click on + and then on “When”
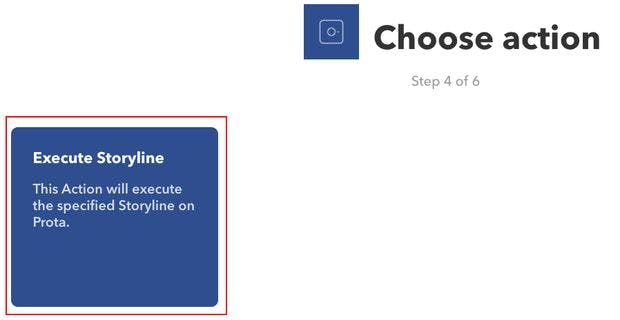
You need then to create the below mentioned storylines that will be later connected to IFTTT applets. Alternatively, click on the links attached to import them automatically via the CITE feature (it’s necessary to add the personal elements to adapt the structures you import).
- When IFTTT applet run, ON/OFF smart socket turn on ⇒ LINK
- When IFTTT applet run, Volumio play the playlist ⇒ LINK
- When IFTTT applet run, Webcam take a snapshot then sends to Telegram bot ⇒ LINK
IFTTT applets
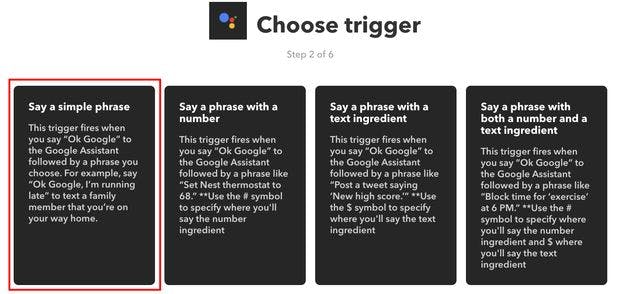
It’s now necessary to create the IFTTT applets that will connect Google Home to our previously created storylines
- Create your account on IFTTT
- Search for the channel “Prota”
- Click on “Connect” and select your Prota (you need to use a device which has been granted a Prota Space access)
- Search for the channel “Google Home”
- Click on “Connect” and identify with the account linked to your Google Home
Next, reproduce or use the following applets:
![]()
![]()
![]()
![]()
If you say "lights on" then execute "smart socket" storyline
If you say "open garage door", then MicroBot pres the garage door button
If you say "music on" then execute the music storyline
If you say "take a snapshot" then execute Snapshot storyline -
10Step 10
Step 9: ENJOY YOUR SMART HOME!
Time to set it all up!
You’ll now be able to do much more with your Google Home and trigger automation workflows by very simple voice commands. Your smart home is now following your orders!
What’s great about automating with Google Home is that you bring your smart home assistant with you when on the go through your Google assistant enabled smartphone. This allows you to trigger remotely any automation from your office or your daily commute, which is very helpful to prepare something for your arrival or monitor your home. Make sure to use the same Google account to have the same Google Assistant on all your devices.
This project should have helped you to understand how you can easily extend your Google Home’s reach as much as you want. Just make sure to connect any new element to a hub like your Prota Pi to connect it to IFTTT. You can integrate sensors to monitor specific elements/rooms/data, add several smart cams in your house (for instance by using old smartphones and Manything service), connect Hue bulbs to your Prota Pi to control more lights, install several MicroBot Push on several appliances to control them. Make sure to have a look at our previous projects on Hackaday to get inspired.
We hope you enjoyed this tutorial and that it will make you want to dive in more into DIY smart home, to increase your Google Home’s reach and make useful automations. Make sure to support us by “liking” this project and following us on both Hackaday and Twitter.
If you have any question, please use our forum!
BETA PROGRAM
You like Prota OS and want to test our newest apps before their release?
Subscribe your email address here to enroll or get further information on our Beta program.
Boost Your Google Home With Prota OS for RPi
Extend your Google Home features to smart light, smart speakers, smart cam and smart appliances with those DIY tricks based on Raspberry Pi
 NaranInc







Discussions
Become a Hackaday.io Member
Create an account to leave a comment. Already have an account? Log In.