Close
0%
0%

Linux Tutorial: Odroid U3 Server w/ Seafile Cloud

I posting this to give a feel for the Odroid U3. There is a forum but not a lot of documentation out there.

Similar projects worth following
In the world of microcomputers the story has been severely limited processing power. We can overclock our RPI and BBB but these lead to premature hardware failure, operational instability and other issues. There have been wonder boards promised like parallella but there are some great boards that are have been out for the last year and they are great. There is the Banana Pi, Hummingbird Pi, and the Odroid line of microcomputers. We will be using the Odroid U3. It is a 1.7GHz Quadcore A9 Cortex Processor with 2 GB of DDR3 RAM and a 16GB EMMC card for the boot drive. This should be a pretty capable board for our personal web server with our own cloud. This will be a great server for hosting a blog, small business server or family media server. I will be adding an older 250 GB One Touch Mini Maxtor USB hard drive. I have some larger capacity drives for my main server. I am using this as a lab server for a few ongoing projects that I have going on.

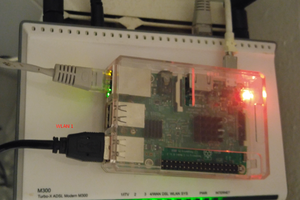
This tutorial is really about the initial installation and setup of a LAMP stack server on an inexpensive low energy high performance linux computer with a personal cloud service. I am just getting into linux over the last year and have had to piece all of together from several tutorials for other boards to get it all working on the Odroid U3. I also had to change the order of a few steps to get it to configure right so that everything would work. Some steps can be out of order after the Seafile Server is installed and running but the setting up the sql database and installing seafile before anything else was crucial to me getting the server working properly. As this is set up for an internal network server we will not be covering DDNS in this tutorial. I am really just trying to show the initial installation of the program to get it to work on my netgear router network with Clear internet service.

  • 1 × Odroid U3 Quadcore Linux Machine
  • 1 × HDMI Cable
  • 1 × Ethernet Cable
  • 1 × 5V 2A MicroUSB Wall Charger
  • 1 × 16GB eMMC card with adapter

View all 8 components

  • Step 9: CONGRATULATIONS!!! You are the proud owner of a server

    tlankford0108/06/2014 at 02:25 0 comments

    This took a short while but you have a the makings of a great server. This is setup to work within your LAN while you learn how to use the server and implement security measures that you will want in place before you go live with a blog or personal webpage. I will be installing Roundcube mail service, phpMyAdmin, and No-IP as my DDNS. There are lots of ways to go about this. I want to publish this so I will be updating with screenshots and other things soon. I hope this helps. You can follow almost all the same instructions for installing on a Raspberry Pi as well. Thank you for checking out my project and I hope that it helps.

  • Step 8: Installing phpMyAdmin

    tlankford0108/06/2014 at 02:23 0 comments

    In this step we are going to add phpMyAdmin. This software is a GUI for our browser that enables us to manage our mySQL databases. We are able to setup users, passwords, permissions, manage databases and most everything else you can do from the command line for mysql. Let's get started.

    Enter the command:

    sudo apt-get install phpmyadmin

    You will be asked to some questions during the setup

    1. Select Apache as your server

    2. Choose Yes to configure the database for phpMyAdmin

    3. Enter your mySQL password

    4. Make a password and confirm for phpMyAdmin

    Next we need to add the phpMyAdmin configurations to the configuration file in Apache.

    Enter the command:

    sudo nano /etc/apache2/apache2.conf

    At the bottom of the file add the following line

    Include /etc/phpmyadmin/apache2.conf

    Ctrl X, y and enter

    Restart Apache with the following command:

    sudo service apache2 restart

    Now you want to enter youripaddress/phpmyadmin in the address bar of your browser. The phpMyAdmin page should come up in your browser. Enter your mySQL password and it will load up GUI for your mySQL databases.

  • Step 7: Installing FTP Server

    tlankford0108/06/2014 at 02:20 0 comments

    We have one last software that we would like to add to our server. We have now completed a LAMP server with Seafile personal cloud service but there is one more piece I would like to add to make for a robust development server. We are going to add an FTP server. First we need to change ownership of the /var/www file.

    Type the command:

    sudo chown -R odroid /var/www

    Next install vsftpd by the command:

    sudo apt-get install vsftpd

    then we need to change the configuration file with the command:

    sudo nano /etc/vsftpd

    change anonymous_enable to YES

    uncomment local_enable and write_enable

    then add the following lines to the bottom of the file

    force-dot-files=YES

    Ctrl x y and enter to save

    sudo service vsftpd restart

    Finally we can check to make sure the FTP server is running properly. Open Filezilla and enter the IP address, user, password and port 21. Log in to the server. It should log right in. You can move files and manipulate directories to make sure it is all working.

  • Step 6: Installing Apache and PHP

    tlankford0108/06/2014 at 02:19 0 comments

    We already have a linux and mysql installed on the Odroid. We need two more pieces to make the LAMP Server complete. The A and the P stand for Apache and Perl, PHP, Python.

    We have made a few changes so we want to run the command:

    sudo apt-get update

    sudo apt-get upgrade

    answer y when prompted.

    Install Apache and PHP:

    sudo apt-get install apache2 php5 libapache2-mod-php5

    answer y when prompted

    we need to enable the htaccess type:

    sudo nano /etc/apache2/apache2.conf

    under htaccess change Require all denied to Require all granted

    restart apache with the command:

    sudo service apache2 restart

    we need to change one more file:

    sudo nano /var/www/html/info.php

    then type this in the file:

    <?php

    phpinfo();

    ?>

    Now we are able to check both the apache and php servers. In your browser type the following URL's

    http://your ip

    you should see the apache start page or a page that says it works but there is not content next you can type: http://yourip/info.php

    you should be able to see the php information page

  • Step 5: Installing and Using the Seafile Server Software

    tlankford0108/06/2014 at 02:17 0 comments

    There are two dependencies that the software may ask for during install so we are going to preempt this error by installing the last of the prerequisite software libraries.

    type the command:

    sudo apt-get install python-setuptools python-simplejson

    Answer y if prompted

    Now we are ready to install the Seafile Server. This will allow a nice interface to your server through your browser window.

    Let's first create a directory seafile by the following command:

    mkdir seafile

    then change directories:

    cd seafile

    now we are ready to download the package into the directory seafile:

    wget hhtps://bitbucket.org/haiwen/seafile/downloads/seafile-server_3.0.4_pi.tar.gz

    and untar the package:

    tar xzvf seafile_server*

    change directories:

    cd seafile_server*

    then install the software:

    .setup-seafile-mysql.sh

    you will follow the prompts here and just choose defaults except for two things:

    when asked for server name choose you server name

    Enter your IP address

    choose the default ports but then you want to direct the data to your drive you setup earlier. My drive path is /media/odroid/labserv/seafile-data

    Choose to setup new mysql databases. After all the questions are answered you should have a setup list that looks like this

    Server Name: Your Server Name

    IPAddress: Your IP

    ccnet server port: 10001

    seafile data: /media/odroid/labserv/seafile-data

    seafile server: 12001

    HTTP server: 8082

    MySQL server: 3306

    ccnet database: ccnet-db

    seafile database: ccnet-db

    seahub database: seahub-db

    During the setup you may be asked to enter to the mysql root password you set earlier

    Now we are going to start seafile server and seahub first type the command:

    ./seafile.sh

    It should start and tell you it is ok then type:

    ./seahub.sh

    you should be asked to enter the administrative email which should be any email you want and then set a password for the browser login just enter those and remember them. The Seahub should setup for the first time and run fine. You can now check it in your chrome browser by typing:

    http:yourip:8000

    just login and check out your new cloud server

  • Step 4: Logging in with SSH and installing MySQL

    tlankford0108/06/2014 at 02:16 0 comments

    We need to log in through SSH. I am not going into too much detail here as there are lots of tutorials on the specifics. I use Putty for my terminal connection. Just install the free software and then initialize the program. You will be asked for the IP address and make sure the port is set to 22. Hit enter and a terminal window will appear. We want to log in as odroid with the password odroid. You should basically have the same terminal you would see on the gui. with the command prompt odroid@odroid~$ This means that you are in your home directory.

    We have made a few changes so we want to run the command:

    sudo apt-get update

    sudo apt-get upgrade

    answer y when prompted.

    We are now going to install the mysql by running the command:

    sudo apt-get install mysql-server mysql-client php5-mysql

    you will be prompted to set a password for the user "root" do so when asked

    we need to run two more commands:

    sudo mysql_installation_db

    sudo mysql_server_installation

    just type y for each of the answers except changing the root user password answer no. We should now be ready to install the Seafile cloud software in the next step.

  • Step 3: Connecting and Configuring the External HDD

    tlankford0108/06/2014 at 02:15 0 comments

    In this step we are going to connect the hard disk drive. Most of these drives have a management and security software on them. We will be eliminating this probably. Some of the new drives may boot right up and be available for immidiate use by the Odroid. My Maxtor was not. It is real simple to check. When you plug in the drive the Unbuntu Desktop should have a prompt to open in file manager. We want to see the drive path for later. In mine it boots in the home directory /media/odroid/OneTouch 4\Mini. We will be making changes including the drive name. you can even move where the drive mounts but this is fine for our purposes.

    Next we will open a terminal.

    Type the command:

    cat /proc/mounts

    this will give us a list of the drives that are mounted. We will ignore the ones that root or boot drives ending in mmc. We are looking for the drive that has /dev/sda*. The * is probably going to be a partition number 1. If there are multiple partitions mounted then we will see them listed in order. If you were to have a flash drive in also it would probably show up as /dev/sdb and so on.

    Next we want to see if the drive is usable as it is formatted or if we are going to have to rewrite the drive.

    Type the command:

    sudo nano mkdir /media/odroid/OneTouch 4\Mini/test

    You will be using the drive path that is you found in the file manager on the desktop and only adding "test" to make a file if it will write compatible with the Odroid. If you get a read only error then you will have to reformat which is a few simple steps. There are several ways to go about this but we are going to use a program called parted. Be very careful and pay attention to what you are doing. This can wreck not only the OS but he board as well so be very careful when working with the drive scripts.

    First issue the command:

    umount /dev/sda1

    This will unmount the partition so that we do not get an in use error.

    next type:

    parted

    this will start the parted program

    Then type the command:

    select /dev/sda

    This is very important to make sure we are in the right drive. We do not want to mess with the boot drive at all.

    Next we will type the command:

    mklabel msdos

    You will be prompted to give a name to the drive. I will call mine labserv since it is for a server for my laboratory.

    next type the command:

    mkpart

    when prompted respond with the following answers

    primary

    ext4

    0%

    100%

    This is the partition layout you can change these values if you wish to make multiple partitions but for our purposes here we will only be writing the one partition.

    Type:

    print

    to check the partition has been written properly

    and exit the editor by typing:

    quit

    We are almost finished making the drive work for our server. Let's write a file system to the partition.

    Type the command:

    mke2fs -v -L labserv -t ext4 /dev/sda1

    This will write the file system to the drive. When this is done we can test it in a few moments.

    Type:

    umount /dev/sda

    Then unplug the drive from the usb. Wait just a moment then plug the drive back in.

    Check the file manager to see the drive path for the HDD. Mine now reads /media/odroid/labserv

    Type the command:

    mkdir /media/odroid/labserv/test

    If there are no errors then we can remove the test folder by typing:

    rm /media/odroid/labserv/test

    Congratulations, we have formatted the drive and prepared the partition and file system for our use with the server. Shutdown the Odroid so that you can unplug the monitor and keyboard. This can be done through the gui or type the command in the terminal

    sudo halt

  • Step 2: First Boot of the Odroid U3

    tlankford0108/06/2014 at 02:12 0 comments

    This is a simple step. While the Odroid can be started headless and is ready for ssh on first boot I like to have the Desktop up for a few early changes. So plug in the eMMC or SD card, monitor, usb dongle for keyboard and mouse, ethernet cable and finally power.

    *I will note here that it is not wise to plug in a blank SD card at this point. I had thought since I have an eMMC card that I would use a high capacity card as a drive. Before this can happen you have to do a little drive priority maintenance. It will not boot up the eMMC drive with an SD card in. I will not be covering that in this tutorial. I may come back to this in the future as an update.

    If you have to enter a password or user they are as follows

    User = odroid

    Password = odroid

    The Odroid boots fast and boots into the desktop immediately. The first think I do is run the odroid utility which seems to be Odroids version of the raspi-config command on Raspberry Pi. It is not very robust but I usually choose to change the hostname. We will not for this tutorial because we are just setting up a development web server and not covering network security. Aside from changing host name we will also expand the root partition and get some updated xorg files for the desktop. If we were sticking with the desktop we would also change the windows manager but since we are not we will skip that part. When you are finished with this step you can reboot so that changes will take effect.

    On reboot we will then start a terminal so we can check a few things and make a few short changes.

    First run the command

    sudo ifconfig

    we can check our internet connection. We are mainly looking for eth0 and what the IP address is. We may need some of the other parameters but we can check them later. Make a note of your IP address.

    next enter the command

    sudo dpkg-reconfigure keyboard-configuration

    This command will let us choose our keyboard for our configuration. Choose the UTF8 configuration for your country. Use the spacebar to deselect the default and to select the keyboard configuration of your choosing.

    next we will enter the command:

    sudo dpkg-reconfigure tzdata

    This command is so that we can choose our own timezone. This is pretty self explanatory.

    Next we will run the command line:

    sudo nano /etc/ssh/sshd.conf

    This will bring up the nano editor so you can make changes to the script. In my image I have found that nano is not installed you can switch nano for the vicommand if you are comfortable with the vi editor. If the nano editor is not there then run the command line:

    sudo apt-get install nano

    Then rerun the command line:

    sudo nano /etc/ssh/sshd.conf

    scroll down till you see the lines

    port# = 22 (make sure this is set to 22 for our initial setup but for security you can change the port later)

    protocol 2 (I am not sure what this is but it is supposed to be on 2)

    permit root login = YES (make sure this is yes for now but again for security you will want to change this to NO later)

    Hit Ctrl X then y then enter to exit and save the file.

    Let's bind the IP address by the following commands:

    ifdown eth0

    ifup eth0

    Make note of the IP Address

    In the command line type:

    sudo reboot

  • Step 1: imaging the eMMC SD Card

    tlankford0108/06/2014 at 02:11 0 comments

    This step is just downloading and imaging the card. I use SD formatter to be able to format the cards and WinDisk Imager. I do not want to go into to much detail as there are lots of tutorials on how to do this. If you are working on a net server then you should know how to do this part by now. Below is a link to the image as of June this year for Unbuntu on Odroid. This tutorial is specifically for the Odroid with Arm processors. This image will not work with Windows or Mac machines. There are plenty of Unbuntu images for those processors.

    http://odroid.in/ubuntu_14.04lts/

View all 9 project logs

Enjoy this project?

Share

Discussions

Similar Projects

Does this project spark your interest?

Become a member to follow this project and never miss any updates