Close
0%
0%

KiT: Keep In Touch

A tactile IoT device for spontaneous long-distance interaction

Similar projects worth following
PROBLEM:
The Internet has allowed us to communicate faster across longer distances than ever before, but it still cannot replace in-person interactions with another person. This problem is especially acute for couples in long-distance relationships who rarely get to see each other.

SOLUTION:
KiT is a device that enables simple, spontaneous interaction between people spread far apart. The KiT hardware is simple: an ESP8266, a few potentiometers, and an LED. The secret sauce lies in the application: with just a twist and a push of a button, you can send a "Touch" to KiT's partner hardware. The paired hardware will light up and match the "Touch" you sent, allowing you to wordlessly communicate with your partner.

WHY KiT?

Communicating by phone, text, or videochat is great, but the setup time can be prohibitive to short, quick interactions that make in-person interaction so meaningful. Modern long-distance relationships, whether with a significant other, friends or family, lack the tactility and physicality of having a loved one nearby. While this project is unable to replace the void of their absence, KiT hopes to make the other person seem a little closer.

KiT is unique in its use of touch and color. While there are many applications for messaging and talking to another person (ranging from texting to videochat), each of them requires a significant amount of setup time that makes it more difficult to just share an emotion or random thought.

By reducing the User Interface to the bare minimum, we are able to create and send a touch in seconds. Why send a text to tell how you're feeling when you can SHOW it, much faster and easier than sending a text or starting a phone call.

KiT has the potential to be world-changing for the people who are struggling in long-distance relationships by removing some of the impediments to communication. Despite the connectivity of the Internet, our personal lives seem to be growing more isolated, so KiT has the potential to make the world just a little bit closer and more personal by improving relationships.

WHAT IS A TOUCH?

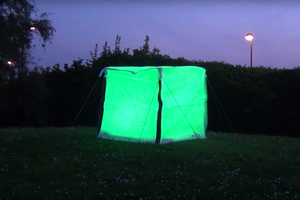
A Touch is a certain color that you would like to send to your partner. You can decide on the meaning yourself, but here are some examples:

  • RED: This can reflect your burning passion, or simply that it's not a good time to talk
  • GREEN: This can show it's a good time to talk on the phone.
  • BLUE: I'm feeling down
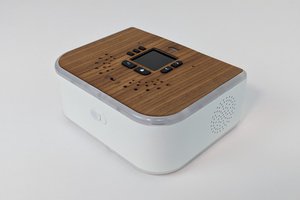
USER INTERFACE

Inputs: The input is very limited by design. There are three points of interaction: two knobs and a button. The knobs control the color that you are sending (using HSV color selection, with V set to a constant), and the button sends the selected color. The knobs are affixed to potentiometers, which are read by the ADC in the ESP8266 (after passing through an analog MUX.

Outputs: The only output is a RGB LED driven by the ESP8266.

Communication: For simplicity in constructing this prototype, the ESP8266 will just push its data to a MQTT server. The paired KiT will monitor the partner's MQTT stream and update whenever a new Touch is sent.

KeepInTouch_v1_0_Gerber.Zip

Gerber PCB files for v1.0. Was designed in Altium Circuitmaker, can't figure out how to find the link to the project online.

x-zip-compressed - 14.27 kB - 06/13/2017 at 03:58

Download

  • 1 × ESP8266 A Wi-Fi Microcontroller
  • 2 × Linear Potentiometer
  • 1 × Button
  • 1 × RGB LED

  • Year Older, Year Wiser

    drewrisinger06/12/2017 at 06:10 0 comments

    I let this project go for the last year, but I recently decided to revisit this and make some much-needed improvements. A lot has changed in terms of my knowledge and hardware support, and some of my design decisions are definitely out of date.

    Change Microcontroller

    I played around with a few Digistump Oaks, and was having serious problems getting them to work at all, let alone connect to the Particle Cloud for the features that I wanted (Remote updates, easy Wi-Fi connection, and built-in messaging). With this advantage gone, it doesn't make sense to pay a premium for inferior hardware, so I will be redesigning this to work with a vanilla ESP8266, which offers everything I need for this relatively simple project. I haven't decided which variant I'll build this around (the key requirement is access to the ADC and several PWM pins), but this option should be several dollars cheaper and allow more people to build their own if desired.

    Simplify ADC

    The original design made the ADC far too complicated because I wasn't aware of the existence of Analog Muxes. The original design used a dedicated ADC IC to read the position of the knobs (which are linear potentiometers) and then send that data to the MCU. After a recent Hackaday article, I learned of the existence of a 74XX4051 IC, which is an 8-way Analog Mux. While I only need 2-3 of these channels, the 74xx IC is about a dollar cheaper than my previous ADC solution, and I don't have to write a driver to setup and communicate with the ADC. Yet another example of good design coming from good part selection.

    Software

    This was honestly never completed for v1.0, so I've got a lot of work to do on this. But removing the separate ADC should reduce the most complicated part, other than figuring out the messaging protocol and if I'll be using private servers for communication or an open MQTT server like Adafruit's or Sparkfun's.

    LEDs?

    I'm still planning to stick with the RGB LEDs, but I need to decide how many I want to use. The v1.0 from last year uses two, but I need to run some tests to figure out if that will be enough to be usable in both daytime and nighttime.

    Enclosure?

    The original design called for an enclosure. I'm not sure how this will work, because this isn't my forte. I'll probably need some sort of frosted glass or diffuser to spread the light from the LEDs. I'M OPEN TO SUGGESTIONS!!!

  • Implementation

    drewrisinger06/12/2017 at 05:55 0 comments

    This post will go into some of the reasoning and design choices that went into v1.0 of the KiT, which was designed Summer 2016.

    Hardware

    Microcontroller

    With the means of communication, colored light, decided on, I had to figure out how to create a *useful* IoT device. Security isn't a huge deal because all that I'm communicating is a color (and this is currently just a prototype), but I prefer to have the option to use it in the future. I settled on the ESP8266 since it's simple, it offers WiFi for easy connection to WiFi networks, and I'd worked with it in the past. The exact board I chose was the Digistump Oak, because I had a few lying around from Kickstarter that I wanted to use and its connection with Particle.io should simplify the communication and programming parts of the board, allowing me to update all boards at once with new firmware if I made revisions. Power regulation was also taken care of by the Oak, so I only needed supply a MicroUSB cable to power the MCU, LEDs, and all peripherals.

    LED

    The LEDs are just generic common cathode RGB LEDs. I'm not going to get into driving an LED because that's been done to death, but in brief I used the PWM ("Analog output" in Arduino-speak) pins to drive a transistor that would drive each diode.

    User Interface (Knobs & Buttons)

    For user input I decided to use knobs. I considered a rotary encoder, but the hardware for that is a little more complicated, and I was going for SIMPLE. The other problem with most rotary encoders is a lack of a "start" position. This makes it harder to select a specific color by memory (which will likely happen as users become familiar with using KiT) because you can't turn the knob to where you expect it to be, as rotary encoders only give relative position, thus requiring the user to use visual feedback to select the desired color. So I decided to use a linear potentiometer (i.e. variable resistor) and an ADC to measure the knob position.

    I need at least two knobs for user interaction. I was originally thinking three, one for each Red, Green, and Blue, but decided that was too complex and unintuitive. Instead, I'm planning to use the HSV color encoding (play around with it at Colorizer), and decode that into RGB values for the LED channels. The advantage of this is that there only needs to be one (maybe two) knobs to choose a color, because I will limit users to choosing either Hue or Saturation. If I limit users to just Hue, I might use the second knob to allow different pulsing patterns instead of just a solid color. Limiting the number of knobs is also beneficial to keeping the PCB small for cost and portability.

    Sending a color will be implemented with a simple pushbutton. Because I was considering putting an enclosure around the KiT and the button needs to be press-able from outside, and I hadn't decided on a button, I left the switch as bare holes in the PCB to solder leads into later.

    I designed the PCB in CircuitMaker to take advantage of their pre-built libraries and 3D mock-ups of the design.

    Where's the Software?

    Good question... unfortunately, when I started this summer of 2016, I got a little bit of work done on the software, but honestly didn't make much progress because I was fighting with setting up my Digistump Oak and trying to figure out how to write a driver for communicating with the off-chip ADC. Now the software should be easier (aka simpler) to write, and I'm going to write a new revision of the software from scratch, with better design. I'm considering adding in different blinking patterns to represent different people or just different emotions too (e.g. a "heartbeat" pulse, quick flashes to get attention, etc), which wasn't possible in the old version, so I'll just write it from scratch. I'll create a Github repo when I get my new hardware version sent out to PCB fab because of the longer lead time of that process.

    In terms of software I'll be using, I'll probably be building this off the basic Arduino/ESP libraries for simplicity,...

    Read more »

  • Visual Communication

    drewrisinger06/12/2017 at 05:40 0 comments

    Communication Options

    The KiT's most unique feature is its chosen method of communication. Because the goal was to simulate in-person communication, the communication methods open to me were: text, video, visual, tactile. Text and video are already common for communication, and are served by any number of systems ranging from SMS to Skype. Tactile is devilishly difficult to implement, and would require a greater knowledge of mechanical engineering than I possess. However, I understand light well from my experience in theater lighting, so I chose to use colored light to communicate via the KiT.

    Advantages of Light

    • Universal. Everyone understands light, and color conveys meaning very well due to our natural associations between colors and ideas or feelings. (NOTE: this product is aimed at the 90% of people who are not colorblind and not blind)
    • Simple. The idea of sending a color to someone is very simple, especially for people used to sending a text.
    • Quick. All that you need to do is choose a color and send it. With just one knob to choose a color, this can take just a second, much faster than a text message.
    • Expandable. You can develop whatever code or shorthand is appropriate for you to match the colors. Are you feeling down? Send Blue. Are you good to go? Send Green. Or just send a random color. Your vocabulary is limited by your imagination.
    • Easy to implement. I view a well-engineered project as minimal and accomplishing the goal. Choosing colored light means you can take advantage of tons of hardware and algorithms built around colored light. And a color can be expressed in just 3 bytes, which makes communication faster and simpler.

    Disadvantages of Light

    • Basic. You can't convey very complex thoughts or feelings by this. But as a secondary form of communication, that's an acceptable compromise.
    • Easy to miss. Depending on the implementation, it can be easy to not see the message.

  • Inspiration & Requirements

    drewrisinger06/12/2017 at 04:27 0 comments

    Motivation

    Long distance relationships suck. I've been in a long distance relationship for a while, and there's a definite lack of intimacy when your loved one (whether significant other or family) is far away. Texting, calls, and video chat can give some of the intimacy that you need, but there's nothing PHYSICAL associated with those media.

    In my experience, some of the things I miss most are the little gestures that remind me that the other person is thinking of me and nearby, whether a hug or holding hands, or just a light touch. The aspects that KiT emulates of these interactions is low-key and spontaneous communication to remind both people of the other. While the KiT cannot replace your loved one, the goal is to provide something physical that can evoke some of those warm feelings similar to a hug or hand nearby. Something to remind you that the other person is thinking of you.

    Requirements

    In no particular order,

    • Internet-connected. KiT is designed for people far apart, so it needs to be on the internet to provide real-time communication
    • Spontaneous. In-person interaction is richer because it isn't forced and is easy. So the whole user inter-face needs to be fast and easy to use to allow people to spontaneously and quickly send a message. It NEEDS to be faster than unlocking a phone and sending a text message.
    • Simple. Those in a relationship would rather be interacting than fighting technology. There's nothing more frustrating than wanting to talk to your significant other and spending 10 minutes getting video chat setup when you could be talking. And it should be accessible to people of all technical levels, so setting the KiT up should be quick and painless, and not require any interaction after initial setup.
    • Universal. The communication method should be universal and flexible enough to apply to any shorthand users create, allowing them to communicate in any way they wish. This means that users will not be forced to use pre-canned messages in the name of quick communication.

View all 4 project logs

  • 1
    Step 1

    Download PCB gerbers from here, and order from a PCB fab such as OSHPark.

  • 2
    Step 2

    Assemble board with transistors, resistors, Digistump Oak, LEDs, and potentiometers.

  • 3
    Step 3

    Plug in Digistump Oak, power on, connect to Particle Cloud

View all 6 instructions

Enjoy this project?

Share

Discussions

Similar Projects

Does this project spark your interest?

Become a member to follow this project and never miss any updates