 WJCarpenter
I finally gave up on the screw terminal blocks I was using originally. Aside from looking kind of sloppy due to play in the alignment, I found lots of delicate wires were coming undone or breaking off as I fiddled with the board. Even though I don't plan to disassemble this thing for maintenance very often, I expect to do quite a bit of trial and error as I get it placed into the mounting box.
I decided to use these "Euroblock" connectors made by Phoenix Contact. (Actually, I think the ones that I have are made by someone else, but "Phoenix connector" is a common name for Euroblocks.) All in all, they are pretty expensive, but I'm only using a few of them. It's a bit hard to visualize how these actually work if you don't have one in front of you. In the picture below, you can see the tops of the screws on the plug on the left. On the hidden bottom side, there is an opening for inserting your wire. The things on the plug that look like chimneys are the parts that slide over the pins of the socket. Imagine the socket (on the right) flipped over and having those protruding pins through the PCB. Then the "chimneys" of the plug slide over the pins in the open channel of the socket. At that point, the screws will have their tops facing up.
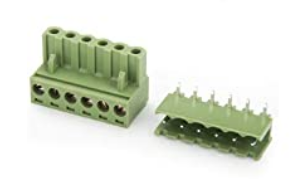
When the plug is then inserted into the socket, it makes a very solid connection. The plugs can still be removed from the sockets with a little effort. The sockets are available with either straight or right-angle pins. I decided the right-angle type work best for me in this project. Using these Euroblock connectors also means forgetting about the 6P6C Keystone jacks mentioned in an earlier project log. The wiring will now go into the Euroblock plug instead.
The pins on the Euroblock sockets are pretty big since they are commonly used for something beefier. They just barely fit, with a little persuasion, into the holes in my PCB. I found that the residual solder left in place after I removed the original screw terminal blocks was too much for placing the Euroblock sockets. I just couldn't get them cleaned out enough. So, I started over with a clean, blank PCB.
Luckily, I had 10 in my original PCB batch. I have spares for most of the parts, so clean desoldering is only necessary to avoid waste. The one part that I didn't have as a spare is the Sparkfun ESP32 Thing. I mainly chose that specific board since I had it on hand for some reason. I tried desoldering it from both sides of the header pins, but I've done so much monkeying around that I ended up lifting a couple of pads. I gave up and ordered another one.
Discussions
Become a Hackaday.io Member
Create an account to leave a comment. Already have an account? Log In.