-
Hardware level mostly done, on to animation.
10/28/2017 at 02:34 • 0 commentsI was able to solve the cube's issues with being blank quicker than I thought so I was able to move on to animations. Currently I have generic animation functions to turn single LEDs on/off, turn off of the LEDs on/off, and to shift the whole cube image in the either directions along it's 3 axes.
The only other generic function I can think of that I want to implement is rotating the image about the axis. After that it's on to creating things that are actually interesting.
The first step is probably getting all of the animation helper functions into an external file though. The main.c is getting to be too long for my tastes.
The code is still a bit rough, but it is now uploaded and being maintained on my GitHub account.
-
Trace of PWM sequence
10/18/2017 at 22:35 • 0 commentsNo real big changes in the software, but I took this video of the oscilloscope measuring the voltage across a resistor (and one current limiting resistor) while it goes through a Pulse Width Modulated dimmer sequence. Edges are looking sharp and the noise on the pins when they're floating is relatively low so I'm pretty happy.
-
Dimming up at working
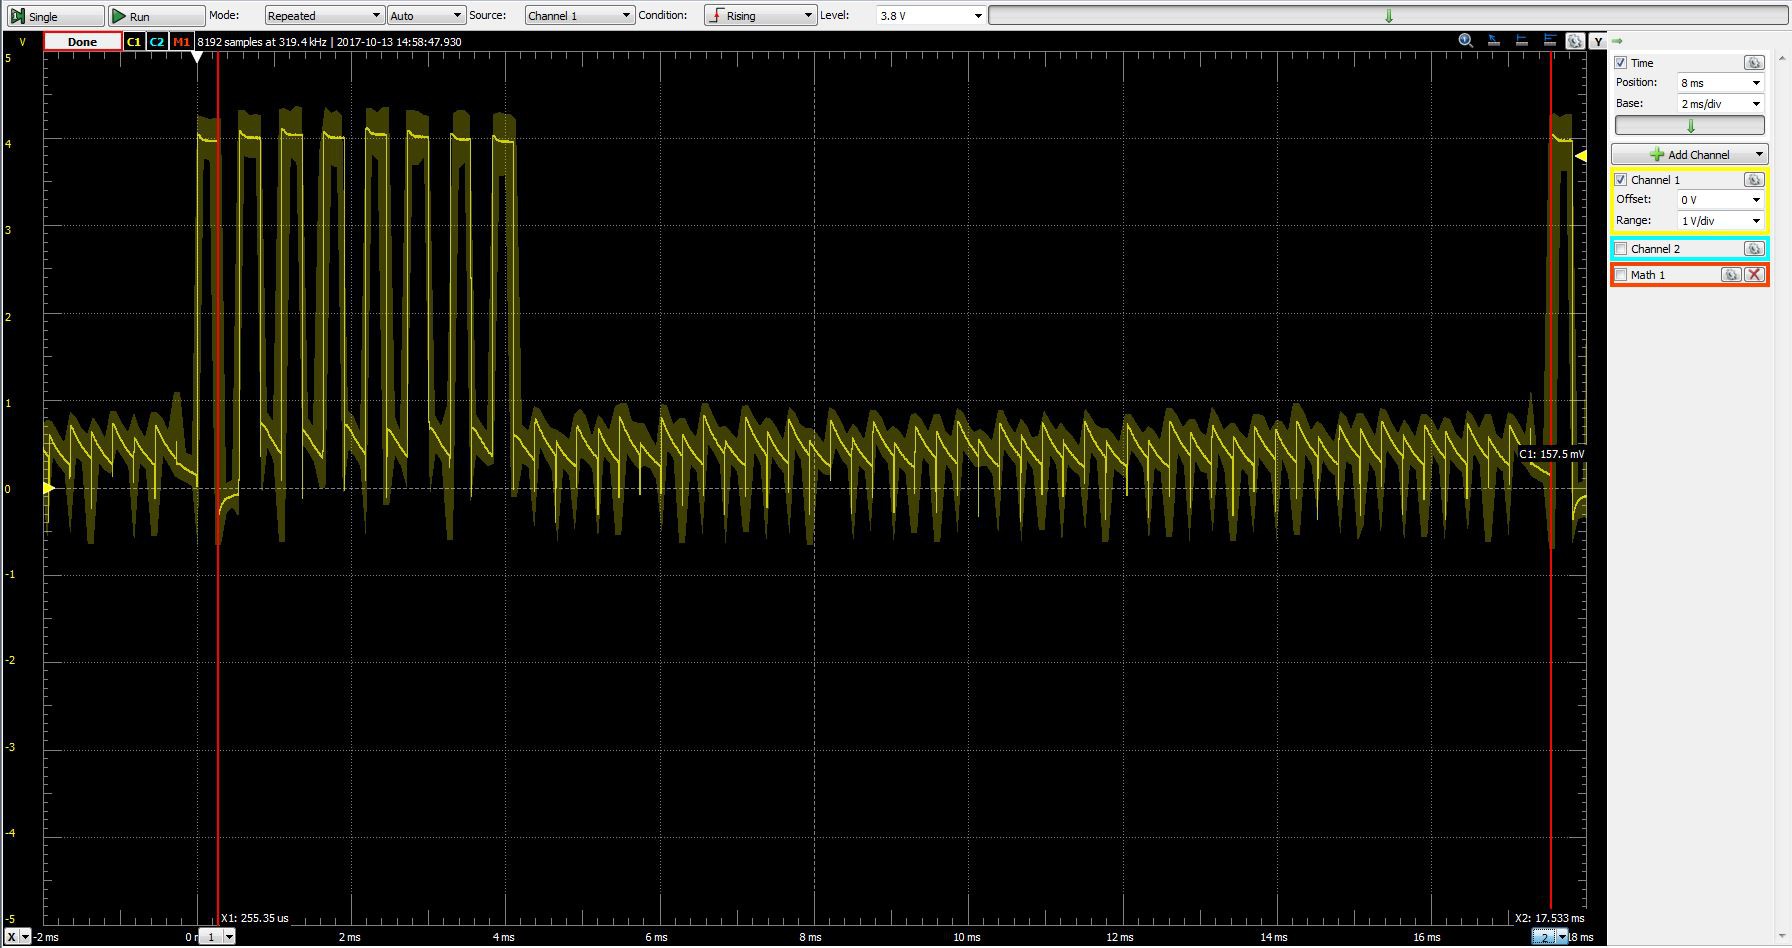
10/14/2017 at 03:15 • 0 commentsI have the chance for another decent chunk of development time for the cube today. The big changes where I upped the internal clock in the MCU from 1MHz to 8MHz and did a lot of fiddling with interrupt timing. In the end I have the whole cube running at an acceptable brightness at close to 60Hz refresh rate with individual 4-bit dimming for each LED. From the scope capture below you can see that the whole cube cycles every 17.5ms which represents a 57Hz refresh rate.
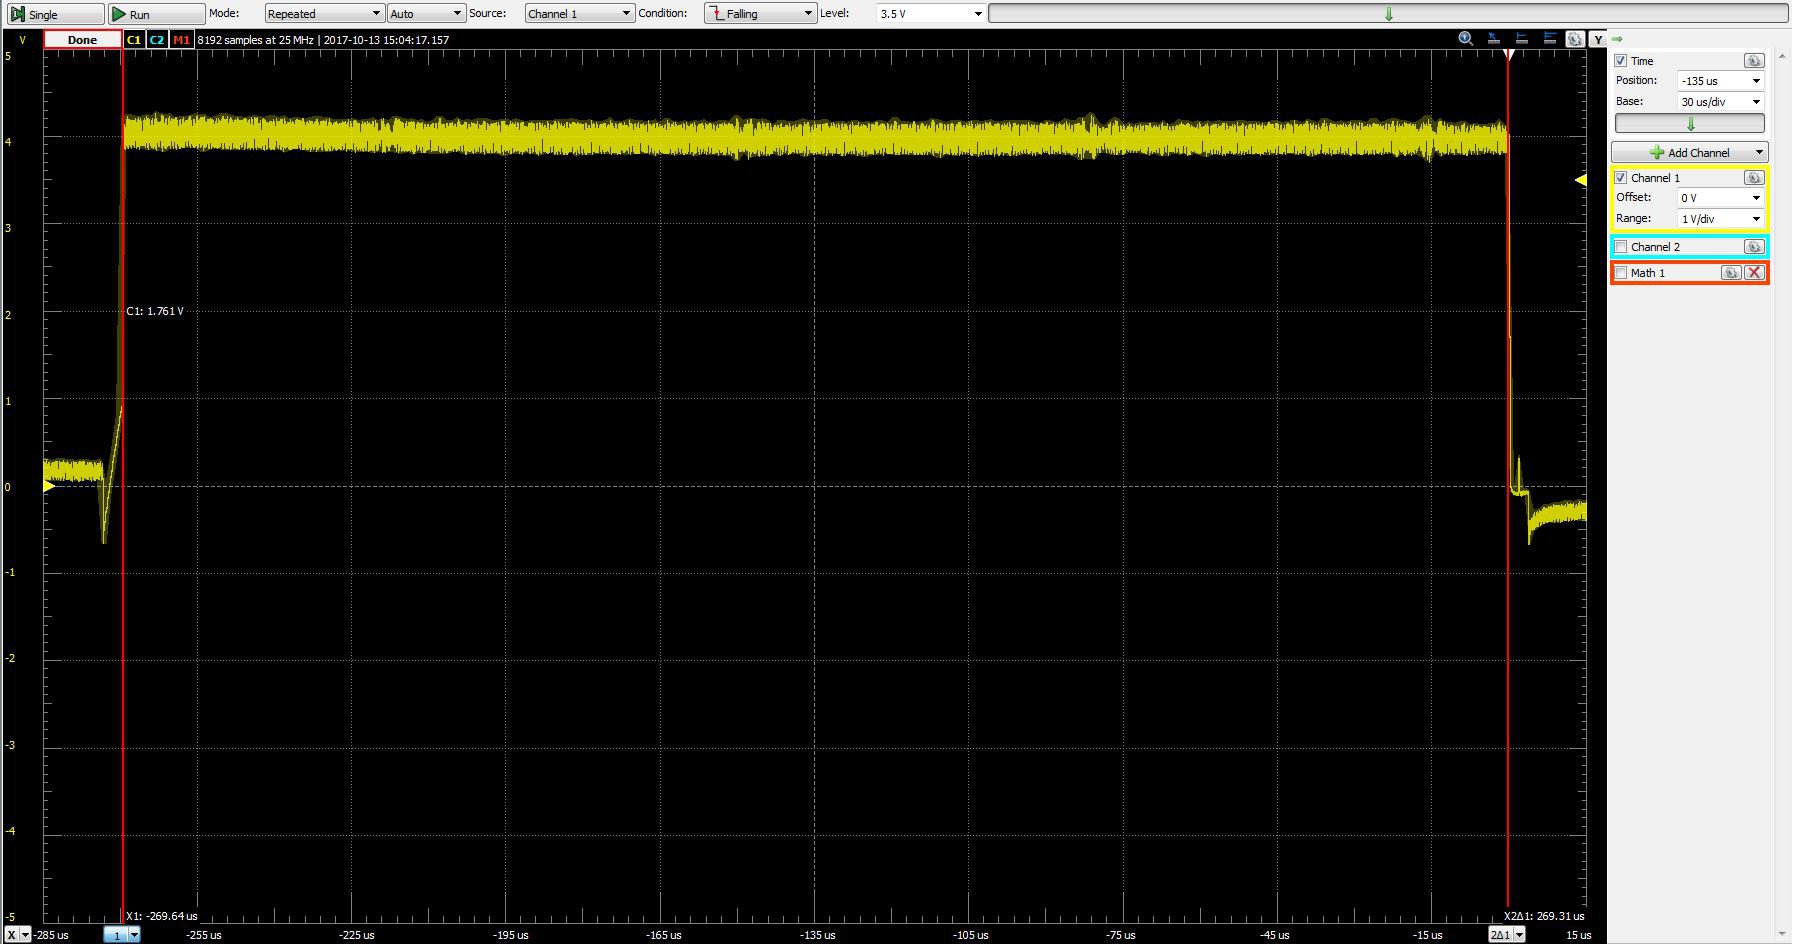
Zooming into a single pulse, the LEDs are on for 269µs. This means that I have a duty cycle of (64*269µs)/17.5ms or 98%. As I suspected from the zoomed out scope capture in the last post this is pretty high. It means that I'm doing all of my computation in between changing LED states which is exactly what I wanted.
Because of the increased system clock I had a lot more program cycles which allowed me to implement 4-bit dimming for each LED. To get any smoother I would have to pass off animation computation off to another device and/or reduce the LED count, but for now 16 steps of intensity is plenty. The dimming test can be seen below. The camera doesn't pick up the dimming curve very well, but you get the idea. It looks much better in person.
-
Code improvements
10/13/2017 at 06:03 • 0 commentsI had to take a break from writing code for the cube to spend the time on other things, but that didn't stop me from coming up with some very important optimizations. The biggest of them being to use pointers to iterate through the cube array instead of loops. I never really thought loops would work well, but they were a shortcut to getting the cube to light up in the first place. In the previous video I had to turn the room's lights off and have multiple LEDs on at once to achieve a respectable looking intensity. In this video I had the lights on, during the daytime, with the camera's flash on to overexpose things a bit. They're much brighter now.
The reason for this huge jump in brightness is that I am no longer paying the "for loop tax". Previously when I programmed the LEDs to be at full intensity I got at best 1/4th duty cycle from them. Because the LEDs are illuminated individually this meant that the best possible case was each LED being on for 1/256th of the time. Honestly I suppose it's impressive that the LEDs are efficient enough to even be visible at that kind of duty cycle. Because of this short duty cycle I also ran up against issues with parasitics. The pulses were so short that when I tried to light up the whole cube at around 60 frames per second I couldn't get the full voltage (and as a result current) across the LED no matter how small of a current limiting resistor I used. This compounded my issues with dimness.
With my new pointer and ISR based animations I not only save all of the program cycles from the loop computation, but I can use the ISR routine to skip pixels that should be off. This gives me a duty cycle for each LED that is much closer to 100%.
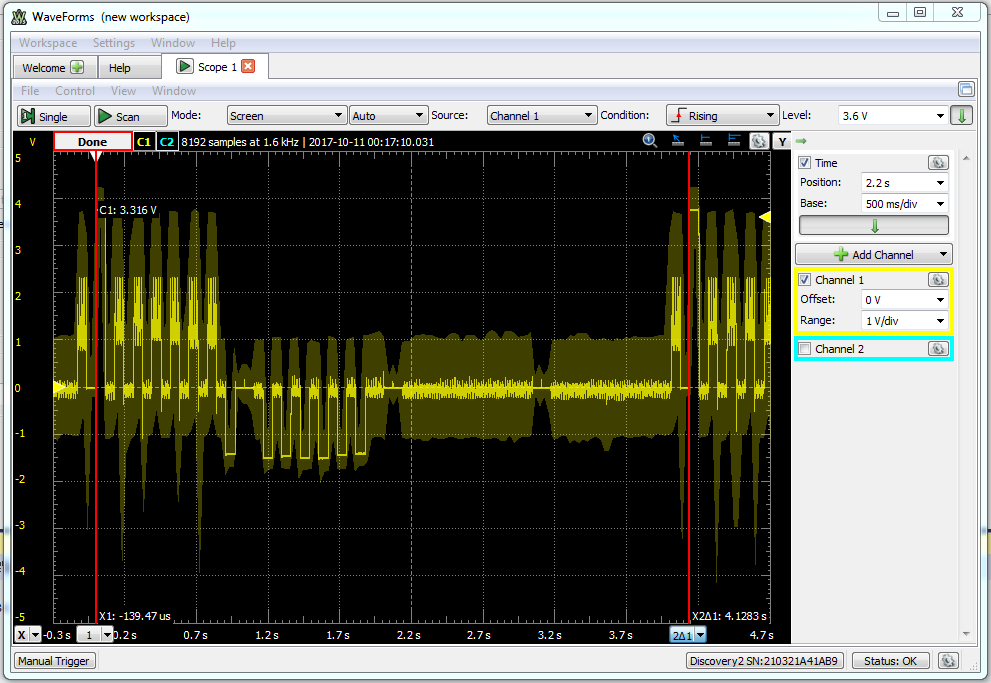
I wish I had taken more oscilloscope captures in my testing process, but hopefully I can explain with the one I did take. Below is a capture of the voltage across a single LED for the whole cube's 4.1s period. Hidden by the label for the cursor on the left is the ~60ms pulse at 3.7V to turn that LED on. It is mirrored again at the right hand cursor because it's the beginning of the next period. That pulse is nice and flat as are the 7 times that pin gets pulled low between ~1s and ~2s so the LEDs are receiving a nice consistent pulse when they're supposed to be on. Vdd is 5V and their are two 47Ω current limiting resistors for each LED so my current through each LED is around 1.3V/94Ω = 13.8mA which I am happy with. The noise on the waveform for the rest of the pulses is understandable because both pins that LED is connected to are floating, but it's not lighting up which is the important part. If you break the waveform up into 64 x ~60ms pulses current is flowing for something like 3.9s of the 4.1s period for something close to 95% duty cycle. I think it's even closer to 100%, but that's about as accurate an observation as I can make from this zoomed out scope capture.
I'm tempted to over drive the LEDs a bit to increase brightness even further, but then I would need to add capacitors to protect from a latched pin. To do that I would need to spend a lot of time prototyping that, and I'm not sure I'll have that anytime soon. Theoretically, a minimum of 30fps*64 pixels = 1920 pixel/second. This would mean that the longest I would want an LED to be on is 1/1920 = .5ms. A capacitor charges 50% after .7 time constants so if I designed for a time constant of 1ms I would have close to full power across the LED for most of the whole .5ms max time I want it on, but would have basically no current flow after 2.2 time constants or 2.2ms if an LED got latched on. Looking at available parts 2x15Ω would result in something like a starting current of 1.3V/30Ω = 43mA (not technically correct, but a very basic first guess) that would slope off rapidly preventing damage to the LED. The 30Ω series resistance in line with a series capacitance of 34uF (2 x 68uF caps) would give a time constant of 1.02ms. That would be my starting point at least, but I would need to extensively test other LEDs from the batch I made the cube with before changing the cube to this system as Charlieplexed arrays are notorious for being hard to troubleshoot because of the various paths for current to flow.
Next up is continued code optimisation, and hopefully at least 4-bit PWM dimming for each LED. I will upload my current code now because it's almost good enough that I'm not embarrassed of it.
-
The first animations
07/26/2017 at 00:37 • 0 commentsThe cube lives! This is running on an Arduino Uno because I had one just lying around. The next step is to move to the ATMEGA328P and then build out the animation capabilities.
-
Fighting the tri-state battle
07/24/2017 at 23:23 • 0 commentsI have never developed on the ARM platform before and I have an ATSAMD20E16A microprocessor layer around so I thought that it would be a perfect match for an eventual 8x8x8 cube. Because of this I wanted to develop this prototype cube to be as portable as possible to that eventuality. The ARM chips, as a whole, from Microchip/Atmel seem to all have I/O pins with a current capacity that is less than 10 mA so if I want to use this chip I need to use external circuitry to boost the current through the LEDs. The duty cycle is already pretty low so current needs to be maximized to ensure reasonable intensity. This thinking is what lead me down a long winding path of confusion and ultimately frustration that I do not recommend. In the end the solution is to use a microprocessor that can source and sink more than 20 mA per I/O pin. I will attempt to relive the futile efforts to design a discrete single input tri-state below, but I will be putting the ARM chip back on the shelf and using an Atmel ATMEGA328P going forward.
Failed tri-state attempt #1
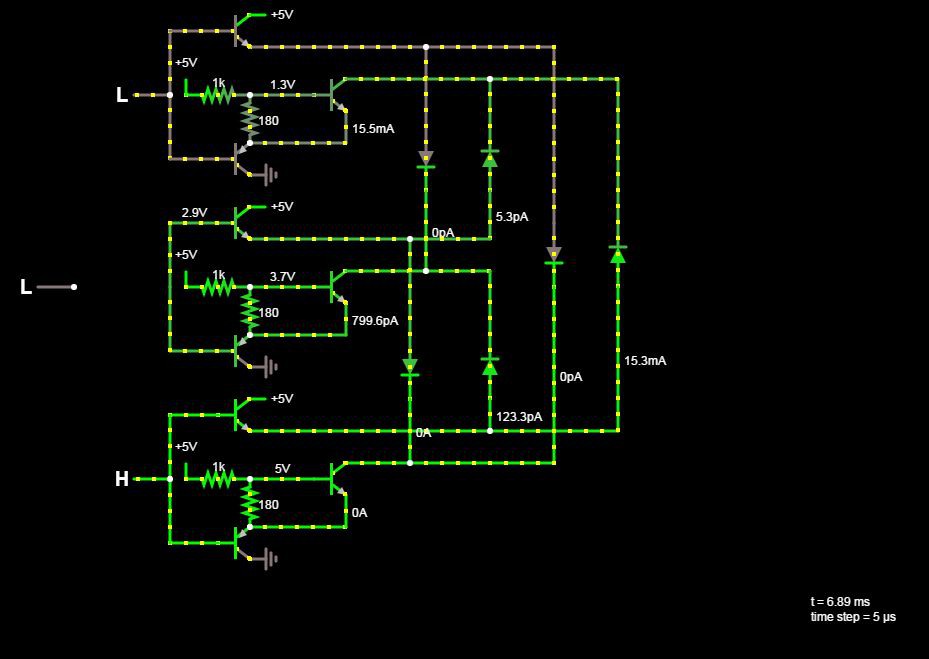
An LED is a current device so my first thought was to use BJTs to build my tri-state circuit. I built a circuit using an NPN transistor with its collector attached to Vcc, a PNP transistor with its collector attached to ground, and the base of both transistors attached to the I/O pin. I was also trying to be fancy and use an additional NPN transistor to regulate the current through each LED. In simulation this worked reasonably well, but once built on a breadboard it just never really worked out. As soon as I sent one pin high every LED with an anode connected to that pin would light up and I couldn't really get any kind of control over the cube.
Failed attempt #2, this time with MOSFETs
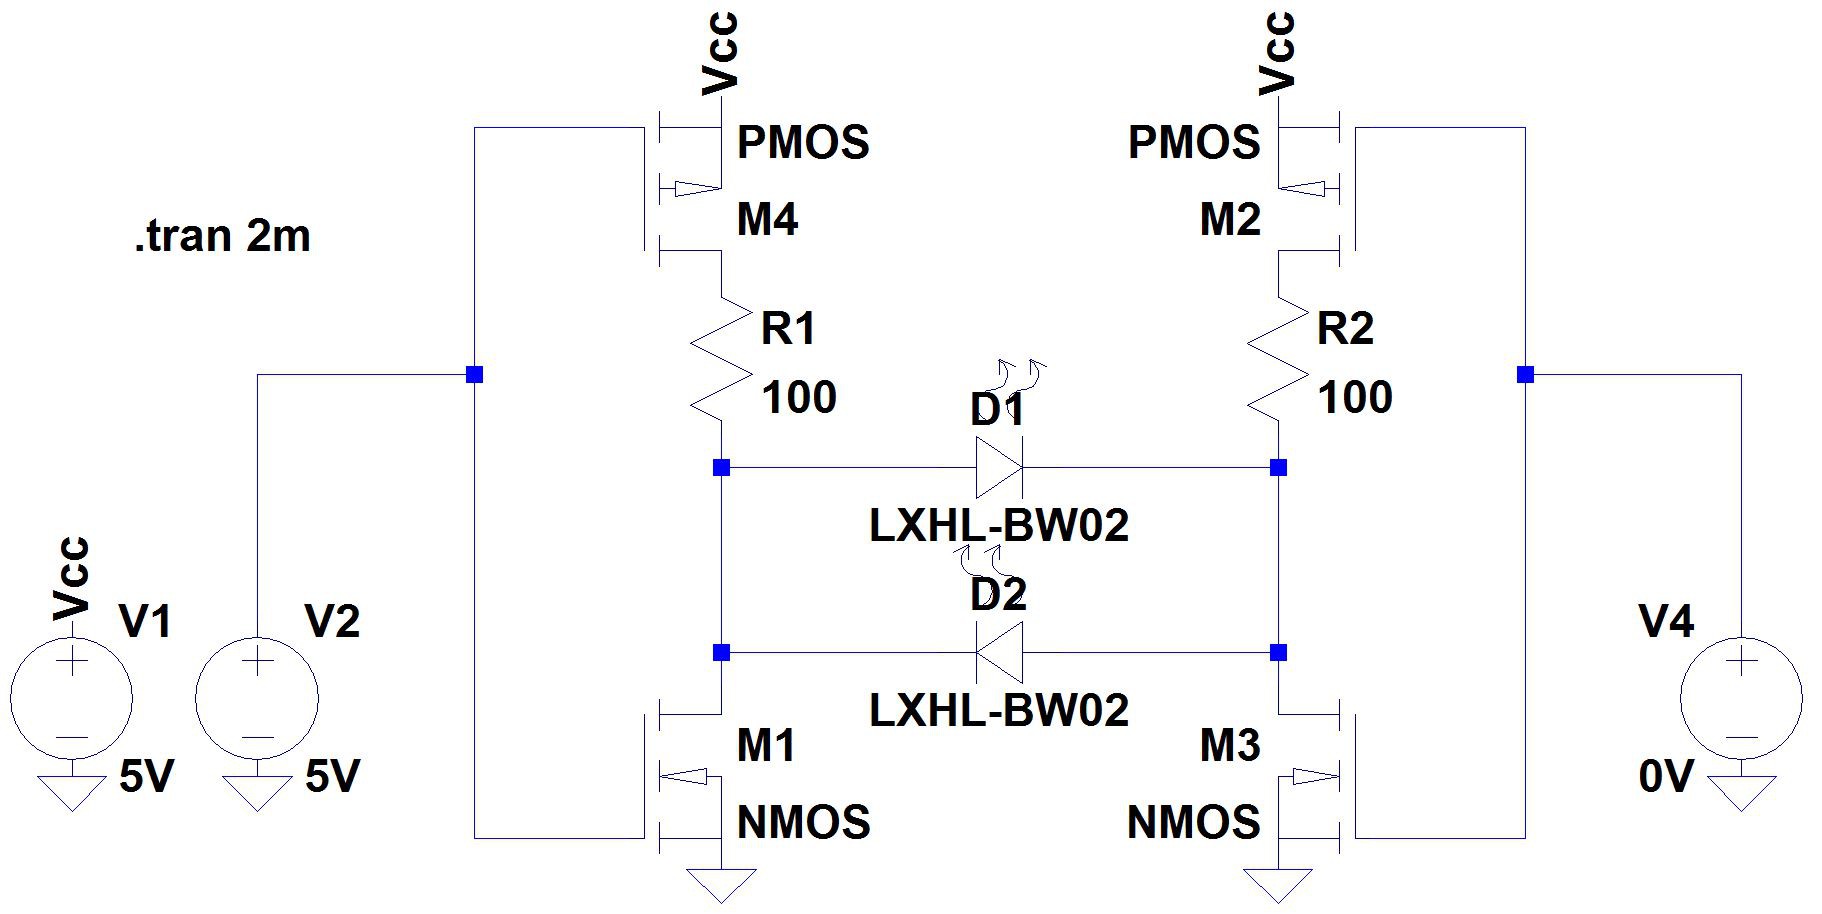
I figured out that there was some cross contamination of current between transistor bases causing issues so I decided to try MOSFETs in place of BJTs. In simulation it seemed to work with a P-channel FET with it's source connected to Vcc and an N-channel FET with it's source connected to ground. The schematic as drawn more or less works, but the pin's high impedance state acts like a very weak pull down resistor. Because there is essentially no current flow from the pin to the gate the MOSFET gates are still pulled close to ground rather than becoming opens when the pin is in it's high impedance state. I fiddled with swapping the N-channel and P-channel MOSFETs with fairly similar results. I also tried mixing MOSFETs and BJTs and ultimately nothing involving MOSFETs worked very well.
Failed attempt #3, back to BJTs
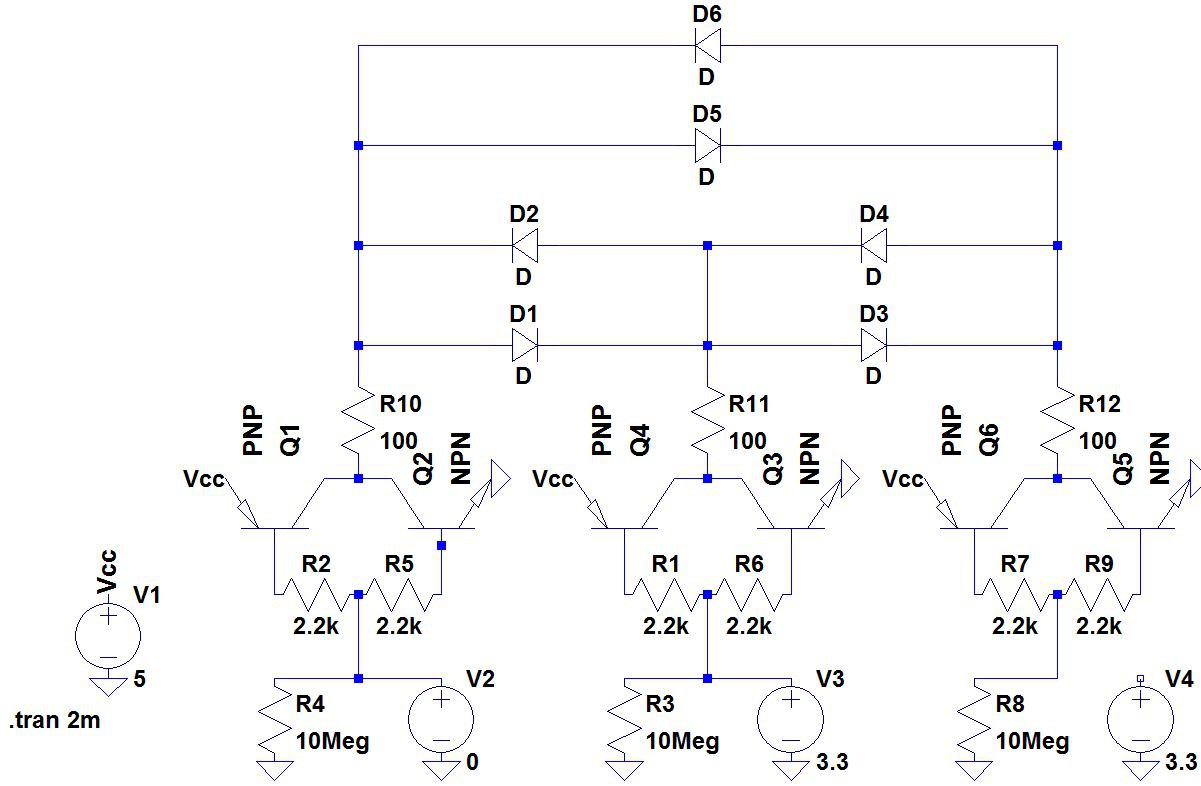
Abandoning MOSFETs as not the right solution for a circuit that ultimately is trying to control current I moved back to BJTs. From this point I did my modeling with a 10 megaohm resistor to ground to represent the pin's high impedance state. In an effort to solve to problem of unintended current flowing between transistor bases I added two resistors connecting the bases together and injected the pin signal to the midpoint of the two resistors. My hope was that this would allow enough current to flow between the intended transistor and the pin while blocking the quiescent current that caused my first circuit to behave poorly. This worked really well in the LTSpice simulation so I was pretty hopeful going in only to be betrayed by what must be some of the most efficient LEDs I've ever come across. When one pin was high and another pin was in it's high impedance state I had something on the order of 50µA flowing through the LED controlled by those pins. Somehow this was still enough to cause a faint, but clearly visible glow from the LED. I varied all of the current limiting resistor values through a pretty wide array of values and the intensity of the undesired glow never really changed while the intensity of the LED when it was supposed to be on got worse and worse.
I modeled a few other solutions, but didn't even build them on the breadboard. Every discrete tri-state circuit I found requires two inputs which really cuts down on the advantages of Charlieplexing. At this point I gave up and am just going to go on with a non-ARM microcontroller with pins that can drive the LEDs without additional circuitry.
-
Cube construction
07/24/2017 at 03:25 • 0 commentsIn a perfect world I would have done the assembly with some kind of jig. I will probably have to look into that if/when I build another one. As it is I just bent the LED leads flat to the bottom of the LED and at a 90 degree angle to each by hand in what looked like an almost consistent process. I then made sharpie marks on the verticals every inch and tried to solder the cathode onto the vertical as close to the mark as possible. The tinned wire gets too hot to touch pretty rapidly but tweezers prevent that from being much of an issue. The horizontal runs are more of a free form art project than an exact science, but I just tried to bend them in a way that got them to where I wanted them to go without putting excess strain on the solder joints.
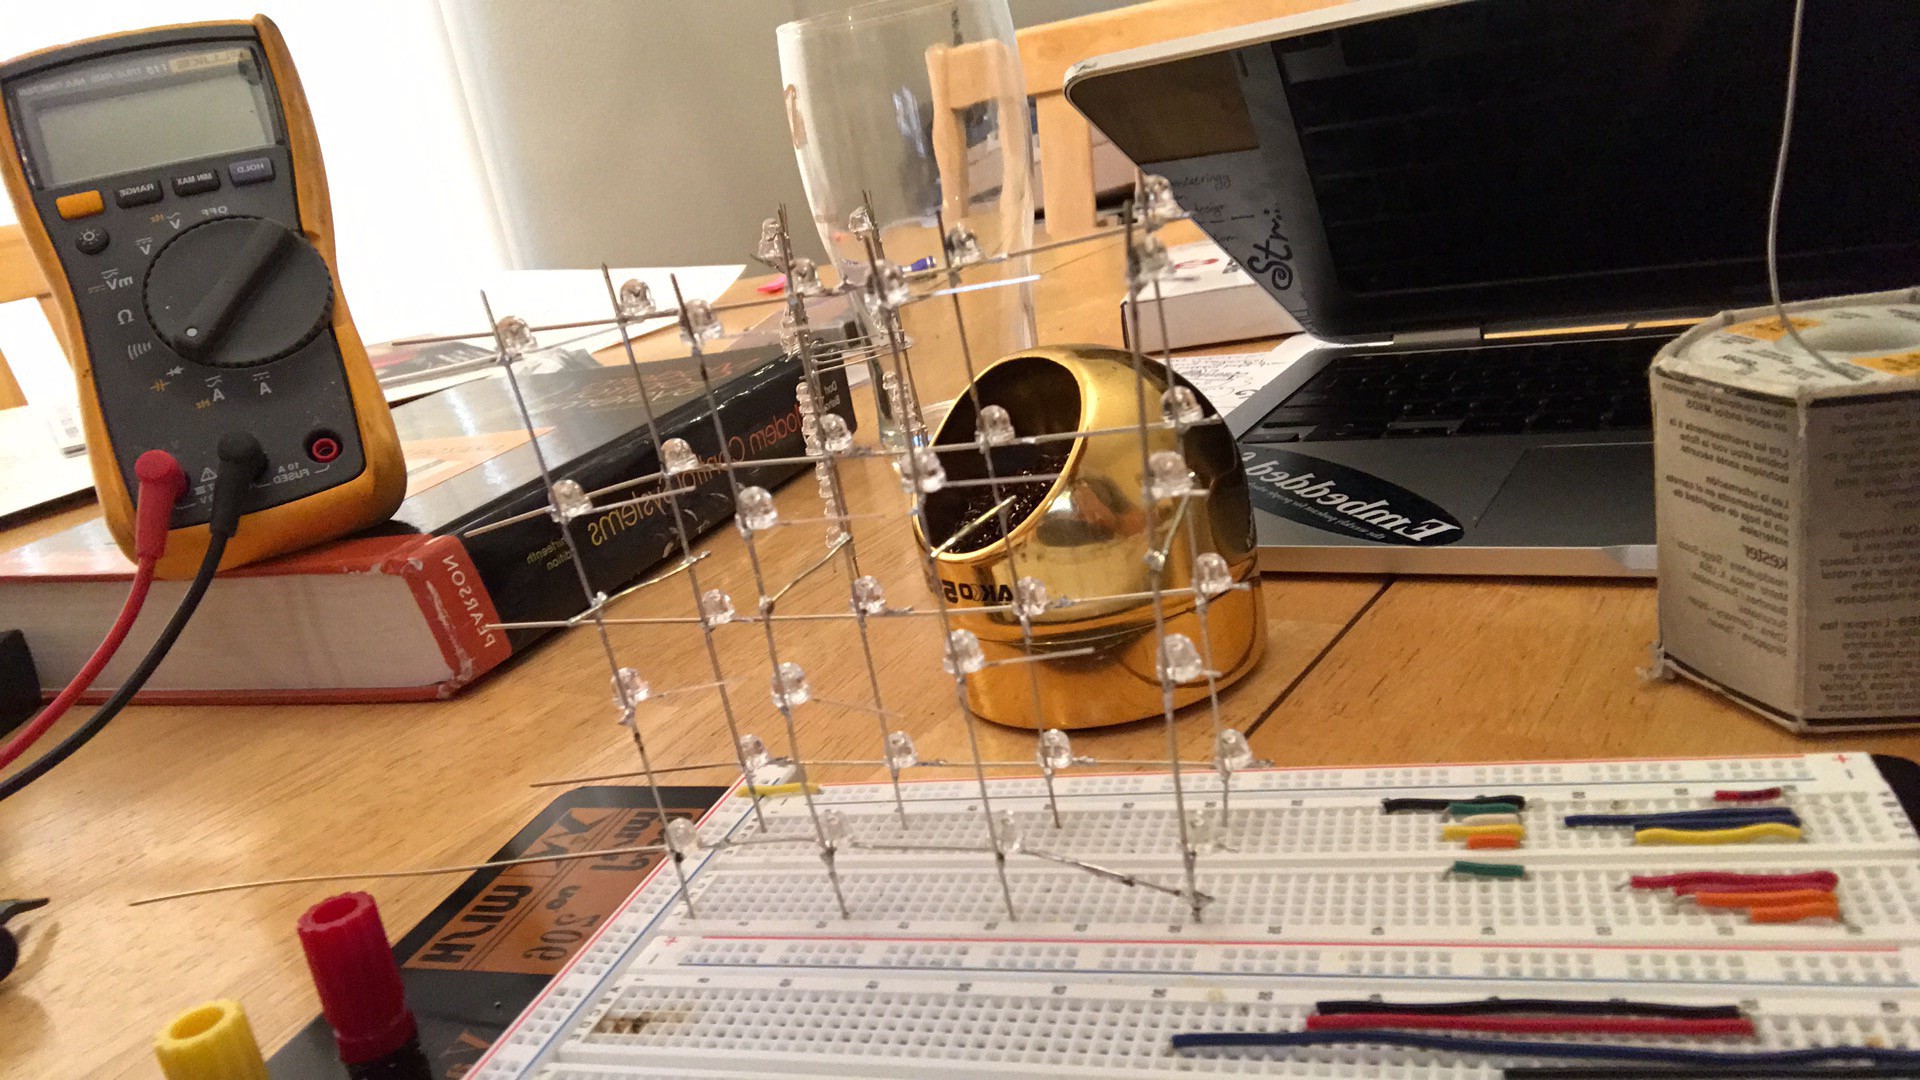
This picture is of one half of the cube complete. The other was finished soon after. I wish I had drawn out the images of the individual layers in the description before I did this. I had a reasonably good mental image of what I was doing, but it still would have saved a lot of mistakes.
First two layers of the cube assembled![]()
After the two pairs of layers were assembled I connected the signals internally with wires. I'm not convinced that this is the most efficient layout in terms of not blocking internal LEDs, but as long as I develop the code to be flexible to pin out changes that shouldn't be a problem.
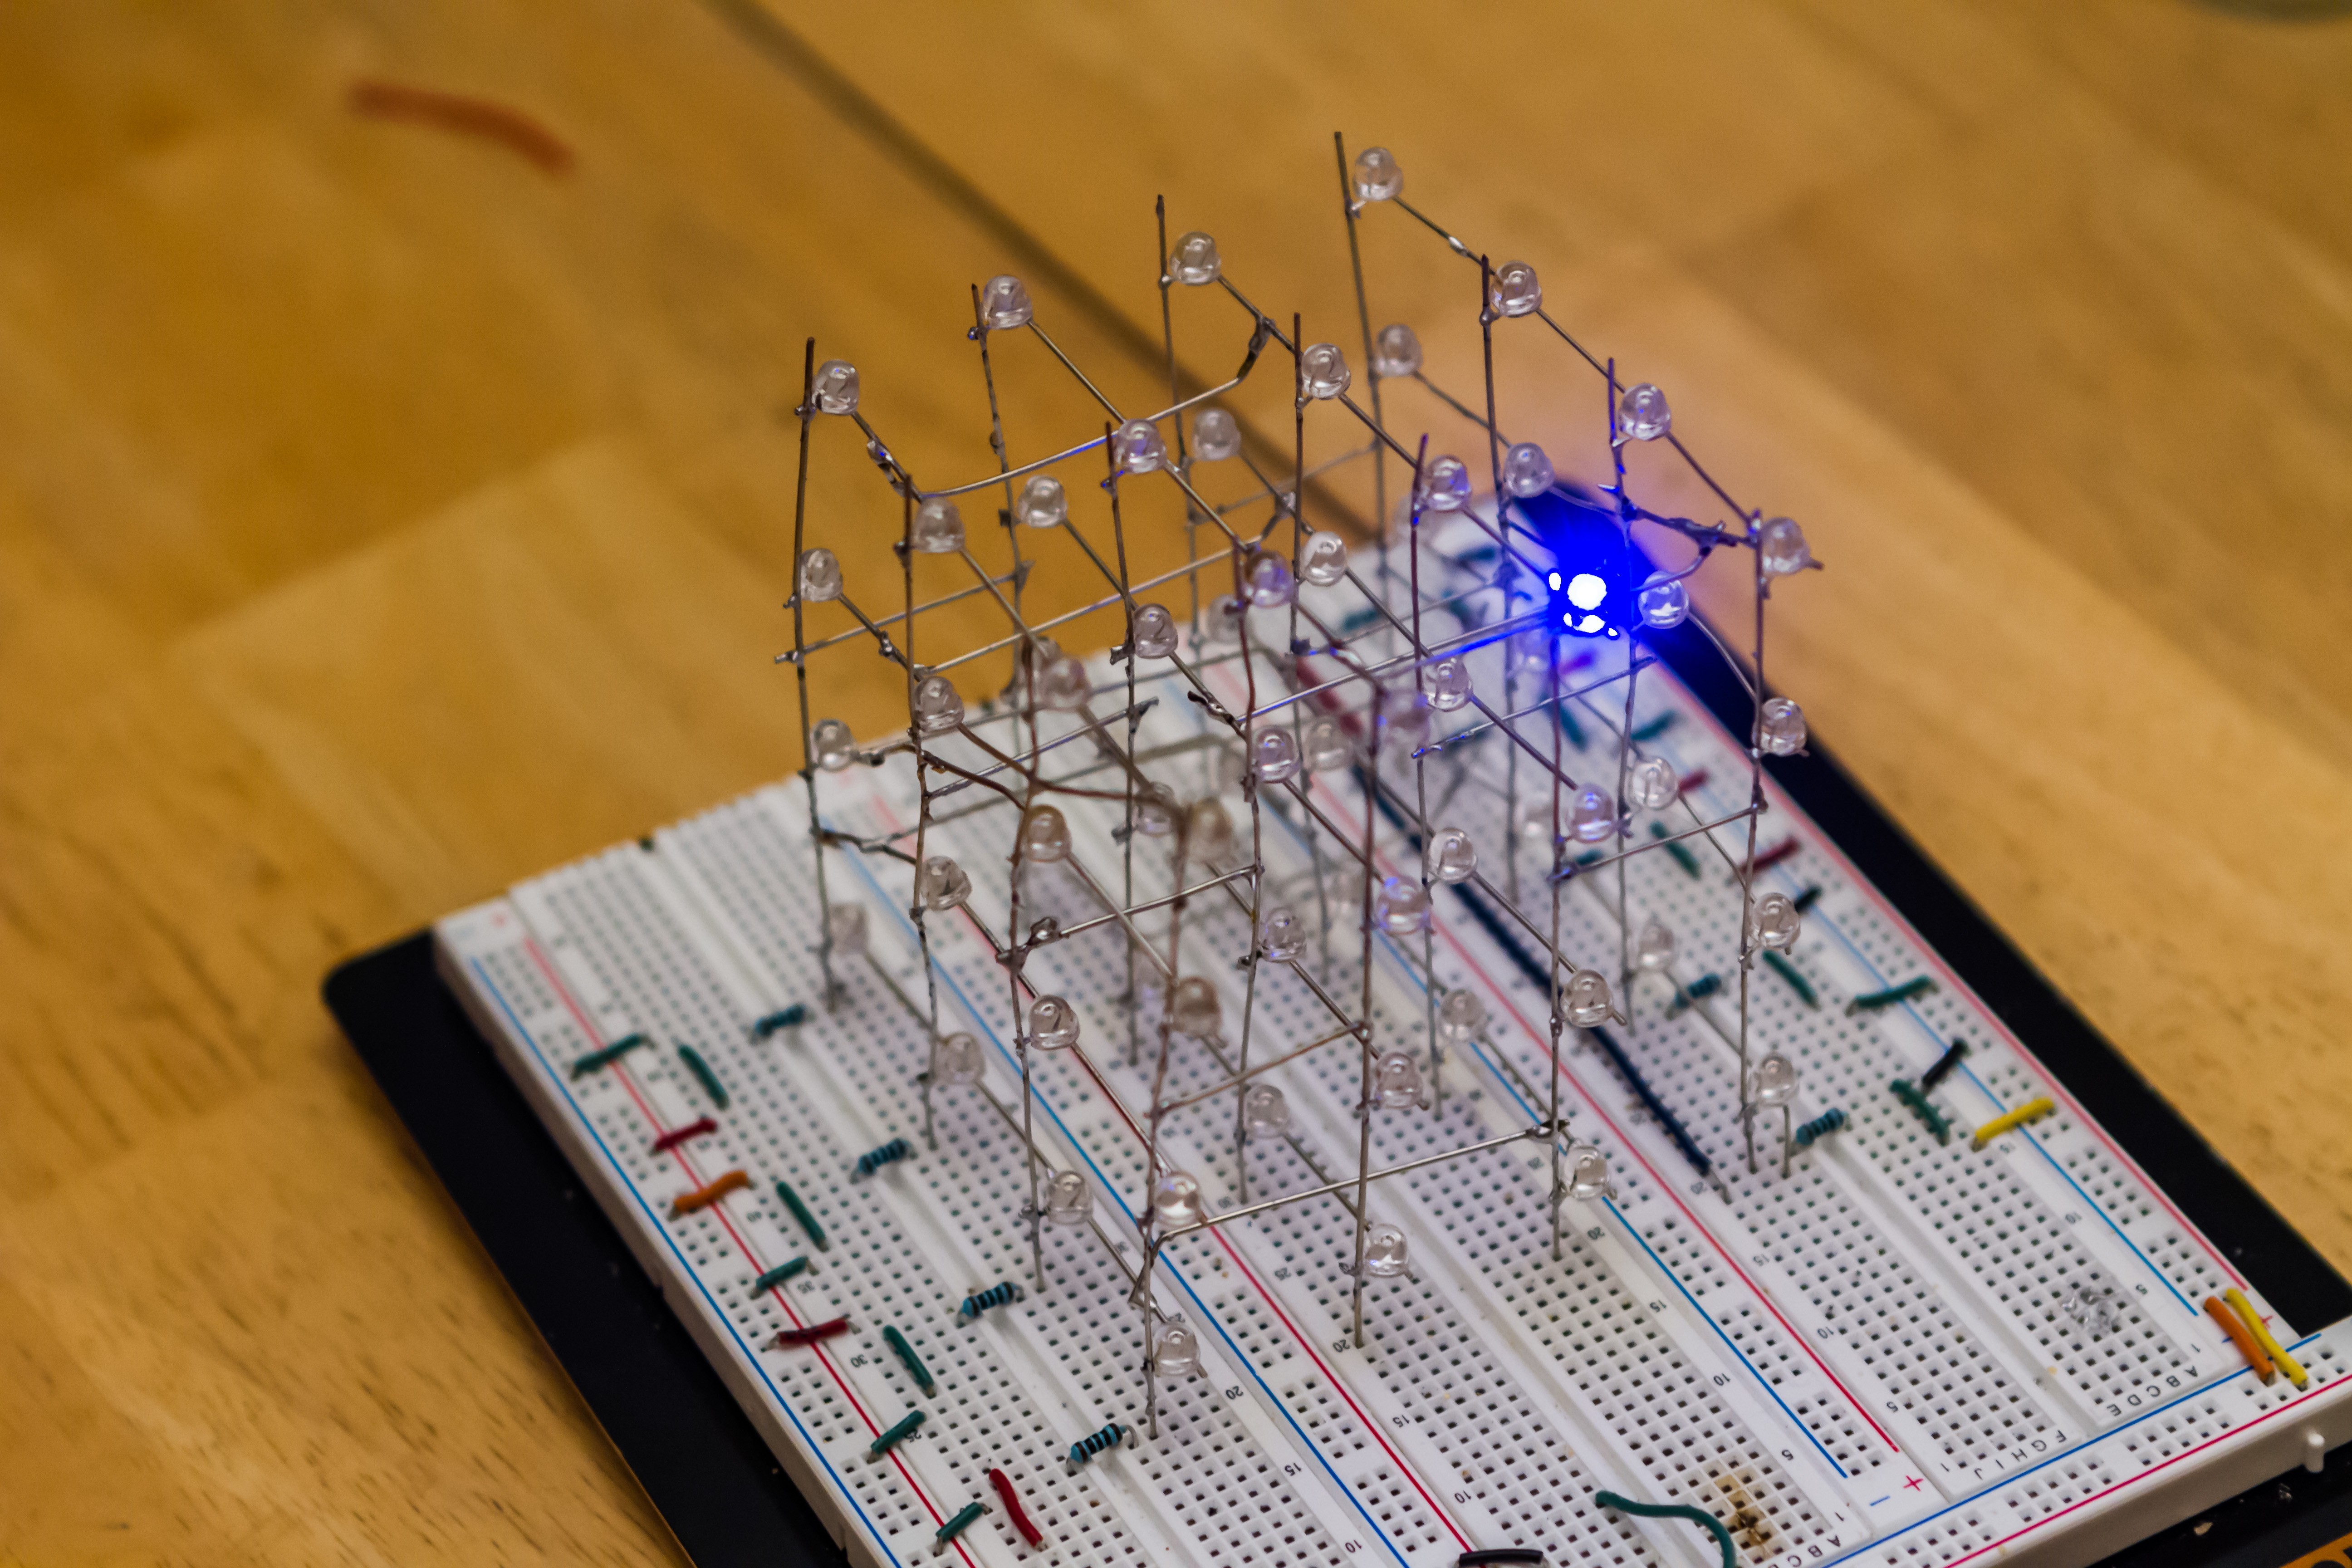
I went through the LEDs and each one seems to be turning on when expected. The wiring of the cube itself seems to be complete. I would try to do a lot of cleanup to make the cube more aesthetically pleasing if this was the final product, but since it's just a proof of concept this is plenty good for now. Now on to the challenge of actually driving this from a microcontroller!
Completed cube with single LED lit.![]()
LED cube using charlieplexing
I'm building a prototype 4x4x4 LED cube with a charlieplexed topology.
 endevor100
 Failed tri-state attempt #1
 Failed attempt #2, this time with MOSFETs
 Failed attempt #3, back to BJTs