 Dmitry
MetaTrader 4 is a great tool for trading on Forex markets. As an ARM-based device user, I would really want to try to install MetaTrader 4 on Raspberry Pi to gain its outstanding benefits. The possibilities of MT4 has brought me to an idea of creating a so-called trading bot on RPi, as a very economy device to use 24/7.
The aim of this bot is to automatically implement the best strategies for currency trading. Being created for x86 architecture hardware, of course, I had to avoid its incompatibility with Raspbian. And going a little further, I can say that I succeeded.
|
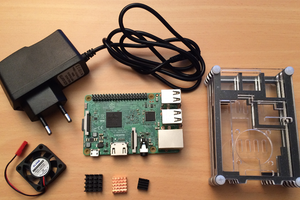
If you are new to what a MetaTrader is like, this is an official and the most popular app for trading on Forex and my aim is to automate it on Raspberry Pi. And as you already know, MT4 is built for x86 devices and we need to put a special effort to make it work on ARM. Well, on the other hand, we have already started Netflix on Raspberry Pi, have launched CrashPlan on it. So, I’m sure we’ll cope with that task too. And to reach our goal we will need the following. Raspberry Pi test stand configuration
|
MetaTrader installation tutorial
Download and Set up ExaGear Desktop
1. So, as the first step, you need to get your ExaGear Desktop . As soon as you are done with the purchase, you’ll receive an email with detailed tutorials on what to do. You need to have it in front of you when you are working with the Pi.
Then enter to Downloads directory via the command line:
$ cd /home/pi/Downloads |
2. You are now inside the folder with ExaGear Desktop archive and a license key. Unpack the archive:
$ tar -xvzpf exagear-desktop-rpi*.tar.gz |
3. And install ExaGear:
$ sudo ./install-exagear.sh |

Launch guest x86 system
4. For x86 soft to run properly you need to start x86 guest system:
$ exagear Starting the shell in the guest image /opt/exagear/images/debian-8 |
Check if you’re in the x86 environment with the help of the ‘arch’ command:
$ arch |
You should see the following result
i686 |

Install Wine
5. To keep on with the installation we need Wine, which is a simple additional app needed for porting MetaTrader to an ARM device. We always need Wine to run x86 apps on Raspberry Pi (or any other ARM). Use the terminal command:
$ sudo apt-get update && sudo apt-get install wine winbind -y |

6. After completing the installation you will have to get inside the “Downloads” directory again for your convenience.
$ cd /home/pi/Downloads |
Set Up MetaTrader 4
7. As we are working on Raspberry Pi, you need to download it on Raspberry Pi. For downloading a proper version you’d better ask your personal broker about that or download it from the official website of your broker (whatever you are working with).
8. As soon as downloading is finished, launch the installation:
$ wine ./metatrader.exe |

This command will open up the MetaTrader installation manager just as if it was on a Windows device. So, simply follow this manager, agree with all the default options and wait until the installation is done.

Run MetaTrader 4
9. To start MetaTrader 4 simply double click on the icon on the Raspbian interface desktop. That’s it. Now it is time to program the best strategies for MetaTrader to implement it 24/7!

Final notes
Of course, it’s worth mentioning, that the fact of setting up MetaTrader on Raspbian doesn’t mean that you have pushed the “cash” button. You also have to use another knowledge for programming your MetaTrader to implement the best selling-and-buying strategy (for example, find some set of strategies here). But once this is done, be sure, that the entire scheme will work consistently and effectively, decreasing your operational cost and time wasting.
Also, note that with ExaGear Desktop...
Read more »

Hello Dmitry, this is a nice project over here.
Look, actually, I got myself lately the DE10-Nano by Terasic which is SoC (ARM HPS+FPGA) based. This little board should be able to do a lot of work but development of projects on it is very limited for now.
I'll try it later and tell you about it. Cheers!