Close
0%
0%

Arduino Controlled Car Alarm

Car alarm controllers are relatively expensive, when they could be replaced by a Arduino or other micro controller

Similar projects worth following
Most of the after market car alarm systems I saw when researching this project were at least $200 and that doesn't include add-ons like zone and tilt sensors. You can get Zone Sensors, tilt sensors, and other components on Amazon for around $30. You just need something to control them. This is something the Arduino can easily do. You also need a way to disable it remotely without setting it off.

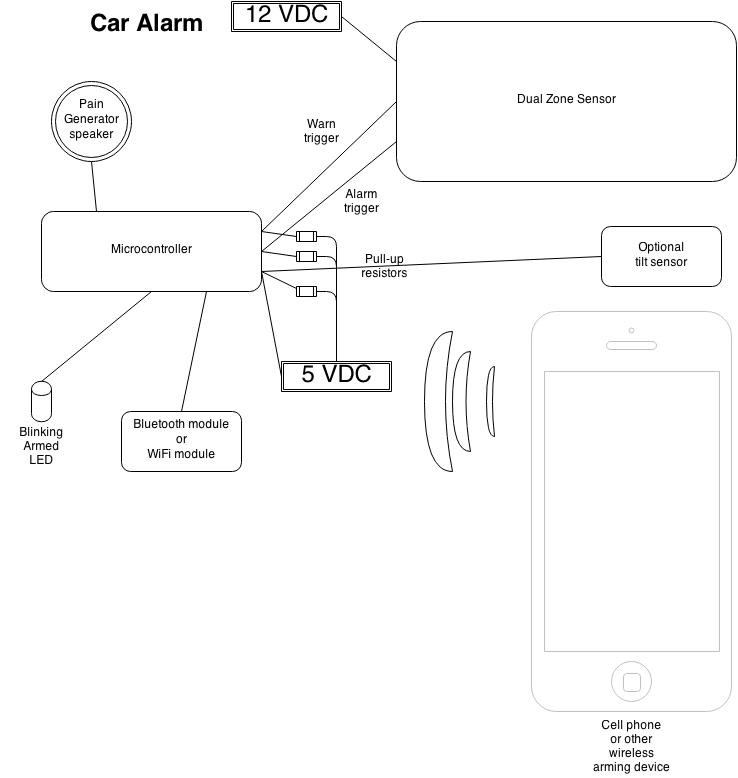
I drive a soft top Jeep Wrangler, which means my stuff is only secure against the relatively limited number of people who cant operate a zipper. While I've gotten used to never leaving anything I value in my Jeep, I wanted to know what it would take to add a car alarm to my car. Most of the after market car alarm systems I saw when researching this project were at least $200 and that doesn't include a zone sensor. This is more than I wanted to spend, so I started looking into what it would take to build my own.

I considered using a few IR or sonar range detectors to detect if anyone was sitting in the seats, but I stumbled across a Dual Zone Motion Sensor on amazon for $26. When I first looked at the specs for the Dual Zone sensor I realized that it required 12v to run. I was worried about how I was going to safely detect the voltage in the Arduino. It turns out that when the sensor is tripped it connects to ground. This means you can safely connect it to a Arduino digital input with a pull up resister.

Currently I when the alarm is triggered it plays SOS to a piezo speaker, but I plan to try using pain generator piezo speakers to annoy intruders.

I don't have a way to remotely arm and disarm the alarm yet. Ideally I would like to have a Bluetooth connection to my phone (I have a iPhone which makes it much more difficult). If my phone is within range, the car alarm gets disabled, as soon as it looses the connection it would arm the system. This way you can simply walk up to your car and it disarms itself.

I would also like to log alarm events and provide them by a webserver the phone can view. This web server would also have the ability to turn off the alarm in case you forgot your phone charger and your phone turns off.

  • WiFi instead of bluetooth

    Mike Hendricks08/21/2014 at 06:39 0 comments

    My ideal arming and disarming of the car alarm is when I walk into range of it. I don't want to have to press a button. I've been hoping I could use bluetooth. If my phone is connected by bluetooth it disarms the alarm. If my phone is not connected by bluetooth it arms the alarm(Because you may want to turn off your phone while driving I may make it detect if the car is running so the alarm will stay disabled if you turn off your phone. If you start the car with the alarm armed, it would not disarm.)

    I have a iPhone, and most of the arduino Bluetooth adapters I've found wont connect to it, and I would also like to have the arduino serve a web page with arm/disarm controls and the ability to view a log of alarm events.

    I just found the wifly wifi shield that can be setup to be a AdHoc network. In this mode I would check the devices the arduino is connected to against a access list. If the device is in the access list it would disarm the alarm.

  • Car Power

    Mike Hendricks08/21/2014 at 06:12 0 comments

    Currently to power this I am planning to attach the 12v sensors directly to the battery. Ideally I will use a relay or optoisolator to power them down when I disarm the alarm. I plan to power the arduino circuit by dismantling a car cigarette to usb power adapter.

    Given that cars are notoriously noisy environments for electronics, I'm hoping that the alarm sensor is designed to filter out any noise generated by the Jeep. I am also hoping that the cigarette to usb adapter takes care of the noise. If noise turns out to be a problem I will look into adding de-coupling circuits.  I found this article informative on the subject.

  • Basic Design

    Mike Hendricks08/20/2014 at 08:10 0 comments

    Connect the car alarm trigger lines to the Arduino digital input pins. For each of these add a pull up resistor connected to the 5v line. Make sure your 12v and 5v share a common ground. Every Car alarm needs a blinking led on the dash to tell you that its armed, so we will add one of those as well.

  • Optoisolators not required

    Mike Hendricks08/20/2014 at 07:26 0 comments

    When I first tried hooking this up to my Arduino I was worried about the sensor running on 12v. I didn't want to pass that voltage into the Arduino and fry it. Eventually I realized that the signal pins are left floating when the alarm is not triggered. When the alarm is triggered the signal pin is connected to ground. This means you can connect the signal pin to a Arduino digital input pin, but you need to connect it to a pull up resistor so you get a constant value.

View all 4 project logs

Enjoy this project?

Share

Discussions

Margaret wrote 09/18/2017 at 00:14 point

Hey, I'm building something similar but I'm not doing great on calibrating it. Did you set your warn away and alarm voltage thresholds to something and then use the built in sensitivity adjust? What did you use as the thresholds? 

  Are you sure? yes | no

Similar Projects

Does this project spark your interest?

Become a member to follow this project and never miss any updates