 f3n0
f3n0sleep apnea....
http://en.wikipedia.org/wiki/Sleep_apnea
is what i suffer from
i cant sleep if i dont have a cpap machine , mostly because i get so nervous about sleeping without it
when i first got sleep apnea i was in my early 20's i remember waking up in the middle of the night gasping for air breathing in saliva and coughing to near death...
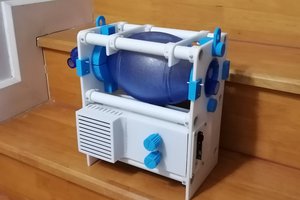
so i got a machine, which broke so ... i made this hack to sleep since im poor and cheap hehehe
i found the code i needed here thanks to these guys for posting it
navillus5 wrote the code i think...
https://forum.sparkfun.com/viewtopic.php?f=32&t=32036&sid=77a27cfcda4d9d63c0ba3819308fd76c
/ This sketch uses the servo library to arm the Hacker X-5 Pro ESC.
#include <Servo.h>
Servo esc; // Define the ESC as a servo object
int arm = 1000; // defines pulse width of 1000 us
int speedvalue;
int steady = 300;
int initiate = 0;
void setup()
{
esc.attach(9);
esc.writeMicroseconds(arm); // This command sends a pulse train
// from pin 9 that continues until
// the pin is called to do something else.
/* Once armed the setup could also be used to specify the
run speed of the motor. The commented out lines provide
a 2 second delay between changes in speed.
delay(2000);
esc.writeMicroseconds(1200);
delay(2000);
esc.writeMicroseconds(1300);
delay(2000);
esc.writeMicroseconds(1400);
delay(2000);
*/
}
void loop()
{
/*
Calls a sub to throttle up motor from 0 rpm to a steady running value.
The if statement is used to run the throttle up once.
*/
if (initiate < 1){
throttleUp();
initiate = 1;
}
/*
You can then change the speed in the main loop by changing the pulse width.
If nothing else is going on in the loop, a delay must be included otherwise
the servo writeMicroseconds is called to fast and there is not the proper
time delay between pulses (I think this is the case...need to check this
on a scope. The minimum delay is 15 ms. The lines below use a 1 second delay
between speed settings. The loop also causes this to be run once
*/
if (initiate < 2){
for (int count = 0; count < 5; count++){
speedvalue = speedvalue+50;
esc.writeMicroseconds(speedvalue);
delay(1000);
}
for (int count = 0; count < 12; count++){
speedvalue = speedvalue-50;
esc.writeMicroseconds(speedvalue);
delay(1000);
}
initiate = 2;
}
esc.detach(); // Disengage ESC from pin
}
//**************************************************
void throttleUp(){
speedvalue = arm;
for (int count = 0; count < steady; count++){
esc.writeMicroseconds(speedvalue);
speedvalue = speedvalue + 1;
delay(15);
}}


 ProgressTH
 Awesome Makes
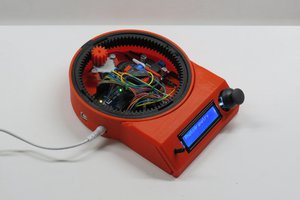
 Brian Brocken
 txdo.msk