 Charles
Step by step instructions.
Required
An old PS2 (DIN or mini DIN) keyboard
An arduino micro
1m flexible isolated wire (23AWG or 0.25mm2)
solder
soldering iron
pc with Arduino software
Remove the screws and take the PS2 keyboard apart. You get a top part, a bottom part, a whole bunch of keycaps, a stack of foils, a pcb, a cable with ps2 connector.The latter three are connected together. Take the saw and cut the top and bottom parts between the arrows keypad and the numeric keypad. Repeat this left from the QWERTY part. Remove the middle part and make sure that the left and right parts fit together. Glue the parts together.
Using scissors, cut the unwanted part of the foils. Take care that the pcb remains connected to the foils.
If the pcb does not fit in the case any more, find a suitable place to cut the pcb in two (where there are not too many pcb traces). Connect the two pcb halves with wires (10cm).
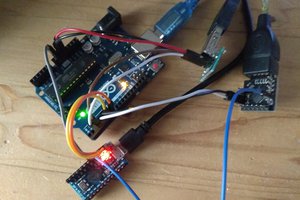
Remove the cable with the PS2 plug and make connections between the Arduino Pro Micro and where the cable used to be as follows:
* DIN-connector PINs (AT keyboard) | MINI-DIN (PS2) | Arduino pin | function
* 1 | 5 | D9 | clock
* 2 | 1 | D8 | data
* 3 | 2,6 | | n.c.
* 4 | 3 | | gnd
* 5 | 4 |VCC | vcc (+5V)
* | |D10| debug-line
*
* Thanks to http://www.computer-engineering.org/ps2protocol/
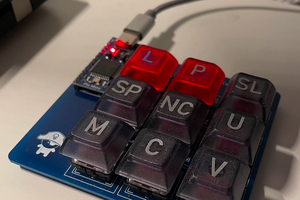
Put the keypad together. Place the following keycaps in stead of the original ones. Each key functions as its CTRL-version, so for example the X, C and V keys on the bottom row will generate CTRL/X, CTRL/C and CTRL/V.
Keypad layout
F1 F2 F3 F4
Y U P +
F A S +
X C V
0 0 . Enter
Connect the USB cable, load the arduino sketch Controlboard.ino into the Arduino Pro Micro and you are ready to go!

 nathalis
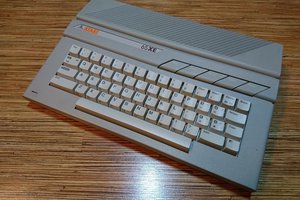
 Freeday82
I'm interested in doing something similar for my 3d printer, I have a Raspberry pi hooked up to it and this would be perfect for control.
I would also like to retain the arrows and home block for my keyboard.
My concern is with the membrane (foils), is it sufficient to just cut it or is there work needed to complete the circuit?
Many of the other projects I have seen like this don't bother cutting the membrane at all. I think it would be much neater though to have them cut.
Your advice would be very welcome.