 wkpsahl
 To start on this project I first needed to know how much solar radiation at the earth's surface is available in the region I live. There are many maps and charts online. (http://www.kcc.state.ks.us/images/PDFs/charts/Solar_KansasSolarRadiationMap.pdf) I found that average my region receives ~4.1 kWh/m^2/day. This kind of took me by surprise since it means I only need close to 4m^2 to power my mining rig if there were no losses.
First I needed to figure out what kind of material I could use to construct a frame. An aluminum frame would be perfect for this project but I don't have that kind of money let alone a friend that can TIG weld. After some time thinking about it; I remembered that the student CO-OP I lived at had a pile of old steel bed frames in the attic. I looked into a design with the various lengths of the bed frames and decided 63" x 63" would allow me to have a 10x10 array of 6"x6" mirrors each spaced 1" apart.( later I found a minor flaw in my design). This design also minimized the number of bed frames needed. I don't have a lot of experience in designing structures and probably could have done better to reduce the twisting moment in the frame but I may just tact on some diagonal pieces when its finished.
I also looked into mirrors, what frequencies of light they reflect and their efficiencies in reflecting light? I don't remember my source but I believe it said there will be about a 16% loss from 1/8" mirrors. I happen to find 3x (3'x6') mirrors on Craigslist for $20ea. I'm trying hard to keep this project as cheap as possible while also making something that will last a while.
I also need a way to position each mirror individually. As I was surfing around online I ran across some ball head mounts for camera tripods that allow you to pick any angle in a half sphere range. They are the most expensive piece coming in at $1.50 a piece from ebay.(free shipping) The rest of the hardware can be easily found at any hardware store(nuts, bolts, locktite, paint, etc.)
The Steam production and power generation planning will come a little later since I need to iron out all the details of how exactly I'm going to implement the system. So far I have pulled a permanent magnet DC motor out of a Treadmill for the generator. I am looking into potential steam engine hacks. One idea is to use a GAST compressed air motor, another is a converted weedwacker engine and last a modified diesel turbo from a school bus engine. It is difficult to find a decent steam turbine that is spec'd closer to my power needs. they pretty much go from handheld hobbyist turbines directly to thousand dollar power plant generators, no middle ground. Please leave a comment if you think of something better!!


 Joel Fairstein
 Brian Gilbert
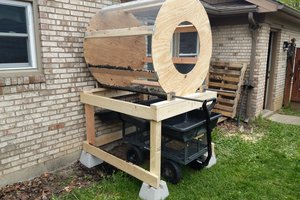
 load.nikon
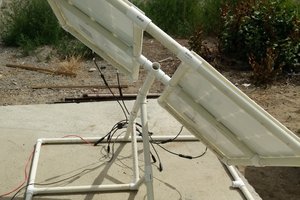
 tz
tz
Nice project, are you still working on it?
How about a tesla turbine for the generator? You might also want a condenser which may be scrapped from an A/C unit.