Close
0%
0%

Intelligent Shields

A system to build intelligent shields, for use with Arduino, Raspberry Pi or directly connected to a computer.

Similar projects worth following
Intelligent shields is an attempt to make a shield system for Arduino and Raspberry PI that can:

* Support any number of shields in a project without having to worry about compatibility issues or address clashes
* Plug and play, the intelligent shield protocol can figure out the capability of each shield that is connected to the system
* Clothes for the shields. A 3D printed enclosure is available for every shield. Building something using enclosed shields should be as easy as to stack blocks of lego together.
* Any layout. Active extension cables enable the shield bus to be several meters long
* Backwards compatible. New intelligent shields should be able to coexist with current hardware.
* Hackable. It should be easy to use intelligent shields as well as to build them.

Each intelligent shield needs a micro controller to implement the intelligent shield protocol.

The shield system uses the I2C bus, but adds dynamic address allocation. Therefore the will never be an address conflict between shields. The I2C bus is the low-level signalling used by the intelligent shields, above they use a the same higher level protocol. The I2C bus is used in multi-master mode, to enable a shield to send an interrupt on the bus. Multi-master means that there are several nodes on the bus that can initiate communication.

Apart from the I2C bus the intelligent shield system also contains an SPI bus, though the Slave Select (SS) signal is missing. To activate the SPI bus on a shield the equivalent of a Slave Select command is sent as a command over the I2C bus.

+5V
+3.3V
VIN
GND
SHIELD ENABLE
SCL
SDA
SCLK
MOSI
MISO

All signals but the Shield Enable is connected as a straight bus to every shield. The Shield Enable on the other hand is connected as both an input and an output signal. Each shields Shield Enable Output is connected to the next shields Shield Enable Input. This makes it possible to enable just one shield at a time.

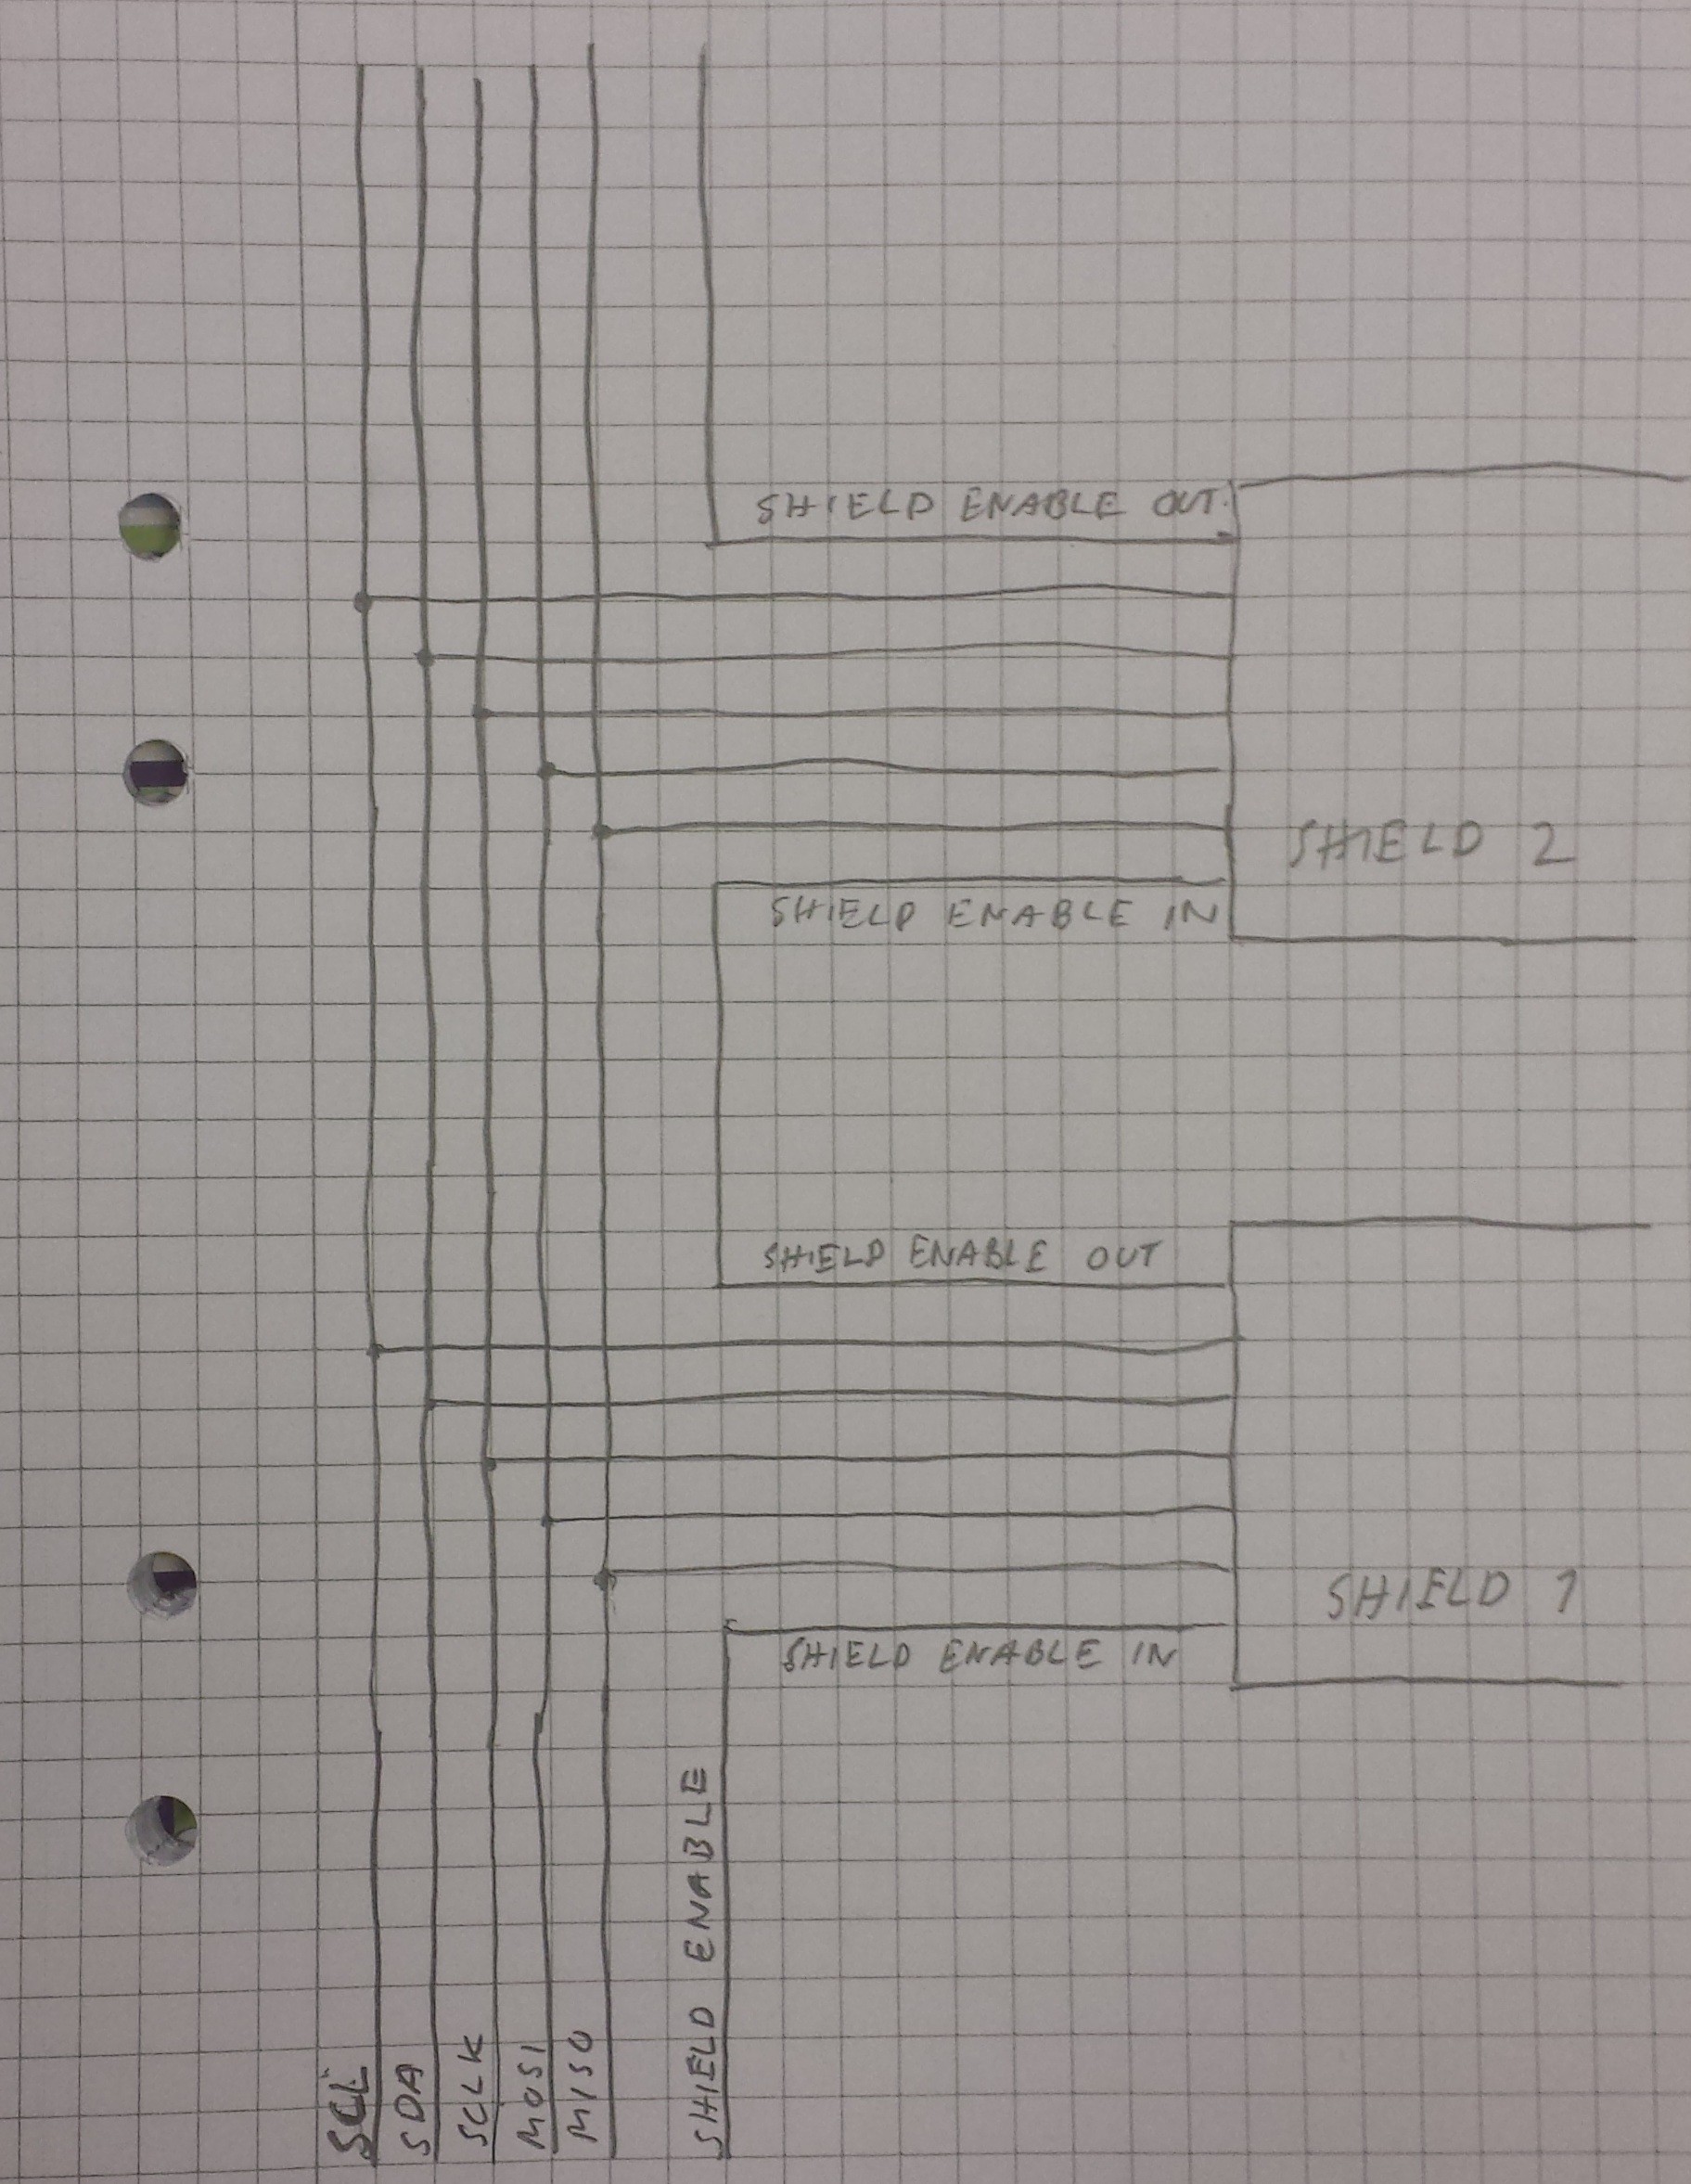
The dynamic address resolution algorithm uses the Shield Enable to wake each shield in order, and give a unique address to each newly enabled shield. This algorithm has the advantage that the physical layout of the shields also become the virtual layout. When programming the fourth physical shield will also be the fourth logical shield.

Higher level software

Each shield implements a higher level protocol that uses I2C. The dynamic address resolution algorithm is part of this protocol. Other functions of the higher level protocols are:

Reflection. It should be possible to ask a shield what it can do.

Configuration. Some shields can be used in different ways. For example, a motor shield may be able to drive two DC motors or one stepper motor. For such a shield the user needs to configure what kind of motor has been connected. It is also possible to configure a static address, in case you need to use the shield in an existing I2C system that does not implement the high level protocol.

Configuration is also necessary to make it easy to bind the hardware to your software. For example giving a name to a motor. You could configuring that shield one has the motor named “left” and shield two has the motor named “right”. Then just use the names "left" and "right" in your software.

Debug. During development of a shield firmware it helps if you can get debug messages.

Firmware updates. Since each shield has a micro controller we are going to need to update its firmware. To make it easy we should be able to do that through the intelligent shield bus.

Of course the higher level protocol also has commands that actually do things, such as set the speed of a motor, the number of steps to move a stepper, and so forth. The commands are standardized – it does not matter which motor shield you use, they all use the same commands.

Backwards compatibility

As described above an intelligent shield can be configured with a static I2C address. After it has been given a static I2C address it can be used as any other I2C component. Thus an intelligent shield will work just fine as a shield for any system that uses I2C.

Any old shield or component that uses I2C can also be used together with intelligent shields. Just tell the new system that one, or more, I2C addresses are taken. The dynamic address resolution skips these addresses. Thus new and old can co-exist.

Furthermore, an old Arduino and shield can be made into a new intelligent shield. You just have to make a sketch that implements the commands necessary to use the old shield, and load it to your Arduino. Then the combination will make an excellent new intelligent shield. You do not have to throw away any old hardware just to use this new system.

Use existing CPU boards

This project will not build a CPU board. The idea is to provide a new, shield system...

Read more »

  • AVR Multi-master Bus Arbitration

    Mattias Wingstedt08/21/2014 at 01:35 0 comments

    One of the design issues of the intelligent shield bus is how to send interrupts from a shield. I like event based programming and think that shields should be able to create events, they should not need to be polled.

    Adding interrupt signals to the bus is not a good solution. It would be much nicer if we could just use the I2C bus itself. And we can. By using the Multi-master mode. In Multi-master mode several nodes can write to the bus at the same time, and use Bus Arbitration to find out that this is happening and determine which node gets to keep writing to the bus.

    It may complicate our terminology when shields, as well as the CPU board, can be bus masters. But we really need the functionality.

    One complication, the node that lost the bus arbitration may actually be the intended destination for the transfer that won. So a node may have to interrupt writing to the bus and instead start reading from it. Fortunately at least some AVR processors has support for this. And it turns out that the default Arduino Wire library actually seems to implement this support. If the AVR is in Master Transmitter or Master Receive mode, loses arbitration, finds out that the address on the bus is its own slave address (or the general call address) it will actually move to Slave Receive or Slave Transmitter automatically. Nice.

    However one thing the Wire library does is that it considers a lost bus arbitration to be an error condition, and aborts writing to the bus. This is not what we want. Instead we should instruct the AVR to wait for a STOP condition and then retry sending data. Unless we are addressed, then we need to handle the incoming call before we try to write to the bus.

    Bus arbitration is not an error, but a normal condition of having multiple masters on the bus.

  • Dynamic address resolution

    Mattias Wingstedt08/21/2014 at 01:14 1 comment

    SMBus already uses a dynamic address resolution, and SMBus is based on I2C. So maybe we could just use their algorithm?

    SMBus relies on slave bus arbitration. Bus arbitration on I2C works by the node both writing to the bus, and listening to the bus. If several nodes write to the bus 0 always trumps 1. So if a node writes a 1 but reads a 0 it knows that several nodes are writing at the same time. It also loses arbitration and needs to shut up. In the dynamic address resolution of SMBus each node that needs an address writes its unique id. Since the UIDs differ the nodes must lose arbitration until only one is left. That node gets an address, and then the process repeats until all nodes have gotten an address.

    However most AVR processors with I2C (or TWI) support do not support bus arbitration in slave mode. They only support bus arbitration in master mode. Which seem to make it impossible to implement the SMBus address resolution protocol on an AVR based Arduino. At least using the builtin TWI support, there is probably a way if you build a software I2C implementation.

    Another factor is that the SMBus standard requires a unique id for each node. Something which may make it harder to create firmware, since each shield would need its UID added in the flashing process.

    So I think there are three ways to design a dynamic address resolution algorithm, that can be implemented on an AVR based Arduino:

    1) A UID based approach, that uses bus arbitration in master mode
    2) A random number based approach, that uses bus arbitration in master mode
    3) An shield enable signal, that is connected between each shield, so we can enable each shield in order

    I do not like the first approach because of the need to add a separate step when flashing the shield firmware

    I am not sure how easy it is to get a good enough random number on an AVR processor. If it is easy then we should look into this approach.

    Now I like the third approach best. The drawback is that it will not be as easy to build a board with through-hole connectors. However it will be easy using surface-mount components. Another advantage is that we will find the physical layout of the shields. We will know in which order the shields are stacked, and may use that order when programming.

View all 2 project logs

Enjoy this project?

Share

Discussions

PointyOintment wrote 08/21/2014 at 19:29 point
I think some of the technologies and concepts you've presented could help in my project: https://hackaday.io/project/2782-Modular-Gamepad%3A-swappable-controls%2C-any-console . I'll be following with great interest.

  Are you sure? yes | no

Similar Projects

Does this project spark your interest?

Become a member to follow this project and never miss any updates