Close
0%
0%

3D Scanning utilizing Photogrammetry

A senior research project to create a 3D scanner utilizing multiple raspberry pi camera modules

Similar projects worth following
A yearlong project to create a 3d scanner that utilizes RaspberryPi and can provide uber accurate points to create detailed meshes. I hope to achieve a standalone module that is capable of scanning a variety of objects. I hope to utilize multiple camera modules to compare and eliminate extraneous points to create detailed meshes with minimal post-processing by the user.

This project is attempting to create a low cost scanner that can be relatively mass produced. This would allow makerspaces and homes to have access to a relatively decent scanner. I hope that this project will eventually garner a community and improvements will ensue. 

  • 1 × Stepper Motor Adafruit 200 step 12 volt Stepper Motor
  • 2 × Raspberry Pi Zero W To power Stepper motor, LCD, and Cameras
  • 1 × Adafruit Stepper Motor HAT Addon for Raspberry Pi to control Stepper Motors
  • 2 × Raspberry Pi camera Module 8mp from element 14
  • 2 × Ribbon cable from RPi camera to RPi Zero Adapter cable as camera module on RPi zero is smaller than the full size RPi

  • 6/1 - Update

    Eric Link05/31/2018 at 01:28 0 comments

    This month led to the completion of the second iteration of the project. This model utilized a camera rotating about a fixed object. This method led to the creation of various models. But, the shortcomings were there is very nearly no robotic aspect to the project as it currently stands. I believe that a quick upgrade would be to introduce a raspberry pi with an IMU, a small display screen, and a remote shutter to create an autonomous solution once a predefined angle has been travelled.

    After completing the second iteration and creating completed scans, I returned to working on the original design. I really want to make that design work as the footprint, shadows, exposure, and focal length work so much better with that design. I looked at a couple of designs online, and found that they were able to create scans when they whitewashed the background so as to eliminate any other background cues than those on the object being rotated. But, I still found no luck with this. The software continued to not find cues and reject the scan.

    Some ideas I have are to look into manually placing the camera images. With the automated rotation, if it was possible to input camera locations, with the white washed background, I think the software would be able to create the scan. This is something I will have to do more exploration into but my initial research did fund any simple way to do this.

    The school year is ending and this project will be put on a second burner for a month or so but I hope to continue working on it once July rolls around.

  • Update 5/1

    Eric Link05/01/2018 at 13:01 0 comments

    This month held in stock some major redesign and changes. After continued problems with Autodesk ReCap Photo, I switched to trying 3DF Zephyr software to create the model. This also had issues and was unsuccessful in creating a scan. But, this software allowed me to see what the issue was. It placed the pictures in the environment which allowed me to see where it thought the photos were. The photos were all stacked on one another leading me to believe that the software is looking at the background. It uses cues in the background to orient the camera. I looked to see if I could manually input camera locations but was not able to accomplish this.

    This is what led to the redesign. I have now made a module that involves the camera spinning around the object, instead of a rotating object. This design poses problems for the raspberry pi and camera as I don’t have a slip ring available nor wanted to try to implement the amount of wires necessary. With this, I opted to utilize a cell phone camera. With this redesign, I am also able to utilize a slider component that will allow me to change the focal distance much easier. While the design is not as replicable currently, I am hoping that once this proof of concept comes to fruition, and I have a complete scan, I will be able to go back and make it more replicable in a home shop or other small scale shop.

    Hopefully I will be able to have a scan in the coming week and will be able to make some minor tweaks. I am excited to have a working and functional design, but I will currently be sacrificing the ease of motorized control of rotation. But, using a stepper and some sort of belt drive I believe I could make it rotation controllable. This would then allow expansion into a mechanism such as a selfie stick with remote shutter that would allow the phone and the rotation to communicate and take pictures at intervals. This may not be in the near future as school is wrapping up and finals inbound, but definitely something I will carry over into the summer. 

  • Update 4/3

    Eric Link04/03/2018 at 13:14 1 comment

    This month got very busy and with snow and spring break mixed in, left not a lot of time to work on the project. But, I was able to fix some of the issues. Looking into the stepper motor and adafruit control board, I was able to switch the stepper motor from single coil stepping to micro stepping to which I believe is 16x. This change has allowed for a much smoother turn and prevents objects from jumping / shifting when it is moving. I have also 3D printed some components that allow for a more polished look. I will be continuing that process through the next month.

    As far as getting Autodesk ReCap Photo to work, I have still been unsuccessful with the scan. It continues to reject the photo set and not attempt to create a mesh of the pictures. I think I will try taking pictures with a camera and upload to the software to make sure it is truly an issue with the photo resolution/aspect ratio of the phone and not the software.

    After working through the camera idea, I will have a better idea about how to approach the next steps. If it is the raspberry pi that is creating the issue, I may have to work with using a different camera, maybe a webcam. Either way, I am moving in the right direction hardware wise, but the software is the bottleneck right now. 

  • Update 3/1

    Eric Link03/01/2018 at 13:04 0 comments

    This month has been exciting for the project. I was able to laser cut, 3D print, and construct the shell of the project. With the shell completed, I have foregone permanent mounting options for tape and glue to make a proof of concept. I have successfully scanned my first object and discovered many issues. I will have to make sure that the part does not move on the rotating table. Currently, the stepper motor is using single-coil stepping leading to a rather jagged movement, which causes the part to shift slightly after each movement. This scan clearly demonstrated that by showing the movement and creating a 2 dimensional image. I also had issues with the background. Heeding the warning of one of my comments, I held a piece of white paper behind the object to eliminate variations there. But, the paper did not appear completely white and led to some variation. The software thought it was part of the scan and incorporated it into the hodgepodge of the file. 

    Noting these issues I conducted a second scan. This is where the real problems began. Autodesk ReCap Photo, the software that completes the photo to stl conversion, will not take the pictures. After conducting research, it appears it may be considering my pictures to have been taken by a fish-eye lens. Upon uploading my photos, it will upload, scan, and then hit a fatal error. By looking at forums, I am not sure how to proceed. I may look into not having any background/one that is stationary, not held by myself. I will also look into changing the focal length on the pi camera. Finally, I think I will paint the rotating table white so as to remove the variations in the plywood that may lead the software to think it is an object to be scanned. 

    But, overall, I am happy with the progress made. I have not started implementing a second pi and camera to provide a new angle until I have successfully received a decent scan from the first camera-pi set.  

  • Update 2/1/18

    Eric Link02/01/2018 at 18:24 0 comments

    Over the past couple of months I have not made much progress in the way of a physical product. Due to complications with the WiFi security at school, I am unable to connect a Raspberry Pi to the network. This means that when I want to install software or libraries, I have to plan time outside of class. That means I have had to focus my time on creating a plan of attack for the project. I have been creating a small collection of websites/forums that outline the commands and software I will need to download when on other WiFi networks. I will list three of the most valuable ones so far but as of yet had not had time to implement/try the software. 

    Mounting a Disk

    Create Startup Protocol

    Inter-pi Communication

    In the coming month, I hope to be able to show a rendered file through a test. I will quickly begin moving forward with some 3D Printing and Laser cutting to create a basic structure. 

    Some products I didn't consider were power supplies and mounting hardware, but I have jerryrigged a battery pack and will move ahead with some tape for now.

  • Update 12/4/17

    Eric Link12/04/2017 at 13:53 0 comments

    This month I have been busy working on acquiring components and beginning the process of integration of the parts. The CAD model is in a state where it will need mounting holes but not much more edits before fabrication can begin. As far as programming, I have identified Adafruit components and learning sources to begin forming a plan of attack for my programming. I plan to have two raspberry pi zeros taking pictures and sourcing the photos to one of the pi's. A future addition, if time permits, may include connecting to the pi via bluetooth or wifi to send pictures directly to a computer. The immediate plan is to work on wiring the electronics and creating the software. I have changed this plan from the fabrication as I want to make sure that I know all of the space constraints prior to fabrication. I acknowledge the comment on working with a blank background and I think that will be a good idea, not yet implemented in my CAD, but definitely will work. I believe Remake will not require a grid background and will not make the move to that until closer to the end of this project.

  • Update 11/2/17

    Eric Link11/02/2017 at 13:55 0 comments

    I have finished parting out my components. I have changed from the original idea to make it more of a coherent project using Raspberry Pi Cameras as opposed to a cell phone or LIDAR. This will be cheaper and easier for people to manage as everyone will have the same hardware. I will have to change my initial CAD model to reflect this change. 

View all 7 project logs

Enjoy this project?

Share

Discussions

Peabody1929 wrote 03/01/2018 at 18:02 point

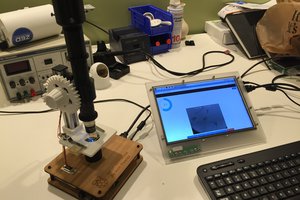
A way to improve rotation of the platform to reduce the jerky movement is to move the stepper motor from the axis of the platform to the edge of the platform.  The idea is like a rack and pinion drive system.  First, create a ring gear around the bottom of the platform.  It can be plastic printed.  Second, create a pinion gear and place it on the stepper motor's shaft.  Third, mount the stepper motor below the the outside edge of the platform.  Now, it will take multiple steps to produce even a slight rotation of the platform.

Place a grid pattern on the background sheet of paper.  A plain, white sheet of paper has no reference points for the picture stitching algorithm.

  Are you sure? yes | no

Peabody1929 wrote 11/02/2017 at 16:45 point

You may want to consider placing a background image behind or around the rotating table.  It might be as simple as a grid.  Many algorithms depend on finding a common point in two images.  The background image will facilitate this operation.

  Are you sure? yes | no

Similar Projects

Does this project spark your interest?

Become a member to follow this project and never miss any updates