 Ben Hencke
2017 Hackaday Supercon VR Badge Hack
This was my entry to the badge hack contest.
It is a wolfenstein/doom style raycaster with trippy procedural textures and a cycling color palette. The map is a maze, and there is a hidden treasure in the room with an X.
I didn't write any of this before badge pickup on Friday for the early badge hacking party, but I have to give huge credit to Lode Vandevenne's website and code examples on raycasting.

Trying It out for Yourself
There is a fork of the awesome badge emulator that can runs the maze with minimal hackery. You can get the emulator + VR hack here.
You might still find one (or two!) of these amazing badges on Tindie
Inspiration
I knew ahead of time that the badge had a 128x128 screen and a camera, so I had planned to do some kind of AR thing. I brought along one of those phone VR headset things so I could hack the optics for some kind of headset.
Then Supercon announced that they had made too many badges and were selling on Tindie. I knew then that I must do some kind of stereo vision thing and got a second one.
3D in 3Days
I recently learned of the raycasting technique that is very characteristic of the Wolfenstien and Doom games. I knew this 3D method would be very efficient since this was used for old DOS games on 286/386 PCs, and I'd need something fast if I wanted to render 3D on the badge. I started googling around for raycasting code that I could adapt.
I found Lode Vandevenne's website and code examples on raycasting. These are really great, and he does an awesome job explaining how raycasting works. I was able to port his textured example over to ANSI C which the badge hacking environment wanted. I removed all of the SDL stuff, adapted memory to overlay with cambuffer (all heap memory was taken by other badge code), replace all of the c++ stuff, and wrote my own procedural textures.
It still uses floating point types and seems to perform well enough that I didn't bother porting it to fixed-point math, though I imagine that would speed things up considerably as the PIC32MX170F256D used in the badge doesn't have an FPU.
But Stereo Vision, 2 Badges?
To generate a stereo image, I support 3 modes: solo, right side, and left side.
Solo mode works without another badge.
When in Right side mode the badge calculates new world and orientation position as normal, then sends this data over UART2 @ 100kbps before rending the next frame. I only needed to send 6 32-bit doubles to keep worlds in sync. I added a start and end byte to create a frame that could aid in synchronizing serial data streams and preventing accidental garbage. Later I added another variable to color cycle the palette.
When in left side mode, the badge reads this data from UART2 instead of reading accelerometer inputs. It then sidesteps the camera over slightly (as long as its not inside a wall) to produce an image offset for the left eye. This gives it a stereoscopic true 3D feel. It then sends an ack byte so that both sides are synchronized and the frame is rendered at more or less the same time.
When rendering the left side, not only is the camera offset, but the rendered image must be rotated 180° so that the badge can be placed close enough to the other screen to line up with the optics.
VR Headset
I didn't bring a 3d printer, but I did bring a handful of leftover filament and a hot air rework station. This let me melt and goop PLA into the (presumably) ABS headset to create badge support structures to keep the 2 badges well aligned. Even being off a few degrees can really mess with the effect. One badge can slide a bit to adjust for pupillary distance.
The badges needed to overlap slightly to get close enough, so I swapped one battery to the other side of the PCB. The whole thing was still too large for the lid to close, so I made a quick and dirty wire post tie to keep the whole thing together.


 Zapp
Zapp
 Roger
Roger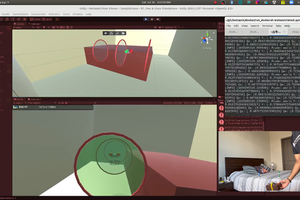

You had amazing execution on this one. I tried it out in person on Saturday night and the syncronization worked perfectly, as did the accelerometer control. Great hack!