Moving Head Projector Conversion
The goal of this project is to convert a regular pan & tilt moving head into a fully open source moving head projector!
The goal of this project is to convert a regular pan & tilt moving head into a fully open source moving head projector!
To make the experience fit your profile, pick a username and tell us what interests you.
We found and based on your interests.
This log entry is about picking the right display.
In order to go from projecting a few fixed patterns and colors to projecting anything your heart desires, the mechanical insides has to be replaced with a display (no moving parts!). I spent quite a long time to find one that would fit this project. I have a few requirements. It should be:
Initially I was looking at smartwatch displays as they tick 2 and 3, however they’re usually OLED instead of LCD which means there’s no backlight to remove so they can’t be converted to projectors.
Then I stumbled upon this project:
They're using the tiny square LCDs used in 6th gen iPod Nano. They're relatively high resolution (240x240), match the size of a gobo, very cheap and their backlight is easily removable. So they tick 2(-ish), 3, 4 and 5. However driving them is not a simple task as they use the proprietary DSI connection. Fortunately one of the creators of the installation runs a fantastic YouTube channel called Mike’s Electric Stuff that has an entire video series on how he reverse engineered the DSI driver circuitry in the iPod Nano for the installation. It’s a very impressive project and, but I wanted something simpler without the need for FPGAs. So the search continues.
The recent trend of making cheaper and cheaper 3D printers have now also brought DLP (resin) printers down into a price range that is affordable for mortal hobbyists. Cheap printers like the Anycubic Photon and Wanhao Duplicator D7 both use a specific 2K resolution LCD where the backlight has been replaced by a powerful UV light source, not unlike what is needed for this project. At a resolution of 2560x1440 it definitely fulfills requirement 2.
The LCD on these kind of printers are considered a consumable as the UV exposure will destroy it after a few months of use. This might sound bad, but it means that replacement parts are readily available, including the driver board that converts HDMI to MIPI DSI. So requirement 1 and 5 is also met.
At 5.5” it’s larger than it needs to be, but it will still just barely fit inside the moving head so we can check off 3 as well.
There’s even video guides on how to remove the backlight:
So you basically just peel it off. Simple!
Conclusion/TL;DR:
So in short it seems to meet all the requirements. The model is LS055R1SX03. I ordered a set of LCD + driver board from AliExpress for around $100.
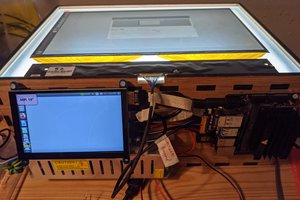
It consists of the LCD, an adapter board, a flex cable and a driver board which uses regular HDMI for video and micro-USB for power.
After removing the backlight we can test it by simply plugging it in and holding the LCD in front of the light source in roughly the position where the gobos would be:
However only a small spot will be exposed. This is why it's so important to have a very high PPI LCD
The projected area is roughly 520x520 pixels. I wouldn't recommend using this for Netflix, but it does work!
The clarity of the image is very good and colors are nicely saturated, so I'm very satisfied with the image quality. However there's no free lunch and the brightness is a lot lower than when using gobos and color wheels.
That's it for this log entry!
Each moving head features two optical incremental encoders. One for pan and one for tilt.
Unfortunately they seem to be defective so I have to replace them.
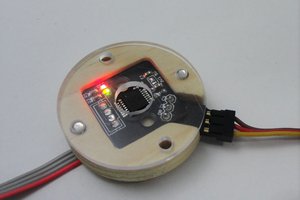
The actual encoders are very simple. It's a small PCB with two optical interrupters and a 4-pin JST connector. The optical interrupters are really the only thing here that could be fried, but they have no markings on the package so it's impossible to find an exact replacement. Instead I decided to go for two Omron EE-SX1041 photomicrosensors because of their almost identical form factor and pinout and because they're readily available and of decent quality.
To make them easier to use with a microcontroller I decided to also replace the PCB with my own design which has onboard current limiting and pull-up resistors. So I started up KiCAD and came up with this:
You might notice that the optical interrupters are not shown as I haven't gotten around to making the 3D model for them yet. I will be using OSHPark for fabricating the boards. I just have to triple-check that everything is gonna fit before I hit the order button. KiCAD source files, OSHPark project link and Bill of Materials will be uploaded in the next part. Meanwhile, here's a preview of the PCB:
Before diving further into this project I first had to figure out how the moving heads work.
The CLMHRGB25W is surprisingly easy to take apart. Removing a few standard phillips bolts is all it takes to access the insides.
By taking apart the base I found the controller board:
The remaining three steppers are used for selecting one of the 8 gobos, rotating the gobos and rotating the color wheel. All of these can be replaced by an LCD. This would convert the entire optical system to fully solid state and allow for an infinite number of colors and patterns and even projecting videos!
Each of these three axes use open loop control and uses a magnet + hall-effect sensor as endstops for homing.
The pan and tilt axes however have no endstops. Instead they use optical incremental encoders:
As far as I can tell the homing procedure for these axes consists of monitoring the encoders while each of the axes turn towards their limits and detect when the motor stalls.
Next up is the light source. Most of the moving heads would not light up so I was afraid that the light source was dead so I removed it so I could test it separately.
The light source consists of 7 bright white SMT LEDs connected in series and mounted on an aluminium PCB. On top is a small plastic lens assembly for focusing. The PCB is attached to a relatively large heatsink with some thermal paste. A fan is attached to the back of the heatsink for extra cooling. On the side of the heatsink we find an interesting component: A TO-220 style package with only two leads and "KSD-01F" written on it. A little bit of research reveals that it is a thermostat which cuts off all current to the LEDs if it reaches more than 60C. A simple way of preventing overheating. I tested the LEDs using a current limited adjustable benchtop power supply.
It definitely works! At 350mA the voltage drop across all 7 diodes is 20.65V, meaning that the forward voltage drop per diode is around 2.95V.
That's it for this log entry!
Create an account to leave a comment. Already have an account? Log In.
The plan is to have an arduino with serial connection for the motion control and then just a regular HDMI connection for the video projection.
Greetings. Take a look at this: https://github.com/komby/RFShowControl
Basically 512 channels of DMX per frequency band at ~30hz update rate, using the cheap nRF24 modules, and you got 12 or so bands with about a 1km range. So real world it will go through walls and still work reliably out in the front yard, on the roof, etc.
You can use the onboard antenna version for the receivers, so It's cheap enough you just make everything wireless and put a module in each device. I did exactly this adapting some power strips and a couple other purpose built devices and it works like a charm.
It also turns out you don't need a purpose built transmitter as any *real FTDI* chip USB adapter will show up in Q Light Controller + as a DMX transmitter! Then you can just pipe the serial output of that FTDI into the serial in of this sketch on an arduino, and you got yourself a transmitter:
https://github.com/komby/RFShowControl/tree/master/examples/RF_Out_DMX_In
The onboard FTDI chips of most arduino's are fake and won't work, so don't bother trying to skimp out that way. It will be a lot of messing around with a sad, sad ending whereas the real ones work straight away and you only need one of them (as the transmitter). Use the version of the nRF24 modules with the amplifier and an external antenna for the transmitter. With some creative pin placement, you don't even need a PCB to build the transmitter...
YW. Made this into a project for ease of dissemination. It will be a while till I can document these properly though. #RFShowControl projects
Become a member to follow this project and never miss any updates

 RossGK Tangibles
 Gabriel D'Espindula
 ottoragam
 David Brown
How do you plan on accomplishing the brain of the light? I'm interested in making a moving head projector, and had planned on using PureData for the signal processing and Gem for graphic generation. https://puredata.info/downloads/gem/documentation/manual/manual/gem-introduction Gem allows you to generate graphics, both are freeware.. More recently someone suggested using ISOdora since it has built in arduino serial I/O capabilities. Excited to see more!