Close
0%
0%

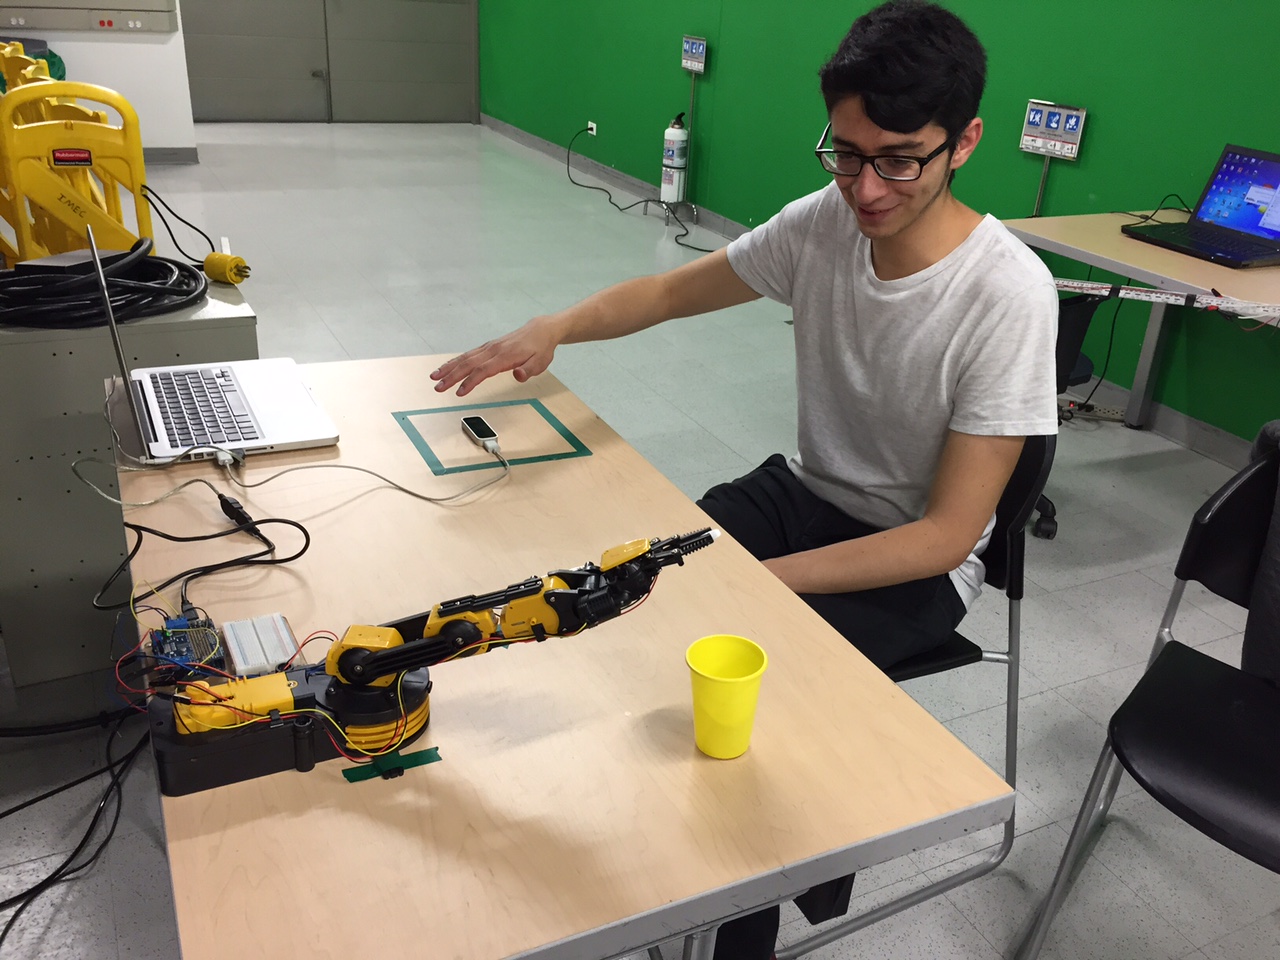
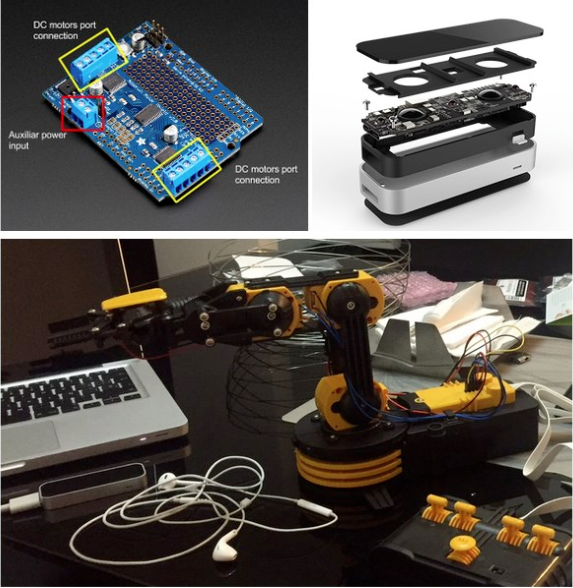
Owi arm controlled by a LEAP Motion

The idea is to create a non convencional interface to control a robotic arm

Similar projects worth following
Hi! this is an old project but it has awaken a lot of interest so i decided to post it here. If you have any doubt please let me know.

This was designed, implemented and presented in conjuction with German Medina and Fernando de la Rosa, Phd. (They dont have hackaday accounts so.... i had to put it somewhere)

brazoP1.ino

the software that runs on the arduino and send signals to the OWI

ino - 2.94 kB - 12/12/2017 at 21:05

Download

brazo.pde

the portion that runs on the computer and sends commands to the arduino

pde - 2.38 kB - 12/12/2017 at 21:05

Download

  • It is a good interface?

    Giovanni Leal08/25/2018 at 15:14 0 comments

    Well... we will give you the data and youlll make your conclusions.

    First the metodology:

    • The project was developed with a framework of agile software development (DAD).
    • Through three incremental iterations, where solutions were provided to each one by adding new functionalities in the next one.
    • There are two configurations. (natural and mirror)
    • The three iterations consisted of one arm, two arms and two arms remotely.
    • The measurements and indicators were defined for two kinds of observations. User’s perception of comfort and performance of the completion of the tasks.

    So we started on the first iteration:

    • One robotic arm
    • Interaction with one hand
    • Mirror and natural configuration
    • One Leap Motion sensor
    • Two tasks

    As you can see the first one we also marked the space where the sensor picks up the hand. The results are the following:

    fig_paper_prueba2.png
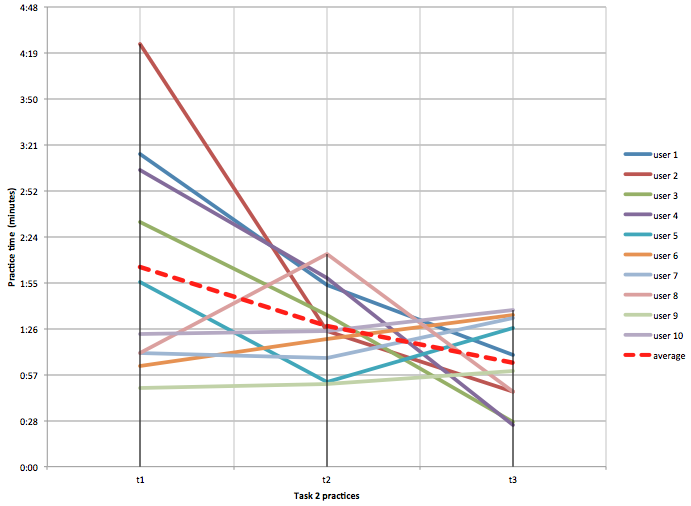
The learning curve show that the system provides a easy to use interface.


    And the feedback was pretty good! 

    Overall everyone was very please, keep in mind that the task where designed for no more than 10 minutes because you will get tired from keeping your arms straigth on the air. For example BMW cars now equip this feature on its cars but only for short commands.

    So as always feel free to ask us anything!

  • Proposed Interface

    Giovanni Leal08/24/2018 at 22:39 0 comments

    The Leap Motion input interface enables the interaction
    between the user and the robotic arms by capturing the
    motions and gestures made by the user’s hands. The
    developed software receives the information of the motions
    and gestures in real-time and then processes it according to
    the commands presented in the function below (Fig. 3).
    These commands depend on the hand being used (right or
    left, which the Leap Motion can detect on its own) as well as
    on the position of the hand over the X, Y, and Z axis,
    defining (0, 0, 0) as the center of the space. Additionally,
    hand gestures made by the user are taken into account. In the
    case that any of these triggers is detected, the corresponding
    command is sent to the Arduino board, which is responsible

    for sending electrical signals through the Adafruit Motor-
    Shield to move a robotic arm according to the user’s motions

    and/or gestures. All of these factors determine the first letter
    of the command (R for right or L for Left) and a number
    corresponding to a selected ASCII character.

    This formula corresponds a two hand configuration setup.

  • About the OWI

    Giovanni Leal08/24/2018 at 15:17 0 comments

    Normally when people saw the project they always get interested for the arm( even though the LEAP is much more interesting) so lets talk about it. 

    The arm is not a great robotic arm... in fact is a pretty crappy robotic arm, because it's a toy!!! Having said that, it is one of the best toys there is. Like really if you have a child and its age appropiate buy it for him, go ahead.

    We choosed the arm beacause its cheap and easy to get to the components. Also it was a blast having to assemble it.  

    In the instructions part we didnt talk about ditching the controller part because if you assemble it it wil be obvious. 

    Resultado de imagen para owi robotic arm

    The short comings to the OWI are pretty narrow but important... its a DC motor based arm so there is no positioning system. We encourage you to find a servo based and implement it a tell us about it. That would take real advantage from the LEAP and would make a great project.

    Here in Hackaday you can also find how to make your own: https://hackaday.io/project/181-mearm-your-robot

  • Abstract

    Giovanni Leal08/24/2018 at 14:40 0 comments

    The study of the ways in which humans interact with
    robots is a multidisciplinary field with multiple contributions
    from electronics, robotics, human-computer interaction,
    ergonomics and even social sciences. The robotics industry is
    mainly focused on the development of conventional
    technologies that improve efficiency and reduce the amount of
    repetitive work. To achieve this, enterprises must train their
    technical staff to accompany the robot when performing tasks,
    during configuration and technical programming for proper
    operation. Taking the latter into account, the development and
    creation of unconventional interfaces for interaction between
    humans and robots is critical, because they allow for a natural
    control over a robot to generate wide acceptance and massive
    use in the performance of a wide range of possible tasks. This
    paper presents the challenges in the design, implementation
    and testing of a hand-based interface to control two robotic
    arms and the benefits of this technology that is between
    robotics and human interaction.

  • Overview (Spanish)

    Giovanni Leal12/20/2017 at 19:56 0 comments

View all 5 project logs

  • 1
    Make shure you got everything

    You'll need:

    Arduino / Feather


    H bridges / motor shield / motor wing 

    Owi arm / Servo based robotic arm

    LEAP Motion 

    Wires, soldering paste, soldering iron.

    In the software theme youll use the arduino IDE and processing, both are free and a great skill to learn.

    As you can see on this components list this project is very versatil and you can change the mayority of the parts and come up with a greater version. Being the ultimate the feather controlled servo based arm.... but the one that we maned works just fine.

  • 2
    Get to know the Leap Motion

    Before we get cracking on the wiring and software we think thats important for you to use the Leap motion and know the advantages or the downsides from this sensor. 

    The IDE has a lot of games and such that are pretty entretaining and this visor, it shows almost all the information from position and explains to you how the Leap sees the world.

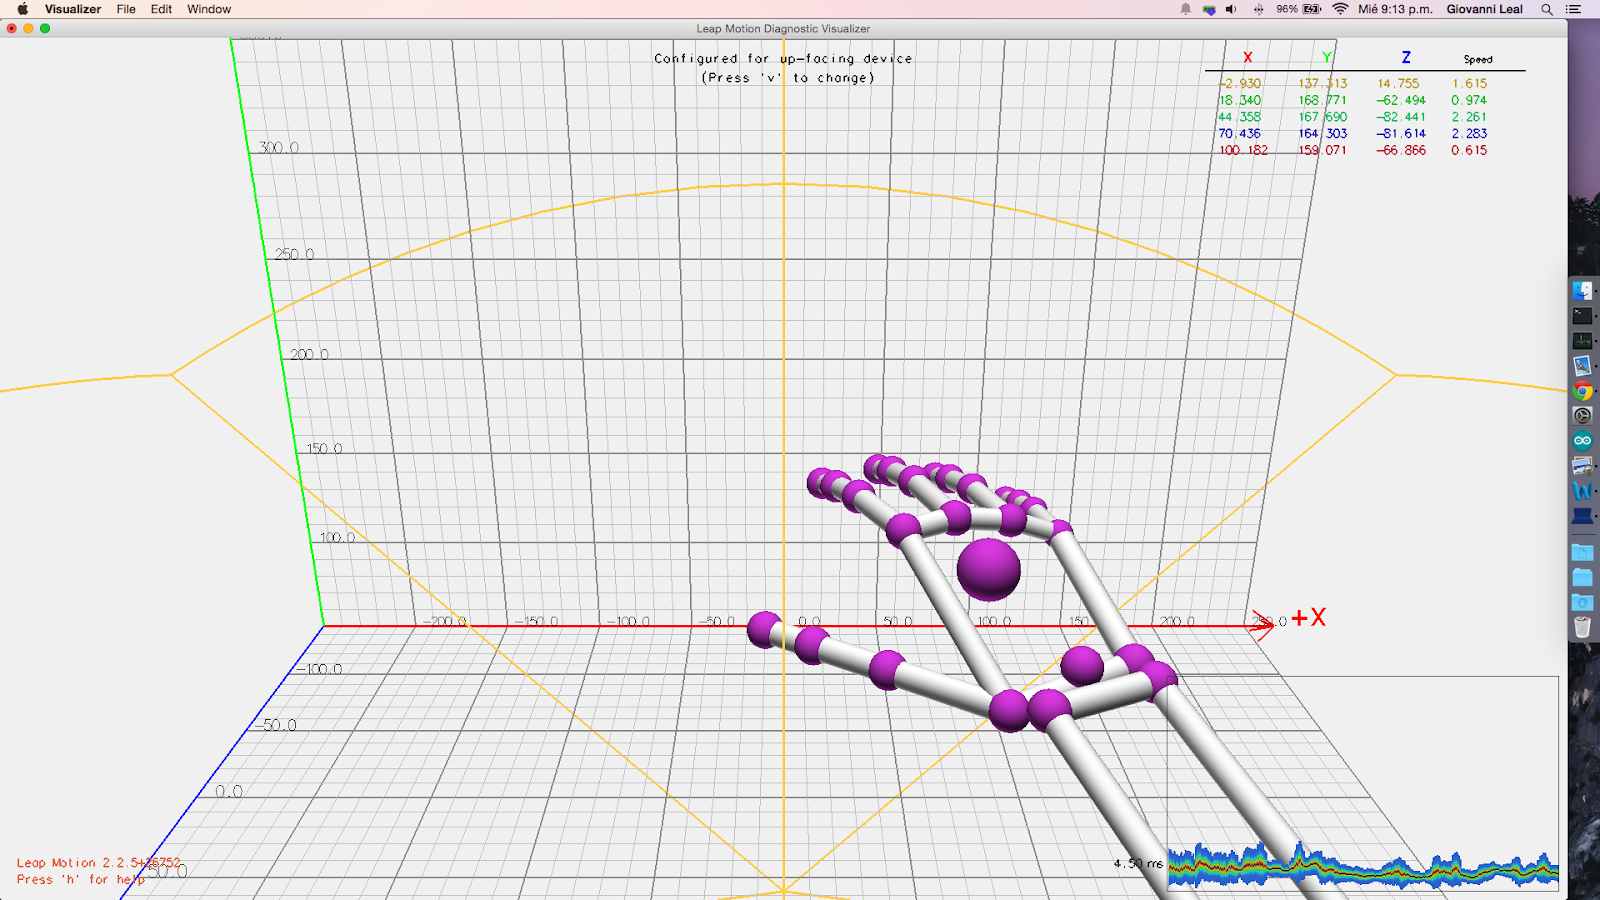
    With this you will get wich is the field where it works and that superposition is a big no no on this thing.

    We are sure that youll find this thing has much fun as we find and will get you a looooot of ideas.

  • 3
    Wiring
    The next graph shows a big overview of how the components interact with eachother. Imagen 3.png

    The PC works as an interface between the data from the LEAP and sends commands to the arduino to what to do.

    The soldering is explained in a much better way in this link: https://learn.adafruit.com/adafruit-motor-shield-v2-for-arduino?view=all#install-headers

    As you see on the motor controller it only has 4 motor controllers so we connected 1 to 3 to the various degrees of freedom and the fourth to the gripper. The one that we choose to left out is the wirst. 

    Obviously it shows two arms but it works exactly the same for only one

View all 5 instructions

Enjoy this project?

Share

Discussions

jrreyescarlos wrote 01/19/2023 at 01:50 point

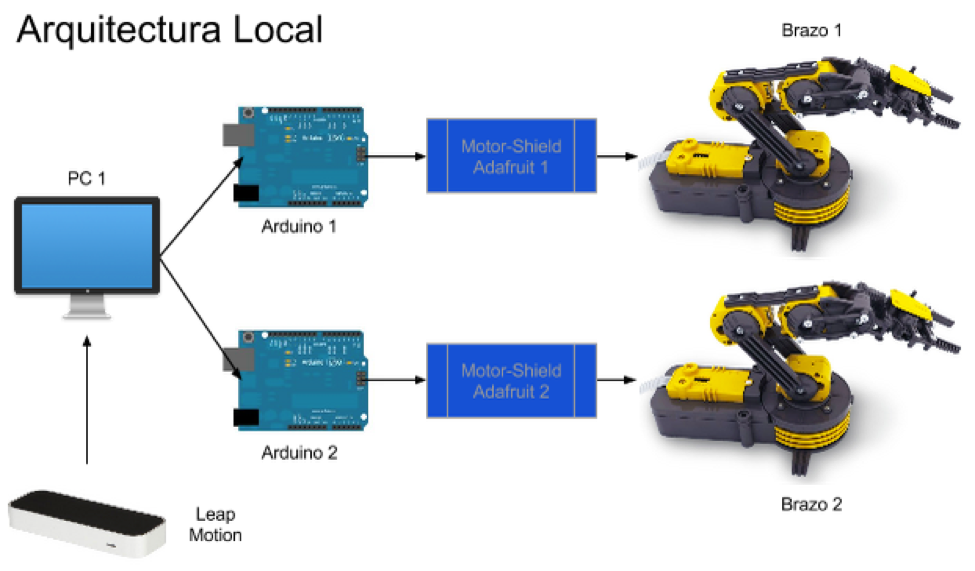
Good day Sir, can you help me regards to this error cannot find anything named "gesture", thank you very much.

  Are you sure? yes | no

Does this project spark your interest?

Become a member to follow this project and never miss any updates