 Rosen Anastasov
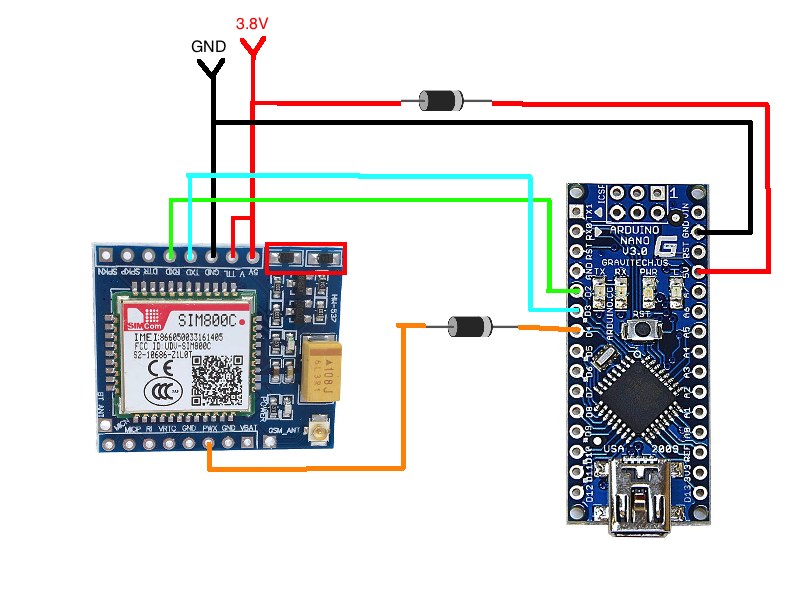
The hardware is ready and running. Below you can find the connection diagram for some of the components.
The cheep module from China was 'broken' by design. The module is designed to work at 5V. To lower the voltage two diodes were added (in red rectangle). SIM800 is well known to be power hungry and can consume over 1A at startup. The forward voltage of the two diodes combined is about 0.8V. However at peek current the voltage drop is over 1.5V and the supply voltage for the module drops below 3.3V. As result - the module restarts 9 of 10 times during startup. To resolve this the DC-DC step down converter was adjusted at 3.8V and the diodes were short circuited. The module was working stable after that. 3.8V is sufficient for stable operation at 16MHz for the ATmega328 processor.
The diode on the 3.8V is used to avoid burning up SIM800C module while the Arduino is powered from the USB. While USB powered the Arduino works at 5V. The SIM800C will not survive at 5V according the data sheet. The diode can freely be removed after the processor is programmed.
The PWX pin (orange wire below) is used to startup the module. If you just power it up it is in shutdown mode. To start it up you need to bring PWD pin to ground. Well, not exactly to ground, but low enough. The diode limits the 5V from the Arduino flowing to the SIM800C and destroying it. To startup the SIM800C the D4 pin is set to output mode. Bringing it low for 1 second powers on/off the SIM800C.
Shortly - 5 wires are needed between the Arduino and the SIM800C module:
- Common ground (black wire).
- Common VCC at 3.8V (red wire). Connected to 5V and V_TTL at SIM800C and to 5V on Arduino side. V_TTL is the power of the built in TTL level converter in the SIM800C module.
- RX (green). Connected to RX on SIM800C and D2 on the Arduino.
- TX (blue). Connected to TX on SIM800C and D3 on the Arduino.
- PWX (orange). Connected to PWX on SIM800C and D4 on the Arduino. Split by low drop diode.
Discussions
Become a Hackaday.io Member
Create an account to leave a comment. Already have an account? Log In.