Don't do this project if you do not feel comfortable working with high voltages.
Circuit
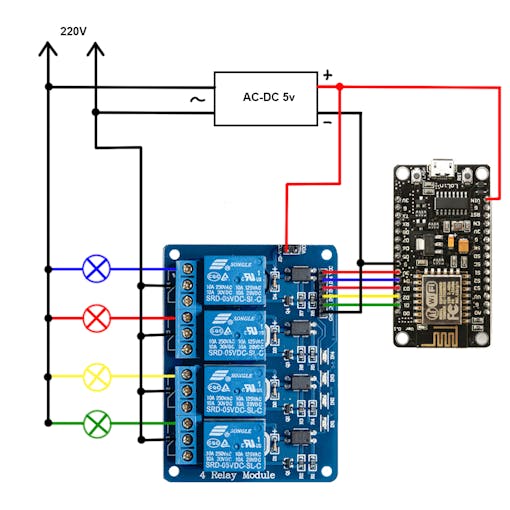
My Christmas lights have 5 wires- one of them common and the rest is colors(red, green, yellow, blue).
The common wire I connected to one plug pin and the other plug pin I connected to common pins of all relays in the module like it showed in scheme. Color wires I also connected to all relays of relay module.
For esp, I used 5V DC power supply which connected to plug.
The control pins of relay module I connected to esp in this way:
IN1- D1(GPIO5)
IN2- D2(GPIO4)
IN3- D3(GPIO0)
IN4- D4(GPIO2)
Blynk app
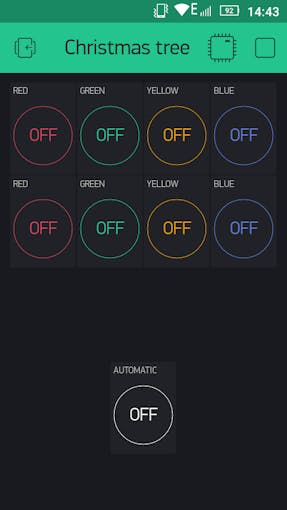
In the Blynk app is placed 9 buttons.
First row of buttons is in switch mode and they operate with digital pins of esp(GPIO5, GPIO4, GPIO0, GPIO2).
Second row of buttons is in push mode and they operate with virtual pins(V1, V2, V3, V4).
If you connected color wires to NO(normally opened) pins of relays you should change buttons output to off-1, on-0.
Automatic button is in switch mode and it operates with Virtual pin 5. If you switch it on, lights will flash automatically.
ESP code
#define BLYNK_PRINT Serial
#include <esp8266wifi.h>
#include <blynksimpleesp8266.h>

// You should get Auth Token in the Blynk App.
// Go to the Project Settings (nut icon).
char auth[] = "YourAuthToken";

// Your WiFi credentials.
// Set password to "" for open networks.
char ssid[] = "YourNetworkName";
char pass[] = "YourPassword";

int automatic=0;

void setup(){
 pinMode(5,OUTPUT);
 pinMode(4,OUTPUT);
 pinMode(0,OUTPUT);
 pinMode(2,OUTPUT);

 Serial.begin(9600);
 Blynk.begin(auth, ssid, pass);
}

void loop(){
 if(automatic==1){                 //Automatic animation
    digitalWrite(5,LOW);
    digitalWrite(2,HIGH);
    delay(500);
    digitalWrite(5,HIGH);
    digitalWrite(4,LOW);
    delay(500);
    digitalWrite(4,HIGH);
    digitalWrite(0,LOW);
    delay(500);
    digitalWrite(0,HIGH);
    digitalWrite(2,LOW);
    delay(500);

  }
 Blynk.run();
}

BLYNK_WRITE(V1){
 int pinValue = param.asInt();
 digitalWrite(5,pinValue);
}

BLYNK_WRITE(V2){
 int pinValue = param.asInt();
 digitalWrite(4,pinValue);
}

BLYNK_WRITE(V3){
 int pinValue = param.asInt();
 digitalWrite(0,pinValue);
}

BLYNK_WRITE(V4){
 int pinValue = param.asInt();
 digitalWrite(2,pinValue);
}

BLYNK_WRITE(V5){
 automatic = param.asInt();
}
This is standard blynk code with some modifications.
Virtual pins form 1 to 4 is turn on and off lights.
Virtual pin 5 set Christmas lights to automatic mode by changing int variable 'automatic'. In loop we have if statement which launching animation if 'automatic' is 1.
Demonstration video
Here is demonstration video.Enjoy!

 PJK
PJK
 Daniel Frausto
 engineerkid1